background image

4

English

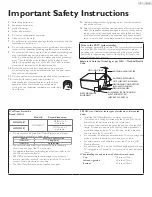
Important Safety Instructions

1. 

  Read these instructions.

2. 

  Keep these instructions.

3. 

  Heed all warnings.

4. 

  Follow all instructions.

5. 

  Do not use this apparatus near water.

6. 

  Clean only with dry cloth.

7. 

  Do not block any ventilation openings. Install in accordance with the 

manufacturer’s instructions.

8. 

  Do not install near any heat sources such as radiators, heat registers, 

stoves, or other apparatus (including amplifiers) that produce heat.

9. 

  Do not defeat the safety purpose of the polarized or groundingtype 

plug. A polarized plug has two blades with one wider than the 

other. A grounding type plug has two blades and a third grounding 

prong. The wide blade or the third prong are provided for your 

safety. If the provided plug does not fit into your outlet, consult an 

electrician for replacement of the obsolete outlet.

10.  

Protect the power cord from being walked on or pinched 

particularly at plugs, convenience receptacles, and the point where 

they exit from the apparatus.

11.  

Only use attachments / accessories specified by the manufacturer.

12. 

 Use only with the cart, stand, tripod, bracket, or 

table specified by the manufacturer, or sold with the 

apparatus. When a cart is used, use caution when 

moving the cart / apparatus combination to avoid injury 

from tip-over.

13. 

 Unplug this apparatus during lightning storms or when unused for 

long periods of time.

14.  

Refer all servicing to qualified service personnel. Servicing is required 

when the apparatus has been damaged in any way, such as power-

supply cord or plug is damaged, liquid has been spilled or objects 

have fallen into the apparatus, the apparatus has been exposed to 

rain or moisture, does not operate normally, or has been dropped.

Note to the CATV system installer:

This reminder is provided to call the CATV system installer’s attention 

to Article 820-40 of the NEC that provides guidelines for proper 

grounding and, in particular, specifies that the cable ground shall be 

connected to the grounding system of the building, as close to the 

point of cable entry as practical.

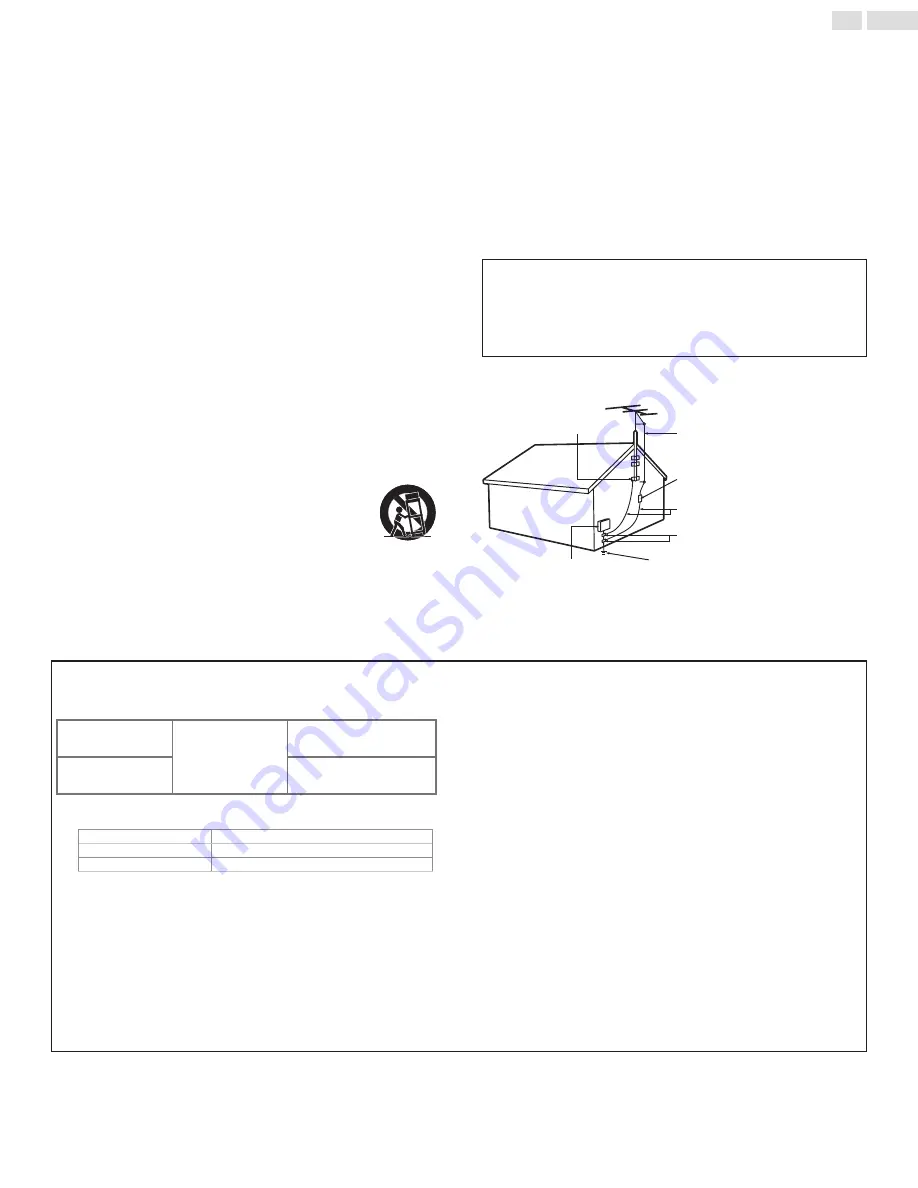
Example of Antenna Grounding as per NEC − National Electric 

Code

ANTENNA DISCHARGE 

UNIT (NEC SECTION 810-20)
GROUNDING CONDUCTORS 

(NEC SECTION 810-21)

POWER SERVICE GROUNDING 

ELECTRODE SYSTEM

(NEC ART 250, PART H)

ANTENNA LEAD IN WIRE

GROUND CLAMPS

ELECTRIC SERVICE 

EQUIPMENT

GROUND CLAMP

Wall Mount Bracket Kit

Brand

: SANUS

Model #

Screw dimension

23PFL4509/F7

SQM6485/17

M4(9mm) x 4 

with space

32PPF4709/F7

M4(15mm) x 4 

with space

•  For use only with UL listed Wall Mount Bracket with minimum 

weight/load: please refer to below table.

Model #

 minimum weight required 


23PFL4509/F7

3.4 kg


(7.4lb)

32PFL4709/F7

5.8 kg


(12.8lb)

•  The recommended Wall Mount Bracket Kit (sold separately) 

allows the mounting of the TV on the wall.

•  For detailed information on installing the wall mount, refer to the 

Wall Mount Instruction Book.

•  P&F USA is not responsible for any damage to the product or 

injury to yourself or others if you elect to install the TV on a wall 

mount of your own choice on your own.

•  The Wall Mount Bracket must be installed by experts.

P&F USA is not liable for these types of accidents or injury noted 

below.

•  Install the Wall Mount Bracket on a sturdy vertical wall.

•  If installed onto a ceiling or slanted wall, the TV and Wall Mount 

Bracket may fall which could result in a severe injury.

•  Do not use screws that are longer or shorter than their specified 

length. If screws too long are used this may cause mechanical or 

electrical damage inside the TV set. If screws too short are used 

this may cause the TV set to fall.

•  Do not fasten the screws by excessive force. This may damage the 

product or cause the product to fall, leading to an injury.

•  For safety reasons use 2 people to mount the TV onto a Wall 

Mounting Bracket.

•  Do not mount the TV onto the Wall Mounting Bracket while your 

TV is plugged in or Turned On. It may result in an electrical shock 

injury.

When installing the unit on the wall, allow this much space.

Top: 


11.8 inches (30cm)

Left and right side: 


5.9 inches (15cm)

Bottom: 


3.9 inches (10cm)

Summary of Contents for 23PFL4509/F7

Page 1: ...stados Unidos 1 866 309 8147 México D F y Área Metropolitana 58 87 97 36 Interior de la Republica 01 800 839 19 89 FR Pour obtenir de l aide supplémentaire communiquez avec le centre de service à la clientèle de votre pays Pour obtenir de l aide communiquez avec le centre de service à la clientèle Philips au Dans le États Unis au Canada à Puerto Rico ou aux ÎlesVierges américaines 1 866 309 8147 M...

Page 2: ...on your TV and putting it in Standby mode 15 Adjusting volume 15 Switching channels 15 Watching channels from an external device 16 Access the Home menu 16 Sleep timer 16 Changing picture format 16 TV screen information 17 5 Use more of your TV 18 Picture 18 Sound 19 Setup 20 Autoprogram 21 Language 22 Features 22 Child lock 23 Caption settings 25 Sleep timer 26 EasyLink 26 Location 26 E sticker 2...

Page 3: ...TION Pour éviter les choc électriques introduire la lame la plus large de la fiche dans la borne correspondante de la prise et pousser jusqu au fond The caution marking is located on the rear or bottom of the cabinet Product Safety Notification Additional Benefits By registering your product you ll receive notification directly from the manufacturer in the rare case of a product recall or safety d...

Page 4: ...he cable ground shall be connected to the grounding system of the building as close to the point of cable entry as practical Example of Antenna Grounding as per NEC National Electric Code ANTENNA DISCHARGE UNIT NEC SECTION 810 20 GROUNDING CONDUCTORS NEC SECTION 810 21 POWER SERVICE GROUNDING ELECTRODE SYSTEM NEC ART 250 PART H ANTENNA LEAD IN WIRE GROUND CLAMPS ELECTRIC SERVICE EQUIPMENT GROUND C...

Page 5: ...ne or more of the following measures Reorient or relocate the receiving antenna Increase the separation between the equipment and the receiver Connect the equipment into an outlet on a circuit different from that to which the receiver is connected Consult the dealer or an experienced radio or television technician for help Declaration of Conformity Trade Name PHILIPS Responsible Party P F USA Inc ...

Page 6: ... Rights Reserved Dolby License Notice and Trademark Acknowledgement Manufactured under license from Dolby Laboratories Dolby and the double D symbol are trademarks of Dolby Laboratories ENERGY STAR is a joint program of the U S Environmental Protection Agency and the U S Department of Energy helping us all save money and protect the environment through energy efficient products and practices Consu...

Page 7: ...use a gas duster on this TV The gas trapped inside of this unit may cause ignition and explosion CAUTION Danger of explosion if battery is incorrectly replaced Replace only with the same or equivalent type WARNING Batteries battery pack or battery installed shall not be exposed to excessive heat such as sunshine fire or the like WARNING To prevent injury this apparatus must be securely attached to...

Page 8: ... link EasyLink allows your other HDMI link devices to be controlled by the HDMI cable connected to your TV HDMI Input HDMI DVI Input If your video device has DVI Output jack use an HDMI DVI conversion cable to connect the unit Component Video Input PC Input AV Input USB terminal The picture JPEG music MP3 and video files stored on a USB Memory Stick can be played back on this unit Digital Audio Ou...

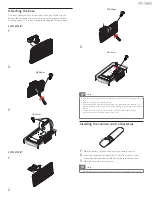
Page 9: ...ching the base ensure that all screws are tightly fastened If the base is not properly attached it could cause the unit to fall resulting in injuries as well as damage to the unit To remove the base from this unit unscrew the Phillips head screws in step 2 Be careful not to drop the base when you remove it Installing the remote control batteries 1 Slide the battery cover off the back of the remote...

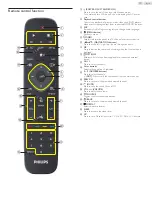
Page 10: ... to move left right up down through the items OK Press to decide the command of setting when the Home menu is displayed OPTIONS Displays a list of menu items applicable to connected external device CH Press to select channels Color buttons Select tasks or options if indicated 0 9 NUMBER buttons Press to select channels DOT Press to shift the subchannel from the main channel PREV CH Press to return...

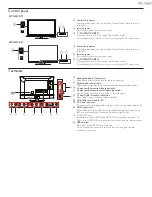
Page 11: ...mm stereo jack for personal listening Digital Audio coaxial cable Digital audio output to home theaters and other digital audio systems Component Composite Video Input jacks Component Composite shared Audio Input jacks Component Composite analog audio L R jacks signal 75 ohm Cable Antenna connection Signal Input from an antenna cable or satellite VGA cable connection for PC PC Audio Input jack PC ...

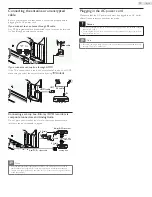
Page 12: ...e to signals OUT IN IN IN IN OUT OUT OUT IN OUT OUT IN IN RF cable RF cable cable set top box Blu ray DVD recorder Audio L R video cable Audio L R video cable Note Only the left loudspeaker reproduces sound for mono equipment Use a mono to stereo adapter not supplied for sound reproduction via all internal loudspeakers If there is no input signal and no operation for 15 minutes the unit will go in...

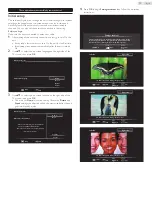
Page 13: ... press OK You must set Home in location setting Otherwise Picture and Sound settings you adjusted will not be memorized after the unit goes into Standby mode Setup Wizard 2 6 Please select Home Retail Home Retail R t il Home Home mode default settings are recommended for in house use ENERGY STAR qualified Retail mode is intended for in store display and resets video settings at Power On Select OK ...

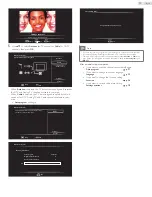
Page 14: ... may take over 20 minutes Select OK OK START Previous Cancel Setup Wizard 5 6 Searching Please wait Searching CH Digital Channels Found Analog Channels Found Channel 1 0 0 0 Exit MENU Setup Wizard 6 6 Congratulations TV Setup is done Exit MENU Note If you are not receiving a signal from your cable service contact the Cable provider If you press during AutoProgram this setup of TV channels will be ...

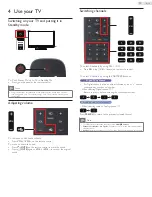
Page 15: ...al sound Switching channels PREV CH CH To select Channels by using CH CH Press CH up CH down on the remote control To select Channels by using the NUMBER buttons DigitalTV operation For Digital channels press a number followed by a dot and the corresponding sub channel number When selecting Digital channel 11 1 Be sure to press before entering the subchannel number Analog CableTV operation When se...

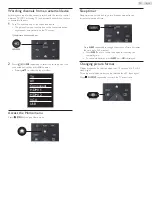
Page 16: ...K to enter Pressing to select the Input modes TV AV Component HDMI 1 HDMI 2 VGA USB Access the Home menu Press MENU to open Home menu Sleep timer Sleep timer can set the unit to go into Standby mode after an incremental period of time Press SLEEP repeatedly to change the amount of time increases the time up to 240 minutes Press SLEEP once to call up the display for checking the remaining time To c...

Page 17: ...size The subtitles may remain visible For PC Input signal This unit can also be connected to your PC that has a DVI terminal Use an HDMI DVI conversion cable for this Video connection and it requires Stereo mini 3 5mm plug Audio cable for Analog Audio signal as well Refer to 16 9 video signal on this page if PC has HDMI Output TV screen information You can display the currently selected channel or...

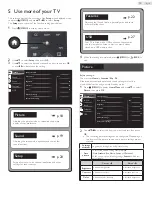
Page 18: ...listen to music or watch videos stored on a USB memory stick p 22 p 27 4 When the setting is completed press MENU or BACK to exit Picture Before you begin You must set Home in Location p 26 Otherwise personalized picture and sound settings will not be memorized after the unit goes into Standby mode 1 Press MENU to display Home Menu and use to select Picture then press OK Picture Sound Setup Featur...

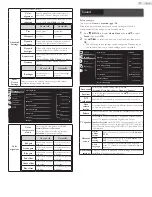
Page 19: ...s with blue to increase brightness with blue Sound Before you begin You must set Home in Location p 26 Otherwise personalized picture and sound settings will not be memorized after the unit goes into Standby mode 1 Press MENU to display Home Menu and use to select Sound then press OK 2 Use to select the item you want to adjust then press OK The following sound settings can be configured Depending ...

Page 20: ... depending on the program Setup Note The Setup menu item is disabled for non tuner sources Setup allows user to do channel installation and other settings for tuner sources 1 Press MENU to display Home Menu and use to select Setup then press OK Picture Sound Setup Features USB Autoprogram Antenna Channel list Audio only On Auto aspect ratio Off 2 Use to select the item you want to adjust then pres...

Page 21: ...s or during Autoprogram the setup of TV channels will be canceled Even if Autoprogram is completed the channel setting will be lost if the AC power cord is unplugged before the unit goes into Standby mode by pressing The PIN code will be required once you set a PIN code in the Child lock p 23 If you want to change your PIN code follow the instruction of Change PIN p 25 Channel list You can make a ...

Page 22: ...s to reset the memory of PC settings EasyLink You can get the most out of your HDMI CEC compliant devices with Philips EasyLink enhanced control features Connect your HDMI CEC compliant devices through HDMI to your TV and control them at the same time with your TV remote control For detailed information please refer to the section of EasyLink on p 26 Location Select Home or Retail as the location ...

Page 23: ... higher rating and set it to the lower ratings will be blocked automatically When you set the All to all ratings return to automatically Region ratings lock will be available when the unit receives a Digital broadcast using the new rating system To block any inappropriate programs set your limits in US TV ratings lock US movie ratings lock and Region ratings lock Channel lock Particular channels o...

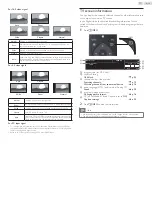
Page 24: ...alog TV 14 TV MA Language Sex Violence Note Blocked sub rating will appear beside the main rating category in US TV ratings lock menu Changing the category to or automatically changes all its sub ratings to the same or Canada English or Canada French ratings You can select the rating for Canada English or Canada French broadcasting 1 Use to select Canada English ratings or Canada French ratings th...

Page 25: ...ble in DTV In addition to the basic Closed Caption DTV has its own Closed Cap tion called Digital caption service Use this menu to change the settings for Digital caption service Digital caption service CS 1 to CS 6 Selects one of these before changing any other item in Caption settings menu Choose CS 1 under normal circumstances You can choose the size font color background and other characteris ...

Page 26: ... On when the power On signal is sent from your connected EasyLink device Auto TV on Off This unit stays in Standby mode even if you Turn On your connected EasyLink device On This unit turns On automatically when you turn On your connected EasyLink device Device list This function lets you see the product model number or name of connected devices Use to select the desired EasyLink device listed on ...

Page 27: ... Audio dat mpg mpe MPG MPEG MPEG1 2 MPEG1 layer 2 MPEG1 layer 3 MPEG2 leyer 3 AC 3 LPCM ADPCM ts trp tp m2ts MPEG2 TS MPEG2 vob MPEG2 PS MPEG2 mp4 MP4 MPEG4 mkv MKV MPEG1 2 4 avi AVI MPEG2 MPEG4 avi mov Motion JPEG JPEG Music MP3 MPEG1 Layer 2 32Kbps 448Kbps Bit rate 32KHz 48KHz Sampling rate MPEG1 Layer 3 32Kbps 320Kbps Bit rate 32KHz 48KHz Sampling rate MPEG2 Layer 3 32Kbps 320Kbps Bit rate 32KH...

Page 28: ...lay pause to play or pause the music FB Press OK to Fast Backward the music Repeatedly press OK to increase the speed FBX2 FBX4 FBX8 FBX16 PLAY FF Press OK to Fast Forward the music Repeatedly press OK to increase the speed FFX2 FFX4 FFX8 FFX16 PLAY Prev Next Go to the previous next track Stop Stop music playback Info Display the information Album Title Bit Rate Artist Sampling Year Size Repeat Se...

Page 29: ...the software ver sion 6 Connecting devices No supplied cables are used with these connections Please purchase the necessary cables at your local store Before you connect AC power cord Be sure other devices are connected properly before plugging in the AC power cord Selecting your connection quality HDMI Highest quality Supports high definition Digital signals and gives highest picture and sound qu...

Page 30: ... ARC allows you to use EasyLink to output TV Audio directly to a connected Audio device without the need for an additional Digital Audio cable OUT HDMI ARC HDMI cable Digital home theater amplifer Note The HDMI 1 connector is HDMI Audio Return Channel ARC compliant Use it to output Digital Audio to an HDMI home theater system Be sure that the device is HDMI CEC and ARC compliant and that the TV is...

Page 31: ...er compatibility The unit accepts 480i 480p 720p 1080i and 1080p video signals HDMI DVI connection requires separate Audio connections as well and the Audio signals are output as Analog L R Audio DVI does not display 480i image which is not in compliance with EIA CEA 861 861B USB Memory Stick This unit offers easy playback of picture music and movie files Insert the USB Memory Stick into the USB t...

Page 32: ...e kind of antenna Input An indoor antenna Digital or VHF UHF an external antenna Digital or VHF UHF or an RF coaxial cable from your wall cable satellite box needs to be plugged into the unit How come there is no image from the connected external devices Check if the correct Input mode is selected by pressing SOURCE Watching channels from an external device p 16 Check the antenna cable or other In...

Page 33: ...ing the HDMI DVI connections Make sure that the Analog Audio signals from the HDMI DVI device are connected to the Analog Audio Input L R jacks Adjusted Picture or Sound settings are not effective every time the unit is Turned On You must set to Home in Location p 26 Otherwise the settings you adjusted will not be memorized after the unit goes into Standby mode Forgotten PIN code Enter 9999 to cle...

Page 34: ...tion decoder cannot read the information of the shortened program Captions that are delayed a few seconds behind the actual dialog are common for live broadcasts Most captioning production companies can display a dialog to maximum of 220 words per minute If a dialog exceeds that rate selective editing is used to insure that the captions remain up to date with the currentTV screen dialog Black box ...

Page 35: ...ent signal lines This allows the viewers to experience picture colors as original as it is There are several signal formats including Y Pb Pr and Y Cb Cr Dolby Digital The system developed by Dolby Laboratories to compress Digital sound It offers stereo sound 2ch or multi channel Audio DTV ATSC Acronym that stands for Advanced Television Systems Committee and the name of the Digital broadcasting s...

Page 36: ...re no user serviceable parts inside Call our toll free customer support line found on the cover of this User Manual to locate an authorized service center IR Signal Check If the remote control is not working properly you can use a Digital camera including a cellular phone with built in camera to see if it is sending out an infrared signal With a Digital camera including built in cell phone cameras...

Page 37: ...hoto Slide show JPEG files only Video playback MPEG1 dat mpg mpeg mkv MPEG2 dat mpg mpeg avi MPEG2 PS vob MPEG2 TS ts trp tp m2ts MPEG4 SP ASP avi MPEG4 mp4 avi MP4 mp4 JPEG Motion JPEG Music MPEG1 Layer 2 32Kbps 448Kbps Bit rate 32KHz 48KHz Sampling rate MPEG1 Layer 3 32Kbps 320Kbps Bit rate 32KHz 48KHz Sampling rate MPEG2 Layer3 32Kbps 320Kbps Bit rate 32KHz 48KHz Sampling rate Connections Compo...

Page 38: ...oss of any programs data or other information stored on any media contained within the product or other additional product or part not covered by this warranty Recovery or reinstallation of programs data or other information is not covered under this Limited Warranty This warranty does not apply a to damage caused by accident abuse misuse neglect misapplication or non supplied product b to damage ...

Page 39: ...BY APPLICABLE LAW ANY IMPLIED WARRANTY OF MERCHANTABILITY OR FITNESS FOR A PARTICULAR PURPOSE ON THIS PRODUCT IS LIMITED IN DURATION TO THE DURATION OF THIS WARRANTY Some states do not allow the exclusions or limitation of incidental or consequential damages or allow limitations on how long an implied warranty lasts so the above limitations or exclusions may not apply to you This warranty gives yo...

Page 40: ...ox 2248 Alpharetta GA 30023 2248 P F Mexicana S A de C V Av La Palma No 6 Col San Fernando La Herradura Huixquilucan Edo de México C P 52787 Philips and Philips Shield are used under license of Koninklijke Philips N V ...

Reviews: