background image

1

4

3

2

31

S

ETTING UP THE

PC M

ODE 

(P

ERSONAL 

C

OMPUTER 

M

ONITOR

)

PC P

ICTURE 

C

ONTROLS

       o ensure the best picture quality from the PC feature
     of this TV, several Picture Controls are available for
adjustment. 

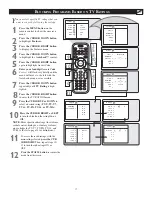
1

Press the MENU button on the remote con-

trol to display the Picture menu.

2

Press the CURSOR RIGHT button to

access the Picture menu.

3

Press the CURSOR UP or CURSOR

DOWN button repeatedly to select any of
the picture items:

Brightness- adds or subtracts light from the

darkest part of the picture.

Picture- improves the detail of the lightest

parts of the picture.

Horizontal- Allows you to adjust the hori-

zontal placement of the image.

Vertical- allows you to adjust the vertical

placement of the image.

Color Temp.- Allows you to adjust the color 

temperature of the picture. Select from
Normal, Cool, or Warm. 

4

Once you have highlighted a selection, press

the CURSOR LEFT or CURSOR RIGHT
button 
to navigate, adjust, or activate the
specific controls.

5

T

Press the PC button on the remote control
to enter into PC mode.


6

É


Picture


• Brightness

 Audio Selection 

• 

Picture


Features 

•  Horizontal

Reset to Factory 

• 

Vertical


Mode 

•  Color Temp


Brightness 


48


Picture 

É


Horizontal 

É


Vertical 

É


Color Temp 

É


Picture

PC Menu

2

6

3

4

5

4

Ñ

É

Press the STATUS/EXIT button to remove 
the menu from the screen.


Brightness 

É


Picture


38


Horizontal 

É


Vertical 

É


Color Temp 

É


Ñ

É

Picture


Brightness 

É


Picture 

É


Horizontal  


39


Vertical 

É


Color Temp 

É


Ñ

É

Picture


Brightness 

É


Picture 

É


Horizontal 

É


Vertical


32


Color Temp 

É


Ñ

É

Picture

PC A

UDIO 

S

ELECTION


T

his TV lets you choose the sound that is heard
while in PC Mode. You can select TV, PC/HD

or FM Radio. For example, you can listen to the radio
while you use the computer.  
NOTE: You must select the source before selecting
PC. You cannot change the channel or station while
in PC Mode. 

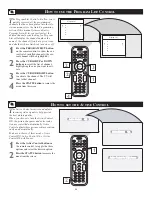
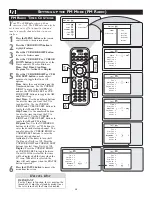
1

Press the MENU button on the remote

control to display onscreen menu.

2

Press the CURSOR DOWN button repeat-

edly to highlight Audio Selection.

3

Press the CURSOR LEFT or CURSOR

RIGHT button repeatedly to select FM
Radio, PC/HD, 
or TV. 

4


PC Menu


Picture


• Brightness

  Audio Selection 

• 

Picture


Features  

•  Horizontal

Reset to Factory 

•  Vertical


Mode  

•  Color Temp.


Picture 

Audio Selection


FM Radio


Features 


Reset to Factory 


Mode 

PC Menu

Ñ

É


Picture 

Audio Selection


TV


Features 

 Reset to Factory 


Mode 

PC Menu

Ñ

É


Picture 

Audio Selection


PC/HD


Features 

 Reset to Factory 


Mode 

PC Menu

Ñ

É

Press the STATUS/EXIT button to remove 
the menu from the screen.

erence en

e

perfor

ff mance

rr

, good quality VGA cab

Note:
When using the LCD TV as a PC monitor, slight diagonal interference lines may 
be observed when it is operated under electromagnetic interference environment 
but will not affect the performance of this product. For better performance, good 
quality VGA cable with good noise isolation filter is recommended.


Brightness 

É


Picture 

É


Horizontal 

É


Vertical 

É


Color Temp   

  Normal


Ñ

É

Picture

1

3

Summary of Contents for 23-LCD HDTV MONITOR FLAT TV DIGITAL CRYSTAL CLEAR 23PF9976I

Page 1: ...LCD TV Streamium User Manual 23PF9976i 23iF9946_12_StDFU_ENG p65 9 1 04 6 06 PM 1 ...

Page 2: ...Registration 14 Chapter 4 Using the Streamium LCDTV 15 4 1 INTERNET 15 16 4 2 PC LINK 16 Chapter 5 Basic navigation 17 Additional information 18 Chapter 6 Problem solving 19 21 Chapter 7 Remote Control 22 23 Contents Thank you for purchasing this Philips StreamiumTelevision You are the proud owner of a Streamium LCDTV which promises full value to you as a customer Please read the user manual and f...

Page 3: ...s identical with the voltage of your local power supply If not please consult your dealer Radio equipment for wireless applications is not protected against disturbance from other radio services The product should not be exposed to dripping or splashing No object filled with liquids such as vases should be placed on the product Do not expose the system to excessive moisture rain sand or heat sourc...

Page 4: ...ed media files there You can always add more files and folders at a later time 3 Adding files to the Media Manager Only the files that you see in the Media Manager will be accessible from the Streamium LCDTV A Click one of the media categories Music Photos or Movies In this example click Music B First click the Add Music button below the media categories then click Add Files or Folders C Select a ...

Page 5: ...You will check the settings of your existing wireless computer network You will adapt Streamium LCD TV to its settings to match your network Go to chapter 2 2 on page 8 9 OR Option C If you want to connect a network cable between the Streamium LCDTV and your PC or wired network In this configuration the Streamium LCD TV and the computer come with a free ethernet connector or a wired network with a...

Page 6: ...Media Manager Leave the Media Manager window open to be sure it is active 3 Switch on the Streamium LCDTV Press the SELECT button repeatedly until STREAM indicator is lighted up 4 Pressing the HOME LINK button on the remote control Do not press the INTERNET button at this time only the HOME LINK button After about five seconds a Streamium welcoming message appears on the television screen 5 If ask...

Page 7: ... your Streamium LCDTV See the section on Enabling broadband Internet entertainment on page 12 14 for information on how to make your broadband Internet connection provided you have one available to the Streamium LCDTV If you encounter problems during installation or should you need additional help then a see Problem solving on page 19 21 or b visit our website www philips com streamium and click o...

Page 8: ... secures your wireless network communications 64 bit 5 charactersASCII or 10 characters HEX or 128 bit 13 characters ASCII or 26 characters HEX Note The encryption key is case sensitive meaning that ABC is not the same as aBc Always input characters in the correct case to avoid problems Basically you will have to try and remember what you set it to If you cannot remember the encryption key you wil...

Page 9: ...nds you will see the PC Link menu appear on your TV screen If you see the text Philips Media Manager appear on yourTV screen the installation has succeeded 6 Explore the PC Link menu on theTV screen Use the navigation buttons Cursor Left Right Up Down and the OK button on the remote control to explore the multimedia content you made available on your PC For example press the Cursor Right button on...

Page 10: ...e Streamium LCDTV directly to your computer In a crossover Ethernet cable the arrangement of the coloured wires changes between the two ends Push one end of the Ethernet cable into the connector on the back of the Streamium LCDTV Push the other end into the Ethernet connector of your computer Note Your computer needs to have an Ethernet connector available OR 1b Use a straight through Ethernet cab...

Page 11: ...n Use the navigation buttons Cursor Left Right Up Down and the OK button on the remote control to explore the multimedia content you made available on your PC For example press the Cursor Right button on the remote control several times until you have selected a music track a photo or a movie and press OK button to play it on your television Have fun 6 How to enable INTERNET For playing Internet R...

Page 12: ...soft Windows operating system For Microsoft and other operating systems third party router gateway software is readily available on the market For more information on sharing an Internet connection read the documentation that came with the software or with your operating system After bridging the internet connection to your wireless or wired network you will be able to access the Internet just lik...

Page 13: ...ess 1 Use the Cursor Up Down Right keys on your remote control to enter your email address If you mis typed press Cursor Left button to delete the character you have entered Next press OK button to send your email address to My Philips See also Chapter 8 Entering or editing information Alternatively use SMS TEXT style keys for inputting your email address SMSTEXT style entry can be used to enter a...

Page 14: ...r after resetting the service of the Streamium LCD TV or if you want to access the Internet later 5 After creating a My Philips account proceed to the Streamium LCDTV and press the INTERNET button again The Streamium LCDTV will require you to enter the email address Enter your password and press the red button on the remote control If you forget your password Press the green button on the remote c...

Page 15: ...V screen Switching from Streamium mode toTV mode Press the SELECT button on the remote control repeatedly until the indicator is lighted up atTV Press the TV button to return to TV mode to view programmes on your Streamium TV screen Switching from Streamium mode to FM Radio mode Press the SELECT button on the remote control repeatedly until the indicator is lighted up atTV Press the RADIO button t...

Page 16: ...nd press OK button to play it on your television Please see Basic navigation on page 17 for an explanation of the navigation and control functions 4 2 HOME LINK With HOME LINK you can make the Streamium LCDTV play media files music photos movies that are stored on your PC or a centralised storage such as a Ehub 1 Press the HOME LINK button on the remote control to open the NavigationView on your T...

Page 17: ...tons you can press to navigate through the menus on the television screen 5 If colour coded user options appear on the TV screen press the matching colour button to use that option 4 Press Cursor Up or Cursor Down to make a selection Next press Cursor Right or OK button to confirm Chapter 5 Basic navigation 1 Press INTERNET or HOME LINK button on the remote control 23iF9946_12_StDFU_ENG p65 8 31 0...

Page 18: ... Inc All other brands and product names are registered trademarks of their respective owners Statements This equipment has been tested and found to comply with the limits for a Class B digital device pursuant to Part 15 of the FCC Rules These limits are designed to provide reasonable protection against harmful interference in a residential installation This equipment generates uses and can radiate...

Page 19: ...ains outlet that provides electrical power Switch on yourTV Increase volume or switch off mute of your Streamium LCDTV Select a lower video quality by pressing the green button on the remote control one or more times Lower video quality requires less bandwidth and should play with less interruptions Comply with the supported codecs Go to www philips com streamium to see which codecs are currently ...

Page 20: ...n and finally Setup exe to start the CD Go to www philips com streamium to see which operating systems are supported Switch off wireless devices that interfere with your wireless network connection Place the wireless access point as high and centrally as possible to improve signal strength Switch on your PC Start the Media Manager software Connect the wireless network adapter to your PC or reposit...

Page 21: ...de the Streamium LCDTV and the software Upgrade the Steamuim TV by pressing the MENU button Then select Online Upgrade Go to www philips com streamium for the latest version of the Media Manager software Check for Internet congestion Do not download large files while listening to Internet radio or viewing movies Firewall software and Anti Virus software may diminish the bandwidth effectively avail...

Page 22: ...e Internet as your source of multimedia content Requires a broadband Internet access of minimum 256 kbps higher recommended Menu navigation buttons up down left right OK Used for navigating through menus and for making choices MENU Accesses the Streamium menu settings è VOLUME buttons Increase or decrease volume SHUFFLE Home Link only Selects the shuffle mode ç Number Text buttons For inputting nu...

Page 23: ...d check whether the lithium battery is placed correctly The words on the battery should face you when you remove the battery cover 3 Insert battery cover and the remote control is now ready for use Note the battery supplied with the set does not contain mercury or nickel cadmuim so as to protect the environment When discarding your batteries use the recycling options available Remote Control 23iF9...

Page 24: ...Model No Serial No 200409219 StDFU_SP p65 9 22 04 5 54 PM 24 ...

Page 25: ...r Manual and or Quick Use Guide first for quick tips that make using your Philips product more enjoyable If you have read your instructions and still need assistance you may access our online help at www p4c philips com or call 1 888 PHILIPS 744 5477 while with your product 3139 125 33471 ...

Page 26: ...l No which is locat ed on the rear of the cabinet Retain this information for future reference Model No __________________________ Serial No ________________________ Know these safetysymbols This bolt of lightning indicates unin sulated material within your unit may cause an electrical shock For the safety of everyone in your household please do not remove product covering The exclamation point ca...

Page 27: ...maged 17 Tilt Stability All televisions must comply with recommended international global safety standards for tilt and stability properties of its cabinet design Do not compromise these design standards by applying exces sive pull force to the front or top of the cabinet which could ulti mately overturn the product Also do not endanger yourself or children by placing electron ic equipment toys on...

Page 28: ...proper ventilation Do not place the LCD TV near a radiator or other sources of heat Do not place the LCD TV where it can be exposed to rain or excessive moisture RECYCLING PROCEDURE END OF LIFE DISPOSAL To minimize harm to the environment the batteries supplied with the LCD TV do not contain mercury or nickel cadmium If possible when disposing of batteries use recycling means available in your are...

Page 29: ... AND SETUP GUIDE GENERAL INFORMATION Features Active Control continuously measures and corrects all incoming signals to help provide the best picture quality This feature moni tors and corrects both the sharpness control and noise reduction control Audio Video Jack Panel allows direct connections with VCRs DVDs or other devices providing quality TV picture and sound playback Audio Volume Leveler A...

Page 30: ...UL HINT TUNER MODE TV Menu Picture Brightness Sound Color Features Picture Install Sharpness Mode Tint TV Menu Picture Language Sound Tuner Mode Features Auto Program Install Channel Edit Mode Install Language English Tuner Mode É Auto Program É Channel Edit É Ñ É Install Language É Tuner Mode Cable Auto Program É Channel Edit É Ñ É Ñ É Tuner Mode Antenna OR Ñ É Tuner Mode Auto OR 3 5 6 2 1 4 5 Th...

Page 31: ...hted 3 Press the CURSOR RIGHT button to enter the Install menu Language will be highlighted 4 Press the CURSOR DOWN button repeatedly until Channel Edit is selected 5 Press the CURSOR RIGHT button to enter the Channel Edit menu Channel will be highlighted 6 Press the CURSOR RIGHT or CURSOR LEFT buttons to scroll through the list of available chan nels you can also press the CH or CH to scroll thro...

Page 32: ...t part of the picture Color adds or eliminates color Picture improves the detail of the lightest parts of the picture Sharpness improves the detail in the picture Tint adjusts the picture to obtain natural skin tones Color Temp offers NORMAL COOL or WARM picture preferences Normal will keep the whites white Cool will make the whites bluish and Warm will make the whites reddish HELPFUL HINT TV Menu...

Page 33: ...er É Balance É AVL É Dolby Virtual Dolby Virtual SAP É Sound É Ñ É Ñ É Sound Equalizer É Balance É AVL É Dolby Virtual Spatial SAP É Sound É Ñ É É É Sound Equalizer É Balance É AVL É Dolby Virtual É SAP Off Sound É Ñ É Sound Equalizer É Balance É AVL É Dolby Virtual É SAP On Sound É Ñ É Sound Equalizer É Balance É AVL É Dolby Virtual É SAP É Sound Stereo Ñ Sound Equalizer É Balance É AVL É Dolby V...

Page 34: ... tons to toggle the AM and PM setting Program No Use the NUMBERED buttons or the CH or CH buttons to enter the desired start up channel You can also press the CUR SOR RIGHT or CURSOR LEFT buttons to enter the desired start up channel Activate Set the timer to turn itself On Once or Daily or Off Press the CURSOR RIGHT and CURSOR LEFT buttons to select Once Daily or Off Display Press the CURSOR RIGH...

Page 35: ...al situations coarse language or suggestive dialogue R Restricted This programming is specifi cally designed for adults Anyone under the age of 17 should view this programming only with an accompanying parent or adult guardian It contains one or more of the fol lowing intense violence intense sexual situ ations strong coarse language or intensely suggestive dialogue NC 17 No one under the age of 1...

Page 36: ... new code is confirmed the AutoLock menu will appear You can proceed to access the functions available in the menu If you do not wish to access the other fuctions press the STATUS button to remove the menu from the screen 7 8 Remember that 0711 is the default AutoLockTM code If your access code has been changed by someone other than you a child for example or you have forgotten the code you can al...

Page 37: ...els you want to lock 9 To block all channels press the CUR SOR DOWN button until Block All is selected Press the CURSOR RIGHT button to select On to activate the blocking of all channels To deactivate the blocking of all channels select Off 10 OCK HANNELS USING AUTOLOCK AutoLock Block Channel Off Lock HD É Change Code É Clear All É Block All É Movie Rating É Ñ É AutoLock Block Channel On Lock HD É...

Page 38: ...k All É Movie Rating É Ñ É AutoLock Block Channel É Lock HD On Change Code É Clear All É Block All É Movie Rating É Ñ É Channel 2 Channel Blocking Access Code Ñ É Features Timer É Access Code Autolock Contrast É DNR É Ñ É Features Timer É Access Code Autolock Contrast É DNR É Correct Ñ É 3 5 1 6 8 2 4 7 9 TV Menu Picture Timer Sound Autolock Features Contrast Install DNR Mode If a channel is block...

Page 39: ... the AutoLock menu will be accessible 7 8 Press the CURSOR DOWN button to select Clear All Clear will appear on the screen 9 Press the CURSOR RIGHT button to activate the clearing of all channels AutoLock Block Channel É Lock HD É Change Code É Clear All Clear Block All É Movie Rating É Ñ É AutoLock Block Channel É Lock HD É Change Code É Clear All Cleared Block All É Movie Rating É Ñ É 3 5 1 9 2 ...

Page 40: ... ly until Movie Rating is highlighted 9 Press the CURSOR RIGHT button and the Rating menu shifts to the left with G highlighted Press the CURSOR UP or DOWN buttons to highlight each rating you want Press the CURSOR RIGHT button to turn the rating ON or OFF Turning the rating ON will block programs with that rating from being seen 10 11 Features Timer É Access Code Autolock Contrast É DNR É Ñ É Fea...

Page 41: ... 14 or TV MA Press the CURSOR RIGHT or LEFT to turn the block on the rating On or Off NOTE More specific subratings for violence sexual content dialogue or fantasy violence are available for TV Y7 TV PG TV 14 and TV MA Refer to page 11 for definitions To access these subratings with the main rating selected press the CUR SOR RIGHT Then repeat steps 10 11 to turn the sub ratings ON or OFF 10 11 12 ...

Page 42: ...ll take place When Off ALL blocking is disabled Block Unrated ALL unrated programs based on the Movie Ratings or Parental TV Guidelines can be blocked if this feature is set to On and the Blocking feature is set to OFF No Rating ALL programming with NO content advisory data can be blocked if set to On and the Blocking feature is set to OFF Press the CURSOR RIGHT or LEFT to toggle Blocking On or Of...

Page 43: ...rol TWICE Your AutoLock settings will appear on the screen NOTE If you have blocked specific subratings such as V for violence in the TV PG category these blocked subratings will not appear in the review The subratings however are still blocked according to your selections 2 After a few seconds the settings will leave the screen automatically or you can press the STATUS button a third time to remo...

Page 44: ...ss the MENU button on the remote control to show the on screen menu 2 Press the CURSOR DOWN to highlight Features 3 Press the CURSOR RIGHT to access the Features menu 4 Press the CURSOR DOWN button until the Contrast control is highlighted 5 Press the CURSOR RIGHT or LEFT to tog gle the On or Off option 6 Press the STATUS button to remove the menu from the screen Tne DNR Dynamic Noise Reduction fu...

Page 45: ...URSOR DOWN button to highlight Features Press the CURSOR RIGHT to access Features menu Press the CURSOR DOWN button repeatedly to highlight PIP Press the CURSOR RIGHT to access PIP menu Press the CURSOR LEFT or RIGHT button to select the PIP Size options Off On Small Medium Large or Side by Side If you want to move the PIP screen horizontally press the CURSOR DOWN button again to highlight Horizon...

Page 46: ...enter the selected Mode NOTE You can also press the dedicated button on the remote control to change the Mode TV Menu Picture TV É Sound FM Radio FM Radio É Features PC É Install HD É Mode TV Menu Picture TV É Sound FM Radio FM Radio É Features PC É Install HD É Mode TV Menu Picture Brightness Sound Color Features Picture Install Sharpness Mode Tint 3 5 1 2 4 TV Menu Picture TV É Sound FM Radio FM...

Page 47: ...area s TV program listings for the stations and times of shows being broadcast with Closed Captioning HELPFUL HINT Have you ever fallen asleep in front of the TV only to have it wake you up at two in the morning with a test pattern sound screeching in your ears Well your TV can enable you to avoid that discomfort by automat ically turning itself off With the Sleeptimer feature ou can set a timer t...

Page 48: ...ti vate 3 Press the CURSOR RIGHT button to activate the channel The TV will tune to that channel 4 The Active Control monitors and adjusts incoming video signals to help provide the best picture quality When you choose to turn the Active Control ON the picture sharpness and noise reduc tion are controlled automatically Active Control adjusts these picture settings continu ously and automatically Y...

Page 49: ...3 While the SURF list message or the SURF channel list appears on the screen press the CURSOR RIGHT button to add the present channel to the SURF list 4 If you want to delete the present channel from the SURF list press the CURSOR RIGHT button again Repeat steps 1 through 3 to add more channels up to 10 to the SURF list Along with regularly programmed chan nels the external video source connection...

Page 50: ...toPictureTM that can be changed To adjust these settings use the Pictureoptions within the onscreen menu All other settings are set up at the factory during production and cannot be adjusted AutoSound allows you to select from three factory set controls and a personal control that you set according to your own preferences through the onscreen Sound menu The three fac tory set controls Voice Music ...

Page 51: ...o Mode onscreen menu 2 Press the CURSOR DOWN button until Mode is highlighted 3 Press the CURSOR RIGHT button to access the TV PC or HD mode 4 Press the CURSOR UP or DOWN buttons to choose TV PC or HD TV This will switch the TV back to the TV Mode of operation PC This control will switch the TV to the PC Mode of operation Note a PC signal must be pres ent for this to work or the TV will go into st...

Page 52: ...ay 5 Press the CURSOR RIGHT or CUR SOR LEFT button to make adjust ments or to toggle the On or Off options Time Enter the current time using the Numbered buttons Use the CURSOR RIGHT to move to the AM PM slot and use the CURSOR LEFT or CUR SOR RIGHT buttons to toggle the AM and PM setting Start Time Use the numbered buttons to enter the time you want the TV to turn itself On Use the CURSOR RIGHT a...

Page 53: ...ance between the right and left TV speakers AVL AutomaticVolume Leveler when ON will keep the volume level at a consistent level should there be sudden peaks and valleys in sound levels during commercial breaks or channel changes DOLBY VIRTUAL Adds greater depth and dimension to TV sound Select from Dolby Virtual or Stereo if Stereo or Spatial or Mono if Mono SOUND Select Stereo or Mono If the sig...

Page 54: ...onscreen menu from the TV screen when finished Or let the display time out and the menu will disappear after a few second AutoSound allows you to select from four factory set controls and a personal control that you set according to your own preferences through the onscreen Sound menu within the FM Mode The four factory set controls Classical Jazz Pop or Rock enable you to tailor the sound so as t...

Page 55: ...ntal É Vertical É Color Temp É Ñ É Picture Brightness É Picture É Horizontal 39 Vertical É Color Temp É Ñ É Picture Brightness É Picture É Horizontal É Vertical 32 Color Temp É Ñ É Picture PC AUDIO SELECTION This TV lets you choose the sound that is heard while in PC Mode You can select TV PC HD or FMRadio For example you can listen to the radio while you use the computer NOTE You must select the ...

Page 56: ...n adjustment is completed press the CURSOR UP or DOWN to select YES if you want to store adjustment or select NO if you do not want to store adjustment 6 PC Menu Picture Phase Audio Selection Clock Features Format Reset to Factory Auto Adjust Mode 3 5 4 Features Phase É Clock 2 Format É Auto Adjust É Features Phase 3 Clock É Format É Auto Adjust É Features Phase É Clock É Format Native Auto Adjust...

Page 57: ... CURSOR DOWN button repeatedly to highlight PIP Press the CURSOR RIGHT to access PIP menu Press the CURSOR LEFT or RIGHT button to select the PIP Size options Off On Small Medium Large or Side by Side If you want to move the PIP screen horizontally press the CURSOR DOWN button again to highlight Horizontal Press the CURSOR LEFT or RIGHT button to move the picture horizontally If you want to move t...

Page 58: ...nu Picture Sound Features Install Mode TV É FM Radio É PC É HD 5 4 2 4 3 5 3 HOW TO USE THE TIMER MENU CONTROLS T he HD Mode Timer also allows you to set to turn On or Off the HD channel at a specific time and tune to a specific channel when it powers itself on The HD Mode Timer operates in exactly the same way as the TV Timer menu 1 2 3 4 In the HD Mode press the MENU button on the remote control...

Page 59: ...NESS This control improves the detail in the picture TINT This control adjusts the picture to obtain natural skin tones COLOR TEMP Choose from NOR MAL keeps whites white COOL makes whites bluish or WARM makes whites reddish picture prefer ences 6 Press the CURSOR RIGHT or LEFT buttons to adjust the selected control 7 Press the STATUS button to remove the onscreen menu from the TV screen when finis...

Page 60: ...ce 0 AVL É Dolby Virtual É SAP É Sound É Ñ É Sound Equalizer É Balance É AVL On Dolby Virtual É SAP É Sound É Ñ É Sound Equalizer É Balance É AVL É Dolby Virtual Stereo SAP É Sound É Ñ É Sound Equalizer É Balance É AVL É Dolby Virtual Dolby Virtual SAP É Sound É Ñ É Ñ É Sound Equalizer É Balance É AVL É Dolby Virtual Spatial SAP É Sound É Ñ É É É OR HD Menu Picture Equaliser Sound Balance Features...

Page 61: ... change your Access Code proceed to press the CURSOR DOWN button and select Change Code Press the CURSOR RIGHT button to enter Change Code mode New Code will appear Enter a new four digit code using the number buttons Confirm Code will then appear Using the numbered buttons re enter your new four digit code to confirm Once message Confirmed appears you have changed to new code Press the STATUS but...

Page 62: ...fill the screen Be careful not to leave nonmoving images on screen for extended periods of time or to display the same images on screen too frequently because subtle ghost images can be left on the picture tubes Sources of stationary images may be DVD disks laser disks video games CD i disks videotapes digital television boxes broadcast channels cable channels satellite channels and others Here ar...

Page 63: ... Contents 5 Troubleshooting Tips 38 TV Mode Controls Active Control 24 AutoLock Controls Access Code 12 Block Channels 13 Blocking Options 18 Clear All Locked Channels 15 Lock HD Channel 14 Movie Ratings 16 Review Screen 19 TV Ratings 17 Understanding the AutoLock Control 11 AutoSound Control 26 Auto Program Control 7 AutoPicture Control 26 AVL Auto Volume Leveler Control 9 Balance Control 9 Chann...

Page 64: ...ed or cost associated with packaging Product lost in shipment and no signature verification of receipt can be provided A product used for commercial or institutional purposes including but not limited to rental purposes Products sold AS IS or RENEWED CARRY IN SHIP IN WARRANTY For Carry In warranty repair take the product to a Philips authorized service center for repair When the product has been r...

Reviews: