background image


Operation 


26 | 40 

Operating instructions sample cleaner SLN 4 | Revision 4 


7.3


Re-weighing 

Calculation example: 
The weight of the sample that you are pouring in the filling container is 1,050 g. 
The cleaning process is started. 
The aspiration is effective when the sample is discharged. 
10 g dust and light dirt particles are sucked in. 
Straw sieve and sand sieve sort 20 g of dirt particles each, i.e. total 40 g. 
The weight of the sample that is to be sorted by the grading sieve is now 1,050 g – 50 g = 1,000 g.  
The waste of 50 g has 4.8 % of the sample. 
The remaining 1,000 g is the weight of the grains without waste that must be sorted: 

1,000 g = 100 %!


After grading, the clean sample now has 850 g top goods and 150 g small grains (i. e. 85 % and 15 %). 
Result of weighing: 

Sample 

1,050 g 

Waste 

50 g = 4.8 % 

Top goods 

850 g / 85 % 

Small grains 

150 g / 15 % 

7.4


Sieve change 


In order to avoid an unexpected starting of the sample cleaner, disconnect the 

mains before changing the sieves. 

The tension springs for the straw sieve, sand sieve and the grading sieves are clamped with holders on the 

sieving trays. 


Press the tension springs downwards and pull them forward. 


In order to attain unrestricted space for the sieve-changing operation, rotate the springs in the 

direction of the respective side wall. 


The sieves are now ready to be changed. 


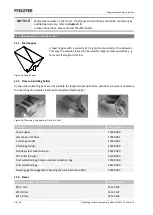
Figure 14: Tension springs on sieving tray 

Item  Name 

Item  Name 

Holder 

Tension spring forwards 

Tension spring 

Tension spring towards side wall 

Tension spring downwards 


3

4

5

1

2

Summary of Contents for SLN 4

Page 1: ...ructions Pfeuffer GmbH Flugplatzstra e 70 97318 Kitzingen GERMANY Telephone 49 9321 9369 0 Telefax 49 9321 9369 50 info pfeuffer com Revision 4 15 12 2020 www pfeuffer com Translation of the original...

Page 2: ...ent is not allowed to be communicated or duplicated utilised without express permission which also applies to communicating its content Offenders are liable to the payment of damages All rights reserv...

Page 3: ...ociated with the machine 11 2 4 Operating and maintenance personnel 11 2 5 Safety measures to be implemented by the operating company 12 2 6 General safety instructions 13 2 7 Safety tests 13 2 8 Resi...

Page 4: ...ve 27 7 4 2 2 Sieve sand sieve 28 7 4 3 3 and 4 Grading sieve 28 7 5 Recommended sieves and settings 30 8 Maintenance and cleaning 31 8 1 Cleaning 31 8 1 1 Motor 31 8 1 2 Deawner 32 8 2 Lubrication 33...

Page 5: ...anufacturer shall not be liable for the resulting damage Damage caused by such an unintended use is at the sole risk of the operator The machine is allowed to be operated only if it is ensured that al...

Page 6: ...e Machine DIN EN ISO 12100 2010 Safety of machinery General principles for design Risk assessment and risk reduction DIN EN 60204 1 2006 Safety of machinery electrical equipment of machines part 1 Gen...

Page 7: ...categories of danger notes and explanations of symbols Pictogram SIGNAL WORD Type of danger and its source Possible consequence of failure to comply Measure to guard against the danger DANGER This is...

Page 8: ...fication The information provided in these Operating Instructions apply only for the machine whose type designation is specified on the title page The identification plate with the type designation is...

Page 9: ...EMERGENCY STOP device In case of an emergency disconnect the sample cleaner from the electrical power supply Secure the plug suitably against unauthorised re plugging by placing it where it can remain...

Page 10: ...operation sample cleaner SLN 4 is protected against interference affecting the machine using protective caps Figure 1 Overview Protective caps Item Name 1 Left sidewall 2 Rear wall 3 Right sidewall 4...

Page 11: ...tely 60 65 cm For this a suitable base frame is necessary so that the operating personnel can access the collecting pans ergonomically Hazard area The entire area of one metre around the machine is da...

Page 12: ...sioning maintenance and cleaning disruptions causes and their rectification and dismantling and disposal The chapters delivery transport and storage installation and commissioning maintenance and clea...

Page 13: ...ns before starting with the cleaning operation 3 Do not let the device get wet during transport storage cleaning and operation 4 Make sure that you only use the sample cleaner when it is in a defect f...

Page 14: ...Make sure that water vapour or dust cannot enter the electronic area when cleaning 3 Technical data Sample cleaner SLN 4 Cleaning and grading all grain crops Sample quantity approximately 1 kg Materi...

Page 15: ...tion bag and dust collection bag holder You can find the respective item numbers in chapter 10 4 2 Transport and packaging Systems and machines of Pfeuffer GmbH are carefully checked and packaged befo...

Page 16: ...ck must be constructed according to the weight of the transport unit The driver must be authorized to drive the forklift truck Lashing Move the forks of the forklift truck between or under the pillars...

Page 17: ...e sample cleaner SLN 4 in the carton using a sack barrow Figure 4 Transport with sack barrow Push a transport pallet behind the carton pay attention to the weight specification Turn the carton over su...

Page 18: ...cyclone The distance between the air outlet and the suction hood must be at least 400 mm so that the aspiration effect is not affected CAUTION Dust warning Due to the nature of the samples increased...

Page 19: ...particles 5 ON OFF control switch 18 4 Grading sieve 6 Locking latch for filler cap 19 3 Grading sieve 7 Control switch Open the bottom of the deawner 20 Sand sieve 2 Sieve 8 Potentiometer Deawner tim...

Page 20: ...ter freely selectable between 0 and 80 s The light dirt such as dust is extracted by the aspiration process and deposited by the cyclone in the dust collection bag The sample proceeds via the straw si...

Page 21: ...ements Item Name 1 Air regulation 2 ON OFF control switch 3 Control switch for manually opening the deawner base 4 Potentiometer 5 Locking lever for deawner base 6 Outlet regulation 7 1 1 Potentiomete...

Page 22: ...d to guarantee an even distribution of the grain across the sieves 1 smallest opening gap more flow time 15 largest opening gap short flow time Make sure that different opening gaps are selected for d...

Page 23: ...ed Press the lever down The small corn goes into the front collecting pan under the fourth grading sieve Figure 10 Lateral outlets Item Name 1 Lever with spring 2 Lateral outlet of third grading sieve...

Page 24: ...mbH recommends placing the sieves according to the table given in chapter 7 5 Tare a collection pan on a pair of scales and fill it with approximately 1 kg raw material All the collecting pans PVC are...

Page 25: ...e of the sieve from above in the sample cleaner through the service openings at the side walls of the sample cleaner The deawner bottom will open automatically at the end of the deawning time o In ord...

Page 26: ...rading the clean sample now has 850 g top goods and 150 g small grains i e 85 and 15 Result of weighing Sample 1 050 g Waste 50 g 4 8 Top goods 850 g 85 Small grains 150 g 15 7 4 Sieve change In order...

Page 27: ...ide the new sieve on the sieving tray till the stop It might have to be slightly lifted Pay attention to the mounting position refer to figure 15 Figure 15 Straw sieve mounting position Dimensions 300...

Page 28: ...ntion to the mounting position refer to figure 17 Figure 17 Sand sieve mounting position Dimensions 300x350 mm Item Name 1 Engraved number 2 Surface not stamped 7 4 3 3 and 4 Grading sieve Pull the Pl...

Page 29: ...lace the Plexiglas cover on it Pay attention to the mounting positions refer to figure 20 Figure 20 Grading sieve mounting position Dimensions 300x470 mm Item Name A 3 Grading sieve B 4 Grading sieve...

Page 30: ...sieve Blind sieve 1 0 x 20 mm 3 0 mm 6 1 2 Linseed Without sieve 1 8 mm 2 0 mm Blind sieve 1 8 x 20 mm 2 2 x 20 mm 3 5 1 2 Maize 11 0 mm 12 0 mm Blind sieve 4 5 mm 6 0 mm 15 10 12 Peas Without sieve...

Page 31: ...ention to local statutory accident prevention regulations Time related factors associated with the execution of the cleansing related and maintenance activities are calculated for single shift operati...

Page 32: ...ng container CAUTION The deawner could start and lead to hand injuries Pull the mains plug Undo both the screws at the side of the filling container Figure 21 Screws at the filling container Item Name...

Page 33: ...n is not necessary 8 3 Inspection interval and functional test Assembly Interval during single shift operation Normal functional tests w m j j 1 j 2 j LD Buttons and switches X Mains isolator plug soc...

Page 34: ...es Close the cover of the gear box A function of all assemblies in setting or manual mode The safety equipment for proper functioning If all the functions are error free the machine is handed over to...

Page 35: ...ated at the centre under the filling cup Specifications about dysfunctions of the motor and control unit and its causes can be obtained from the respective Operating Instructions of the manufacturer 1...

Page 36: ...11 2 Flow cup and bag holder As the usual collecting pans are not suitable for larger sample quantities another accessory is necessary for operating the sample cleaner with integrated feed hopper Fig...

Page 37: ...3115 6999 3 Grading sieve 4 Grading sieve 300 x 470 mm Item number Blind sieve 3115 6997 Triangularly stamped sieve 3115 9510 2 8 mm 3115 7067 3 0 mm 3115 7070 3 5 mm 3115 7076 4 5 mm 3115 7088 6 0 m...

Page 38: ...according to the local regulations and in accordance with the notes in the manufacturers safety data sheets 14 Glossary Aspiration is the suction of light weight impurities Deawner is a device for rem...

Page 39: ...of perforated metal plate Test process Figure 25 Diagram for selecting the hole widths to be tested Select about 40 sieve holes see diagram for 2 5 mm sieve with 29x11 holes 44 selected Position the s...

Page 40: ...sieves Technical requirements and testing Part 2 Test sieves of perforated metal plate Nominal hole width as embossed mm specified tolerance mm Actual hole widths 1 2 3 4 5 6 7 8 9 10 11 12 13 14 15...

Reviews: