background image

10

6. Maintenance 

6.1. Precautionary Measures During

Maintenance Work

Whenever working on the pump ensure the

motor cannot get switched on.
If necessary, remove pump from the system for
inspection. Before dismantling allow the pump
to cool down.

Only dismantle the pump as far is necessary to effect
repairs.

Use only alcohol or similar cleaning agents for cleaning.
Do not use solvents.

All bearings are encapsulated and are filled with long-life
lubricant. The valves and the diaphragms are wear parts. If
the rated ultimate vacuum is no longer achieved, the pump
interior, the diaphragms and the valves must be cleaned and
the diaphragms and valves must be checked for cracks or
other damage.
Depending on individual cases it may be efficient to check
and clean the pump heads on a regular basis.

Service life of the diaphragms and valves

If the pump is operated primarily in Low-speed mode, a life of
> 12,000 operating hours can be expected.
If the pump is operated primarily in High-speed mode, a life of
> 8,000 operating hours can be expected.

6.2. Cleaning And Replacing Valves And

Diaphram

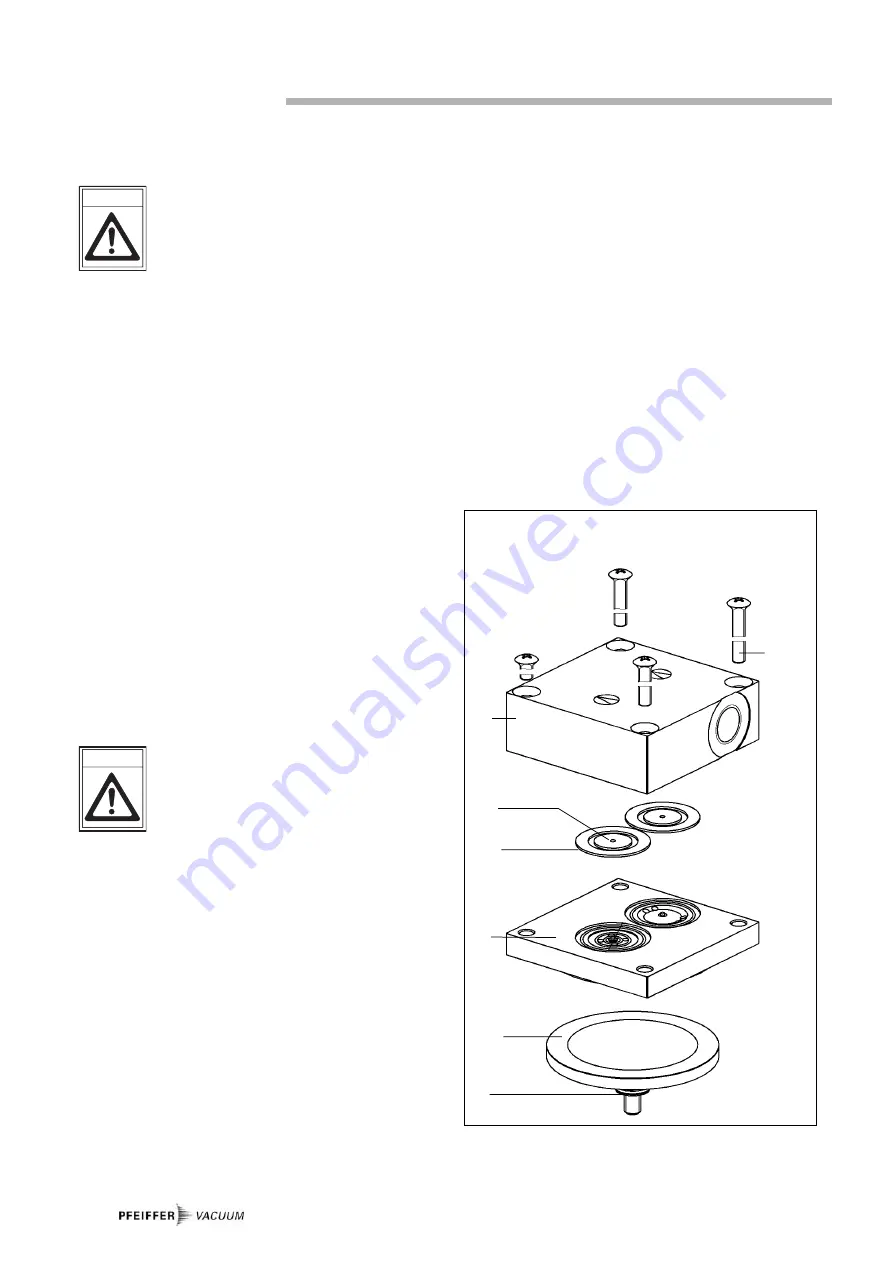
There can be different numbers of washers 17

in each membrane head. Ensure the correct
assignment for mounting when dismantling the
membrane heads. Don’t interchange the
washers 17.

Dismantling the pump

Allow the pump to cool down before dismantling.

Detach intake and exhaust line from the pump.

As far as possible place pump on its side so that the head
to be dismantled points up.

Use open-ended wrench SW 12 to remove fitting 10.1 at
the interhead connection 10 and remove connecting hose
one-sided.

Using an SW 3 key, unscrew the four crosshead screws 11
and remove head cover 12, taking care with the two valve
plates 13 and sealing rings 14.

Remove intermediate plate 15.

Use a small screwdriver to carefully ease out diaphragm
16 and manually unscrew from the connecting rod (right-
hand thread). Look out for possible washers 17.

CAUTION

CAUTION

Mounting the diaphragm heads

All parts should be cleaned only with alcohol or similar
cleaning agents. Please check diaphragm valves and seals
for mechanical damage and replace if necessary. In case
of diaphragm change please use the existing washers 17.
If the washers are missing the pump will not reach final
pressure.

Assemble all parts in reverse order. The connecting rod
should be positioned in the upper dead point when fitting
the diaphragm.

Screw in diaphragm and tighten by hand.

Check correct sealing ring 14 seating.

Assemble membrane heads, ensure correct positioning of
all parts; mind the markings at head cover, intermediate
plate and pump housing.

Re-make interhead connection 10 and re-tighten hose
fitting 10.1.

Test pump for function.

12

16

17

11

Crosshead screw

12

Head cover

13

Valve plate

14

Sealing ring

15

Intermediate plate

16

Diaphragm

17

Washer

Dismantling the diaphragm heads

13

14

15

11

Summary of Contents for MVP 006-4

Page 1: ...Diaphragm Pump PU 0034 BE B 0606 MVP 006 4 Betriebsanleitung Operating Instructions...

Page 2: ...The Pressure Side 6 3 4 Connecting To Power Supply 7 4 Operations 8 4 1 Important Information 8 4 2 Switching On The Pump 8 4 3 Select rotation speed control 8 4 4 Shutting Down The Pump 8 5 What To...

Page 3: ...instructions in the Service Section Due to the residual leak rate of the equipment there may be an exchange of gas albeit extremely slight between the environment and the vacuum system Adopt suitable...

Page 4: ...Pressure side Power supply connection Position numbers Identical components and accessories parts have the same position numbers in all illustrations Danger of damage to the pump or system CAUTION Da...

Page 5: ...d The pumping of gases which are contaminated with particles dust and condensate The Pump may not be used for the purpose of generating pressure The pumping of liquids Connection to pumps and units wh...

Page 6: ...between the vacuum system and pump as short as possible Ensure no mechanical forces act on the pump by a rigid piping system use elastic connections or bellows Connect pump with intake connection to...

Page 7: ...th pump base to frame potential as defined Stand alone operation with TPS 100 Connect power supply via connection cable PM 051 421 T with TPS 100 The pump starts immediately when the power unit is swi...

Page 8: ...alone operation In the the standalone operation mode the pump can be opera ted in two different modes High speed mode and Low speed mode To select the operating mode the DIP switch 2 on the control bo...

Page 9: ...at atmospheric pressure for condensate a few minutes Deposits have been formed Clean and inspect pump heads inside the pump Hose connectors between pump Check hose connectors between pump are leaky h...

Page 10: ...e dismantling Detach intake and exhaust line from the pump As far as possible place pump on its side so that the head to be dismantled points up Use open ended wrench SW 12 to remove fitting 10 1 at t...

Page 11: ...4 3 3 3 2 2 2 view B Ansicht A Ansicht B B 1 Dismantling the membrane heads 1 Membrane head 1 2 Membrane head 2 3 Membrane head 3 4 Membrane head 4 10 Interhead connection 10 1 Hose fitting 11 Crossh...

Page 12: ...nits which are contaminated microbiologically explo sively or radioactively cannot be accepted as a matter of principle Fill Out The Contamination Declaration In every case the Contamination Declarati...

Page 13: ...ssure mbar 1050 Permissible exhaust pressure mbar 1300 Leak rate mbar l s 6 10 2 Max operating altitude a s l m approx 1000 Ambient temperature range C 5 40 Emission sound pressure level at 1000 min 1...

Page 14: ...ch Come Into Contact With The Medium 1 TPS 100 Power supply unit for MVP 006 4 2 TPS 150 Power supply unit for MVP 006 4 TMH 071 TPD 011 Pos Description Pieces Size Number Comments Order Quantity Oper...

Page 15: ...he repair and or service of vacuum components will only be carried out if a correctly completed declaration has been submitted Non completion will result in delay The manufacturer could refuse to acce...

Page 16: ...WG entspricht We hereby certify that the product specified below is in accordance with the provision of EU Machinery Directive 98 37 EEC EU Electromagentic Compatibility Directive 89 336 EEC and EU Lo...

Page 17: ...17...

Page 18: ...9 0 64 41 8 02 2 02 info pfeiffer vacuum de www pfeiffer vacuum net Vacuum is nothing but everything to us Turbopumps Rotary vane pumps Roots pumps Dry compressing pumps Leak detectors Valves Componen...

Reviews: