12 - 7
Adjustment
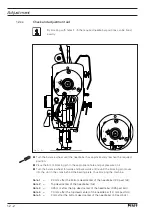
Fig. 12 - 06
2
1
7
7
6
5
3
4
●
Set the needle position adjustment lever
4
to
"
middle
"
and loosen screws
5
and
6
.
●
Run the machine slowly and turn the zigzag stitch adjustment lever
3
to the right until
the needle bar no longer moves laterally.
●
Turn the machine off. Move screw
5
to the right until it touches and then tighten it.
●
Loosen screws
7
and move scale
1
in accordance with
requirement
2
.
●
Tighten screws
7
.
Screw
6
remains loose for the following adjustment.
12
.05.05
Zero stitch and zigzag stitch scale
Requirement
With the zigzag stitch set at
"0"
:
1. the needle bar must not move laterally when the balancewheel is turned and
2. the marking
"0"
on scale
1
must be at marking
2
.
Summary of Contents for 3704-2/02
Page 28: ...8 4 Installation and commissioning 8 04 Table top cutout for the PFAFF 939 U ...
Page 115: ...14 3 91 191 477 95 Part 1 Version 05 11 03 Circuit diagrams PFAFF 939 U ...
Page 116: ...14 4 Circuit diagrams Version 05 11 03 91 191 477 95 Part 2 PFAFF 939 U ...
Page 117: ...14 5 91 191 477 95 Part 3 Version 05 11 03 Circuit diagrams PFAFF 939 U ...
Page 118: ...14 6 Circuit diagrams Version 03 09 04 91 191 487 95 Part 1 PFAFF 3704 ...
Page 119: ...14 7 91 191 487 95 Part 2 Version 03 09 04 Circuit diagrams PFAFF 3704 Fadenwischer ...
Page 120: ...14 8 Circuit diagrams Version 03 09 04 91 191 487 95 Part 3 PFAFF 3704 ...
Page 121: ...Notes ...


