


9 - 8
Setting up
9
.09.03
Applying fullness intermittently
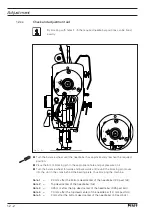
●
Turn adjustment wheel
1
as far as possible in the "
+
" direction.
●
Turn adjustment wheel
2
until "
0
" is at marking
3
.
●
Turn adjustment wheel
1
back until the desired level of fullness (green numbers) is
at marking
3
.
●
Adjust the stitch length (see
chapter 9.08 Adjusting the stitch length
).
The sum of the selected fullness level and the stitch length must not exceed
4.5
because more than this lessens the stitch length.
When the left pedal is in its neutral position, the machine works with the same
feed stroke for the main and differential feed dogs. When the left pedal is
operated, the fullness set on adjustment wheel
1
is worked into the bottom ma-
terial ply (see
Chapter 7.03 Pedal on the PFAFF 939 U
.
9
.09.04
Constantly stretch the top material ply.
●
Turn adjustment wheel
1
as far as possible in the "
+
" direction.
●
Turn adjustment wheel
2
until the desired level of stretch (red numbers) is at marking
3
.
●
Turn adjustment wheel
1
back until the same red number is at marking
3
.
●
Adjust the stitch length (see
chapter 9.08 Adjusting the stitch length
).
1
0
2
3
4
1
2
3
Fig. 9 - 11
Summary of Contents for 3704-2/02
Page 28: ...8 4 Installation and commissioning 8 04 Table top cutout for the PFAFF 939 U ...
Page 115: ...14 3 91 191 477 95 Part 1 Version 05 11 03 Circuit diagrams PFAFF 939 U ...
Page 116: ...14 4 Circuit diagrams Version 05 11 03 91 191 477 95 Part 2 PFAFF 939 U ...
Page 117: ...14 5 91 191 477 95 Part 3 Version 05 11 03 Circuit diagrams PFAFF 939 U ...
Page 118: ...14 6 Circuit diagrams Version 03 09 04 91 191 487 95 Part 1 PFAFF 3704 ...
Page 119: ...14 7 91 191 487 95 Part 2 Version 03 09 04 Circuit diagrams PFAFF 3704 Fadenwischer ...
Page 120: ...14 8 Circuit diagrams Version 03 09 04 91 191 487 95 Part 3 PFAFF 3704 ...
Page 121: ...Notes ...