background image

1-800-732-2677

12

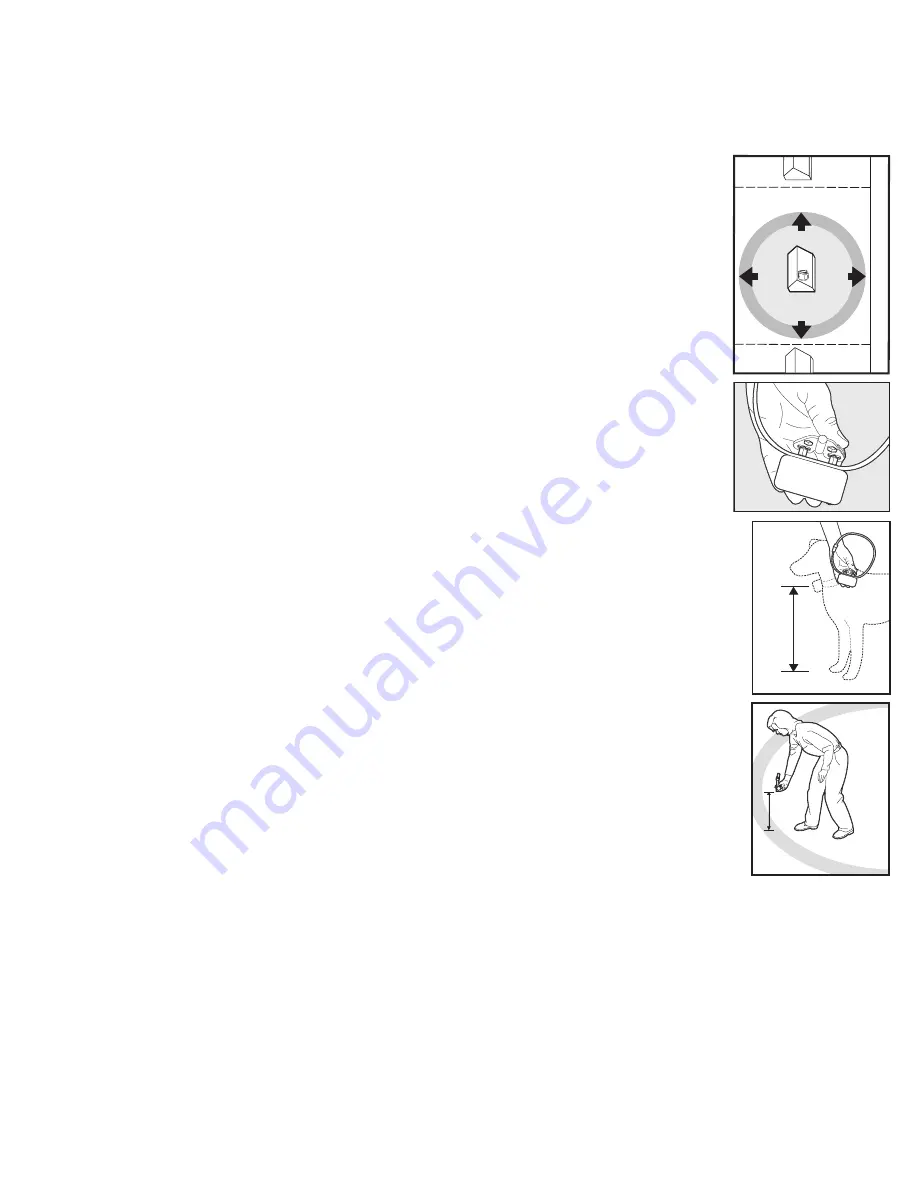
Step 3: Adjust the Pet Area to Desired Size

Make sure the entire Pet Area lies within your property boundaries (

3A

). Always start determining the 

Boundary Zone at the shortest distance from Transmitter. Place the Boundary Switch on “–” if the  

Boundary Zone will be less than 45 feet from the Transmitter.

Note: If your next-door neighbor has a containment system, see Troubleshooting section page 26.

Test Light Instructions

1. Make sure the Receiver Collar battery is properly installed.

2. Set the Correction Level to 2 or above.

3. Hold the Test Light Contacts to the Contact Points (

3B

).

4. Walk toward the Boundary Zone holding the Receiver collar at your pet’s neck  

level (

3C

) until the Test Light flashes (

3D

).

Save Test Light for future testing.

Note: If the Test Light does not flash, check the battery status by turning the receiver off, then 

on and verify the light is green. If the light is red install a new battery and re-test. If Test Light  

still does not flash, contact the Customer Care Center at 1-800-732-2677.

To maximize your Pet Area, make sure the Boundary Switch is on “+” and the  

Boundary Control Dial is set to “8”. Plug Power Adapter into Power Jack and  

standard 120-volt outlet. Turn the transmitter on.

Two-Person Method

Hold the Receiver Collar at your pet’s neck height (

3C

) with logo side facing away from 

the Transmitter and Contact Points facing upwards. Walk to the edge of the desired  

Pet Area. Facing away from the Transmitter, hold the Receiver Collar at the edge of  

the desired Pet Area (

3D

). 

Starting with the Boundary Control Dial set to “8”, have a second person turn the dial 

down SLOWLY. When the Receiver Collar tone starts, tell the person to stop turning  

the Boundary Control Dial. Walk back into the Pet Area until the receiver stops sounding. 

Verify the Pet Area boundary by walking towards the Boundary Zone and verifying that 

the tone/test light flashes begin at the desired location. Test at multiple locations around 

the Pet Area to verify the Pet Area is within your desired location. Record your settings 

below for future reference.

One-Person Method

Measure the shortest distance from the desired Boundary Zone to the Transmitter.  

Find the distance on the Transmitter Range Chart on page 13 and set the Boundary 

Switch and Boundary Control Dial. Hold the Test Light Contacts to the Contact Points 

(

3B

). Take the Receiver Collar to the Boundary Zone with the logo side facing away from 

the Transmitter and Contact Points facing upwards (

3C

). Hold the Receiver Collar at  

your pet’s neck level (

3D

) until the Receiver Collar tone sounds and the Test Light 

flashes. If the Receiver Collar tone sounds before or after the desired Boundary Zone, 

return to the Transmitter and adjust the Boundary Control Dial. Repeat this process until 

the Receiver Collar tone sounds at the desired location. Record your settings on page  

13 for future reference.

Pet

Area

STREET

3A

3B

3C

Bou

ndar

y Zone

Pet

Area

3D

Summary of Contents for PIF00-15001

Page 1: ...Operating and Training Guide Model Number PIF00 15001 PLEASE READ THIS ENTIRE GUIDE BEFORE BEGINNING FREETO ROAM WIRELESS FENCETM...

Page 2: ...1 800 732 2677 2...

Page 3: ...isit our website at www petsafe net or contact our Customer Care Center at 1 800 732 2677 To get the most protection out of your warranty please register your product within 30 days at www petsafe net...

Page 4: ...ection to remain in the boundary established It is important that you reinforce training with your pet on a regular basis Since the tolerance level to Static Correction varies from pet to pet Radio Sy...

Page 5: ...Uninterruptible Power Supply UPS for use with your wireless fence Should the power go out at your home your pet will be unprotected Power outages can be unpredictable and the use of a UPS will provide...

Page 6: ...ver Collar 14 Training Guide 16 Day 1 Boundary Awareness 17 Days 2 thru 4 Continue Boundary Awareness 17 Days 5 thru 8 Distraction Phase 18 Days 9 thru 14 Unleashed Supervision 19 Days 15 thru 30 Pet...

Page 7: ...apter Long Contact Points Test Light Tool Receiver Collar with Short Contact Points Mounting Bracket Mounting Screws Mounting Anchors Contact Point Wrench Other Items You May Need Scissors Lighter Scr...

Page 8: ...ture that will stop correcting after 15 seconds if your pet remains outside the Pet Area Receiver Collar Receives the radio signal from the Transmitter Mode Button Turns Receiver ON OFF and adjusts th...

Page 9: ...recesses are over the bracket hooks on both sides 6 Rotate transmitter up and push firmly until the top latch locks into place 1E To maximize your Pet Area make sure the Boundary Switch is on and the...

Page 10: ...you Turning the Receiver Collar ON Press and hold the Mode Button continuously for 5 seconds 2D The green or red Receiver Indicator Light will turn ON for 5 seconds 2E to indicate battery status foll...

Page 11: ...atic Correction being delivered up to 15 seconds Continuous green 10 seconds No Tone Over Correction Protection collar locked for 10 seconds Low Battery Status Slow blinking red every 4 to 5 seconds N...

Page 12: ...facing upwards Walk to the edge of the desired Pet Area Facing away from the Transmitter hold the Receiver Collar at the edge of the desired Pet Area 3D Starting with the Boundary Control Dial set to...

Page 13: ...Correction Level set at 2 or greater hold the Receiver Collar at your pet s neck height with logo side facing away from the Transmitter 2 Walk towards the Boundary Zone until the Receiver Collar tone...

Page 14: ...When using a separate collar for a lead don t put pressure on the electronic collar Wash the pet s neck area and the contacts of the collar weekly with a damp cloth Examine the contact area daily for...

Page 15: ...t Point and your pet s neck The fit should be snug but not constricting 5B a Allow your pet to wear the collar for several minutes then recheck the fit b Check the fit again as your pet becomes more c...

Page 16: ...ime with your pet in the Pet Area Common stress signals include Pet pulling on leash toward the house Ears tucked Tail down Body lowered Nervous frantic movement or stiffening of pet s body Your pet m...

Page 17: ...ndary Zone the Receiver Collar will begin to tone 1B Allow your pet to stay in the Boundary Zone for up to 2 seconds then gently help him back into the Pet Area 1C Immediately praise and offer your pe...

Page 18: ...y pieces of treats available hot dogs or lunch meat work well Have your pet s favorite play toy available Create distractions to tempt your pet to enter the Boundary Zone such as Have a family member...

Page 19: ...ter you are satisfied your pet s training is complete remove every other Boundary Flag every 4 days until all flags are removed Save Boundary Flags for future use Taking Your Pet Out of the Pet Area I...

Page 20: ...rter rated for 50 watts or more Accessories To purchase additional accessories for your PetSafe Free to Roam Wireless Fence system contact the Customer Care Center at 1 800 732 2677 or visit our websi...

Page 21: ...ive please consult your veterinarian or a certified trainer Can I use the Wireless System on a cat The Wireless System can be used as long as the cat can comfortably wear the Receiver Collar A nylon c...

Page 22: ...ter Troubleshooting The Receiver Collar tone is not sounding when setting up the Boundary Zone The tone may be difficult to hear in a noisy environment Use Test Light as explained in the Test Light In...

Page 23: ...er I was setting up the Pet Area and after I turned down the Boundary Control Dial the Receiver Collar would no longer tone or correct You may have turned the Boundary Control Dial down too quickly ca...

Page 24: ...igital device pursuant to Part 15 of the FCC Rules These limits are designed to provide reasonable protection against harmful interference when the equipment is operated in a residential environment T...

Page 25: ...in many regions check the regulations in your area before discarding spent batteries At the end of the product life please contact our Customer Care Center to receive instructions on proper disposal o...

Page 26: ...e that Radio Systems does not provide refunds replacements or upgrades for change of mind or for any other reason outside of these Warranty terms Claims Procedure Any claim made under this Warranty sh...

Page 27: ...www petsafe net 27...

Page 28: ...adio Systems Corporation 10427 PetSafe Way Knoxville TN 37932 1 800 732 2677 www petsafe net Protected by US Patents 6 879 300 6 921 089 7 142 167 and D515 027 400 1824 1 2015 Radio Systems Corporatio...

Reviews: