www.petsafe.net
www.petsafe.net
11
DE
IT
NL
ES
FR
EN
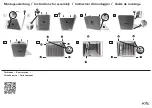
To Splice or Repair the Boundary Wire
If you need additional Boundary Wire to
expand your wire loop, you will need to splice
the wires together. Note the locations of all
splices for future reference. Most Boundary
Wire breaks occur at splices.
Strip approximately 1 cm of insulation off the
ends of the Boundary Wires to be spliced
(3D)
.
Make sure the copper Boundary Wire is not
corroded. If the Boundary Wire is corroded, cut
it back to expose clean copper wire.
Insert the stripped ends into the wire nut and
twist the wire nut around the wires. Ensure that
there is no copper exposed beyond the end of the wire nut. Tie a knot 7.5 cm - 10 cm from the wire nut
(3E)
. Ensure that the wire
nut is secure on the wire splice.
Once you have securely spliced the wires together, open the lid of the gel-filled splice capsule and insert the wire nut as
deeply as possible into the waterproof gel inside the capsule
(3F)
. Snap the lid of the capsule shut
(3G)
. For proper system
performance, the splice connection must be waterproof.
If your splice pulls loose, the entire system will fail. Make sure your splice is secure. Additional gel-filled splice capsules and wire
nuts are available through the Customer Care Centre.
Additional Boundary Wire
Extra direct burial Boundary Wire can be purchased in 150 m
spools at the store where you purchased the kit or through the
Customer Care Centre.
Note: When adding Boundary Wire, it must act as a continuous loop.
The table at right indicates the approximate length of Boundary Wire
needed for a square, Single Loop layout. Length will vary due to the
amount of twisted wire and layout used. Remember that a Double Loop
will require twice as much wire.
1
1 cm
1 cm
2
3D
3E
3F
3G
Area to be enclosed
Approximate wire
length required
Ares
Acres
Meters
10
1/4
127
13
1/3
146
20
1/2
180
40
1
255
80
2
360
200
5
570
400
10
854


