background image

76700  -40/94- 


13. [Confirm] Function check 1 

[Required equipment]   
SD card for adjustment 4pcs (FW for service, Data initialize, Test mode ON, Test mode OFF)


Regulated DC power supply (8V/3A), Circuit tester, DC code, AC adaptor, TV color monitor, Video cable, 
Top cover (0-A301), Bottom cover (A401), Lens for confirmation (FA 50mm F1.4),


13-1. Preparation 

* Prepare the following procedure for function check 
(1) Connect video cable to the TV monitor 
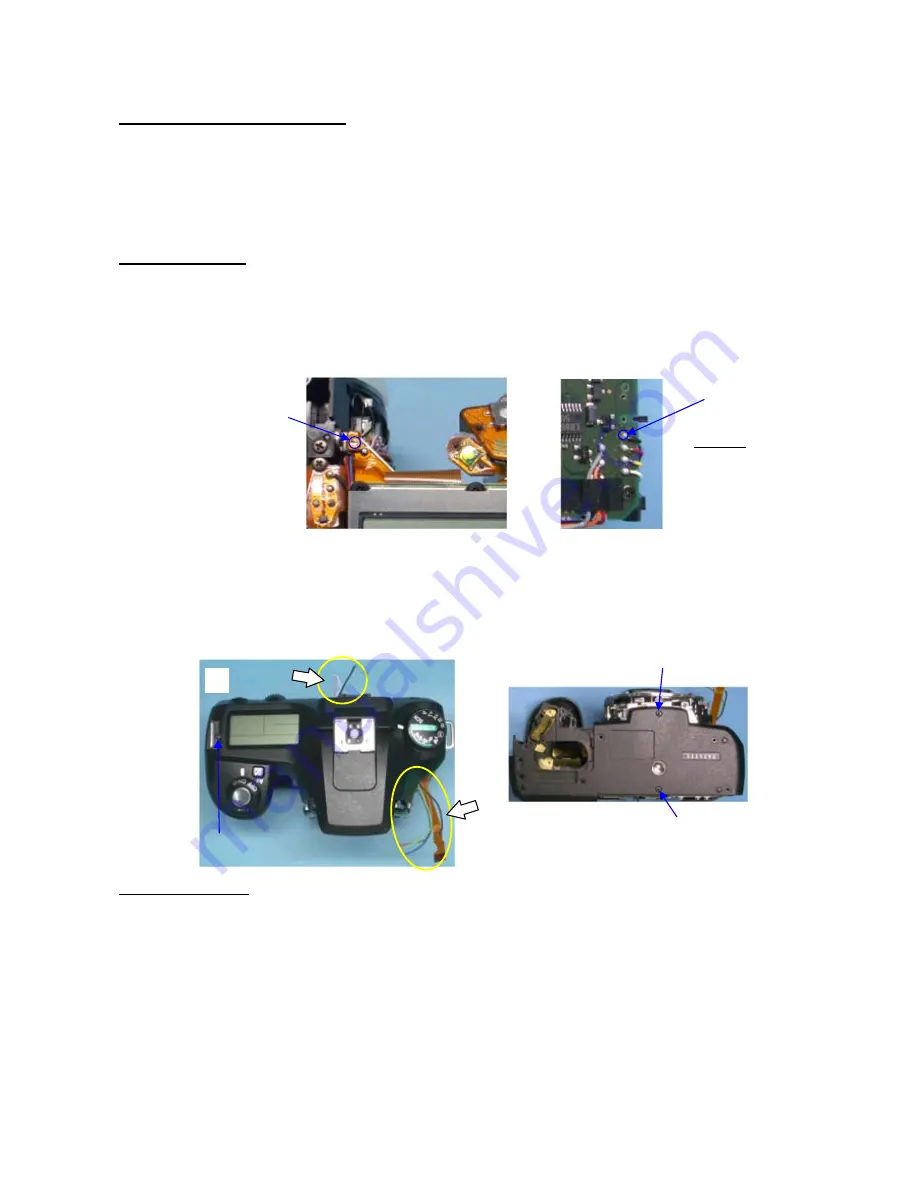
(2) Solder the Main SW land as shown figure.   
(3) Unsolder black lead wire (T10) on T100. 


(4) Arrenge lead wires (3+4) and flex from Top cover to outside of body as shown figure and temporary 

install Top cover by one screw.   

[Caution] Do not give too much foce to the top cover. Because Top cover hold by only one screw. 

(5) Temporary install bottom coverr by two screws.


13-2. power check 

(1) Connect DC cord to the Regulated DC power supply, set DC 6.5V (3A) 
(2) Connect DC cord to the camera 
With this condition, make sure there is a no short circuit or no battery leak 

[Caution] If there is overcurrent, disconnect the power immediately. 

With this condition battery current is:   
Momentary maximum battery current is approximately 120mA. 
Stable battery current battery current is approximately 4.5mA.   
(3) Disconnect DC cord from camera. 


Main SW

Land 

(2) 

(3) 

Black (T10)

Unsolder 

A73 
(TY 4.5mm) 

(4) 

(5)

A67 (5mm) 

A75 (1.8m) 

Summary of Contents for K 100D Super

Page 1: ...PENTAX Service Co Ltd Technical Service Dep Product No 76700 TM 仮サービスマニュアル TM TM ...

Page 2: ...dure of main body 31 FW FIRMWARE 79 1 Checking Firmware Version 79 2 Updating Firmware Version 1 80 3 Updating Firmware Version 2 81 TECHNICAL INFORMATION 82 Battery consumption current 82 Block diagram 83 Table of Error Code Digital adjustment 84 AE Program line and APEX chart ISO 200 85 Feature of K100D 86 INFORMATION OF JIGS TOOLS AND TESTERS FOR K100D 90 Jigs Tools and Testers 90 Method for ma...

Page 3: ...h test 3 For test mode ON 4 For test mode OFF 5 う nitialize 6 For data initialize 2 Installing procedure of the Adjustment Software Setting of the Computer 1 Copy the 76700_SLR folder from the Programmed software contained in the CD ROM to C drive as shown in the picture below Adjustment Software for SLR operation 2 Copy the 76700 folder from the Programmed software contained in the CD ROM to C dr...

Page 4: ...ction 3 Set up the VB run time If your computer is not installed VisualBasic software set up the VB run time is required as follow It is not required if the VisualBasic is already installed before istDL2 Procedure Set the 76700 adjustment program soft into the computer Execute the setup exe in the folder of vb6run_csx x x Install will start The Execute file and uninstall setting file will be gener...

Page 5: ...76700 4 94 Click OK Do not click Directory Click installation button ...

Page 6: ...76700 5 94 Set up will be started Click OK to end the installation ...

Page 7: ...ul attention to the connector terminals and flexible boards and we recommend marking to the flexible board before disconnecting them This will be helpful to reconnect the flexible board to the connector terminal properly 2 Flowchart for Assemble Adjustment and Confirmation page 2 ASSEMBLY AND DISASSEMBLY PROCEDURE OF FRONT HOUSING 19 1 FRONT HOUSING BLOCK 19 2 0 G100 19 3 M1 22 4 CONFIRM CHECKING ...

Page 8: ...T MODE 42 14 SR ADJUSTMENT I UNIT ADJUSTMENT 43 14 1 SETTING THE COMPUTER 43 14 2 PREPARATION 43 14 3 ADJUSTMENT ITEMS 43 14 4 ADJUSTMENT PROCEDURE 44 14 5 END PROCEDURE 46 14 6 RESET TEST MODE 46 15 A150 FRONT COVER 47 16 A201 REAR COVER 47 17 ADJUST POSITIONING 0 J100 49 18 0 A301 TOP COVER 50 19 A161 SIDE COVER 51 20 CONFIRM FUNCTION CHECK 2 52 20 1 PREPARATION 52 20 2 BATTERY CONSUMPTION CURRE...

Page 9: ...24 1 SETTING OF COMPUTER 64 24 2 SETTING THE CAMERA 64 24 3 ADJUSTMENT CONFIRMATION ITEMS 64 24 4 ADJUSTMENT PROCEDURE 65 24 5 PROCEDURE OF WDC ADJUSTMENT 68 24 SHUTTER SPEED ADJUSTMENT 1 4000 BY HISTOGRAM DISPLAY 69 24 1 PREPARATION 69 24 2 SETTING THE CAMERA 69 24 3 CHECKING PROCEDURE 69 24 4 ADJUSTMENT PROCEDURE 72 25 A401 BOTTOM COVER 72 26 CONFIRMATION FUNCTION CHECK FINAL 73 26 1 CONFIRMATIO...

Page 10: ...mera does not pop up the flash Use flash pop up tool as shown in figure 1 The same tool as MZ 7 Use telephone card and processes it as follow Fig 1 Remove A73 TY screw x2 4 5mm 2 A401 Bottom cover Unscrew A73 TY screw x3 4 5mm Unscrew A67 screw x3 5mm Unscrew A75 screw 1 7x1 8 Open the battery cover and then remove the battery cover and bottom cover Unhook A167 spring Caution There is strong magne...

Page 11: ...s inside the cover Remove A161 as shown figure bellow Discharger the main capacitor Discharge the main capacitor by using 100Ω 1kΩ resistor Discharge between Blue and Brown soldering land on Q200 4 0 A301 Top cover Unsolder 4 lead wires Blue Green Black Brown Q100 Peel off the BT 6x10 while holding flex board Disconnect T51 flex board from connector Frip lock connector 100 1kΩ Black Blue Green Bro...

Page 12: ...Inside of battery chamber Lift up top cover Unsolder 3 lead wires Pink Purple Black G119 A330 Remove the top cover 5 A150 Front cover Unsolder 4 lead wires Black Red Blue White 0 T950 Unscrew CNL D1 7x2 5 Take off fromt cover A150 When working on the camera put the mount cover to protect SI LED part Pink Purple Black A330 Black Red Blue White ...

Page 13: ...0 12 94 6 0 A201 Back cover Open the SD card cover Unscrew A74 TY screw x2 5 5mm Remove the terminal and lift up the back cover Disconnect 2 flex board from connector Unscrew CNL D 1 7x3 0 x2 Take off M311 ...

Page 14: ... Unsolder 4 lead wires Gray Orange Black Red S300 S250 Unsolder 4 lead wires Black Red Yellow White T10 N300 Unsolder 1 lead wire Gray I17 Peel off BT 6x15 from bottom side Disconnect J100 flex from connector Flip lock connector Disconnect T901 flex from connector Frip lock connector Unscrew CNL D 1 7x2 5 x2 Unscrew TY CNL D 1 7x3 5 x2 Red Black Black Red Black Red Yellow White Gray Orange Black R...

Page 15: ...is carried in the inside of a CCD SR block Caution Since performance can be damaged a CCD SR block cannot be disassembled and also don t apply the external pressure to a movable part Unscrew C45 Stainless steel screw x3 Remove CCD SR block 0 C000 Since it is sticking to a tripod seat it removes carefully 9 Exterior LCD block Unscrew CNL D 1 7x2 5 Unscrew TY CNL D 1 7x3 5 x2 LCD block 0 T100 ...

Page 16: ...block Unsolder lead 3 wires Black Unsolder 13 lead wires E000 G100 Unsolder 4 soldering lands T71 Unsolder 6 lead wires Q200 Unsolder 7 lands O170 Unsolder 6 lead wires T940 S300 Peel off A40 tape while holding flex board Unscrew TY CNL E 1 7x3 5 Black35mm Black65mm Black A105 Pink Skyblue White Green Black Orange Blue Gray Red Pink Purple Black Yellow Blue Green Pink White Skyblue Brown Yellow Gr...

Page 17: ... Av SW flex from double stick tape T200 separates 11 0 A3 Bottom plate assy Unscrew CNL D 1 7x2 5 x4 Remove 0 A51 Peel off 2 lead wires from DT Unscrew CNL D 1 7x1 8 Peel off A53 Unscrew TY CSM 1 7x4 0 Unscrew CNL E 1 7x2 2 x2 Unscrew TY CNL D 1 7x4 0 x2 Unscrew CNL D 1 7x2 5 x2 Remove 0 A3 ...

Page 18: ...141 13 A6 Left shoulder plate Unscrew TY CNL D 1 7x3 5 Inside battery box Unscrew TY CNL D 1 7x3 0 Remove A19 Unscrew TY CNL D 1 7x4 0 Unscrew TY CSM 1 7x4 0 x3 Unscrew CNL D 1 7x2 5 Remove A6 14 0 Q200 Flash PC board Unscrew TY CNL D 1 7x4 0 Unscrew CNL D 1 7x2 5 Remove A5 with A4 A15 Unscrew TY CNL D 1 7x4 0 x2 Remove 0 Q200 ...

Page 19: ...front housing block to mirror up position Unscrew TY CNM 2 0x5 0 x5 Remove main plate and battery chamber from front housing block 16 0 E000 Shutter block Unscrew A70 shoulder screw x3 Remove 0 E000 17 Main plate and battery chamber Unscrew TY CNL D 1 7x4 0 x2 Separate Main plate and battery chamber ...

Page 20: ...ont Housing Block A102 B41 M120 DT 4x15 B58 x2 B59 TY CNL G 1 7x2 0 0 B52 mirror sheet B66 shaft A screw lock SL and L115 are applied B63 B57 B62 spring Apply screw lock 2 0 G100 Apply G126 at 13 positions and apply L115 at one position Install B20 to B11 B11 Hook the spring to shaft of mirror sheet Note Caution for come off spring B19 B10 B21 G126 L115 Bond L115 SL L115 ...

Page 21: ...urface of cam B7 Apply G126 to surface of cam on both side Align the both hole of 0 B8 and B7 B3 B4 B5 B6 Turn B7 cloolwise until the arrow indicated in figure right Clean code plate by solvent and apply G151 Latch the lever of G100 while pushing down the sliding plate ...

Page 22: ...le 40 Red 80mm Black 80 Notice for Disassembly Set the mirror seat at top position before removing 0 G100 1 As shown in a figure a gear is turned and it sets to a mirror up position Caution Since there is no stopper B65 of a mirror don t carry out by turning on electricity to a mirror motor absolutely Mirror up Shutter charge lever 1 and mirror seat 2 and sliding plate 3 must be top end position 2...

Page 23: ... and sliding plate a must be moved smoothly and surely go up and down Set the mirror seat to the down position while applying DC1 5V Fine adjustment is possible when turn white gear at behind of G100 Mirror down mirror sliding lever shutter charge lever at down position White gear must be positioned as shown in figure Both mirror seats 1st and 2nd must be returned smoothly to the original position...

Page 24: ...21 A133 TY CNL F1 4x4 0 0 A126 and related parts Apply G134 as shown figure TY CNL D1 7x3 0 A105 Apply G134 as shown figure A110 0 A108 A104 TY CNS 2 0x4 5 Ni screw x5 Screw is bolted in the shape of a diagonal line G134 G134 ...

Page 25: ...touches the mirror without gap Tolerance X axis 15 Y axis 10 Positioning 2nd mirror Attach the mirror positioning scope and the 2nd mirror angle adjusting jig to the camea and then adjust the mirror angle while looking through the eyepiece lens Tolerance X axis 0 3mm Y axis 0 1mm Refer to below tolerance for positioning scope After adjustment is done apply the supper glue to both B58 Tolerance for...

Page 26: ... AF Joint stroke Required equipment Vernier calipers Set the AF lever to the AF position AF coupler 0 S300 must be projected from the mount surface by 1 2mm or more When the mount lock pin comes to the mount surface with depressing the mount lock lever the AF coupler must not be projected out of the mount surface Adjustment 0 A121 by turning an eccentric screw and apply the screw lock S364 0 S300 ...

Page 27: ...the hook portion M22 In the case of temporary adjustment Using with the M22 00G 0 45 Put the focusing screen L2 on the frame M4 and then push it back until it locks in place Super X Black Note of Disassembly 1 Three screws which hold M9 Penta cover are removed 2 The bond between M9 and three leg tips and penta sheets is removed and is removed together with penta mirror Caution Confirm there is nei...

Page 28: ...focus and parallax Required equipment 50mm lens Collimator Focus master lens Preparation 1 Adjust the diopter by the diopter adjustment lever 2 Set the AF mode switch to to MF position upper position 12 1 Parallax Caution Confirm that the Pentaprism must be installed securely Check Confirm there is neither gap nor an inclination at an upper and lower Right and left position 12 2 Viewfinder focus C...

Page 29: ...tion Do not stress to the lands of 0 O170 Apply DC3 5V to 0 O170 and confirm the positioning And lighting of SI LED 11points ADJ1 Loosen 2 screws and then adjust the position of 0 O170 Tighten 2 screws and then confirm the position again ADJ2 Turn adjusting screw to adjust fine adjustment for up and down position then confirm the position again After adjustment is done apply the screw lock to 4 po...

Page 30: ...wer supply 8V 3A DC cord 15 1 Preparation Connect the flex borad of 0 O100 to the jig As shown figure Apply 6 0 V to the jig Turn the main SW ON Turn the mode SW ON Indication of O100 display 15 2 Adjustment Confirmation Check whether the position of the display is straight Adjustment Loosen the screw and change the position After adjustment is done apply screw lock Caution 1 Remove the screw lock...

Page 31: ... agent to between the head of adjustment screws and washers 17 0 J100 M10 Set the diopter lever at end of left side and then install it 0 J100 M5 TY CNL G1 7x5 0 Temporary M7 There should be no dust Apply small amount of bond 18 0 T940 Set AF mode lever to AF Bottom side 0 T940 TY CNL D1 7x3 0 Caution Set AF SW to AF Bottom side when remove 0 T940 M125 Caution Disassembly 1 Set the Diopter lever t...

Page 32: ...nd battery seal 2 Attach Main body to the A13 3 TY CNL D1 7x4 0 x 2 2 0 E000 Shutter block 1 0 E000 Check there is no dust and scratch 2 A70 x3 sholder screw After install 0 E000 has a little movement A20 A12 A12 Gray Black TY CNL D 1 7x3 5 x3 A16 TY CNS2 0x4 5 Red White N300 A13 TY CNL B 1 4x3 0 Yellow Black T10 Super X Black x3 A14 TY CNL D1 7x3 5 Red 3 2 ...

Page 33: ...ousing Pay attention the lead wires and flex 4 TY CNM2 0x5 0 x5 5 Apply DC2V to the mirror motor and set mirror down position Caution Do not make scratch on the eyepiece lens while working 4 0 Q200 Flash PCB 1 0 Q200 Arrange the lead wires as shown figure Avoid pinching lead wire 2 TY CNL D1 7x4 0 x2 3 A5 A4 A15 Arrange Gray lead wire at the back 4 CNL D1 7x2 5 5 TY CNL D1 7x4 0 2 3 5 4 1 5 4 3 2 ...

Page 34: ...s and flex as shown figure 2 CNL D1 7x2 5 3 TY CSM1 7x4 0 x3 4 TY CNL D1 7x4 0 5 A19 6 TY CNL D1 7x3 0 7 TY CNL D1 7x3 5 In battery chamber 6 T901 Lower flex board 1 A141 2 TY CNL D1 7x3 5 3 T901 4 Solder 7 lands T301 5 Solder 13 lands M100 2 1 5 4 3 1 4 3 2 5 6 7 ...

Page 35: ...NL E1 7x2 2 Ni x2 5 TY CSM1 7x4 0 6 Attach A53 on plate 7 CNL D1 7x1 8 8 Attach two lead wires by DT as shown figure 9 0 A51 Avoid pinching lead wire 10 CNL D1 7x2 5 x4 8 T200 Upper flex block Put T200 on body while arrange the lead wires 1 Attach T200 main SW land Av SW flex by DT 2 TY CNL D1 4x2 5 x2 3 CNL D1 7x1 8 x5 8 7 3 6 5 4 10 9 1 1 2 2 3 2 3 ...

Page 36: ... 11 Solder 4 lands T71 12 Solder 13 lead wires E000 G100 Arrange as shown figur 13 Solder 3 black lead wires 9 O201 and other External LCD block 1 A17 2 BO2 0 Apply G134 3 A335 Apply G134 Connect LCD block 4 Connect O100 flex to connector flip lock 5 Connect T200flex to connector flip lock 9 10 Yellow Blue Green Pink White Skyblue 2 1 8 Brown Yellow Green Black Red Orange 7 6 5 4 13 Black35mm Blac...

Page 37: ...From 01 to 03 04 and later 13 and later Tolerance Only fot 76700 49 876 0 02 mm 49 676 0 02 49 640 0 02 49 610 0 02 Using Block gauge for 35mm 45 46mm 4 416 0 02 mm 4 396 4 436 mm 4 216 0 02 4 196 4 236 4 18 0 02 4 16 4 20 4 15 0 02 4 13 4 17 Height of Pillar Previous parts 0 New parts 0 2 New Parts 0 236 New parts 0 266 Shape of plate for 0 C000 Previous oarts counterbore 0 2 New parts No counter...

Page 38: ...s no dust no scratch on surface of CCD 1 Confirm Center plate must move up and down and right and left by own weight 2 Install CCD SR block according to the guide pin of the plate 3 C45 Screw Stainless steel x3 2 1 Caution When replacing 0 C000 1 Arrange the flex as shown figure Do not bend he flex 2 Peel off the tape attached on the buttom plate and replace new CCD ID No seal of C000 Number must ...

Page 39: ...act or drop Caution Solder 4 lead wires at T100 side and arrange read wairs 1 Connect CCD SR flex connector plig in type 2 Install 0 T100 while connecting T200 connector plig in type vertically Caution Do not pinch lead wire or flex 0 T100 2 1 3 A32 2 A33 DT18x18 1 A31 4 Solder 110mm Red 110 Green 105 Black 115 Orange 6 0 T970 7 M8 8 A226 10 T8 5 T979 9 Red Black Orange Green ...

Page 40: ...10 N300 9 4 lead wires Gray Orenge Black Red S300 S250 10 2 lead wires Black Red GND BATT 11 2 lead wires Red Black Q200 12 Fix J100 flex by A38 PT3 8x10 13 Arrange all read wires as shown figure then fix three positions by BT 6x15 14 Arrange read wires as shown figure and fix by BT 6x15 3 4 6 5 14 13 12 11 Red Black 13 10 Black Red 8 Black Red Yellow White 9 Gray Orange Black Red 7 Gray ...

Page 41: ...cover to outside of body as shown figure and temporary install Top cover by one screw Caution Do not give too much foce to the top cover Because Top cover hold by only one screw 5 Temporary install bottom coverr by two screws 13 2 power check 1 Connect DC cord to the Regulated DC power supply set DC 6 5V 3A 2 Connect DC cord to the camera With this condition make sure there is a no short circuit o...

Page 42: ...EEPROM data will be initialized Cleared Caution When replacing 0 T100 you must excute this initialization In other case す s not necessary to excute Data initialization 1 Install SD card For data initialization to the camera 2 Connect the ACadaptor Initialization will be started It takes approx 20 sec Caution Do not t す F the power 3 When monitor display is turn off WAIT COMPLETE disconnect the AC ...

Page 43: ...milarly when the aperture value Av is set in opening the middle and the minimum with the Av dial 13 7 AF function 1 Set lens A position to the camera and set the AF_SW to AF down position 2 The distance ring of the lens must turn between infinity and shortest distance end when the shutter button is depressed halfway while covering the front of lens with the palm 3 Confirm the operation of AF while...

Page 44: ...R1 す sensor sensitivity adjustment Positional detection gain adjustment To secure the resolution of the amount of the shaking correction the positional detection resolution of the hole sensor is adjusted in the maximum SR2 Movement range adjustment Correction range limit adjustment す The current greatly flows to the coil when the correction mechanism controls and attaching to the mechnical limit a...

Page 45: ...onfirm that the camera is recognized by computer hot plug icon 4 Click 76700 SR Operation Adjustment in the adjustment software folder 5 Adjustment screen will be displayed 6 Click Start to execute the program Do not give vibration to the camera while adjusting also do not even walk around the camera also 7 It is completed when the following screen display ...

Page 46: ...0 12 2 Gain_X over limit C0 block 12 3 Gain_YL over limit C0 block Hole gain adjustment 12 4 Gain_YR over limit C0 block 13 0 USB communication error 13 1 Range is too narrow Movement range adjustment 13 2 Center is over limit 14 0 Communication Error 14 1 Offset value is over limit Gyro offset adjustment 14 2 Gyro is unstable Error code First 2 number is for cheking item number And last number is...

Page 47: ...r of the camera OFF and click OK button on the screen 2 Click Exit button and finish the program soft 3 Disconnect AC adaptor USB cable 14 6 Removing Tempoarty installed part 1 Remove Tempoarty installed top cover and bottom cover 2 Unsolder main SW land T200 3 Solder black lead wire T10 Main SW Land 6 7 Black T10 Solder A73 TY 4 5mm 5 5 A67 5mm A75 1 8m ...

Page 48: ...ge lead wires as shown figure 16 A201 Back cover Befor installing A201 confirm installed condition for parts 1 Install M311 with engaging the Diopter adjustment lever 2 CNL D1 7x3 0 x2 3 Before installing A201 open the SD card cover 4 Connect two flex from back cover Slide lock 5 Install from terminal side of back cover 2 1 2 1 4 5 3 Black Red Blue White 4 ...

Page 49: ...76700 48 94 6 A74 TYscrew x2 5 5mm 7 Close SD card cover 6 7 ...

Page 50: ... FA 50mm f 1 4 Lens 3 The photo sensor must be positioned at the center of AF frame and there is no inclination as shown in the figure below 4 Adjustment Loosen the screw a little move M10 eccentricscrew to left side Turn M10 to adjust height of left side move 0 J100 to adjust whole position height and inclination Tighten screw and ensure position is not changed 5 After adjustment is completed app...

Page 51: ...W on T200 is not shorted by solder 3 Put top cover to body 4 Solder 3 lead wires Pink Purple Black 5 Pop up Flash for installing screw 6 Arrange 3 lead wires between body and top cover then attach top cover to the body without pinching lead wires 7 Connect T51 Flex Fold Excess Flex under Top cover 8 A73 TY screw x2 4 5mm 9 A73 TY screw 10 A74 TY screw x2 5 5mm 11 TY CNL D1 7x8 0 Battery chamber 8 ...

Page 52: ...ack Brown Q100 14 Arrange lead wires as shown figure 15 After install check the function of AE L button and Av button 19 A161 side cover 1 Set AF_SW to AF both of body and A161 Install from front as shown figure 2 A74 TY screw 5 5mm 3 A73 TY screw 4 5mm 4 A67 screw 5mm 5 CNL D1 7x2 5 12 A39 BT6x10 11 5 3 2 4 1 13 Black Blue Green Brown ...

Page 53: ...to the camera confirm the battery consumption current There must be neither short nor leakage 20 3 AF and SI Check 1 Attach the lens to the camera and set the AF_SW to AF 2 Check auto focus function while pressing the release button halfway 3 Confirm the display of SI Superimpose in the viewfinder 20 4 Exposure mode release function 1 Attach the lens to the camera and set the AF_SW to MF 2 Set the...

Page 54: ...cription Color display SWS Measure SW Change MODE Mode dial Code SWR Release SW MAIN Main SW Not in use AUTO PICT SCN Auto picture AP Scene mode 0A 02 PRV Preview SW Change P Program mode 04 FLPOP Pop up SW TV TV mode 0C POPUP Flash button AV AV mode 08 MENU Menu button M Manual mode 00 ERASE Delete button B Bulb mode 01 INFO INFO button Flash offAP Flash off mode 05 DISP Playback button Night PIC...

Page 55: ...e four way controller key and OK button 9 Turn the main SW to OFF and remove the SD card from the camera 20 7 Flash Check 1 The built in flash pops up when the flash button is pressed And must be appeared in the viewfinder and on the LCD panel when flash is fully charged 2 The flash must be discharged when taking a picture in low light condition 3 The built in flash must be retracted firmly when f...

Page 56: ...he power must be turned ON 21 ADJ Adjustment with Programmed Software SLR operation The adjustment method is same as istDL2 76670 CAUTION When the T100 is replaced should be follow this adjustment Required equipments Programmed software for 76700 for SLR operation Regulated DC power supply 8V 3A Battery adaptor AC adaptor D AC10 PC Windows2000 XP with USB port equipped Temporary bottom cover Hand ...

Page 57: ...osed Unconnect Op USB open start the communication with camera Same as USB Test in the menu bar Cl USB close Close the communication with camera same as USB Test in the menu bar p s Print screen Same function as key board ver Display F W Version end End of adjustment software m n Display menu screen Connect 76700 A Tool bar C Menu screen Adjust Check items Product number Menu bar B USB communicati...

Page 58: ...ut of AF sensor Focus offset adjust Adjustment of AF focus 4 Number of repairs Recording the number of repair 5 Same as above 1 6 Battery level adjust Adjustment of battery level 7 Shutter speed adjust Adjustment of high shutter speed 21 5 Adjustment procedure Turn the power of the camera Off and then install AC adaptor Suggest installing battery to avoid the Power supply interception Connect the ...

Page 59: ...ver1 5mm HD M1 5 AF master lens for 2m FA F 35 80mm F4 5 6 AF chart for 2m x2 Exclusive item FA Macro 50mmF2 8 2m AF chart have to be set as follows 1 Distance between chart and mount of camera 1 954 5mm 1 9545m 2 Chart should be set at perpendicularly against light axis of the lens CCD POSITION ADJUST ADJUSTMENT 1 Alpha CROSS Dump Start Adjustment Stop 2 Focus Start Next Stop Close When replaced ...

Page 60: ... screen When open and close the battery cover Pc will be displayed in the LCD panel of the camera Click Op and then start the correspond with camera Display will change to Press BC Adjust and execute the adjustment After finished the adjustment press Close button If the power turned ON again execute above 7 SHUTTER SPEED ADJUST Tools Reflection type of Shutter tester Select the shutter tester 1 40...

Page 61: ...ttom cover can stay for the next adjustment 22 Adj SR adjustment II Gain adjustment Caution1 Execute this adjustment when replaced T100 or C000 block Caution2 Do not give the camera the vibration when you adjust it Preparation Adjustment software for 76700 SR gain adjustment USB cable AC adaptor Personal computer Windows 2000 or XP which equipped USB port DA 50 200mm SR gain adjustment set Control...

Page 62: ...MF SR switch ON 4 Attach camera to the driving stage Driving stage must be the horizontal position 5 Set the camera 1 9545m from the chart and match the chart with frame of spot measurement in the view finder 22 4 Adjustment items SR4 Gain adjustment The adjustment that the amount of the correction becomes the best for an actual amount of the gap 防振ユニット 補正機構 補正量 手ブレ量 Chart P C SR Unit SR mechanism...

Page 63: ...ower of the camera ON and confirm that computer is recognized theUSB connection Turn the power of the controller ON Click SLR_SR_Gain116 exe in the folder of SLR_SR_Gain Adjustment screen display Match the chart with frame of spot measurement in the view finder Click Execute button and start the adjustment z Do not give the camera the vibration when you adjust it ...

Page 64: ... the adjustment Click Removing the hardware on the screen of PC Turn the power of the camera OFF and disconnect the AC adaptor USB cable from the camera If the adjustment is NG the following message display this case please check all the setting and execute the adjustment again ...

Page 65: ...ividual master lens Therefore use the same master lens as the ID number printed on CD to adjust it accurately Confirm CCD ID No when replace T100 or C000 23 1 Setting the computer 1 Copy the folder 76700 from the CD ROM into the Computer Log data will be created automatically whenever the camera is adjusted 23 2 Setting of K100D 1 Attach the master lens 76180 and Diaphragm set ring F8 to the camer...

Page 66: ...rd center of light window of LB3300 and then cover the whole camera by using a dark curtain and so on 6 Start the adjustment software CSAdjust exe Input ID number of master lens and then click OK button CAUTION The adjustment software ends compulsorily while indicating the following error message if ID number which is not correct is input and OK button is clicked In that case restart the adjustmen...

Page 67: ...ual ID Input CCD ID No 2 times Input ID No Press Execute button or Enter key Input ID No Press OK button or Enter key Adjustment process start 10 When select Auto Press Execute button or Enter key Adjustment process start When the following error window is displayed select Manual ID and input correct CCD ID No Manual ID ...

Page 68: ...low safe removal of hardware Turn off the camera and disconnect the camera Error massage The following display appear when the mode dial of the camera is not set on M If the error code display on the monitor check the list of error code in the technical information of this service manual Example error code 03 08 01 07 00 Pre Process Gain xx xx DSC Result Strange Data ...

Page 69: ...urn the main switch ON and then confirm that the camera is recognized as a Removable Disk under My Computer 4 Start the adjustment software WDC exe NOTE Lens ID number is not necessary 5 The following window will be displayed when the adjustment software is started 6 Execute the adjustment by clicking Execute button in the dialog box or push Enter key on the keyboard 7 When the screen changes as f...

Page 70: ...Setting the camera Setting the camera as follows Mode dial Manual exposure mode Focus lever MF WB Tungsten light ISO 200 Menu Capture Setting the Image Tone Natural Except istD Quality level Recorded Pixels Best 6M L Saturation Sharpness Contrast Standard Playback Quick view 5 Seconds Playback display Setting the Histogram display Custom Using aperture ring Set to disable shutter release when lens...

Page 71: ...re 5 images 9 Playback the image by histogram display and compare the peak position with standard data and then measure the difference mm on the monitor Caution Confirms it from the position of the front to the LCD monitor and do not make scratch on LCD monitor Example Minus side Plus side 10 Select the histogram zone A D of the peak position of Tv 4000 from the below In the case of above the hist...

Page 72: ...6 0 3 7 2 0 3 8 8 0 4 0 4 0 4 2 0 0 4 3 6 m S 6 5 7 0 7 5 8 0 8 5 9 0 9 5 1 0 0 A 0 3 2 7 0 3 3 4 0 3 4 0 0 3 4 6 0 3 5 3 0 3 5 9 0 3 6 6 0 3 7 2 B 0 3 6 8 0 3 7 7 0 3 8 7 0 3 9 6 0 4 0 6 0 4 1 5 0 4 2 5 0 4 3 4 C 0 4 1 0 0 4 2 3 0 4 3 6 0 4 4 9 0 4 6 2 0 4 7 4 0 4 8 7 0 5 0 0 D 0 4 5 2 0 4 6 8 0 4 8 4 0 5 0 0 0 5 1 6 0 5 3 2 0 5 4 8 0 5 6 4 m S 基 準 よ り 右 側 偏 差 m m ヒ ス ト グ ラ ム ゾ ー ン 基 準 よ り 右 側 偏 ...

Page 73: ...he data input screen and input 0 25 and finish the adjustment 5 After finish the adjustment execute the software adjustment and then disconnect the connection 6 Confirmation follow the above procedure 3 and 4 the shutter speed should be within 0 227mS 0 30 mS 1 4000 25 A401 Bottom cover A167 Spring Keep open the battery cover and then install Bottom cover A67 Screws x 3 5mm A75 Screw 1 7x1 8 A73 S...

Page 74: ...Required equipment Computer for Digital adjustment AC adaptor USB cable I USB17 SD Card for taking picture FA50mm F1 4 Light source LB 3300 color temperature must be calibrated 2850K 10 Image viewing software Adobe Photo shop Attach the lens FA50mm to the camera and set the aperture to the A position Set the camera as follows Image Natural Capture mode Program mode Metering Method Multi Segment me...

Page 75: ...l Color Space sRGB Default setting 3 Put the Color checker on the Gray chart as shown in the figure below 4 Light up the Color checker by the A light 5 Set the WB White Balance mode to Tungsten Light 6 Position the camera so that the Color Checker and Gray Chart are framed in the viewfinder as shown in the figure below while looking through the viewfinder 7 Take a picture of them while changing th...

Page 76: ...e mode AV Aperture priority mode Focus mode SW AF S Focus point Spot White Balance AWB Recorded pixels 6M Default setting Quality Level Best Color Saturation Normal Image Sharpness Normal Contrast Normal 3 Set the aperture to open position by Av dial of camera 4 Set the chart and scale as follows Lighten the chart so that the white portion of chart becomes EV12 or more If necessary settle the came...

Page 77: ...on Personal computer AC adaptor USB cable FA50mm lens SD card For test Application software PENTAX PHTO BrowserTM ACDSeeTM Adobe Photoshop Attach FA50mm lens to the camera and set aperture ring at A position Set the camera as follow Exposure Tv mode AF focus mode AF measurement Center AF S mode Drive mode Single AWB Fn menu Recording size 6M Set Tv15 1 15sec It is equal to approx 2 5 step The dist...

Page 78: ...5milli size camera Calculate the shutter speed of prevention for shaking as above For instance if the focal length is 200mm 1 200 x 1 5 1 300 Converts above shutter speed to two step down 1 300 1 150 1 75 It is equal to approx 1 80 Set Tv 80 or TV 90 and 1 2 EV step Follow the procedure of 27 6 Caution The effect of the shake reduction is influenced by the focal length of the lens and the object d...

Page 79: ...ar the position of dust with such as coordinate If you see dust clearly on image there is possibility that the dust enters into the inside of CCD Disassembly and cleaning or replace T600 Cleaning method of dust CAUTION 1 For safety use two type of power source for cleaning AC adapter and full capacity of battery 2 Do not use a brush less blower and a spray type blower to clean the CCD because ther...

Page 80: ...eared turn the main switch to OFF and remove the SD card from the camera 5 Initial Setting will be displayed on the LCD monitor when the main SW is turned ON 26 9 FW version up Version up latest FW if necessary Refer to FW Firmware FW Firmware Checking Firmware Version 1 Checking FW version for customer 1 Turn the main switch to ON while pressing MENU button The firmware version for customer VER x...

Page 81: ...he SD card cover must open until installation is completed 4 Turn the main switch to ON 5 FW version CPU DSP will be appeared on the LCD monitor as shown in the figure If you cancel the updating disconnect the all power at this point 6 Remove the SD card when the message EJECT SD CARD is appeared then starting updating It takes approx 60sec for loading firmware CAUTION Do not turn OFF the camera w...

Page 82: ... camera 2 Insert the SD card into the camera 3 Closes the SD card cover 4 Turn the main switch to ON while pressing MENU button 5 When program update screen is displayed as shown in figure Select YES by pressing the four way key then press OK Update will be started It takes approx 60sec for loading firmware CAUTION Do not turn OFF the camera while loading FW version for customer is displayed at th...

Page 83: ...mA 240mA 180mA 240mA 3 180mA 240mA Main SW ON Meter ON 370mA 420mA 4 370mA 420mA 5 Charging Flash Meter ON 2 100mA 2 200mA 6 Driving AF motor 2 200mA 2 300mA Releasing shutter 3 000mA 3 200mA 7 3 000mA 3 200mA 8 Recording image after release the shutter 350mA 350mA Bulb 1 200mA 1 200mA 9 1 200mA 1 200mA 10 Displaying menu LCD 500mA 450mA 11 Displaying menu Video output 400mA 350mA 12 Displaying pl...

Page 84: ...76700 83 94 Block diagram ...

Page 85: ...n 01 Wrong communication 03 Pre Process Gain 01 USB RS 232C 02 Not communicate 04 ISO Base Gain 00 Not found file 05 W Defect Compensation 01 Not accessed 02 Not correct format 03 Out of range 02 File 04 Out of range number 00 Out of range value 03 AP Parameter 01 Not correct format 04 AP Execution 00 Not supported 00 Not executed 05 DSC 01 Not correct 00 Not supported 01 Rejected 06 DSC Execution...

Page 86: ...76700 85 94 AE Program line normal and APEX chart ISO200 Standard program exposure mode DA F 3 5 5 6 18 55mm ...

Page 87: ...s left hand Fleming s left hand rule The Thumb represents F Thrust or resulting Motion The First finger represents B Field The Second finger represents I or V Current in the classical direction from positive to negative As a result photographers can capture sharp images at a shutter speed that is two stops slower e g 1 15 sec instead of 1 60 sec with a standard lens than would otherwise be possibl...

Page 88: ...in optical quality To provide optimal Shake Reduction the camera must know the focal length of the lens in use PENTAX F FA D FA and DA series lenses automatically relay focal length information to the camera With older lenses the PENTAX K100D allows users to manually input focal length information via the Shake Reduction menu which allows focal lengths all the way from 8mm to 800mm K100D SR Shake ...

Page 89: ...on With a total of approximately 210 000 pixels it also offers digital zooming of playback images up to 12 times for easy confirmation of the image s focusing status and details The large monitor size allows for large letters digits and icons on the menu screens to facilitate menu confirmation and camera operations In addition the color scheme between the menu listings and the background is optimi...

Page 90: ...tandard output sensitivity The K100D features an auto sensitivity control function which automatically sets the optimum standard output sensitivity up to 3200 which is the highest automatic setting in its class based on such data as the subject s brightness level and the lens focal length Since this function allows the use of higher shutter speeds in poor lighting situations such as indoor sports ...

Page 91: ...1 K284 Lead free solder No 95901 K286 Common in use with istDS 76450 istDL 76570 Battery adaptor for 76450 No 95901 D23 How to use a battery adapter and a temporary battery cover SD card 8 pcs For adjustment 7 pcs 8MB or more For test 1pcs 32MB or more 16MB No 95901 M99 Personal computer Windows 2000 or XP support USB Light source LB3300 No 95901 M86 A light color temperature 2 850K 10 brightness ...

Page 92: ...ng is required refer to the additional processing Mirror positioning scope No 95901 N49 Hexagonal driver 1 5mm HD M1 5 No 95901 K72 FA F 35 80mm F4 5 6 For AF adj D FA Macro 50mm F2 8 For AF adj FA 50mm F1 4 For checking Remote control F For checking Cable release swich CS 205 For checking Jig for flash pop up Hand made same as 27550 MZ 7 Hexagonal driver 0 9mm HD M0 9 For flash positioning adj No...

Page 93: ...ver as shown in figure 2 Method for making temporally battery cover For battery adaptor Preparation A412 battery cover Cut off part of battery cover as shown in figure 3 Processing is added to mirror angle adjusting jig for 27830 No 95901 J137 Cut off part of mirror angle adjusting jig for 27830 as shown in figure 3mm 28 6 28 3 9 11 20 1 7 5 32 φ7 ...

Page 94: ...76700 93 94 Chart for SR Gain adjustment 1 When print this chart print out the page with high quality setting 2 Size of the center of the chart should be 17 x 17mm ...

Page 95: ...onfirmation chart and scale This conformation is apply for service Scale for focus confirmation AF chart for confirmation C E B E A E 9 E 8 E 7 E 6 E 5 E 4 E 3 E 2 E 1 E 1 E 2 E 3 E 4 E 5 E 6 E 7 E 8 E 9 E A E B E C E ...

Reviews: