background image

12

Be
fore

 Us
ing
 Your Ca

m

e

ra

1

1

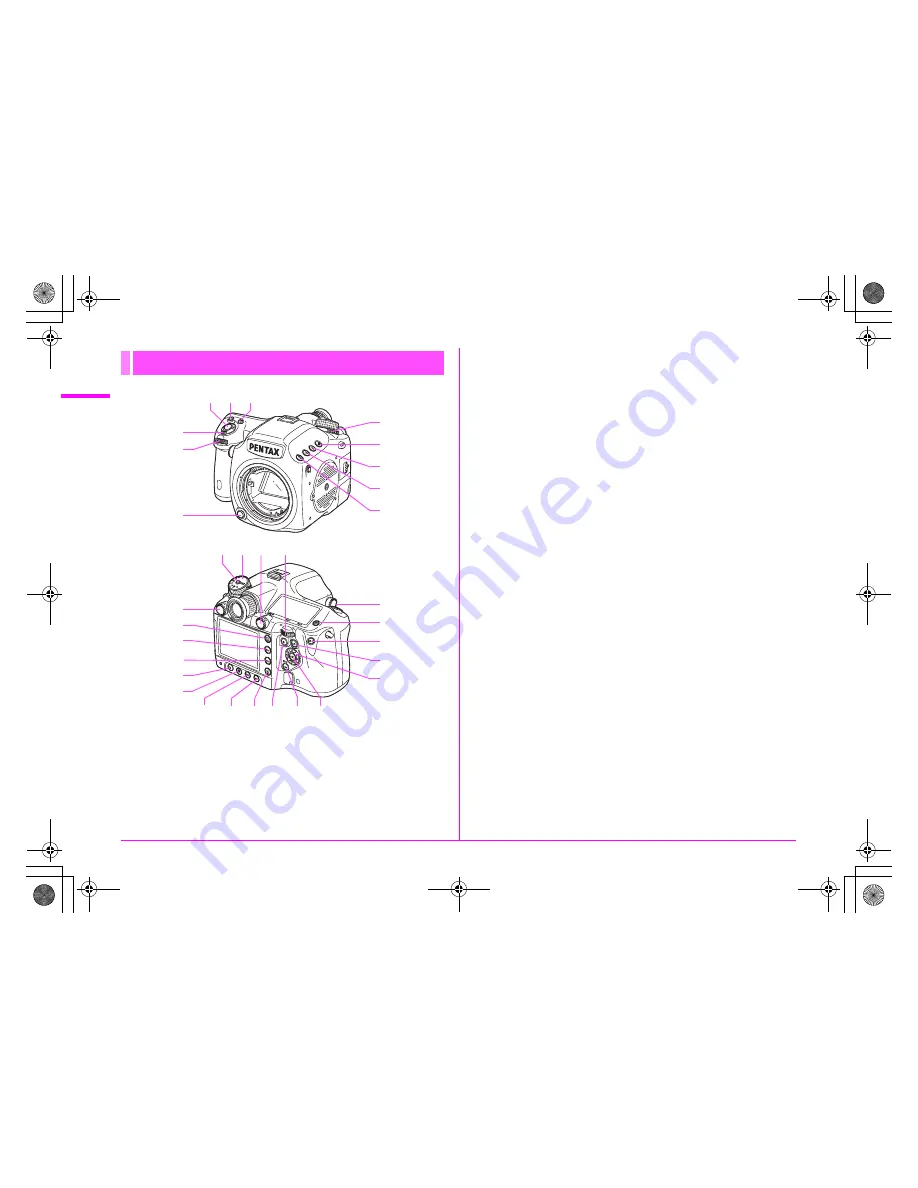
Shutter release button

Press to capture images. (p.37)
Press halfway during playback to switch to Capture mode.

2

o

 button

Turn the 

S

 dial while pressing this button to set the ISO 

sensitivity. (p.46)

3

m

 (EV Compensation) button

Turn the 

S

 dial while pressing this button to set the EV 

compensation value. (p.48)
Press to increase the magnification in enlarged view during 
playback. (p.67)

4

Main switch

Move to turn the power on/off (p.33) or to preview (p.61).

5

R

 (Front) e-dial

Changes setting values.
Displays the next or previous image during playback.
Switches between the menu categories when a menu is displayed. 
(p.40)

6

Lens unlock button

Press to detach a lens.

7

Metering mode switching lever

Switches between the metering modes. (p.45)

8

]

 (Exposure Bracketing) button

Sets exposure bracketing. (p.56)

9

x

 (SD2 quality level) button

Sets the file format for saving images to the SD Memory Card in 
the SD2 slot. (p.42)

0

w

 (SD1 quality level) button

Sets the file format for saving images to the SD Memory Card in 
the SD1 slot. (p.42)

a

|

 button

Temporarily changes the file format. Set the file format in the [

A

4] 

menu. (

z

p.R19)

b

Mode dial lock button

Press to allow the mode dial to be turned. (p.48)

c

Mode dial

Switches between the exposure modes. (p.48)

Buttons, Dials, and Levers

l
m
n
o
p

f
g
h

i

t

j
k

c d

b

u v

e

s

r

q

7

8

9

0

a

4
5

3

6

2

1

e_kb487.book  Page 12  Wednesday, December 8, 2010  9:49 AM

Summary of Contents for 645D

Page 1: ...ium Format Digital SLR Camera Operating Manual To ensure the best performance from your camera please read the operating manual before using the camera e_kb487 book Page i Wednesday December 8 2010 9 49 AM ...

Page 2: ...rporated in the United States and or other countries HDMI the HDMI logo and High Definition Multimedia Interface are trademarks or registered trademarks of HDMI Licensing LLC All other brands or product names are trademarks or registered trademarks of their respective companies This product supports PRINT Image Matching III PRINT Image Matching enabled digital still cameras printers and software h...

Page 3: ...condition the use of the camera may cause itching rashes or blisters In case of any abnormality stop using the camera and get medical attention immediately Warning Always use the battery charger and AC adapter exclusively developed for this product with the specified power and voltage Using a battery charger or AC adapter not exclusive to this product or using the exclusive battery charger or AC a...

Page 4: ...re the battery out of the reach of small children Placing it in their mouths may cause an electric shock If any leakage from the battery should come in contact with your eyes do not rub them Flush your eyes with clean water and get medical attention immediately Caution Only use the specified battery with this camera Use of other batteries may cause an explosion or fire Do not disassemble the batte...

Page 5: ...gh Do not subject the camera to strong vibrations shocks or pressure Use a cushion to protect the camera from vibrations of motorcycles automobiles or ships The temperature range for camera use is 10 C to 40 C 14 F to 104 F The monitor may appear black at high temperatures but will return to normal at normal temperatures The monitor may respond more slowly at low temperatures This is due to liquid...

Page 6: ...ecommended every one to two years to maintain high performance Refer to Precautions When Using the SD Memory Card p 32 regarding the SD Memory Card Please note that deleting images or formatting the SD Memory Cards does not completely erase the original data Deleted files can sometimes be recovered using commercially available software It is user s responsibility to ensure the privacy Cleaning You...

Page 7: ...rating Manual contains pages 1 to 103 Menu Reference Describes the functions that can be set when the 3 button is pressed and the product specifications After you read the Operating Manual and become familiar with the basic operations of your camera you can carry the Menu Reference with you as a handy reference guide The Menu Reference contains pages R1 to R48 1 Refer to another location within th...

Page 8: ...ge Eyecup 37 Testing Your Camera 37 Shooting 37 Playing Back Captured Images 38 How to Change Function Settings 38 Using the Direct Keys 38 Using the Control Panel 39 Using the Menus 40 3 Shooting Functions 41 Setting the File Format and Data Saving Method 42 File Format 42 JPEG Recorded Pixels Quality Level 43 Focusing 44 Selecting the Focus Mode 44 AF Point Switching 44 Exposure Setting 45 Selec...

Page 9: ...es 72 Protecting Images 73 Rotating Images 74 Changing the Image Size 75 Resizing Images 75 Cropping Images 75 Digital Filters 76 Applying the Digital Filter 76 Recreating Filter Effects 77 Searching for the Original Image 77 DPOF Settings 78 Connecting the Camera to AV Equipment 79 5 Using a Computer 81 Connecting to a Computer 82 System Requirements 82 Connecting Your Camera to a Computer 83 Usi...

Page 10: ...MEMO 8 e_kb487 book Page 8 Wednesday December 8 2010 9 49 AM ...

Page 11: ...1 Before Using Your Camera Checking the Contents of the Package 10 Names and Functions of Working Parts 11 Display Indicators 14 e_kb487 book Page 9 Wednesday December 8 2010 9 49 AM ...

Page 12: ...nc socket 2P cap Installed on camera Standard eyecup Installed on camera Large eyecup 645 O EC107 Body mount cap 645 Installed on camera Triangular ring and protective cover Installed on camera Strap O ST107 USB cable I USB107 Rechargeable lithium ion battery D LI90 Battery charger D BC90 AC plug cord Software CD ROM S SW107 Operating Manual this book Menu Reference e_kb487 book Page 10 Wednesday ...

Page 13: ...ipod socket AF coupler Lens mount index Self timer lamp Remote control receiver Mirror Lens unlock button Diopter adjustment ring Viewfinder Monitor Card access lamp Cable switch terminal Battery cover unlock knob Battery cover Image plane CCD plane indicator Tripod socket Video terminal Mini jack DC input terminal Strap lug Remote control receiver LCD panel mini HDMI terminal Type C SD1 slot USB ...

Page 14: ...categories when a menu is displayed p 40 6 Lens unlock button Press to detach a lens 7 Metering mode switching lever Switches between the metering modes p 45 8 Exposure Bracketing button Sets exposure bracketing p 56 9 x SD2 quality level button Sets the file format for saving images to the SD Memory Card in the SD2 slot p 42 0 w SD1 quality level button Sets the file format for saving images to t...

Page 15: ... n L button Locks the exposure p 49 Saves the preview image when setting White Balance or Custom Image p 50 p 62 o button Operates in the same way as when pressing the shutter release button halfway and temporarily provides manual focus p 44 z p R31 p 2345 Four way controller keys When the control panel or menu is displayed use these keys to move the cursor or change items When the AF point switch...

Page 16: ...perations You can operate both a button and e dial such as m and S or and R to change the settings using either of the following methods Hereafter this Operating Manual explains by using the Turn the dial while pressing the button operation Operation Confirming the Setting Turn the dial while pressing the button Take your finger off the button Press the button take you finger off the button and th...

Page 17: ...FT AF S 1 ISO AUTO 2000 1600 2 8 1 0 G1A1 RAW M UP C L JPEG F 1 1 2 2 3 3 4 4 5 5 AWB 2 456 1 123 L WB 1 Exposure Mode p 47 2 AE lock p 49 3 Mirror Up p 55 4 Copyright Information embedded z p R27 5 AF mode p 44 6 Metering mode p 45 7 Battery level p 29 8 e dial guide 9 Shutter speed 10 Aperture value 11 ISO ISO AUTO 12 Sensitivity p 46 13 Exposure Bracketing p 56 Multi exposure p 55 HDR Capture z...

Page 18: ...maining image storage capacity 12 SD2 Image File Format JPEG Recorded Pixels JPEG Quality Remaining image storage capacity 13 Current date and time 1 2 13 3 4 5 6 7 8 9 10 11 12 456 123 05 05 10 ISO AUTO Adjustment On 10 30AM HDR HDR OFF OFF WB DR DR 200 200 ISO AUTO RAW L JPEG L 1 2 Vertical Display When the camera is rotated to the vertical position with the meter operating timer turned on the s...

Page 19: ...s session The information display type differs depending on the setting of Memory in the A4 menu z p R20 You can set whether to display the Bright Dark Area warning with Playback Display Method in the Q1 menu z p R22 Horizontally and vertically level green Tilted 1 5 to the left yellow Vertically level green Outside horizontal level display red Tilted 5 up yellow Horizontally level green Outside v...

Page 20: ...6 Flash Mode 7 Metering mode 8 Focal length 9 Shutter speed 10 Drive Mode 11 Highlight Correction 12 Shadow Correction 13 Distortion Correction 14 Lateral Chromatic Aberration Adjustment 15 Aperture value 16 EV Compensation 17 Flash Exposure Compensation 18 Sensitivity 19 White Balance 20 White Balance fine tuning 21 SD1 Image File Format JPEG Recorded Pixels JPEG Quality Protect 22 SD2 Image File...

Page 21: ...ightness histogram 2 Color Space 3 Shutter speed 4 Aperture value 5 Protect setting 6 Folder number File number 7 Switch Brightness histogram RGB histogram 8 R histogram 9 G histogram 10 B histogram 2000 F5 6 100 0001 1 2000 F5 6 100 0001 1 1 2 RAW RAW JPEG JPEG 5 4 6 3 4 5 6 3 2 8 9 10 7 1 1 Brightness histogram RGB histogram 2 3 2 3 e_kb487 book Page 19 Wednesday December 8 2010 9 49 AM ...

Page 22: ...when the value can be adjusted 7 Aperture value Underlined when the value can be adjusted 1 4 11 12 13 12 13 14 15 10 2 1 1 1 3 5 6 7 8 9 8 ISO ISO AUTO Appears when the sensitivity is displayed 9 Sensitivity Underlined when the value can be adjusted Displays the number of recordable images immediately after shooting Max display is 999 When Electronic Level Disp is set to O Displays the difference...

Page 23: ...osure is set that value blinks Electronic Level Display Displays the camera angle when Electronic Level Disp in the A3 menu is set to O z p R19 When level at 0 When tilted 5 to the left When held vertically and tilted 3 to the right e_kb487 book Page 21 Wednesday December 8 2010 9 49 AM ...

Page 24: ... Format JPEG Recorded Pixels JPEG Quality p 42 1 RAW capture 1P RAW JPEG capture 13 SD1 Image File Format JPEG Recorded Pixels JPEG Quality p 42 14 e dials Appears when the adjustment is available 15 ISO ISO AUTO Appears when the sensitivity is displayed 16 Sensitivity EV compensation value 17 Copyright Information embedded z p R27 18 Interval Shooting p 54 19 Auto Bracketing Blinks when used toge...

Page 25: ...taching the Lens 24 Using the Battery 28 Inserting Removing the SD Memory Card 31 Power 33 Initial Settings 34 Diopter Adjustment 37 Testing Your Camera 37 How to Change Function Settings 38 e_kb487 book Page 23 Wednesday December 8 2010 9 49 AM ...

Page 26: ...amera is turned off 2 Remove the body mount cap 1 and lens mount cap 2 Hold down the lens unlock button 3 and remove the body mount cap 3 Align the Lens mount index red dots 4 on the camera and the lens and turn the lens clockwise Do not press the lens unlock button at this time 4 Remove the front lens cap by pushing the indicated portions e_kb487 book Page 24 Wednesday December 8 2010 9 49 AM ...

Page 27: ...25 Getting Started 2 To detach the lens hold down the lens unlock button and turn the lens counterclockwise e_kb487 book Page 25 Wednesday December 8 2010 9 49 AM ...

Page 28: ...will differ when using Rear converter A645 1 4 with a lens other than A 645 300mm F4 or FA 645 300mm F4 Displaying the lens aperture value as is indicated on the lens FA645 300mm F5 6 FA645 400mm F5 6 A 645 600mm F5 6 Displaying the maximum effective aperture value when combined with a lens A645 200mm F4 FA645 200mm F4 A 645 300mm F4 FA 645 300mm F4 A645 macro 120mm F4 FA645 macro 120mm F4 Display...

Page 29: ...er 2s delay is set switches the shooting mode to Single Frame Shooting Setting the shutter speed ring to LS when Remote Control 3s delay or Remote Continuous Shooting is set switches the shooting mode to Remote Control Mirror lock up shooting is not available Setting the shutter speed ring to LS when the mirror is raised lowers the mirror The shutter cannot be released when the shutter speed ring ...

Page 30: ...he battery charger but the indicator lamp is not lit the battery is faulty Use a new battery in the camera Memo The maximum charging time is approximately 390 minutes Charge in a location where the temperature is between 0 C and 40 C If usage time is reduced the battery has reached the end of its usage span Use a new battery in the camera Caution Do not open the battery cover or remove the battery...

Page 31: ...o The displayed battery level may not be correct when the camera is used at low temperatures or when performing continuous shooting for long periods of time Battery performance decreases at low temperatures When using the camera in cold climates keep the battery warm in your pocket Battery performance will return to normal when returned to room temperature The battery level is not displayed when u...

Page 32: ... plug cord to the AC adapter and then plug the AC plug cord into the power outlet Memo Make sure the camera is turned off before connecting or disconnecting the AC adapter Make sure that all the terminals are securely connected The SD Memory Card and data may become corrupted if the connection is dropped while the camera is accessing the SD Memory Card The battery in your camera will not charge wh...

Page 33: ... 3 Insert the card all the way into the SD1 or SD2 slot with the SD Memory Card label facing toward the monitor Insert an SD Memory Card into one or both of the SD1 and SD2 slots To remove the SD Memory Card push the card in again 4 Close the card cover and then slide it in the opposite direction of the arrow 1 Caution Be sure to fully close the card cover The camera will not turn on if the card c...

Page 34: ...ed in the following circumstances We do not accept any liability for data that are deleted if 1 the SD Memory Card is mishandled by the user 2 the SD Memory Card is exposed to static electricity or electrical interference 3 the SD Memory Card has not been used for a long time 4 the SD Memory Card or the battery is removed while the card is being accessed If it is not used for a long time the data ...

Page 35: ... any operations within a set period of time Auto Power Off To reactivate the camera after it turns off automatically turn it on again or perform any of the following Press the shutter release button halfway Press the Q button 3 button or M button By default the camera is set to power off automatically after 1 minute of inactivity You can change the setting in Auto Power Off in the R3 menu z p R27 ...

Page 36: ...turns to the Initial Setting screen 7 Press the 3 key The cursor moves to Text Size 8 Press the 5 key use the 23 keys to select Standard or Large and press the 4 button Selecting Large increases the text size of the selected menu item 9 Press the 3 key to select Settings complete and press the 4 button The Date Adjustment screen appears Memo You can select from 75 cities for the hometown and desti...

Page 37: ...es between am and pm depending on the time 7 Select Settings complete and press the 4 button The status screen is displayed and the camera switches to Capture mode The seconds value is set to 0 seconds when the 4 button is pressed Memo Pressing the 3 button while setting the date and time cancels the settings and switches the camera to Capture mode The Initial Setting screen or the Date Adjustment...

Page 38: ... to select the card to format and press the 4 button You cannot select a card when either one of the cards is locked or not inserted 5 Press the 2 key to select Format and press the 4 button Formatting starts When formatting is completed the camera returns to Capture mode Formatting an SD Memory Card JPEG JPEG L Exit MENU 1 2 3 4 SD1 Image File Format SD2 Image File Format JPEG Recorded Pixels JPE...

Page 39: ...covering over the standard eyecup Testing Your Camera Take some test pictures to familiarize yourself with the camera 1 View the subject through the viewfinder and press the shutter release button The picture is taken The image appears for 1 second default setting on the monitor shortly after capturing Instant Review Available operations during Instant Review Memo You can set the Instant Review di...

Page 40: ... p 81 How to Change Function Settings Function settings can be changed using the direct keys control panel or menus Some functions can be changed using both the control panel and menus This section explains the basic ways to change function settings You can use the direct keys in Capture mode to directly set functions The following explains how to set the flash mode as an example 1 Press the E but...

Page 41: ...R S dials to change the setting Press the 4 button to display the detailed setting screen for the selected item For some items such as Extended Bracketing you can make more detailed settings from the detailed setting screen 4 Press the M button The camera switches to Capture mode Using the Control Panel Flash Mode Flash On Cancel OK OK MENU 0 0 456 123 05 05 10 ISO AUTO Adjustment On 10 30AM HDR H...

Page 42: ...item and press the 4 button The camera returns to the menu screen Next set other items Press the 3 button to exit the menu and return to the screen that was displayed before the menu was selected Caution Your settings may not be saved if the camera is turned off improperly such as by removing the battery while the camera is on Memo Refer to Menu Reference for details on each menu A Rec Mode Menu z...

Page 43: ...tting the File Format and Data Saving Method 42 Focusing 44 Exposure Setting 45 White Balance 50 Drive Mode 53 Auto Bracketing 56 Flash Mode 58 Preview 61 Custom Image 62 e_kb487 book Page 41 Wednesday December 8 2010 9 49 AM ...

Page 44: ...res images in RAW format After shooting use RAW Development p 72 or the provided PENTAX Digital Camera Utility 4 software for RAW image development p 84 RAW Captures images in both RAW and JPEG formats and saves them to one card RESERVE When either of SD Memory Cards becomes full images are saved to the other one in the same file format If an SD Memory Card which is not set to RESERVE becomes full...

Page 45: ...nd in the viewfinder p 20 When JPEG is selected as the file format set the recorded pixels and quality level C Best D Better and E Good This does not have to be set when RAW is selected as the file format Set the recorded pixels for M and S with 35 M and S Pixel Resolution in the A5 menu z p R35 1 Turn the R dial while pressing the w x button The setting changes in the following sequence LC defaul...

Page 46: ... in the viewfinder Superimpose AF Area Selecting the Focus Mode l Autofocus Single mode Locks the focus at the position where the subject is in focus A k Autofocus Continuous mode Continuously adjusts the focus to keep the subject in focus The shutter can be released even if autofocus does not work The camera automatically tracks the subject if the subject is determined to be a moving object durin...

Page 47: ...ging of the AF point in Step 2 is canceled The main switch is turned off The AF point switching dial is turned The mode dial is turned The Q or 3 button is pressed When the camera is used with the A645 mount lens an intermediate ring or other accessory the focus area is always set to U Exposure Setting 1 Turn the metering mode switching lever The set metering mode is displayed in the viewfinder an...

Page 48: ...itivity adjustment with ISO AUTO Adjustment in the A1 menu or on the control panel z p R14 You can set the sensitivity in increments of 1 EV or in accordance with the EV step setting for exposure It can be set with 2 Sensitivity Steps in the A1 menu z p R30 You can expand the sensitivity range to ISO 100 to 1600 with 3 Expanded Sensitivity in the A1 menu z p R30 You can reduce noise at high sensit...

Page 49: ...ity Priority You can set the desired sensitivity z Other than AUTO b Shutter Priority You can set the desired shutter speed z z z c Aperture Priority You can set the desired aperture value z z z L Shutter Aperture Priority Automatically sets the sensitivity according to the set shutter speed and aperture value z z z AUTO only a Hyper manual You can set all settings z z z Other than AUTO p Bulb Bul...

Page 50: ... during compensation Press the button while pressing the m button to return to 0 0 Memo Set the EV steps with 1 EV Steps in the A1 menu z p R30 Mode dial lock button M AF S 1 ISO 125 200 5 6 RAW L JPEG F 1 1 2 2 3 3 4 4 5 5 AWB 2 456 1 123 L EV Compensation EV Compensation for a and M modes If you set the EV compensation to a positive value for a and M modes underexposure is displayed on the EV ba...

Page 51: ...value AE lock is not available in p or M mode When any of the following operations are performed AE lock is canceled The L button is pressed again The Q button 3 button or M button is pressed The mode dial is turned The metering mode switching lever is turned The lens is changed The lens with an aperture s position is set to the s position or is switched to another position When using a zoom lens ...

Page 52: ... Fluorescent Light Daylight Color N Fluorescent Light Daylight White W Fluorescent Light Cool White L Fluorescent Light Warm White Approx 6 500K Approx 5 000K Approx 4 200K Approx 3 000K I Tungsten Light Approx 2 850K L Flash Approx 5 400K f Color Temperature Enhancement K Manual 1 3 Approx 2 500 to 10 000K K Color Temperature 1 3 Main switch Displays the background image with Digital Preview L bu...

Page 53: ...l white balance settings 1 Select K in the White Balance screen and press the 5 key 2 Use the 23 keys to select K1 K2 or K3 and press the 5 key 3 Aim the camera at the subject to measure the white balance and press the shutter release button fully 4 Use the S dial to select the entire screen or spot area for the measuring range When a spot area is selected use the 2345 keys to move the frame to th...

Page 54: ...k mode display the image with the white balance setting you want to copy 2 Select K Save as Manual WB in the playback mode palette The save confirmation screen appears 3 Select K1 K2 or K3 and press the 4 button The white balance setting of the selected image is saved to Manual White Balance and the camera switches to Capture mode Caution The fine tuned white balance value used when shooting is re...

Page 55: ... a drive mode With Continuous Shooting you can shoot at a maximum speed of 1 1 frames per second The number of frames that can be shot continuously varies depending on the number of recorded pixels quality level and other settings 1 Select j in the Drive Mode screen and press the 4 button Continuous Shooting Drive Mode Continuous Shooting Cancel OK OK MENU e_kb487 book Page 53 Wednesday December 8...

Page 56: ...When using the Remote Control Waterproof O RC1 you can use the S button on the remote control to enable autofocus By specifying the shooting time and interval you can capture up to 999 images with Interval Shooting Set this in the A2 menu z p R17 Caution Interval Shooting is not available when the exposure mode is set to p or when Extended Bracketing or HDR Capture is set Self timer Shooting g Shu...

Page 57: ...a is ready to raise the mirror 2 Press the shutter release button fully The mirror is raised 3 Press the shutter release button fully again The picture is taken and the mirror is lowered To exit mirror lock up shooting return the d dial to its original position Memo The mirror will be lowered automatically about one minute after being raised Caution Turning the mode dial or adjusting the lens aper...

Page 58: ...aken continuously while the shutter release button is held down If you take your finger off the shutter release button before the set number of frames is taken the next bracket setting will remain effective for twice the amount of the meter operating time Select OFF in Step 1 to finish shooting with Exposure Bracketing Memo To take all frames with one press of the shutter release button set 7 One ...

Page 59: ...sure Bracketing three pictures are saved each time the shutter is released Set this on the control panel or in the A2 menu z p R16 Caution The file format is always set to JPEG and cannot be changed You cannot use Extended Bracketing when the file format is set to RAW or RAW When Extended Bracketing is set Interval Shooting and Multi exposure are not available Extended Bracketing and HDR Capture c...

Page 60: ... used as this may damage the camera or flash Linked functions will not work To prevent vignetting caused by Trailing Curtain Sync from occurring it is recommended to take a test shot using a shutter speed one stop slower than the flash sync speed The contact of the X sync socket is not dust proof or water resistant Attach the provided Sync socket 2P cap when not in use The following flash modes ar...

Page 61: ...ensation value differs depending on the setting of 1 EV Steps z p R30 in the A1 menu Press the button to return to 0 0 4 Press the 4 button The camera switches to Capture mode EV Steps Compensation Value 1 3 EV 2 0 1 7 1 3 1 0 0 7 0 3 0 0 0 3 0 7 1 0 1 2 EV 2 0 1 5 1 0 0 5 0 0 0 5 1 0 Flash Mode Flash On Cancel OK OK MENU 0 0 e_kb487 book Page 59 Wednesday December 8 2010 9 49 AM ...

Page 62: ...peed Sync z z z z z z 6 z 6 z z 5 Auto check in the viewfinder Trailing Curtain Sync 1 z z 7 z 7 Contrast Control Sync Flash z Slave flash z z 8 Flash compensation z z z AF Assist Light z z z Multiple flash z 8 High speed flash sync z Wireless flash 2 1 There is a limit to the available shutter speed 2 Two or more compatible flash units are required 3 Available only when using A645 AE645 FA645 FAE...

Page 63: ...2 Take your finger off the main switch Optical Preview ends and the camera is ready to take a picture 1 Set Digital Preview in the A3 menu Refer to Menu Reference z p R18 2 Turn the main switch to while viewing the subject on the monitor A preview appears on the monitor Available operations 3 Press the shutter release button halfway Digital Preview ends and the autofocus system operates Memo The m...

Page 64: ... to change and use the 45 keys to change the setting Available operations Parameter Setting Saturation 1 4 to 4 Hue 1 4 to 4 Filter Effect 2 None Green Yellow Orange Red Magenta Blue Cyan Infrared Filter Toning 2 4 to 4 High Low Key Adj 3 4 to 4 Contrast 3 4 to 4 Contrast Highlight and Contrast Shadow can be added to make more advanced settings Sharpness 4 to 4 You can change Sharpness to Fine Sha...

Page 65: ... also be adjusted after shooting Immediately after shooting press the y button and change the setting and then press the L button and select Save as When Reversal Film is selected and White Balance is set to F images are captured with an effect similar to using a daylight film e_kb487 book Page 63 Wednesday December 8 2010 9 49 AM ...

Page 66: ...MEMO 64 e_kb487 book Page 64 Wednesday December 8 2010 9 49 AM ...

Page 67: ...aying a Single Image 67 Displaying Multiple Images 68 Developing RAW Images 72 Protecting Images 73 Rotating Images 74 Changing the Image Size 75 Digital Filters 76 DPOF Settings 78 Connecting the Camera to AV Equipment 79 e_kb487 book Page 65 Wednesday December 8 2010 9 49 AM ...

Page 68: ...es processes the image or adjusts the brightness p 76 n Resize Changes the number of recorded pixels and quality level of images p 75 o Cropping Crops images p 75 u Slideshow Plays back images one after another p 70 K SaveasManual WB Copies the white balance setting of an image and saves it as Manual White Balance p 52 h RAW Development Converts RAW images to JPEG format p 72 p Index Joins a numbe...

Page 69: ...ure during Instant Review p 37 or Digital Preview p 61 The default setting for the initial magnification is 1 2 120 You can set the initial magnification with Playback Display Method in the Q1 menu z p R22 The full display of vertical images is displayed at three quarters the size of horizontal images therefore the initial enlarged magnification of vertical images is 100 Deleting Images One by One...

Page 70: ...ton and select Select Delete Multi image Display 2345 keys Moves the selection frame 4 button Displays a full screen display of the selected image M button Displays the Multi img Display Setting screen Select the number of images to display at the same time This is not available when developing multiple RAW images p 72 INFO 100 0001 1 Selection frame Scroll bar INFO Cancel OK OK MENU Multi img Dis...

Page 71: ...ble operations Folder Display 2345 keys Moves the selection frame 4 button Displays the images in the folder on the multi image display screen u button w button x button Switches between the SD Memory Cards i button Deletes the folder and all the images in it 100_0105 12345 100 101 102 103 104 105 1 Number of images in the folder Calendar Display 23 keys Selects the shooting date 45 keys Selects a...

Page 72: ... Displays the next or previous image 3 key Q button 3 button Stops playback and the camera returns to Playback mode Shutter release button button Mode dial switching Main switch Stops playback and the camera switches to Capture mode OK Start Image Comparison 4 button Moves the selection frame right image both images left image 2345 keys Moves the area to enlarge button Returns the enlarged area to...

Page 73: ...mode and the index image is displayed Memo Processing may take a while when creating an index image When the number of saved images is smaller than the number set for Images empty spaces will appear in Thumbnail layout and some images may be duplicated in other layouts Index o Thumbnail r Random2 p Square s Random3 q Random1 p Bubble Index Layout Images Backgrnd Selection Create an index image OK ...

Page 74: ...lop images as shot in Step 4 you can set only File Format Recorded Pixels and Quality Level Press the 5 key to display the setting screen for White Balance and Custom Image OK MENU RAW JPEG AE L 1 OK OK MENU Develop images as shot Develop images with modified settings Parameter Value Page File Format JPEG TIFF Recorded Pixels 1 i 7264 5440 k 6528 4896 n 5376 4032 q 4224 3168 a 3072 2304 p 43 Quali...

Page 75: ...ce When White Balance is set to K Manual press the M button to display the measuring screen Protecting Images You can protect images from being accidentally deleted 1 Select Z Protect in the playback mode palette 2 Select Single Image or All Images If Single Image is selected use the 45 keys to select an image to protect 3 Select Protect or Unprotect If Protect is selected the image is protected a...

Page 76: ... p R35 To not add rotation information set 31 Saving Rotation Info in the A5 menu to Off z p R35 Caution Rotation information cannot be changed in the following situations For protected images For images without rotation information When 32 Auto Image Rotation in the A5 menu is set to Off z p R35 1 Select the image to rotate and select s Image Rotation in the playback mode palette Four thumbnail i...

Page 77: ...an image and save it as a new file Caution Only JPEG and RAW images captured with this camera can be cropped Images resized to a or s with this camera cannot be cropped 1 Select the image to crop and then select o Cropping in the playback mode palette 2 Specify the size and position of the area to crop by using the cropping frame that appears on the screen Available operations 3 Press the 4 button...

Page 78: ...tion and repeat Steps 2 to 4 Memo You can apply up to 10 filters to the same image Filter name Effect Parameter Monochrome Creates a monochrome image Filter Effect OFF Red Green Blue IR Infrared Filter Toning B A 7 levels Extract Color Extracts a specific color and makes the rest of the image black and white Color Red Magenta Blue Cyan Green Yellow Color Freq Range 2 to 2 Color Adds a color filter...

Page 79: ... You can only select an image that has not been processed with a filter 4 Select Save as You can search for and display the original image prior to digital filter application 1 Select Searching for the original image in Step 2 in Recreating Filter Effects Memo If the original image is no longer stored on the SD Memory Card the message Original image prior to digital filter application is not found...

Page 80: ...opies You can set up to 99 copies To cancel the DPOF setting set the number of copies to 00 5 Turn the S dial to select O or P for printing the date O The date will be printed P The date will not be printed Repeat Steps 3 to 6 to set other images 6 Press the 4 button The DPOF settings are saved Caution You cannot switch between the SD Memory Cards while making the DPOF settings Depending on the pr...

Page 81: ...yed back change the video output format with HDMI Out in the R2 menu z p R25 1 Turn the AV equipment and camera off 2 Open the terminal cover on the camera and connect the video cable to the video terminal or the HDMI cable to the mini HDMI terminal 3 Connect the other end of the video cable or HDMI cable to the video IN jack or HDMI IN jack on the AV equipment and then turn on the camera and AV e...

Page 82: ...MEMO 80 e_kb487 book Page 80 Wednesday December 8 2010 9 49 AM ...

Page 83: ...5 Using a Computer Connecting to a Computer 82 Using the Provided Software 84 e_kb487 book Page 81 Wednesday December 8 2010 9 49 AM ...

Page 84: ... or higher recommended Memory 2 0 GB minimum 3 0 GB or more recommended Free disk space 1 GB minimum 8 GB or more recommended Monitor 1280 800 pixels or more 1920 1200 or more recommended with 24 bit full color approximately 16 77 million colors Others USB 2 0 port as standard equipment Macintosh OS Mac OS X 10 4 11 10 5 or 10 6 CPU PowerPC G5 Dual core 2 0 GHz or higher Intel Core 2 Duo processor...

Page 85: ...he Removable Disk Drive dialog appears when the camera is turned on select Open folder to view files using Windows Explorer and click the OK button When using Windows XP if the SD Memory Card has a volume label the volume label name appears instead of Removable Disk A new unformatted SD Memory Card may show the manufacturer s name or model number 6 Save the captured images to your computer Copy th...

Page 86: ...2 Place the CD ROM S SW107 into the CD ROM DVD drive on your computer The PENTAX Software Installer screen appears If the PENTAX Software Installer screen does not appear For Windows 1 Click My Computer from the Start menu 2 Double click the CD ROM drive S SW107 icon 3 Double click the Setup exe icon For Macintosh 1 Double click the CD ROM S SW107 icon on the desktop 2 Double click the PENTAX Inst...

Page 87: ... the Menu bar appears at the top of the desktop 2 Tool Bar Frequently used functions are provided as Tool bar buttons 3 Control Panel The shooting information and settings for the selected image appear in this panel You can switch the panel tab sets by pressing the Browser Laboratory and Custom buttons on the Tool bar 4 File Display Pane The file list or the images in the selected folder appear he...

Page 88: ...appears here The Custom tab set default setting The screen display can be customized here The Custom tab set enables you to customize whether to show hide the various tab pages in accordance with your needs By default all control panels are displayed e_kb487 book Page 86 Wednesday December 8 2010 9 49 AM ...

Page 89: ... serve you please take a moment to register your software 1 Click Product Registration on the screen in Step 3 on p 84 A world map for Internet Product Registration is displayed 2 If your computer is connected to the Internet click the displayed country or region and then follow the instructions to register your software Note that you can only register online if your country or area is shown e_kb4...

Page 90: ...MEMO 88 e_kb487 book Page 88 Wednesday December 8 2010 9 49 AM ...

Page 91: ...6 Appendix Optional Accessories 90 Error Messages 93 Troubleshooting 94 Index 95 WARRANTY POLICY 100 e_kb487 book Page 89 Wednesday December 8 2010 9 49 AM ...

Page 92: ...lash AF540FGZ Auto Flash AF360FGZ The AF540FGZ and AF360FGZ are P TTL auto flash units with a maximum guide number of approximately 54 and 36 ISO 100 m respectively Their features include slave sync flash contrast control sync flash auto flash high speed sync flash wireless flash slow speed sync and trailing curtain sync flash Auto Flash AF200FG The AF200FG is a P TTL auto flash unit with a maximu...

Page 93: ...5P Off camera Shoe Adapter F Use the adapters and cords to use the external flash away from the camera Off camera Shoe Clip CL 10 When using the AF540FGZ or AF360FGZ as a wireless flash this large clip is used for setting the external flash on a desk or table Large Eyecup 645 O EC107 AF Framed Matte DF 80 AF Cross Lined Matte DG 80 AF Golden Section Matte DK 80 AF160FC Hot Shoe Adapter FG Off came...

Page 94: ...r remote control From the front of camera approx 4 m From the back of camera approx 2 m Remote Control F Remote Control Waterproof O RC1 Camera Strap O ST107 Body Mount Cap 645 Hot Shoe Cover FK USB Cable I USB107 Sync Socket 2P Cap Imagesensor Cleaning Kit O ICK1 Cable Switch CS 205 Remote Control Strap Other Accessories e_kb487 book Page 92 Wednesday December 8 2010 9 49 AM ...

Page 95: ...age is protected The image is protected Remove the protection from the image Battery depleted The battery is exhausted Install a charged battery in the camera Not enough battery power remaining to clean sensor Appears if the battery level is insufficient Replace the battery with a fully charged one or use an AC adaptor kit K AC50 optional Not enough battery power remaining to activate Pixel Mappin...

Page 96: ...acting a service center Problem Cause Remedy The camera does not turn on The battery is not installed Check if the battery is installed The battery power is low Replace with a charged battery or use the AC adapter kit K AC50 optional The shutter will not release There is no available space on the SD Memory Card Insert an SD Memory Card with available space or delete unwanted images Also check the ...

Page 97: ... Filter 76 Battery 28 Battery level 29 Beep R24 Best Quality level 43 R14 Better Quality level 43 R14 Bright Dark Area R22 Brightness Level R24 Bulb mode 47 C A AF mode 44 Cable switch terminal 11 Calendar display 69 Card access lamp 11 CCD plane indicator 11 Center weighted metering 45 Charging 28 City R23 Cloudy White Balance 50 Color Digital Filter 76 Color Space R19 Color Temperature 52 Color ...

Page 98: ... Custom Image 62 Flash 60 Flash White Balance 50 E button 59 Flash compatibility 60 Flash compensation 59 Flash Mode 58 Flash On 58 Flash X sync Speed mode 47 Fluorescent Light White Balance 50 Fluorescent Light Cool White White Balance 50 Fluorescent Light Daylight Color White Balance 50 Fluorescent Light Daylight White White Balance 50 Fluorescent Light Warm White White Balance 50 Focus Mode 44 ...

Page 99: ...4 Menu operation R12 Metering mode 45 Meter operating timer 46 R30 Mired 52 R33 Mirror Up 55 Mode dial 48 Modeling Flash R35 Monitor 14 Monochrome Digital Filter 76 MSC R25 Multi exposure 55 R17 Multi image display 68 Multi segment metering 45 N Names of parts 11 Noise Reduction R32 NTSC R25 Number of AF Points R32 Number of shots R36 O One Push Bracketing R30 Optical Preview 61 R18 P e mode 47 R3...

Page 100: ...R16 Sharpness Custom Image 62 Shooting 37 Shooting information 14 Shutter Aperture Priority mode 47 Shutter Priority mode 47 Single Image Display 67 Single mode 44 Slideshow 70 R22 Slot 42 Slow Shutter Speed NR R32 Slow speed Sync 58 Soft Digital Filter 76 Specifications R36 Spot metering 45 sRGB R19 Start Interval R17 Status Screen 15 R18 Strap 24 Superimpose AF Area 44 R32 K mode 47 R33 Sync cor...

Page 101: ...99 Appendix 6 White Balance Extended Bracketing R16 Windows 82 World Time R23 X M mode 47 R34 X sync socket 58 Z Zoom display 67 e_kb487 book Page 99 Wednesday December 8 2010 9 49 AM ...

Page 102: ...oms procedures required If the equipment is covered by warranty repairs will be made and parts replaced free of charge and the equipment will be returned to you upon completion of servicing If the equipment is not covered by warranty regular charges of the manufacturer or of its representatives will apply Shipping charges are to be borne by the owner If your PENTAX was purchased outside of the cou...

Page 103: ...unications However there is no guarantee that interference will not occur in a particular installation If this equipment does cause harmful interference to radio or television reception which can be determined by turning the equipment off and on the user is encouraged to try to correct the interference by one or more of the following measures Reorient or relocate the receiving antenna Increase the...

Page 104: ...ontinue to reflect the equipment being produced can be expected to be within the variation accepted due to quantity production and testing on the statistical basis as required by 47CFR 2 909 Operation is subject to the following two conditions 1 This device may not cause harmful interference and 2 This device must accept any interference received including interference that may cause undesired ope...

Page 105: ...ity for further details By disposing of this product correctly you will help ensure that the waste undergoes the necessary treatment recovery and recycling and thus prevent potential negative effects on the environment and human health which could otherwise arise due to inappropriate waste handling 2 In other countries outside the EU These symbols are only valid in the European Union If you wish t...

Page 106: ...MEMO e_kb487 book Page 104 Wednesday December 8 2010 9 49 AM ...

Page 107: ...MEMO e_kb487 book Page 105 Wednesday December 8 2010 9 49 AM ...

Page 108: ...r Strasse 104 22527 Hamburg GERMANY http www pentax de PENTAX Imaging Systems Limited PENTAX House Heron Drive Langley Slough Berks SL3 8PN U K http www pentax co uk PENTAX Imaging Company A Division of PENTAX of America Inc Headquarters 600 12th Street Suite 300 Golden Colorado 80401 U S A PENTAX Service Department 250 North 54th Street Chandler Arizona 85226 U S A http www pentaximaging com PENT...

Page 109: ...dium Format Digital SLR Camera Menu Reference To ensure the best performance from your camera please read the operating manual before using the camera e_kb487 book Page i Wednesday December 8 2010 9 49 AM ...

Page 110: ... Incorporated in the United States and or other countries HDMI the HDMI logo and High Definition Multimedia Interface are trademarks or registered trademarks of HDMI Licensing LLC All other brands or product names are trademarks or registered trademarks of their respective companies This product supports PRINT Image Matching III PRINT Image Matching enabled digital still cameras printers and softw...

Page 111: ...R1 e_kb487 book Page 1 Wednesday December 8 2010 9 49 AM ...

Page 112: ...6 HDR Capture R16 Multi exposure R17 Interval Shooting R17 Status Screen R18 Digital Preview R18 Instant Review R18 Electronic Level Display R19 Color Space R19 RAW File Format R19 RAW Button R19 Memory R20 USER R20 Q Playback Menu R22 Slideshow R22 Playback Display Method R22 Delete All Images R22 R Set up Menu R23 Language u R23 Date Adjustment R23 World Time R23 Text Size R24 Guide Display R24 ...

Page 113: ...ea R32 16 Number of AF Points R32 17 AF with Remote Control R32 18 Remote Control in Bulb R32 19 Slow Shutter Speed NR R32 20 High ISO Noise Reduction R32 21 High ISO NR Start Level R32 22 Color Temperature Steps R33 23 e dial in Program R33 24 e dial in Sv Mode R33 25 e dial in Tv Mode R33 26 e dial in Av Mode R34 27 e dial in TAv M Modes R34 28 e dial in B X Modes R34 29 Green Button in TAv M R3...

Page 114: ... Yes Upper sensitivity limit 400 Yes AUTO ISO Parameters s Yes D Range Setting 2 Sets highlight and shadow correction Highlight Correction P Yes p R14 Shadow Correction Off Yes A2 Lens Correction 2 Corrects lens distortion and lateral chromatic aberration Distortion Correction P Yes p R15 Lat Chromatic Ab Adj P Yes Program Line 2 Sets the Program Line priority items k Yes p R15 Extended Bracketing...

Page 115: ...and or on the monitor Viewfinder P Yes p R19 Monitor O Yes A4 Color Space Sets the color space of image files sRGB Yes p R19 RAW File Format Sets the RAW data file format PEF Yes p R19 RAW Button Sets the file format and RAW button function which are temporarily changed when the button is pressed Cancel after 1 shot O Yes p R19 JPEG RAW Yes RAW RAW Yes RAW RAW Yes Memory Sets the settings to be sa...

Page 116: ...k Menu Menu Item Description Default Setting Reset Setting Page Q1 Slideshow Sets the slideshow display method Interval 3sec Yes p R22 Screen Effect Off Yes Repeat Playback P Yes Playback Display Method Sets whether to display the Bright Dark Area warning and also sets the initial magnification when enlarging images Bright Dark Area P Yes p R22 Quick Zoom Off Yes Delete All Images Deletes all save...

Page 117: ...anges the hometown and destination Setting the Time Hometown Yes p R23 X Destination City 3 No DST 3 No W Hometown City 2 No DST 2 No Text Size Sets the size of the text that appears on the menu screens 2 No p R24 Guide Display Sets the length of the time that the guide indicators are displayed 3sec Yes p R24 Beep Switches the beep tone on off Setting g Yes p R24 In focus O Yes AE L O Yes RAW O Ye...

Page 118: ...gning folder names Date Yes p R26 File Name Sets the method for assigning file names IMGP _IGP No 4 p R26 Reset File Name R3 Copyright Information Sets the photographer and copyright information embedded to Exif Embed Copyright Data P No p R27 Photographer No Copyright Holder No Auto Power Off Sets the length of the time until the camera automatically turns off 1min Yes p R27 Reset Resets all sett...

Page 119: ...st the white balance when the light source is specified Fixed Yes p R31 12 AWB in Tungsten Light Adjusts the tungsten light color tone when White Balance is set to F Subtle Correction Yes p R31 13 AF Button Function Sets the function of the button when being pressed Enable AF Yes p R31 14 AF with Press Halfway Sets whether to use the autofocus when the shutter release button is pressed halfway On ...

Page 120: ...nt and rear e dials in p and M modes Front Not Available Rear c Yes p R34 A5 29 Green Button in TAv M Selects the exposure adjustment method when the button is pressed in L or a mode Program Line Yes p R34 30 Green Button in X Mode Selects the exposure adjustment method when the button is pressed in M mode Off Yes p R34 31 Saving Rotation Info Sets whether to add image rotation information when sh...

Page 121: ...lette Item Default Setting Reset Setting Page Image Rotation z p 74 Digital Filter Monochrome Yes z p 76 Resize JPEG Recorded Pixels Maximum size according to the setting JPEG Quality C z p 75 Cropping Maximum size according to the setting z p 75 Slideshow z p 70 Save as Manual WB Yes z p 51 RAW Development File Format JPEG JPEG Recorded Pixels i JPEG Quality C Yes z p 72 Index Layout o Images 12 ...

Page 122: ...tended Bracketing HDR Capture Multi exposure Interval Shooting Exit MENU 1 2 3 4 Off OFF OFF Program Line Lens Correction Extended Bracketing HDR Capture Multi exposure Interval Shooting Exit MENU 1 2 3 4 Off OFF OFF Program Line Lens Correction Extended Bracketing HDR Capture Multi exposure Interval Shooting Cancel OK OK MENU 1 2 3 4 OFF OFF Program Line Lens Correction Extended Bracketing HDR Ca...

Page 123: ...rs at the top right of the screen You can also set this by turning the S dial while pressing the w or x button z p 42 Sets the image size when the file format is set to JPEG Memo Set the recorded pixels for M and S with 35 M and S Pixel Resolution p R35 in the A5 menu You can also set the image size by turning the R dial while pressing the w or x button z p 43 Exposure Mode A1 SD1 SD2 Image File F...

Page 124: ...in the image When Highlight Correction is set to O On in D Range Setting p R14 in the A1 menu the minimum sensitivity is ISO 200 Expands the dynamic range and the light level expressed by the CCD sensor and prevents bright and dark areas from occurring Set Highlight Correction to O or P default setting and set Shadow Correction to off default setting low medium or high Memo When Highlight Correcti...

Page 125: ...e format the correction information is saved as a RAW file parameter Select a Program Line for automatically setting the proper exposure Memo The Program Line is available for the following exposure modes e or K mode When 1 Program Line is selected for 29 Green Button in TAv M p R34 in the A1 menu in L or a mode Lens Correction A2 Program Line A2 Setting Characteristics j AUTO Camera determines th...

Page 126: ...setting Caution When HDR Capture is set the file format is always set to JPEG and cannot be changed You cannot use HDR Capture when the file format is set to RAW or RAW HDR Capture and Extended Bracketing cannot be used at the same time The mode set last is used When HDR Capture is set the following functions are not available Interval Shooting Multi exposure Continuous Shooting and Remote Continu...

Page 127: ... exposure or HDR Capture at the same time The mode set last is used Interval shooting is not available when the exposure mode is set to p or A mode Interval shooting is canceled when the SD Memory Card has no more available space If the subject is not in focus with the focus mode set to l Single mode or if the Interval setting is too short and the previous image processing cannot be completed befo...

Page 128: ...creen and control panel Sets the preview method Memo When Interval Shooting or Multi exposure is set Optical Preview is used regardless of the setting Refer to the Operating Manual for details on preview operations z p 61 Select from 1sec default setting 3sec 5sec and Off for the time the image appears on the monitor immediately after being captured Also sets the histogram Bright Dark Area warning...

Page 129: ...n Sets the file format and the function of the button The default settings are Cancel after 1 shot and RAW Electronic Level Display A3 Color Space A4 RAW File Format A4 PEF PENTAX original RAW file format default setting DNG General purpose publicly available RAW file format designed by Adobe Systems RAW Button A4 O The recording format returns to the original file format after a picture taken P T...

Page 130: ...e R3 menu all Memory settings return to the default settings Saves the current camera settings to A on the mode dial You can easily retrieve the following saved settings when shooting 1 Make the necessary settings 2 Select USER in the A4 menu press the 5 key and select Save Memory A4 Flash Mode Drive Mode White Balance Sensitivity EV Compensation Flash Exposure Compensation Auto Bracketing HDR Cap...

Page 131: ...ve The settings are saved to A To shoot with the saved settings turn the mode dial to A Memo To change the saved settings turn the mode dial to A and repeat Steps 1 to 3 above Check Saved USER Settings OK OK P 0 0 0 0 0 1 0 0 2 0x5 200 800 0 5 BA AdobeRGB JPEG L RESERVE 1 2 0 5 ISOAUTO AWB G1 A1 WB 1 2 DR DR 200 200 e_kb487 book Page 21 Wednesday December 8 2010 9 49 AM ...

Page 132: ...gs Off default setting 2 200 4 400 8 800 16 1600 or 32 3200 You can select the SD Memory Card in the SD1 or SD2 slot and delete all saved images at once Slideshow Q1 Item Description Setting Interval Select the image display interval 3sec default setting 5sec 10sec 30sec Screen Effect Select the transition effect when the next image is displayed Off default setting Fade Wipe Stripe Repeat Playback...

Page 133: ...destination Language u R1 Date Adjustment R1 Display Format Date mm dd yy dd mm yy yy mm dd Time 12h 24h World Time R1 World Time Setting the Time Destination London Hometown New York MENU 15 00 10 00 Region City Region City North America Honolulu Europe Stockholm Anchorage Budapest Vancouver Warsaw San Francisco Athens Los Angeles Helsinki Calgary Moscow Denver Africa West Asia Dakar Chicago Algi...

Page 134: ...de is changed Select from 3sec default setting 10sec 30sec and Off You can turn the operation beep on or off There are six items that you can set In focus AE lock button operation sound self timer remote control and mirror up The default setting is g On Memo You can turn all the beeps off by selecting Z for Setting You can select from 15 brightness levels East Asia Ho chi Minh Oceania Perth Jakart...

Page 135: ...camera Set the USB connection mode MSC or PTP when connecting the camera to a computer via the provided USB cable I USB107 The default setting is MSC LCD Color Tuning R2 23 keys Adjusts the tone of the colors between green G and magenta M from among seven levels 45 keys Adjusts the tone of the colors between blue B and amber A from among seven levels button Resets the adjustment value R dial Displ...

Page 136: ...ter entering the text move the text selection cursor to Finish and press the 4 button The file name is changed Folder Name R2 Date default setting The two digits of the month and day on which the picture was taken are assigned as the folder name in the form of xxx_MMDD xxx is a sequential number from 100 to 999 MMDD month and day is displayed according to the date format set in Date Adjustment p R...

Page 137: ...ext in the same manner Memo Use the provided PENTAX Digital Camera Utility 4 software to check the Exif information When Embed Copyright Data is set to O On a copyright symbol appears on the status screen and LCD panel You can set the camera to turn off automatically if unused after a set period of time Select from 1min default setting 3min 5min 10min 30min or Off Memo The Auto Power Off function ...

Page 138: ...A or FA s aperture position lens Set the focus mode on the lens to AF Caution The exposure time may be long when using the Dust Alert function Note that if the direction the lens is pointed changed before processing is complete dust will not be detected properly Depending on the subject conditions or temperature dust may not be detected properly The Dust Alert function cannot be used when the shut...

Page 139: ...pray type blower Use a brush less blower to remove dirt and dust from the CCD sensor Using a blower with a brush may scratch the sensor Do not wipe the sensor with a cloth Sensor cleaning cannot be performed when the battery level is low Use the AC adapter kit K AC50 optional or load a fully charged battery If the battery capacity becomes low during cleaning a warning beep will sound Please stop c...

Page 140: ...Exposure is locked when the focus is locked The default setting is Off Sets whether to link the exposure and AF point in the focus area during multi segment metering Exposure is set in accordance with the AF point The default setting is Off Shoots all frames with one press of the shutter release button when using Exposure Bracketing The default setting is Off 1 EV Steps A1 Setting Exposure Setting...

Page 141: ...1 0 1 2 3 0 2 frames 3 frames 5 frames 0 1 1 0 1 0 1 2 1 0 1 2 4 0 2 frames 3 frames 5 frames 1 0 1 0 0 1 1 0 1 1 2 2 9 Auto EV Compensation A2 10 WB When Using Flash A2 11 WB Adjustable Range A2 1 Fixed default setting Color temperature of the light source is fixed 2 Auto Adjustment Automatically performs fine tuning 12 AWB in Tungsten Light A2 1 Subtle Correction default setting Keeps the tungst...

Page 142: ...ty level the High ISO Noise Reduction function starts to work Select ISO 200 ISO 400 default setting ISO 800 or ISO 1600 The noise reduction process starts from a sensitivity at or above the set sensitivity 14 AF with Press Halfway A2 15 Superimpose AF Area A3 16 Number of AF Points A3 17 AF with Remote Control A3 18 Remote Control in Bulb A3 1 Mode1 default setting Press the shutter release butto...

Page 143: ...e R and S dials when the exposure mode is K Sets the R and S dials when the exposure mode is b 22 Color Temperature Steps A4 23 e dial in Program A4 Setting R S 1 default setting b Shutter Speed c Aperture 2 c Aperture b Shutter Speed 3 m EV Compensation eSHIFT Program Shift 4 eSHIFT Program Shift m EV Compensation 5 Not Available Not Available 24 e dial in Sv Mode A4 Setting R S 1 default setting...

Page 144: ...Av M Modes A4 Setting R S 1 default setting b Shutter Speed c Aperture 2 c Aperture b Shutter Speed 28 e dial in B X Modes A4 Setting R S 1 default setting Not Available c Aperture 2 c Aperture Not Available 3 Sensitivity c Aperture 4 c Aperture Sensitivity 29 Green Button in TAv M A5 Setting Operation 1 default setting Program Line Automatically adjusts the aperture value and shutter speed accord...

Page 145: ... to M or S Returns settings in A1 5 menu to default settings Memo The adjustment value of 33 AF Fine Adjustment is not reset 31 Saving Rotation Info A5 32 Auto Image Rotation A5 33 AF Fine Adjustment A5 Apply All Applies the same adjustment value to all lenses Apply One Appears only when the lens ID is obtained Saves and applies an adjustment value for each lens type Up to 20 lens types 5 key or S...

Page 146: ...D Memory Card SDHC Memory Card Recorded Pixels File Format JPEG Quality SD Memory Card Capacity 32 GB 16 GB 8 GB 4 GB 2 GB 1 GB i 7264 5440 PEF 362 images 180 images 89 images 44 images 22 images 11 images DNG 362 images 180 images 89 images 44 images 22 images 11 images i 7264 5440 C 1418 images 706 images 351 images 172 images 87 images 43 images D 2516 images 1254 images 623 images 306 images 1...

Page 147: ...gle frame multi image display zoom display up to 32 times magnification scrolling possible image comparison rotating calendar display folder display slideshow histogram bright dark area resize cropping index Thumbnail Square Random1 Random2 Random3 Bubble Exposure Mode A e Hyper program K Sensitivity priority b Shutter priority c Aperture priority L Shutter Aperture priority a Hyper manual p Bulb ...

Page 148: ...ox 13 frames RAW PEF up to approx 13 frames RAW DNG up to approx 13 frames JPEG i C up to approx 13 frames Self timer Electronically controlled with delay time of 12 sec 2 sec with mirror up function Start by pressing the shutter release button Operation confirmation Possible to set beep Can be cancelled after operation Remote Control PENTAX Remote Control F optional Remote Control Waterproof O RC...

Page 149: ...ccur in actual use depending on usage conditions Battery Exhaustion Battery exhaustion indicator is lit The shutter is locked and no indication appears in the viewfinder when starts blinking In Out Port USB terminal USB 2 0 high speed compatible Video terminal Mini jack mini HDMI terminal DC input terminal Cable release terminal X sync socket Video Output Format NTSC PAL Dimensions and Weight Appr...

Page 150: ...8 Battery level 29 Beep R24 Best Quality level 43 R14 Better Quality level 43 R14 Bright Dark Area R22 Brightness Level R24 Bulb mode 47 C A AF mode 44 Cable switch terminal 11 Calendar display 69 Card access lamp 11 CCD plane indicator 11 Center weighted metering 45 Charging 28 City R23 Cloudy White Balance 50 Color Digital Filter 76 Color Space R19 Color Temperature 52 Color Temperature Steps R3...

Page 151: ...Flash White Balance 50 E button 59 Flash compatibility 60 Flash compensation 59 Flash Mode 58 Flash On 58 Flash X sync Speed mode 47 Fluorescent Light White Balance 50 Fluorescent Light Cool White White Balance 50 Fluorescent Light Daylight Color White Balance 50 Fluorescent Light Daylight White White Balance 50 Fluorescent Light Warm White White Balance 50 Focus Mode 44 Folder display 69 Folder N...

Page 152: ...e 45 Meter operating timer 46 R30 Mired 52 R33 Mirror Up 55 Mode dial 48 Modeling Flash R35 Monitor 14 Monochrome Digital Filter 76 MSC R25 Multi exposure 55 R17 Multi image display 68 Multi segment metering 45 N Names of parts 11 Noise Reduction R32 NTSC R25 Number of AF Points R32 Number of shots R36 O One Push Bracketing R30 Optical Preview 61 R18 P e mode 47 R33 PAL R25 PEF R19 Photographer R2...

Page 153: ...nformation 14 Shutter Aperture Priority mode 47 Shutter Priority mode 47 Single Image Display 67 Single mode 44 Slideshow 70 R22 Slot 42 Slow Shutter Speed NR R32 Slow speed Sync 58 Soft Digital Filter 76 Specifications R36 Spot metering 45 sRGB R19 Start Interval R17 Status Screen 15 R18 Strap 24 Superimpose AF Area 44 R32 K mode 47 R33 Sync cord 58 System requirements 82 T L mode 47 R34 Test Fla...

Page 154: ...R44 Appendix X M mode 47 R34 X sync socket 58 Z Zoom display 67 e_kb487 book Page 44 Wednesday December 8 2010 9 49 AM ...

Page 155: ...equired If the equipment is covered by warranty repairs will be made and parts replaced free of charge and the equipment will be returned to you upon completion of servicing If the equipment is not covered by warranty regular charges of the manufacturer or of its representatives will apply Shipping charges are to be borne by the owner If your PENTAX was purchased outside of the country where you w...

Page 156: ...nications However there is no guarantee that interference will not occur in a particular installation If this equipment does cause harmful interference to radio or television reception which can be determined by turning the equipment off and on the user is encouraged to try to correct the interference by one or more of the following measures Reorient or relocate the receiving antenna Increase the ...

Page 157: ...ontinue to reflect the equipment being produced can be expected to be within the variation accepted due to quantity production and testing on the statistical basis as required by 47CFR 2 909 Operation is subject to the following two conditions 1 This device may not cause harmful interference and 2 This device must accept any interference received including interference that may cause undesired ope...

Page 158: ...ty for further details By disposing of this product correctly you will help ensure that the waste undergoes the necessary treatment recovery and recycling and thus prevent potential negative effects on the environment and human health which could otherwise arise due to inappropriate waste handling 2 In other countries outside the EU These symbols are only valid in the European Union If you wish to...

Page 159: ...MEMO e_kb487 book Page 49 Wednesday December 8 2010 9 49 AM ...

Page 160: ...r Strasse 104 22527 Hamburg GERMANY http www pentax de PENTAX Imaging Systems Limited PENTAX House Heron Drive Langley Slough Berks SL3 8PN U K http www pentax co uk PENTAX Imaging Company A Division of PENTAX of America Inc Headquarters 600 12th Street Suite 300 Golden Colorado 80401 U S A PENTAX Service Department 250 North 54th Street Chandler Arizona 85226 U S A http www pentaximaging com PENT...

Reviews: