background image

92

Pla

ybac

k/Er

asing/Editing

Changing the Image Size

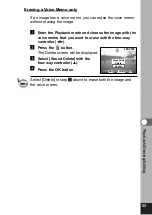
By changing the size and quality of a selected image, you can
make the file smaller than the original. After changing the size,
the image can be saved as a new image or written over the
original image.

z

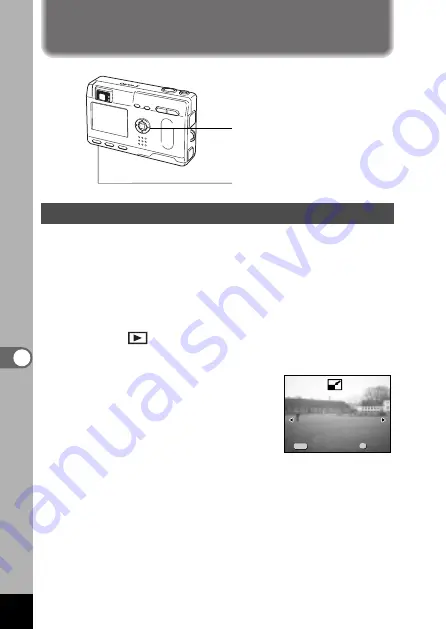
Press the MENU button.

x

Press the four-way controller (

).

The [

Playback] menu will be displayed.

c

Press the four-way controller (

) to select [Resize].

v

Press the four-way controller (

).

The Resize screen will be displayed.

b

Use the four-way controller (

) to choose the image

you want to resize.

Editing Images

Menu button

Four-way controller
(OK button in the center)

100-0020

100-0020

Exit

Exit

Ok

Ok

Exit

Ok

OK

MENU

Summary of Contents for 18263 - OptioS Digital Camera

Page 1: ...Digital Camera Operating Manual To ensure the best performance from your camera please read the Operating Manual before using the camera ...

Page 2: ...with the purpose of obtaining copyrights also cannot be used outside the scope of use of the copyright as laid out in the Copyright Act and care should be taken here also Regarding trademarks The SD logo is a trademark PENTAX is a trademark of PENTAX Corporation Optio is a trademark of PENTAX Corporation All other brands or product names are trademarks of registered trade marks of their respective...

Page 3: ...identally swallowed Use an AC adapter that are of the power and voltage specified for exclusive use with this product The use of an AC adapter other than that specified exclusively for use with this product may cause fire or electric shocks If the camera emits smoke or a strange smell or in the event of any other irregularity stop using the camera immediately remove the battery or disconnect the A...

Page 4: ... properties of the liquid crystal and is not a fault Remove dust from the lens and viewfinder using a blower or clean off dust using a lens brush Periodic checks are recommended every 1 to 2 years in order to maintain high performance When the camera has not been used for a long time confirm that it is still working properly particularly prior to taking important pictures such as at a wedding or d...

Page 5: ...tal panel used in the LCD display is manufactured using extremely high precision technology Although the level of functioning pixels is 99 99 or better you should be aware that 0 01 or fewer of the pixels may not illuminate or may illuminate when they should not However this has no effect on the recorded image There is a possibility that the illustrations and the display screen of the LCD monitor ...

Page 6: ...Mode 19 Setting the Date and Time 20 Quick Start 22 Taking Still Pictures 22 Playing Back Still Pictures 24 How to View the Recorded Images 26 Common Operations 28 Turning the Camera On and Off 28 Playback Only Mode 28 Voice Recorder Mode 28 Using the Button Functions 29 Capture Mode 29 Playback Mode 30 Voice Recorder Mode 31 Setting the Menus 32 How to Set the Menus 32 Menu List 34 Taking Picture...

Page 7: ...s User Mode 62 Taking Stereo Pictures 3D Image Mode 63 Continuous Shooting Continuous Shooting Mode 68 Using the Self Timer 69 Using the Remote Control Unit optional 70 Using the Zoom 71 Taking Time lapse Movie Pictures Fast Fwd Movie 73 Saving the Settings Memory 74 Saving the Menu Items Memory 74 Register Functions in User Mode 75 Recording and Playback 76 Recording Sound Voice Recorder Mode 76 ...

Page 8: ...osh 109 Settings 110 Camera Settings 110 Formatting a SD Memory Card MultiMediaCard and the Built in memory 110 Changing the Sound Settings 111 Changing the Start up Screen 112 Setting the Date Style 113 Changing the Date Time 114 Setting the World Time 114 Changing the Display Language 116 Changing the Video Output Format 117 Sleep Timeout 118 Setting Auto Power Off 118 Setting the Quick Delete F...

Page 9: ...lains common operations such as the functions of the buttons and how to use the menus For more details refer to the respective Taking Pictures Recording and Playback Playback Erasing Editing and Settings chapters Taking Pictures This chapter explains the various ways of capturing images and how to set the relevant functions including how to use the virtual mode dial to change the shooting mode and...

Page 10: ...Manual To ensure the best performance from your camera please read the Operating Manual before using the camera Operating Manual this manual About items marked with Items marked with are also available as optional accessories For other option al accessories refer to the list on page 130 Type of AC plug cord D CO2A Australia D CO2B United Kingdom D CO2E Europe D CO2H Hong Kong D CO2J Japan D CO2K K...

Page 11: ... switch Remote control receiver Shutter release button Built in flash Flashlight sensor Lens Self timer lamp DC input terminal Microphone Strap lug PC AV terminal Terminal cover Viewfinder LCD monitor Battery Card cover Tripod socket ...

Page 12: ...n Display button Menu button Names of Operating Parts Guide indications A guide to available button operation is displayed on the LCD monitor during operation The buttons are indicated as shown below Four way controller Four way controller Four way controller Four way controller MENU button Display button Zoom button Only for digital zoom and magni fied playback button button ...

Page 13: ...11 Getting Started Pass the narrow end of the strap through the strap lug and pass the other end through the loop Getting Started Attaching the Strap ...

Page 14: ...e ambient temperature range for charging the battery is 0 C 40 C 32 F to 104 F The charging time may vary depending on the ambient tempera ture and charging conditions When the battery reaches the end of its service life the time that the camera can be operated becomes shorter even when the battery is fully charged In this event replace the battery Always charge the battery after purchasing or whe...

Page 15: ...finger to press the battery lock lever in the same direction as when you inserted the battery and pull the battery out If you intend to use the camera continuously for a long period use of the AC adapter D AC8 optional is recommended p 15 Do not remove the battery when the camera is turned on If you do not intend to use the camera for a long time remove the battery If the camera is left without th...

Page 16: ...perature decreases When the camera is used in a cold environment keep this product warm by holding it in some protection against cold or inside the clothes Battery perfor mance once deteriorated due to low temperature will be recovered when the batteries are returned to room tempera ture Battery Level Indicator You can check the battery level by the symbol displayed on the LCD monitor lit green Ad...

Page 17: ...the AC plug cord to the AC adapter v Plug the AC plug cord into the power outlet Make sure that the camera is turned off when connecting or disconnecting the AC adapter Make sure that the AC plug cord and connecting cord are inserted securely If the cord becomes disconnected while you are taking pictures the data may be lost When using the AC adapter D AC8 be sure to read the operation manual acco...

Page 18: ...lose the battery card cover To remove the card eject the card by pressing it in the direc tion indicated by the arrow and pull it out Approximate Number of Recordable Images and Recorded pixels Quality levels The above table indicates the number of images when using a 16MB SD Memory Card The above table is based on standard shooting conditions specified by PENTAX and may vary depending on the subj...

Page 19: ...ting Never remove the SD Memory Card MultiMediaCard during formatting as this may cause the card to be damaged and become unusable The data on the SD Memory Card MultiMediaCard may be erased in the fol lowing circumstances Pentax does not accept any liability for data that is erased when the SD Memory Card MultiMediaCard is mishandled by the user when the SD Memory Card MultiMediaCard is exposed t...

Page 20: ...isplay Language You can choose the language in which the menus error mes sages etc are displayed from the following English French German Spanish Italian and Japanese z Turn the camera on x Use the four way controller to select the display language The default setting is English c Press the four way controller The screen for setting the next item will be displayed You can change the setting after ...

Page 21: ...g after it has been made Refer to Setting the World Time p 114 Setting the D S T Mode You can choose whether or not to display the D S T Daylight Saving Time mode z Use the four way controller to select On or Off The default setting is Off x Press the four way controller The screen for setting the next item will be displayed You can change the setting after it has been made Refer to Setting the Wo...

Page 22: ...ller and will be displayed above and below the year v Repeat Step c to change the year hour and minutes b Use the Display button to select the 12 hour or 24 hour display format 1 1 2003 0 00 Date Adjust Exit Ok OK MENU DISP 12 24 1 1 2003 0 00 Date Adjust Exit Ok OK MENU DISP 12 24 Date Adjust 10 20 2003 0 00 Exit Exit MENU Ok OK Exit DISP 12 24 Date Adjust 10 20 2003 0 00 Exit Exit MENU Ok OK Exi...

Page 23: ...again after pressing the OK button when the clock reaches 00 seconds to return to capture mode When the initial settings screen is displayed you can cancel the settings operation and switch to Capture mode by press ing the MENU button If this is done the initial settings screen will be displayed next time you turn the camera on You can change the settings after they have been made Refer to Changin...

Page 24: ...middle of the LCD monitor indicates the zone of automatic focusing You can change the size of the sub ject by pressing the Zoom but ton makes the subject bigger makes the subject smaller You can check the size of the subject by looking through the viewfinder As there is no focus frame in the viewfinder be sure to check the focusing area on the LCD monitor memo Focus Frame Zoom button Viewfinder LC...

Page 25: ...n is pressed lightly halfway You can find the following information on the LCD monitor the status lamp and the flash lamp Autofocus frame If the subject is in focus the frame will light green If the subject is out of focus the frame will not be displayed Focus status lamp Flash status lamp status Focus status lamp green Flash status lamp red lit Subject is in focus Flash is charged blink Subject i...

Page 26: ... be dis played on the LCD monitor Playing Back Previous or Next Images Still images can be played back one at a time proceeding either forward or backward z Press the Playback button after taking a picture An image will be displayed on the LCD monitor x Press the four way controller displays the previous image displays the next image LCD monitor Playback button Four way controller OK button ...

Page 27: ...alfway to return to capture mode When the screen is changed to the playback screen the image with the largest file number will be displayed first You can enlarge the image displayed on the LCD monitor by pressing the Zoom button In the case of movie pictures the first frame will be dis played If there are no images stored the No image sound mes sage will be displayed Zoom Display p 79 memo 100 002...

Page 28: ...on the camera One of the advantages of a digital camera is that it enables you to view your pictures immediately after you have taken them You can check the composition and brightness and take the picture again if you are not satis fied Playing Back Still Pictures p 79 Viewing images on a TV If you want to show your pictures to friends you can display them on your TV monitor To view images on your...

Page 29: ...he card slot To remove the SD Memory Card MultiMediaCard from the camera and transfer images using another device refer to the operating manual for the device Viewing Images with your PC p 96 Viewing Images with your Macintosh p 106 Printing images by a printing service Prints of images recorded on the SD Memory Card MultiMediaCard can be ordered in the same way as with conventional photographs by...

Page 30: ...yback Only mode When the camera turns on in Playback Only mode the lens does not extend To switch from Playback Only mode to Capture mode turn the camera off and then turn it on again Playing Back Still Pictures p 79 Voice Recorder Mode Holding the power switch down for more than 2 seconds activates the Voice Recording Only mode The power switch is illuminated by a red light To switch from Voice R...

Page 31: ...tered on the four way controller can be changed in the Fn settings p 120 Adjusts the ratio when the digital filter is set to Slim Filter on the virtual mode dial p 60 Four way controller Selects self timer mode remote control mode and continuous shooting mode Displays the virtual mode dial and changes the shooting mode Adjusts the focus in mode p 38 OK button Determines the Menu items p 32 MENU bu...

Page 32: ... Displays the image you wish to view p 25 MENU button Displays the active menus in Playback and Set up p 32 OK button Determines the Menu items p 32 Display button Changes the information displayed on the LCD monitor p 40 81 Playback button Switches to Playback mode p 24 When the camera is turned on in Playback Only mode press ing the Playback button does not change the mode to the Capture mode Tu...

Page 33: ...nds When is pressed during playback advances 5 seconds If there are recorded indexes When is pressed during playback plays back starting from the previous index When is pressed during playback plays back starting from the next index Playback button Switches between Voice Recorder Mode and Playback mode MENU button When pressed during recording an index can be added When the shutter release button ...

Page 34: ... Use the four way controller to move the frame up or down v Use the four way controller to change the setting v If there is a Select screen use the four way controller to move to the Select screen When you have finished making the settings press the OK button to return to the menu b Press the OK button The settings will be saved and the screen will return to cap ture or playback status If you pres...

Page 35: ...rimming Alarm Slideshow Exit 1 1 Ok OK MENU 3sec Off Set up Format Sound Start up Screen Date Style Date Adjust World Time Exit 1 3 Ok OK MENU On On Off 1 1 2003 mm dd yy Set up menu Playback menu Rec Mode Recorded Pixels Quality Level White Balance Focusing Area Multiple Auto AE Metering Sensitivity AWB 2048 1556 Exit 1 3 Ok OK MENU Rec Mode Recorded Pixels Quality Level White Balance Focusing Ar...

Page 36: ...For taking digital zoom pictures Sensitivity For setting the Sensitivity Instant Review For setting the instant review time Sharpness For setting the sharpness Saturation For setting the saturation Contrast For setting the contrast 3D Mode For taking 3D pictures Memory For saving the shooting function set tings when the camera is turned off AE Metering For setting the metering method to determine ...

Page 37: ...elete screen is displayed with Delete or All Images selected p 119 Quick Zoom For playing back images at the maximum zoom size with the Zoom button pressed only once p 119 Reset For returning the camera settings to defaults p 120 p 121 Fn Setting For registering a function on the four way controller Start up Screen For setting the Start up screen when the camera is turned on p 112 Date Style For s...

Page 38: ...x Move the icon for the desired mode to the top of the dial using the four way controller The icon will be surrounded by a green frame c Press the OK button Taking Pictures Setting the Shooting Functions Standard mode Lets you set all the functions p 22 Picture mode Lets you set the functions accord ing to the situation There are 7 available modes in Picture mode p 54 Night Scene mode Lets you tak...

Page 39: ...mera is focused on the subject in the autofo cus area when the shutter release button is pressed halfway Use this mode when the distance to the subject is more than 40 cm 1 3 ft Macro mode This mode is used when the distance to the subject is approx 18 cm 50 cm 7 inch 20 inch When the shutter release button is pressed halfway the camera is focused on the object in the autofocus area Infinity lands...

Page 40: ...ing the indicator on the monitor For distant focus For closer focus After the focus is set press any buttons except the four way con troller or take a finger off from the four way controller The screen returns to the normal display two seconds later The central portion of the picture is not enlarged when the digital zoom is enabled Saving the Focus Mode p 74 Changing the Focusing Point In autofocu...

Page 41: ...atus of the Focus Status Lamp and Flash Status Lamp p 23 Saving the Flash Mode p 74 Using the flash in Macro mode may cause the image to be overexposed No icon Auto flash The flash discharges automatically depending on the light conditions Auto flash Red eye Reduction This mode reduces the phenomenon of red eyes caused by the light from the flash being reflected in the subject s eyes The flash wil...

Page 42: ...d brightest at the right end and the y axis shows the pixel numbers q Histogram w Recorded pixels e Quality level r White balance t AE metering y Sensitivity u Card Built in memory Display Off No shooting information is displayed The AF frame is displayed in Autofocus mode If any of the modes are changed such as Flash mode the mode you have changed is displayed for a few seconds LCD Monitor Off Tu...

Page 43: ... If you select a large size the picture may appear distinct when it is printed out Rec Mode Recorded Pixels Quality Level White Balance Focusing Area Multiple Auto AE Metering Sensitivity AWB 2048 1556 Exit 1 3 Ok OK MENU memo Rec Mode Recorded Pixels Quality Level White Balance Focusing Area Multiple Auto AE Metering Sensitivity AWB 2048 1556 Exit 1 3 Ok OK MENU xc z 2048 1536 Suited for printing...

Page 44: ...he camera is ready to take the picture Rec Mode Recorded Pixels Quality Level White Balance Focusing Area Auto AE Metering Sensitivity AWB 2048 1556 Exit 1 3 Ok OK MENU Multiple BEST Lowest compression ratio Suited for photo prints GOOD Highest compression ratio Suited for attaching to emails or creating webpages BETTER Standard compression ratio Suited for viewing the image on a computer screen R...

Page 45: ...icture Saving the White Balance p 74 z xcv Rec Mode Recorded Pixels Quality Level White Balance Focusing Area Multiple Auto AE Metering Sensitivity AWB 2048 1556 Exit 1 3 Ok OK MENU Auto The camera adjusts the white balance automatically Daylight Shade Tungsten Light Fluorescent Light Manual Use this mode when taking pictures outside in sunlight Use this mode when taking pictures outside in the sh...

Page 46: ...k sheet of paper so that it fills the screen c Press the Display button The white balance is automatically adjusted Adjust is displayed on the LCD monitor and the display returns to the menu screen v Press the OK button The camera is ready to take the picture Adjust DISPLAY AWB White Balance Exit Ok OK MENU ...

Page 47: ...es not appear in the viewfinder Always check the focusing area on the LCD monitor Saving the Focusing Area Setting p 74 z xc Rec Mode Recorded Pixels Quality Level White Balance Focusing Area Multiple Auto AE Metering Sensitivity AWB 2048 1556 Exit 1 3 Ok OK MENU Normal range The autofocus range becomes smaller Spot Multiple Spot Rec Mode Recorded Pixels Quality Level White Balance Focusing Area A...

Page 48: ...elected the metering point moves in correspon dence with movement of the focusing area z xc Rec Mode Recorded Pixels Quality Level White Balance Focusing Area Multiple Auto AE Metering Sensitivity AWB 2048 1556 Exit 1 3 Ok OK MENU Multi segment The exposure is determined by the entire screen Center weighted The exposure is determined mainly by the center of the screen Spot The exposure is determin...

Page 49: ...hite Balance Focusing Area Multiple Auto AE Metering Sensitivity AWB 2048 1556 Exit 1 3 Ok OK MENU Rec Mode Recorded Pixels Quality Level White Balance Focusing Area Multiple Auto AE Metering Sensitivity AWB 2048 1556 Exit 1 3 Ok OK MENU Auto The camera sets the sensitivity automatically 100 200 The lower the sensitivity the sharper the image and the less noise The shutter speed will be slower in ...

Page 50: ...troller to select the display time c Press the OK button The camera is ready to take the picture The Instant Review setting is saved when the camera is turned off z xc Rec Mode Recorded Pixels Quality Level White Balance Focusing Area Multiple Auto AE Metering Sensitivity AWB 2048 1556 Exit 1 3 Ok OK MENU Rec Mode Digital Zoom Instant Review Fast Fwd Movie 3D Mode Memory Sharpness Exit 2 3 Ok OK M...

Page 51: ...ay controller to change the setting from Normal to Hard or Soft c Press the OK button The camera is ready to take the picture z xc Rec Mode Recorded Pixels Quality Level White Balance Focusing Area Multiple Auto AE Metering Sensitivity AWB 2048 1556 Exit 1 3 Ok OK MENU Rec Mode Digital Zoom Instant Review Fast Fwd Movie 3D Mode Memory Sharpness Exit 2 3 Ok OK MENU Off 2sec On Parallel ...

Page 52: ...four way controller to change the setting from Normal to Hard or Soft c Press the OK button The camera is ready to take the picture z xc Rec Mode Recorded Pixels Quality Level White Balance Focusing Area Multiple Auto AE Metering Sensitivity AWB 2048 1556 Exit 1 3 Ok OK MENU Rec Mode Saturation Contrast EV Compensation Exit 3 3 Ok OK MENU 0 0 ...

Page 53: ... way controller to change the setting from Normal to Hard or Soft c Press the OK button The camera is ready to take the picture Rec Mode Recorded Pixels Quality Level White Balance Focusing Area Multiple Auto AE Metering Sensitivity AWB 2048 1556 Exit 1 3 Ok OK MENU Rec Mode Saturation Contrast EV Compensation Exit 3 3 Ok OK MENU 0 0 z xc ...

Page 54: ...negative c Press the OK button The camera is ready to take the picture Saving the EV Compensation Value p 74 EV Compensation is registered on the four way controller in the Fn default settings p 120 The light metering method is either center weighted or spot when the EV setting is adjusted memo z xc Rec Mode Recorded Pixels Quality Level White Balance Focusing Area Multiple Auto AE Metering Sensit...

Page 55: ...oller in Capture mode The virtual mode dial appears x Use the four way controller to select Standard mode c Press the OK button v Set the functions you want to use Refer to Setting the Shooting Functions p 36 to p 52 for details of how to set the functions b Press the shutter release button The picture is taken Taking Still Pictures p 22 b zxc Ok OK v ...

Page 56: ...OK button The Picture mode is selected n Press the shutter release button The picture is taken In Picture mode the EV compensation saturation contrast sharp ness and white balance are automatically set to their default set tings You can change the settings Ok OK Ok OK Landscape Enables to take landscape photos with bright colors Flower Enables to take flower photos bright in color Surf Snow Enable...

Page 57: ...mode The virtual mode dial appears x Use the four way controller to move the icon for night scene mode at the top of the dial c Press the OK button v Press the shutter release button The picture is taken Using the shutter release button p 23 Playing back still pictures p 24 The shutter speed is slower when taking pictures of dark scenes To prevent camera shaking secure the camera on a tripod or ot...

Page 58: ...ller to display the Movie Picture mode at the top of the dial c Press the OK button q Flash off mark w Movie picture mode icon e Recordable time for next set r Number of remaining sets t Card Built in memory v Press the shutter release button Shooting will start You can change the size of the image using the Zoom button makes the image bigger makes the image smaller b Press the shutter release but...

Page 59: ...tures p 80 The flash will not discharge in Movie Picture mode Infinity landscape shooting is not possible in Movie Picture mode The LCD monitor cannot be turned off in Movie Picture mode Sound cannot be recorded when Fast Fwd Movie is set to ON Autofocus mode Infinity landscape mode and Manual focus mode can be set in Movie Picture mode Only the digital zoom can be used to change the size of the i...

Page 60: ...ssist mode at the top of the dial c Press the four way controller v Use the four way controller to choose the direction in which the images will be joined Joins the images at the left Joins the images at the right Joins the images at the top Joins the images at the bottom The example shows the images when is selected b Take the first picture Press the shutter release button to take the first image...

Page 61: ...screen returns to Step v To cancel Panorama mode change to another mode The camera cannot join the images Use the panorama software provided with the camera Continuous shooting is not possible in Panorama Assist mode A computer that supports Windows is necessary for join ing images to form a panorama picture The software provided with the camera is not supported by Macintosh memo ...

Page 62: ...the Digital Filter mode the display on the LCD monitor is filtered with the selected color and the pictures are taken in that color Slim Filter You can set the degree of slimness in 8 steps vertically or hori zontally z Press the four way controller in Capture mode The virtual mode dial is displayed x Use the four way controller to select the Digital Filter mode c Press the four way controller The...

Page 63: ...r in Digital Filter Mode the slim ness setting screen is displayed z Use the four way controller to set the slimness Decreases slimness Increases slimness x Press the OK button The camera returns to digital filter mode The digital zoom cannot be used when the slim filter is selected ...

Page 64: ...gs registered in advance in User mode z Press the four way controller in Capture mode The virtual mode dial appears x Use the four way controller to select User mode c Press the OK button v Press the shutter release button The picture is taken Registering Functions in User Mode p 75 v zxc 11 19 11 19 10 20 2003 10 20 2003 5 5 ...

Page 65: ...ss the MENU button The Rec Mode menu will be displayed x Press the four way controller to select 3D Mode c Use the four way controller to select Parallel To view the picture with the 3D image viewer select Parallel You can also view it without the image viewer v Press the OK button The 3D image mode screen appears again Take the pictures b Press the four way controller in Capture mode The virtual ...

Page 66: ... will not be achieved if the two images are taken in widely different positions heights or are not straight When taking a person you are recommended to ask your model to stay as still as possible and to take the second picture as quickly as you can It is easier to take the pictures if you use a tripod or appropriate base As a guide the camera should be moved about 1 40 of the distance between the ...

Page 67: ...ge This principle is applied to taking and viewing 3D pictures 3D pictures can be viewed by the parallel method where the left and right lines of vision are virtually parallel as when looking at a distant scene or the cross method where the left and right lines of vision are crossed as when you cross your eyes A cer tain amount of practice may be necessary to view 3D pictures without using the vie...

Page 68: ...nd right eyes differs from per son to person some people may have difficulty obtaining a three dimensional effect even when looking at prints that are the same size It may be especially difficult if the pictures are very large or very small Try different sizes until the right effect is achieved Never look at the sun through the 3D image viewer Do not leave the 3D image viewer where it is exposed t...

Page 69: ...67 Taking Pictures Example of a 3D picture ...

Page 70: ... while the shutter release button is pressed Shooting stops when you take a finger off from the shutter release button Playing Back Images p 24 You can continue shooting until the SD Memory Card MultiMediaCard is full The interval will vary according to the Recorded Pixels and Quality Level setting The flash will not discharge in Continuous Shooting mode Continuous shooting is not available for Mo...

Page 71: ...er lamp lights The picture is taken approximately 3 seconds after the self timer lamp starts to blink If you turn the LCD monitor on the second count will be dis played To cancel the self timer press the four way controller or the Menu button while the second count is displayed In 3D Image mode both the first and second images will be taken with the self timer engaged Playing Back Still Pictures p...

Page 72: ...mera can be used in the same way Please ensure that the remote control unit is no more than 4 meters away from the front of the camera To take a picture immediately after pressing the shutter release button on the remote control unit press the four way controller in step z to display on the LCD monitor You can use the remote control E optional to operate the zoom Life of the Battery for the Remote...

Page 73: ...igital zoom function is disabled you can take pictures at up to 3 times magnification using the optical zoom When the digital zoom is enabled you can further enlarge the subject to a maximum magnification equiv alent to 12 times Saving the Zoom Position p 74 You cannot use the optical zoom in Movie Picture mode z Digital zoom range Zoom bar 198 198 198 198 198 When digital zoom is enabled memo ...

Page 74: ...eady to take a pic ture When you turn the LCD monitor off the digital zoom is disabled even if the digital zoom function is set to On If Slim has been selected for the digital filter you cannot use the digital zoom When you use the digital zoom function the object should be focused by the LCD monitor Saving the Digital Zoom Function Setting p 74 Rec Mode Digital Zoom Instant Review Fast Fwd Movie ...

Page 75: ...ay controller to choose Off 1 2 5 10 20 50 or 100 v Press the OK button b Press the shutter release button Shooting in Fast Forward Movie mode starts Off 1 is the normal setting for movie pictures 12 frames per second Each time 2 or 5 is selected the number of frames taken per second is reduced to 1 2 or 1 5 As movie pictures are normally played back at the rate of 12 frames per second movies take...

Page 76: ...mory can be set separately in User mode and other shooting modes Saving the Settings Memory memo Flash Default Setting The flash mode setting on the button is saved Focus Mode The focus mode setting is saved Item Description White Balance The White Balance setting on the Rec Mode menu is saved AE Metering The AE Metering setting on the Rec Mode menu is saved File The file number is saved If a new ...

Page 77: ...ital Zoom Instant Review Fast Fwd Movie 3D Mode Memory Sharpness Exit 2 3 Ok OK MENU Off 2sec On Parallel Mode Flash White Balance AE Metering Sensitivity Exit 1 2 Ok OK MENU Alarm Digital Zoom EV Compensation Default setting Page Items registered in User mode Flash mode Auto p 39 Drive mode Normal p 68 70 Focus mode Autofocus p 36 Manual focus position Infinity p 38 Recorded pixels 2048 1536 p 41...

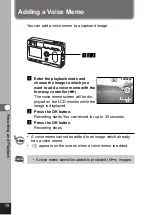
Page 78: ...stops The remaining recordable time is displayed v To exit Voice Recorder mode turn the camera off When you press the power switch the lens extends then retracts immediately and the camera enters the Voice Recorder mode Sound is saved in WAVE monaural files The microphone is located on the front of the camera Aim the camera to obtain the best sound An index can be added by pressing the MENU button...

Page 79: ...ayback Press again to resume playback If there are no recorded indexes Four way controller Rewinds 5 seconds Four way controller Advances 5 seconds If there are recorded indexes Four way controller Plays back from the previous data Four way controller Plays back from the next data Zoom button Increases the volume Zoom button Reduces the volume v Press the four way controller Playback will end b Pr...

Page 80: ...e LCD monitor while the image is displayed x Press the OK button Recording starts You can record for up to 30 seconds c Press the OK button Recording stops A voice memo cannot be added to an image which already has a voice memo appears on the screen when a voice memo is added A voice memo cannot be added to protected images Caution memo zxc 100 0019 100 0019 100 0020 100 0020 11 19 11 19 10 20 200...

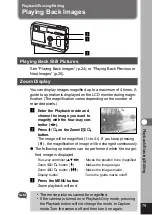
Page 81: ...button The image will be magnified 1 to 4 If you keep pressing the magnification of image will be changed continuously The following operations can be performed while the magni fied image is displayed Four way controller Moves the position to be magnified Zoom button Makes the image larger Zoom button Makes the image smaller Display button Turns the guide marks on off c Press the MENU button Zoom ...

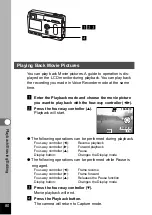
Page 82: ... be performed during playback Four way controller Reverse playback Four way controller Forward playback Four way controller Pause Display button Changes the Display mode The following operations can be performed while Pause is engaged Four way controller Frame reverse Four way controller Frame forward Four way controller Releases the Pause function Display button Changes the Display mode c Press t...

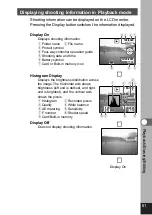
Page 83: ...y icon Histogram Display Displays the brightness distribution across the image The horizontal axis shows brightness left end is darkest and right end is brightest and the vertical axis shows the pixels q Histogram w Recorded pixels e Quality r White balance t AE metering y Sensitivity u F number i Shutter speed o Card Built in memory Display Off Does not display shooting information 100 0019 100 0...

Page 84: ... with the four way controller When 10 or more images have been recorded the previous 9 images will be displayed if you press the four way controller while an image on the left row is selected If you press the four way controller while an image on the right row is select ed next 9 images will be displayed c Press on the Zoom button The screen will return to single image display of the select ed ima...

Page 85: ...interval Choose from the following 3 sec 5 sec 10 sec 15 sec 20 sec 25 sec 30 sec b Press the OK button Playback will start at the set interval If you press the OK button during continuous playback the slideshow will stop The slideshow will continue until you press any button Movie pictures and pictures with a voice memo will be played through to the end before the next picture is played back rega...

Page 86: ...he Delete screen will be dis played c Select Delete with the four way controller v Press the OK button You can also delete images from Instant Review p 48 You cannot erase protected images with the sym bol If Quick Delete is set to On in the Set up menu Step c can be omitted Erasing Images memo zcv x 100 0020 100 0020 Cancel Delete Exit Exit Ok Ok Exit Ok OK MENU AllImagesSound AllImagesSound ...

Page 87: ...with the voice memo that you want to erase with the four way controller x Press the button The Delete screen will be displayed c Select Sound Delete with the four way controller v Press the OK button Select Delete in step c above to erase both the image and the voice memo memo 100 0020 100 0020 Cancel Delete Sound Delete Exit Exit Ok Ok Exit Ok OK MENU All Ima All Images es All Images ...

Page 88: ... cannot be restored Protected images sound cannot be erased z Enter the Playback mode and press the button twice The Delete All screen will be displayed x Select Delete All with the four way controller c Press the OK button z xc 100 0020 100 0020 Cancel Delete All Delete all images sounds Exit Exit Ok Ok Exit Ok OK MENU ...

Page 89: ... setting If the image is protected the symbol is displayed when the image sound is played back Protecting All Images You can protect all the images z Enter the Playback mode x Press the button twice The Protect all screen will be displayed c Select Protect with the four way controller v Press the OK button Select Unprotect in step c to cancel the Protect setting on all the images Even protected im...

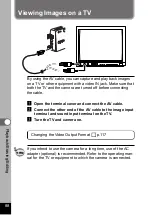
Page 90: ...nnecting the cable z Open the terminal cover and connect the AV cable x Connect the other end of the AV cable to the image input terminal and sound input terminal on the TV c Turn the TV and camera on Changing the Video Output Format p 117 If you intend to use the camera for a long time use of the AC adapter optional is recommended Refer to the operating man ual for the TV or equipment to which th...

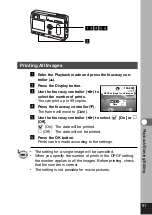
Page 91: ...owing items for each image Copies Set the number of prints up to a maximum of 99 Date Specify whether you want the date imprinted on the print or not z Enter the Playback mode use the four way controller to choose the image for which you want to make DPOF settings x Press the four way controller button The DPOF menu will be displayed zxcvb 100 0020 100 0020 Date Copies 1 Exit Exit Ok Ok Exit Ok OK...

Page 92: ...ously set number of prints and On Off date setting will be displayed To cancel DPOF settings set the number of prints to 0 and press the OK button You cannot set the printing service for movie pictures or sound only files Depending on the printer or printing equipment at the photo processing lab the date may not be imprinted on the pictures even if the DPOF setting was made DPOF settings cannot be...

Page 93: ...y controller to select On or Off On The date will be printed Off The date will not be printed n Press the OK button Prints can be made according to the settings The setting for a single image will be cancelled When you specify the number of prints in the DPOF setting the number applies to all the images Before printing check that the number is correct The setting is not possible for movie pictures...

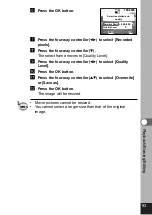
Page 94: ...en over the original image z Press the MENU button x Press the four way controller The Playback menu will be displayed c Press the four way controller to select Resize v Press the four way controller The Resize screen will be displayed b Use the four way controller to choose the image you want to resize Editing Images Menu button Four way controller OK button in the center 100 0020 100 0020 Exit E...

Page 95: ...r way controller to select Quality Level 0 Press the OK button 1 Press the four way controller to select Overwrite or Save as 2 Press the OK button The image will be resized Movie pictures cannot be resized You cannot select a larger size than that of the original image memo 100 0020 100 0020 Select resolution and quality Quality Level Recorded Pixels 640 480 Exit Exit Ok Ok Exit Ok OK MENU ...

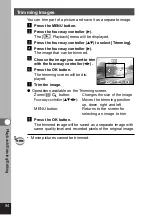
Page 96: ...with the four way controller n Press the OK button The trimming screen will be dis played m Trim the image Operations available on the Trimming screen Zoom button Changes the size of the image Four way controller Moves the trimming position up down right and left MENU button Returns to the screen for selecting an image to trim Press the OK button The trimmed image will be saved as a separate image...

Page 97: ...ing method Select and press the OK button All the files will be copied to the SD Memory Card MultiMediaCard To copy from the SD Memory Card MultiMediaCard to the Built in memory b Select the copying method Select and press the OK button n Use the four way controller to select the file you want to copy m Press the OK button The selected file will be copied to the Built in memory If the image has a ...

Page 98: ...a software ACD Photostitcher System environment OS Windows 98 98 SE 2000 Me Windows XP Home Edition Professional CPU Pentium or later recommended Memory 64MB or more Hard disk space 15MB or more Standard equipped USB port To view movie pictures on your PC Direct X 8 0 or later and Media Player pre installed on system or QuickTime 3 0 or later are required For Windows Me XP Media Player pre install...

Page 99: ...are Installer screen will appear If the PENTAX Software Installer screen is not displayed Follow the procedure below to display the screen 1 Double click the My Computer icon on the desktop 2 Double click the CD ROM Drive S SW8 icon 3 Double click the Setup exe icon c Click your applicable lan guage You can choose the language from the following English French German Spanish Italian and Japanese I...

Page 100: ... for your device Recommended Windows 98 98SE ME 2000 in the task bar recognized area to begin the installation Double click My Computer on the desktop When the installation is completed your camera can then be found in the My Computer window as Removable Disk Make sure that Removable Disk is displayed in the My computer window In the case of Windows XP if the SD Memory Card MultiMediaCard has a vo...

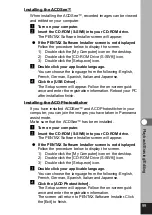
Page 101: ...n Reboot your PC after installation finish Installing the ACD Photostitcher If you have installed ACDSee and ACD Photostitcher in your computer you can join the images you have taken in Panorama assist mode Make sure that the ACDSee has been installed z Turn on your computer x Insert the CD ROM S SW8 into your CD ROM drive The PENTAX Software Installer screen will appear If the PENTAX Software Ins...

Page 102: ... camera can be found in the My Computer window as Removable Disk Camera images can be found in My Computer Removable Disk or the name on the volume label on the SD Memory Card MultiMediaCard if there is one DCIM XXXPENTX XXX is a 3 digit number A list of the images will be displayed b Select the image you want to view from the list Double click the selected image to enlarge it to full screen displ...

Page 103: ...mages you have taken in Panorama Assist mode The folder names and image names displayed on the screen for explanatory purposes may vary depending on your operating system z Start up ACDSee See p 102 for instructions on how to start up ACDSee x Select the images you want to join from the list of images To select more than one image at once click on the images while pressing Ctrl on the keyboard Aft...

Page 104: ...moving the images one by one to the desired position When you have finished correcting the position click the STITCH button v Select the type of panorama picture you want There are two types of panorama picture Big Plane and Cylinder As the former type is used in this explanation click the Big Plane button A dialog box will appear Click OK 102 Playback Erasing Editing Click the STITCH button Adjus...

Page 105: ...d trimming click the Trimming but ton n Save the picture When you are satisfied with the trimmed picture click the Save button to save the picture To cancel trimming click the Cancel Trimming button After saving the picture if you have finished creating panorama pictures exit ACD photostitcher and ACDSee 103 Playback Erasing Editing Click the Trimming button Trim the picture Click the Save button ...

Page 106: ...ar recognized area The Unplug or eject hard ware screen will appear x Make sure PENTAX USB DISK Device is selected and click Stop Stop Hardware Device screen will appear c Make sure PENTAX USB DISK Device is selected and click OK A message will appear v Click OK b Turn off the camera and dis connect the USB cable from your computer and camera PENTAX USB DISK Device at PENTAX OPTIO S ...

Page 107: ...ck Stop c Make sure PENTAX USB DISK Device is selected and click OK v A message confirming removal of the hardware will appear Turn off the camera and dis connect the USB cable from your computer and camera Disconnecting the camera from your PC Windows 98 For Windows 98 there is no Hot Plug icon To disconnect the camera turn the camera off and remove the USB cable PENTAX USB DISK Device at PENTAX ...

Page 108: ... the provided software S SW8 About the included software The included CD ROM S SW8 contains the following software USB driver Image viewing software ACDSee System environment OS Mac OS 8 6 or later QuickTime 4 0 or later required CPU Power PC 266MHz or higher Memory 8MB or more Hard disk space 6MB or more Standard equipped USB port When you connect the camera to your Macintosh you are recommended ...

Page 109: ... choose the lan guage from the following English French German Spanish Italian and Japanese Installing the USB driver Mac OS 8 6 only m Click USB Driver The USB driver will be installed When installation is completed reboot your Macintosh The USB driver does not need to be installed on Mac OS 9 0 and later versions Installing ACDSee When you install ACDSee you can edit and manage image files on yo...

Page 110: ...lick the ACDSee folder on the hard drive b Double click the ACDSee program icon n Open the camera folder Camera images can be found in untitled or the name on the volume label on the SD Memory Card MultiMediaCard if there is one DCIM XXXPENTX XXX is a 3 digit number m Select the image you want to view from the list Double click the selected image to enlarge it to full screen display Copy the image...

Page 111: ...ed instead of untitled If the card is unformatted the manufacturer and type of card may be displayed Disconnecting the camera from your Macintosh z Drag the untitled or the name on the volume label on the SD Memory Card MultiMediaCard if there is one folder on the desktop to Trash x Unplug the USB cable from your Macintosh and camera memo ...

Page 112: ...e card is being formatted The card may be dam aged and become unusable Formatting will delete protected data too z Select Format on the Set up menu x Press the four way controller The Format screen will be displayed c Select Format with the four way controller v Press the OK button Formatting will start When formatting is completed the camera is ready to capture images Four way controller OK butto...

Page 113: ...apture or play back images Changing the type of start up shutter or operation sound z Select Sound on the Set up menu x Press the four way controller The Volume screen will be displayed c Press the four way controller to select Start up Sound and choose 1 2 3 or Off with the four way controller v Change the Shutter sound and Operation Sound in the same way b Press the OK button twice The camera is...

Page 114: ...tart up screen b Press the OK button n Use the four way controller to select On or Off m Press the OK button twice The camera is ready to take or play back images Once the welcome screen has been set it will not be erased even if the original image is deleted or the SD Memory Card MultiMediaCard is formatted Four way controller OK button in the center Menu button Rec Mode Recorded Pixels Quality L...

Page 115: ... on the Set up menu x Use the four way controller to change the date style c Press the OK button The camera is ready to capture or play back images with the selected date style The style in which the time is displayed is set by Date Adjust memo Set up Format Sound Start up Screen Date Style Date Adjust World Time Exit 1 3 Ok OK MENU On On Off 1 1 2003 mm dd yy ...

Page 116: ...s p 18 serve as the Home Time setting You can display the time in a city other than the Home Time city World Time when shooting or playing back z Select World Time on the Set up menu x Press the four way controller The World Time screen will be dis played How to recall the Set up menu Four way controller OK button in the center Menu button Rec Mode Recorded Pixels Quality Level White Balance Focus...

Page 117: ...our way controller to select the World Time city and press the four way controller on the LCD monitor will move to n Select DST On or Off with the four way con troller and press the four way controller The frame will move to home time city Use the four way controller to change the Home Time city and DST setting m Press the OK button twice The camera is ready to capture or play back images with the...

Page 118: ...up menu x Use the four way controller to select the language c Press the OK button The camera is ready to take or play back images How to recall the Set up menu Four way controller OK button in the center Menu button Rec Mode Recorded Pixels Quality Level White Balance Focusing Area Multiple Auto AE Metering Sensitivity AWB 2048 1556 Exit 1 3 Ok OK MENU ...
Page 119: ...ack images on a TV monitor z Select Video Out on the Set up menu x Use the four way controller to change the video output format c Press the OK button The camera is ready to take or play back images Set up Format Sound Start up Screen Date Style Date Adjust World Time Exit 1 3 Ok OK MENU On On Off 1 1 2003 mm dd yy ...

Page 120: ...camera to turn off automatically when no opera tion is performed for a fixed time z Select Auto Power Off on the Set up menu x Use the four way controller to select 3 min 5 min or off c Press the OK button The camera is ready to capture or play back images The menu screen turns off 1 minute after the last operation The Auto Power Off function will not work when the USB cable is connected How to re...

Page 121: ...y to capture or play back images Setting the Quick Zoom Function When the Quick Zoom function is set to On images can be dis played at maximum magnification simply by pressing the Zoom button once during zoom playback z Select Quick Zoom on the Set up menu x Use the four way controller to select On or Off c Press the OK button The camera is ready to capture or play back images Set up Format Sound ...

Page 122: ...ra is ready to capture or play back images Only one function can be registered on each key of the four way controller You can choose from the following 9 functions EV Compensation Recorded Pixels Quality Level White Balance Focusing Area AE Metering Instant Review and Fast Fwd Movie Retrieving a function z Press the four way controller The function will be recalled memo Four way controller OK butt...

Page 123: ... Select Reset on the Set up menu x Press the four way controller button The Reset screen will be displayed c Use the four way controller to select Reset v Press the OK button The camera is ready to capture or play back images Set up Format Sound Start up Screen Date Style Date Adjust World Time Exit 1 3 Ok OK MENU On On Off 1 1 2003 mm dd yy ...

Page 124: ...roller The list of alarms will be displayed Active alarms are indicated by b Press the OK button twice If any alarms are enabled the camera will be turned off and the alarms will be set Setting the Alarm z Press the MENU button x Press the four way controller The Playback menu will be displayed c Press the four way controller to select Alarm Setting the Alarm Four way controller OK button in the c...

Page 125: ...he four way controller to select the image to be displayed when the alarm rings Press the OK button 0 Press the OK button 3 times The camera will turn off Turning the Alarm Off When the camera is turned off and the set time is reached the alarm will ring for one minute The camera will turn off automatically when the alarm has fin ished ringing To stop the alarm ringing press any button The alarm w...

Page 126: ...ty DAC Dacca CHI Chicago RGN Rangoon MIA Miami BKK Bangkok YTO Toronto KUL Kuala Lumpur NYC New York VTE Vientiane SCL San Diego SIN Singapore CCS Caracas PNH Phnom Penh YHZ Halifax SGN Ho chi Minh BUE Buenos Aires JKT Jakarta SAO Sao Paulo HKG Hong Kong RIO Rio de Janeiro PER Perth MAD Madrid BJS Beijing LON London SHA Shanghai PAR Paris MNL Manila MIL Milan TPE Taipei ROM Rome SEL Seoul BER Berl...

Page 127: ...are available for this camera AC adapter D AC8 USB Cable I USB7 AV Cable I AVC7 Camera Case O CC8 Strap O ST5 3D image viewer O 3DV1 Remote control E Remote control F Rechargeable lithium ion battery D LI8 Battery charger D BC8 Optional Accessories ...

Page 128: ...e the battery or replace with charged battery p 12 Shooting and playback are impossible due to a problem with SD Memory Card MultiMediaCard Try displaying on a PC The SD Memory Card MultiMediaCard you have inserted is unformatted or has been formatted on a PC or other device and is not compatible with this camera p 110 The image is being recorded on the SD Memory Card MultiMediaCard The protect se...

Page 129: ...The battery is exhausted The image you just captured has not been saved Recharged the battery or replace with charged battery Battery depleted the image is not stored Compression of the image you captured has failed Change the recorded pixels or quality levels and take a picture again Compression error The movie picture is being recorded Data being recorded The image you are trying to delete is a ...

Page 130: ... Check battery is installed If not install battery Battery is installed incorrectly Check orientation of battery Reinsert battery with symbol towards back of camera p 13 Battery power is low LCD monitor is set to OFF Image is displayed but is hard to see Flash is charging No available space on SD Memory Card MultiMediaCard or in Built in memory Insert SD Memory Card MultiMediaCard with available s...

Page 131: ...s not in focus ing area Position subject in AF frame focusing area in middle of LCD monitor If the subject is outside the focusing area aim the camera at the subject and lock the focus press shutter release button halfway then compose picture and press the shutter release but ton fully Subject is too close Set focus mode on Macro or Super Macro p 37 Focus mode is set on Macro or Super Macro Normal...

Page 132: ...mposition 6 elements in 5 groups one aspherical elements Zoom type Electrically driven Picture Range 38 4 mm x 28 5 mm screen is filled using macro mode or manual focus at max WIDE position Lens Barrier Electrically driven Effective Pixels Type Sensor Fully automatic compact type digital still camera with built in zoom lens 3 2 megapixels Auto manual equivalent to ISO 50 100 200 Good Better Best B...

Page 133: ... m to infinity Drive Modes Single frame Continuous Remote Control Self timer Self timer Electronic control type delay time approx 10 sec Time function World Time setting for 62 cities 28 time zones Video Output Format NTSC PAL Size 83 W 52 H 20 D mm excluding operating members and projections Mass 98g excluding battery and SD Memory Card MultiMediaCard Mass when shooting 113g including battery and...

Page 134: ...ntatives of the manufacturer in your country send the equipment to the man ufacturer with postage prepaid In this case it will take a consider able length of time before the equipment can be returned to you owing to the complicated customs procedures required If the equip ment is covered by warranty repairs will be made and parts replaced free of charge and the equipment will be returned to you up...

Page 135: ...tries can supersede this warranty policy Therefore we recommend that you review the warranty card supplied with your product at the time of purchase or contact the PENTAX distributor in your country for more information and to receive a copy of the warranty policy 133 Appendix The CE Mark is a Directive conformity mark of the European Community ...

Page 136: ... may cause harmful interfer ence to radio communications However there is no guarantee that interference will not occur in a particular installation If this equipment does cause harmful interference to radio or television reception which can be determined by turning the equipment off and on the user is encouraged to try to correct the interference by one or more of the following measures Reorient ...

Page 137: ...andards Records main tained continue to reflect the equipment being produced can be expected to be within the variation accepted due to quantity production and testing on the statistical basis as required by 47CFR 2 909 Operation is subject to the following two conditions 1 This device may not cause harmful interference and 2 This device must accept any interference received including interference...

Page 138: ...RLANDS http www pentax nl for Belgium Luxembourg Weiveldlaan 3 5 1930 Zaventem BELGIUM http www pentax be PENTAX Schweiz AGWidenholzstrasse 1 Postfach 367 8305 Dietlikon SWITZERLAND http www pentax ch PENTAX Scandinavia ABP O Box 650 75127 Uppsala SWEDEN http www pentax se PENTAX U S A Inc 35 Inverness Drive East Englewood Colorado 80112 U S A http www pentax com PENTAX Canada Inc 3131 Universal D...

Reviews: