


Air Conditioner Operating Instructions
(cont'd)
FAN
(High-Med-Low).
LCD
SWING
LCD
SWING
(8 beeps)
Water Full
Horizontal Louver Blades
(excluding the top or bottom louver)
(excluding the top and/or bottom
louvers).
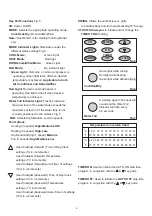
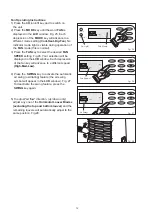
5) Press the
key to select the desired fan
speed setting
See Fig.14.
Your selection will be displayed in the
window (each depression of the fan key will
advance to a different setting).
6) Press the
key to activate the automatic
air swing (oscillating )feature (the "air swing"
symbol will appear in the
window ). Fig. 15.
To deactivate the air swing feature, press the
key again.
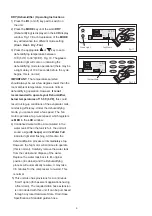
7) Condensed water will be accumulated in the
water tank. When the tank is full, the unit will
sound a signal
and the
indicator light start flashing. At this time the air
conditioning process will immediately stop
However , the fan motor will continue to operate
(this is normal ). Carefully remove the water tank
from the cabinet and dispose of the water .
Replace the water tank back to it's original
position (in cabinet) and the air conditioning
process will automatically resume. It may take
3-5 minutes for the compressor to re-start . This
is normal.
8) To adjust "air flow" direction , (up / down only )
adjust any one of the
and the
remaining louvers will automatically adjust to the
set position
Fig.16.
Cooling stops automatically when the set
temperature is achieved. Cooling resumes when the
room temperature rises above the set temperature
level. The temperature has no effect on the fan
operation. Therefore, the fan will operate
continuously (after the compressor has cycled off) to
maintain optimal temperature control.
12:00
00
TIMER
TIMER
ON
MODE
MODE
COOL
TEMP.
FAN SPEED
SWING
Fig. 14
Fig. 15
Fig. 16
SWING
SWING
OFF
OFF
ON
ON
MODE
MODE
TIMER
TIMER
FAN
FAN
I/O
I/O
CLOCK
CLOCK
HIGH
Fan Speed
Air Swing
12:00
00
TEMP.
TIMER
FAN SPEED
MODE
ON
COOL
HIGH
8
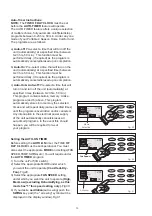
During air conditioning and dehumidifying modes, if the
compressor cycle is interupted (unplugged, power
failure, etc.) And reinstated immediately thereafter,(within
3-5 minutes.) A "compressor protection circuit"is
automatically self-affected. The mode indicator light will
flash "green" for approximately 10 seconds, confirming the
protection circuit is activated. The compressor cannot
operate during a "compressor protecton" condition.(this is
normal)It may take 3-5 minutes before the "protection
circuit" self-deactivates.
DO NOT ATTEMPT TO START THE UNIT
(COMPRESSOR)DURING THIS PERIOD.
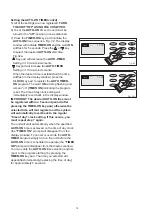
Removal and/or partial displacement of the water
tank will cause the compressor to stop operating
(this is a safety feature). This condition will cause
the unit to "beep 8"times"and the "water full"light
will flash
continuously until corrected.
Check the following;
1. Is the water tank full?
Empty and re-install water tank.
2. Has the water tank been accidently displaced?
Re-Position water tank.
The "red" light will stop flashing automatically
When the water tank has been emptied and/or
correctly re-positioned.
(red)
The
compressor cannot operate during a flashing
"red" light condition.
CAUTION
ATTENTION
!
!
!
!


