Pegasus PDCHRDN-700AI User Manual Download Page 10

8

2.5 Adjusting the Camera Position

The dome camera has three axes for positioning the camera.  While monitoring the 

picture on the monitor, adjust the camera position as follows:

Horizontal Adjustment 

 Rotate 3D assembly in the base. Do not turn assembly 

more than 360° as this may cause the internal cables to twist and disconnect or 

break.

Vertical Adjustment

  After loosening the screw on the bracket, position the camera 

as desired, then tighten the screw back to the bracket.

Horizontal Rotation  

For wall mount and tilted ceilings, rotate the lens base 

(maximum 360°) until you are satisfied with the field of view.

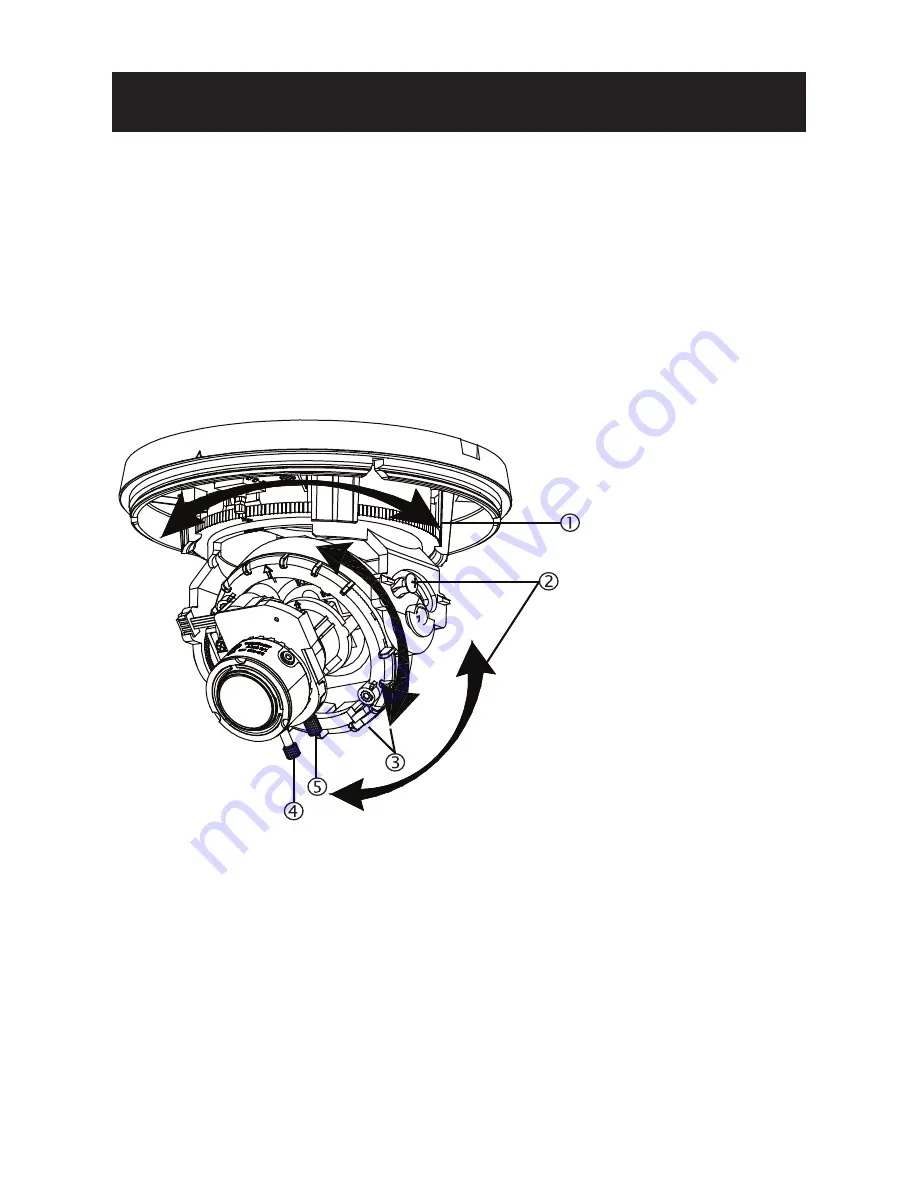
1. Rotate 3D assembly in base for 

horizontal adjustment

2. Tilt adjustment bracket and screw 

for vertical adjustment

3. Axis ring for horizontal rotation 

for wall mount and tilted ceilings 

4. Focus lever
5. Zoom lever

Figure 2-4 Camera adjustment

2.6 Adjusting the Lens

1. 

Loosen the focus lever (#4) counter-clockwise a little, then adjust the focus for 

optimum picture sharpness.

2. 

Loosen the zoom lever (#5) counter-clockwise a little, then rotate the zoom lever 

and determine the image view. 

3. Re-tighten the zoom lever and focus lever after adjustment. 

Note: 

It is important that you lock the 

zoom 

and focus levers after making 

adjustments. This will avoid the positions moving (for example, from temperature 

changes or vibrations).


INSTALLATION

Summary of Contents for PDCHRDN-700AI

Page 1: ...Indoor Dome Camera User Manual Before attempting to connect or operate this product please read these instructions carefully and save this manual for future use ZEIM 4000511G 447 A 1...

Page 2: ......

Page 3: ...ns not expressly approved by the party responsible for compliance could void the user s authority to operation this equipment Warning and Operating Notest Installation and serving the camera should be...

Page 4: ...wiring 6 2 3 Mounting the Camera 6 2 4 Optional Camera Settings 7 2 5 Adjusting the Camera Position 8 2 6 Adjusting the Lens 8 2 7 Completing the Installation 9 3 OSD Settings 10 3 1 Lens 10 3 2 SHUT...

Page 5: ...efore you install the dome camera Keep this guide for future reference 1 2 Unpack Everything Check that the items received match those listed on the order form and packing slip The dome camera packing...

Page 6: ...put connector Note See Figure 2 3 for camera board controls 1 5 Routine Maintenance The dome cover is an optical part Use a soft dry cloth to remove any fingerprints or dust Clean the camera housing w...

Page 7: ...mble the camera 1 Insert a coin or flat tool to the side hole and twist to remove the dome cover 2 Remove the inner liner 3 by gently pulling it free from the tilt adjustment bracket 2 3 Set the dome...

Page 8: ...3 Mounting the Camera 1 Attach the mounting template to the wall or ceiling 2 Drill two holes then insert the screw anchors 1 into the holes 3 Secure the bottom case to the wall or ceiling with the T...

Page 9: ...required To use the OSD joystick control Press the OSD joystick control straight down to enter the Main menu or a selected item Move the OSD joystick control UP DOWN LEFT and RIGHT to navigate throug...

Page 10: ...u are satisfied with the field of view 1 Rotate 3D assembly in base for horizontal adjustment 2 Tilt adjustment bracket and screw for vertical adjustment 3 Axis ring for horizontal rotation for wall m...

Page 11: ...a housing 1 Use a soft lint free cloth to wipe the dome cover clean and remove fingerprints 2 Attach the inner liner 3 to the tilt adjustment bracket 2 Push down unitl it clicks into place 3 Assemble...

Page 12: ...UTO Then select SPEED to adjust the DC Iris Lens convergence speed TYPE DC MODE OPEN SPEED 046 3 2 SHUTTER AGC You can set the SHUTTER AGC as AUTO or MANUAL The default setting is AUTO When LENS is se...

Page 13: ...SER2 You can adjust blue setting B GAIN and red setting R GAIN value from 0 to 255 PUSH When selected in the appropriate position the whole area will perform white balance PUSH LOCK When selected in t...

Page 14: ...oring The default setting is OFF If selecting ON you will enter the PRIVACY submenu You can configure up to 8 privacy areas and set color and transparency of the privacy zones In addition you can enab...

Page 15: ...in dark areas become lessened Also resolution will become lower When it is lower there are more noise in dark areas 3 11 CAMERA ID CAMERA ID allow you to specify camera ID Options are OFF default and...

Page 16: ...ain Control On Off selectable White Balance ATW Manual User Push Push lock Electric shutter 1 60 sec 1 50 sec Flickerless Yes BLC Off BLC HLC High Light Compensation selectable Day Night Mode Digital...

Reviews: