Peachtree Audio deepblue3 Owner'S Manual Download Page 6

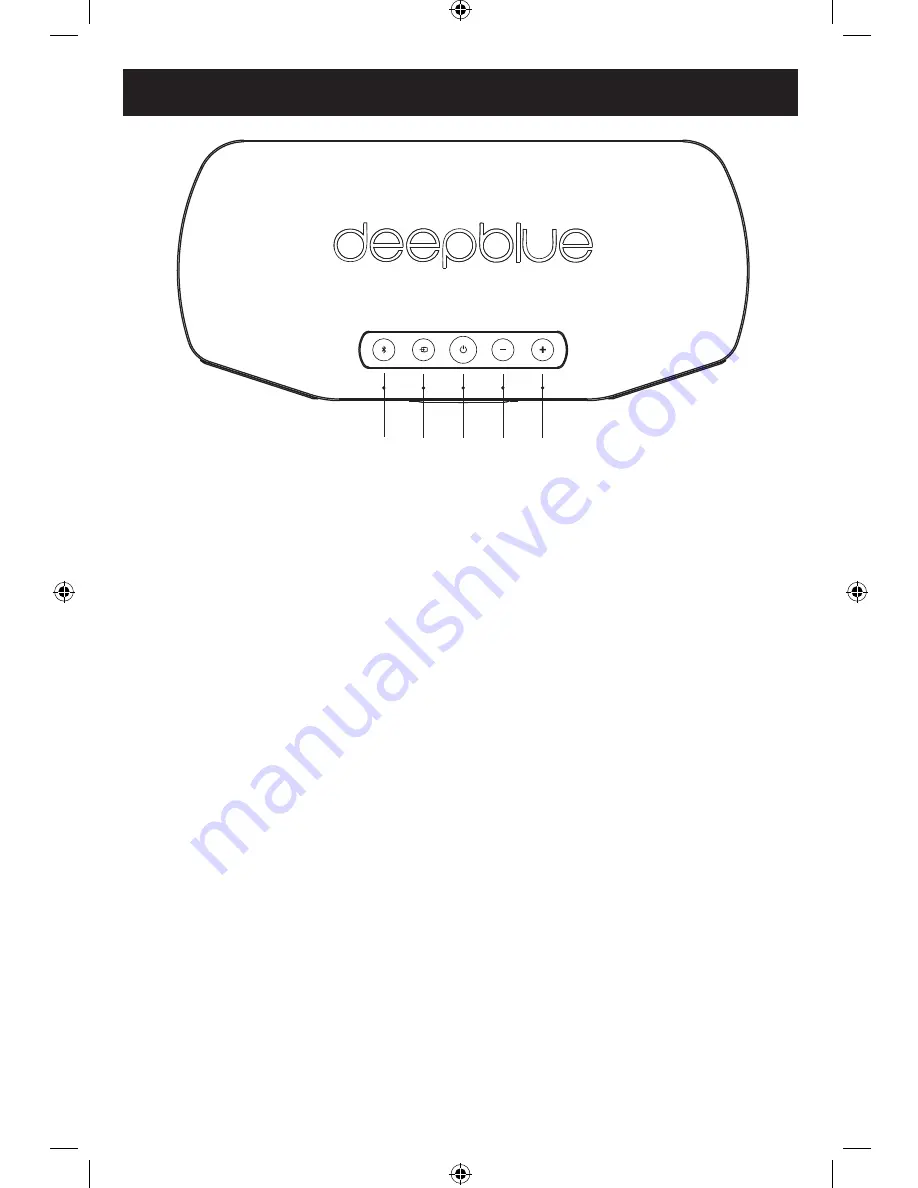
Bluetooth: Push and release to select the Bluetooth input. The LED will light blue 

for 10 seconds indicating the input is selected. Push and hold for 5 seconds to 

enter Bluetooth pairing mode. The Bluetooth LED will flash blue and white in this 

mode. Enter the Bluetooth menu on your device and select “deepblue

3

” to confirm 

the pairing.  The Bluetooth LED will light solid blue and you will hear a double-beep 

when the deepblue

3

 is connected to a Bluetooth device.

Notes: deepblue

3

 will pair with up to 5 Bluetooth devices. After they are paired, 

pressing and releasing the Bluetooth button will switch between them. To clear 

all paired devices, press and hold the power button for 10 seconds. The power 

LED will blink white to confirm that the Bluetooth paired device memory has been 

cleared.

INPUT: Push and release to toggle between the AUX (blue LED) and OPT (white 

LED) inputs on the rear panel. The LED will light blue for 10 seconds indicating the 

AUX input is selected. The LED will light white for 10 seconds indicating the OPT 

input is selected.

On/Standby: Push and release to toggle between power on and standby modes. 

The current input LED will light for 10 seconds after the unit is powered on.

Volume “-”: Push and release to decrease the volume level by 1 step. Push and 

hold for more than 1 second to continually decrease the volume level.  The volume 

level will continue decreasing until you release the button or achieve the minimum 

volume level.

Volume “+”: Push and release to increase the volume level by 1 step. Push and 

hold for more than 1 second to continually increase the volume level. The volume 

level will continue increasing until you release the button or achieve the maximum 

volume level.
Notes:  The five LEDs flash white while the volume level is muted. The blue 

LEDs indicate the volume level for 10 seconds after a volume button is released. 

Each LED represents ~20% of the volume level range.

B

C

D

E

F

TOP PANEL BUTTONS

Summary of Contents for deepblue3

Page 1: ...Owner s Manual...

Page 2: ...hout the EU To prevent possible harm to the environment or human health from uncontrolled waste disposal recycle it responsibly to promote the sustainable reuse of material resources To return your us...

Page 3: ...3 Rev 8 2017 Introduction Contents and Rear Panel Connections Top Panel Buttons Remote Control Useful Tips and More Troubleshooting and Specifications Product Warranty and Service...

Page 4: ...amazing sound quality and output capability from a relatively small footprint This manual is intended as an overall guide to your deepblue3 It explains how to set it up pair and connect devices and us...

Page 5: ...For connection to a compatible AC power source using the included power cord D USB Port For service use only Note Does NOT function as a USB digital audio input E OPT Digital Audio Input Accepts digit...

Page 6: ...nputs on the rear panel The LED will light blue for 10 seconds indicating the AUX input is selected The LED will light white for 10 seconds indicating the OPT input is selected D On Standby Push and r...

Page 7: ...Push and release to decrease the bass level by 1 step Push and hold for more than 1 second to continually decrease the bass level The bass level will continue decreasing until you release the button...

Page 8: ...and open the Bluetooth menu and if necessary tap on the deepblue3 to reestablish the connection Out of Range or Lost Signal When the paired device is more than 33 feet away from the deepblue3 or ther...

Page 9: ...ure Bluetooth is enabled on your device Make sure your Bluetooth device is within 33 feet of the deepblue3 Move closer or adjust the position of the deepblue3 to establish a connection Make sure music...

Page 10: ...lost You may also wish to initiate a RA through your dealer or distributor which is encouraged The unit should be packed in its original shipping carton and packaging and returned to the dealer or dis...

Page 11: ...try to correct the interference by one or more of the following measures Reorient or relocate the receiving antenna Increase the separation between the equipment and receiver Connect the equipment in...

Page 12: ...Owner s Manual...

Reviews: