background image

7.

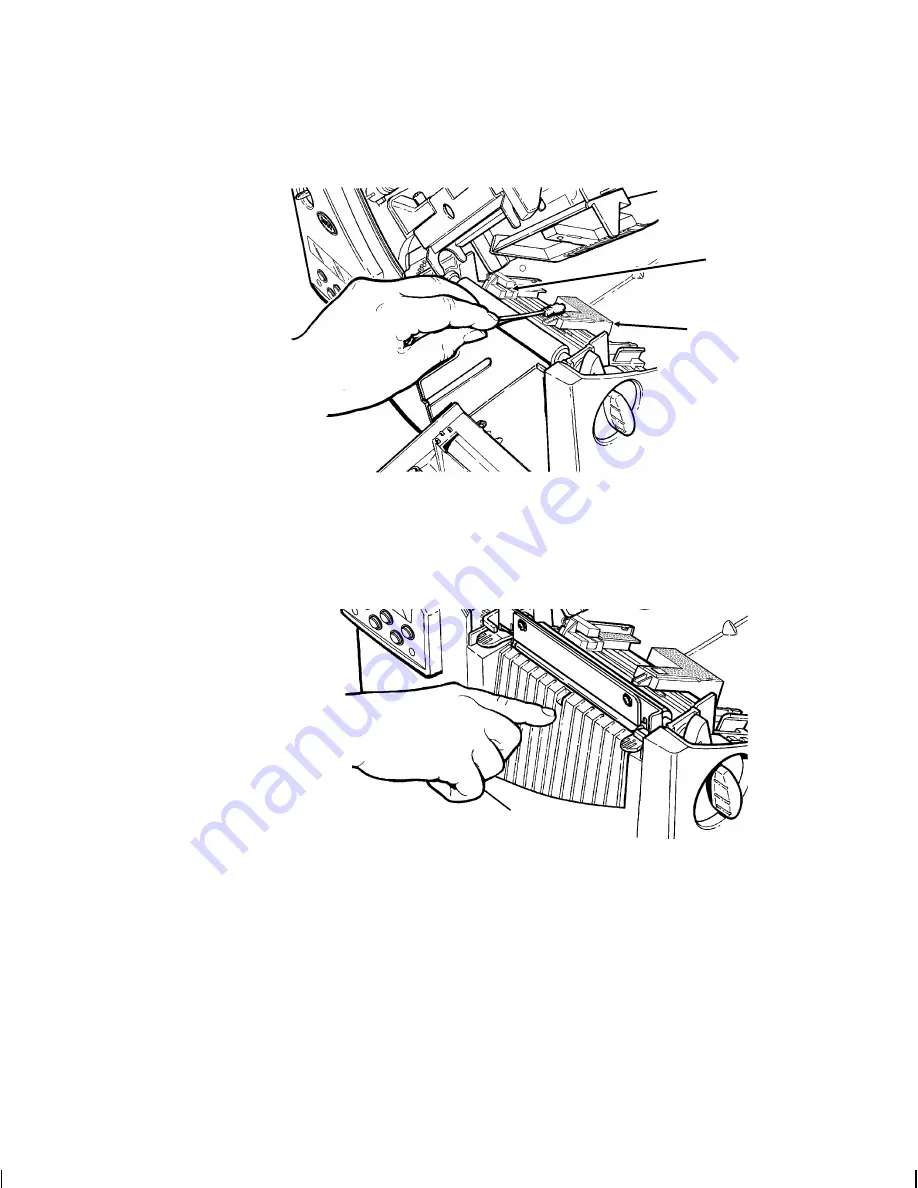
Rub the cotton swab across the supply sensor and die cut
sensor and remove any build-up.

8.

Clean the build-up in the supply path.

9.

Let the printer dry before you reload supplies.  

10.

Close the exit cover by pushing firmly on it.  Both latches will
click into place.

11.

Close the cover and printhead assembly.

12.

Turn on the printer.

13.

Press

 Feed/Cut

 to position the supply under the printhead.

Resend your format, batch, and check digit packets.

Die Cut Sensor

Supply Sensor

9-4    

Care and Maintenance

Summary of Contents for Monarch 9855

Page 1: ...Paxar 9855 Printer TC9855OH Rev AB 4 03 2003 Paxar Americas Inc All rights reserved ...

Page 2: ...ser will be required to correct the interference at his own expense CANADIAN D O C WARNING This digital apparatus does not exceed the Class A limits for radio noise emissions from digital apparatus set out in the Radio Interference Regulations of the Canadian Department of Communications Le présent appareil numérique n émet pas de bruits radioélectriques dépassant les limites applicables aux appar...

Page 3: ... 1 3 Establishing Communications 1 4 Connecting the Communication Cable 1 4 Using the Control Panel 1 5 Printer Status Lights 1 5 Button Functions 1 6 Display 1 7 Selecting a Function 1 7 Exiting an Option 1 8 LOADING SUPPLIES 2 1 Loading Labels or Tags 2 2 Using the Optional Tear Bar 2 8 Using Linerless Supply 2 9 Adding the Peel Edge or Shelf 2 9 Using String Tag Supply 2 13 String Tag Considera...

Page 4: ... Feed Mode 4 5 Backfeed 4 6 Positioning 4 7 Print Position 4 7 Supply Position 4 9 Margin Position 4 10 Cut Position 4 11 Dispense Position 4 12 Backfeed Distance 4 13 Batch Separators 4 14 Skip Index 4 15 Setting Contrast 4 16 Verifier 4 18 COMMUNICATION VALUES 5 1 Baud Rate 5 2 Word Length 5 2 Stop Bits 5 4 Parity 5 4 Flow Control 5 5 Reset to Default Values 5 6 ii ...

Page 5: ... 6 8 Using Flash Memory 6 9 Formatting Flash Memory 6 9 Checking Available Flash Memory 6 10 Packing Flash Memory 6 11 Memory Guidelines 6 12 Setting Batch Options 6 13 USING SCRIPTS 7 1 Initial Script Startup Procedures 7 1 Viewing Script Information 7 2 Downloading a Script 7 3 Enabling a Script 7 4 Deleting a Script 7 5 Enabling Status Polling 7 6 Enabling Immediate Commands 7 6 iii ...

Page 6: ...e Fonts 8 9 Licensing Your Fonts 8 10 CARE AND MAINTENANCE 9 1 Clearing Label Jams 9 1 Cleaning 9 1 Replacing the Printhead 9 6 DIAGNOSTICS TROUBLESHOOTING 10 1 Factory Set Password 10 1 Checking the Software Version 10 1 Printing a Test Label 10 2 Checking Supply Quality 10 3 Using Password Protection 10 4 Enabling the Password System Administrators only 10 4 Service Diagnostics 10 5 Troubleshoot...

Page 7: ...A 3 Linerless Supplies A 4 String Tag Supplies A 4 Ribbon Specification A 5 About Ribbons A 5 Cable Pinouts A 6 ACCESSORIES OPTIONS B 1 Accessories B 1 Packaging Materials B 3 Factory Installed Options B 3 Ethernet Information B 4 RF Information B 4 GLOSSARY G 1 v ...

Page 8: ...vi ...

Page 9: ...pply Type in Chapter 4 for more information about the supply types This chapter includes information about N unpacking the printer N connecting the power cord N connecting the communication cable N using the printer s control panel Several chapters of this manual have one or more charts showing the printer s menu structure For example The black boxes show where you are the bordered boxes show how ...

Page 10: ... S h i p p i n g t h e P r i n t e r If you need to ship the printer to a different location 1 Remove the ribbon roll if one is loaded 2 Remove the supply roll if one is loaded 3 Close the printhead by pressing down on the thumb well until you hear it click into place 4 Place the printer in the original box and secure with packaging material Make sure the printer is adequately packed to avoid dama...

Page 11: ...int this manual or order a hard copy version part number TC9800PM A b o u t M o n a r c h M P C L To o l b ox U t i l i t i e s The Monarch MPCL Toolbox utilities are available on our Web site and are free to download This group of development utilities helps you configure the printer customize fonts and download files Monarch MPCL Toolbox utilities are not label production software Call Customer ...

Page 12: ...able Part 118366 Parallel Communication IEEE 1284 or Centronics mode cable Part 118363 C o n n e c t i n g t h e C o m m u n i c a t i o n C a b l e Connect the communication cable into the appropriate port Secure the cable with the connecting screws serial or spring clips parallel If you are communicating with the host through the serial port make sure the printer s communication values match tho...

Page 13: ... 2 status lights and five buttons The control panel displays error codes messages and allows you to setup configure the printer P r i n t e r S t a t u s L i g h t s Power The printer shows a steady green light when it is on The Power light blinks when the battery needs to be recharged only on battery powered cart models Fault The printer shows a blinking amber light when there is a printer error ...

Page 14: ...is online pauses the current print job or resumes a paused print job When the printer is offline selects the displayed menu item Escape Clear N When an error is present clears the error N When a job batch is printing cancels the print job batch For more information about canceling batches see Canceling a Paused Batch in Chapter 8 N When the printer is online without errors enters the offline menu ...

Page 15: ...The Main menu has several functions operating modes These functions are shown in the chart below If the printer displays PRINT MODE Ready when you turn it on press Escape Clear to display the Main menu To display menu options press l or r N When the screen displays a right arrow press r to display more options MAIN MENU Cancel All r N When the screen displays a left arrow press l to display more o...

Page 16: ...eration Through the Setup Menu you can select a sub menu for the supply contrast default or port settings Each of those sub menus have several options such as ribbon speed monetary symbols and baud rate E x i t i n g a n O p t i o n To exit an option press Escape Clear once You will exit to the next higher menu If you press Escape Clear from a menu your settings are not saved Your settings are onl...

Page 17: ...istant supplies that require a ribbon able to withstand high temperatures See Using a High Energy Ribbon in Chapter 3 for more information If you are using thermal direct supplies do not load a ribbon If you switch from black mark to die cut supplies make sure the printer s supply type is set correctly See Supply Type in Chapter 4 for more information Your System Administrator can also send the su...

Page 18: ... Lift printhead assembly using the printhead tab until the assembly locks into place 4 Place the roll of supply on the supply holder For labels the supply unrolls from the top or the bottom For tags make sure the supply unrolls from the bottom because tag rolls are wound face in Do not pick up the printer by the supply holder PrintheadTab DeflectorTab 2 2 Loading Supplies ...

Page 19: ... across the supply guide so that a few inches extend past the front of the printer Tuck the supply under the nibs and in between the die cut sensor Do not feed supply between the supply roller and deflector For fan fold supplies lay the label strip over the supply holder and across the supply guide so that a few inches extend past the front of the printer Tuck the supply under the nibs and in betw...

Page 20: ...upply through the knife Make sure at least 0 5 inches of supply is past the knife 8 Adjust the supply guides so they touch the supply Push up on the supply lever to lock the supply guides into place Tag Nibs SupplyLever DieCut Sensor 2 4 Loading Supplies ...

Page 21: ...b while pressing down on the printhead release 10 Close the printhead by pressing down on the thumb well until you hear it click into place 11 Close the cover 12 Press Feed Cut to position the supply under the printhead ThumbWell Loading Supplies 2 5 ...

Page 22: ...ed one is removed from the printer Make sure the printer is configured for on demand mode and the correct supply type The minimum feed length is 1 5 inches for peel mode We recommend using 0 5 inch gap supplies in peel mode when backfeed is disabled Hold the leading edge of peeled labels when printing on stock longer than six inches You must use non perforated supplies for peel mode Follow the ste...

Page 23: ...wer opening of the exit cover Close the exit cover Pull down on the backing paper to remove any slack When removing the backing paper pull up across the saw toothed tear edge Make sure the backing paper tears at the edge PeelBar LowerOpening BackingPaper TearEdge Loading Supplies 2 7 ...

Page 24: ... the optional tear bar Tear labels against the tear bar You cannot tear tags with the tear bar Slide the supply between the tear bar and peel bar It may be easier if you cut one corner of the supply first Do not tear both label and backing paper at the same time N Tear labels against the tear bar N Tear backing paper against the tear edge BackingPaper TearEdge TearBar PeelBar 2 8 Loading Supplies ...

Page 25: ...educe the platen roller life Use the narrow setting for linerless supplies To prevent jams do not leave the printhead closed in the locked position longer than 30 minutes without printing Open unlock the printhead before a break period at the end of each shift and at the end of each day Your linerless machine includes a shelf already installed You can remove the shelf and add the peel edge if you ...

Page 26: ...er tabs to open the exit cover 6 Pull back slightly on the spring latch with your thumb or fingernail and lift the shelf out CAUTION Be careful when inserting or removing the shelf The shelf has sharp points 2 10 Loading Supplies ...

Page 27: ...you hear it click into place The peel bar must be lined up with the platen roller 8 If inserting the shelf Insert the left edge of the shelf into the side slot at an angle Slide the shelf to the right aligning it with the spring latch and press down until you hear it click into place The shelf must be lined up with the platen roller Loading Supplies 2 11 ...

Page 28: ... See the following diagrams CAUTION Make sure the shelf is not misaligned with the platen roller or damage to the platen roller could occur PlatenRoller Shelf SpringLatch Shelf inserted correctly PlatenRoller Shelf Shelf not inserted correctly 2 12 Loading Supplies ...

Page 29: ...or shelf Press Feed Cut to position the supply under the printhead U s i n g S t r i n g Ta g S u p p l y String tags are used in a variety of applications such as jewelry tags and item marking S t r i n g Ta g C o n s i d e r a t i o n s N Thermal direct printing fan fold supplies and the knife are not supported with string tags N The maximum print speed with string tags is 6 0 inches per second ...

Page 30: ...ck the printhead by turning the retaining latch 3 Lift printhead assembly using the printhead tab until the assembly locks into place 4 Shake the roll of string tags down to untangle the roll 5 Place the roll of supply on the supply holder with the strings facing out 2 14 Loading Supplies ...

Page 31: ...es have been angled slightly for string tag supplies 8 Lay the supply across the supply guide so that a few inches extend past the front of the printer Tuck the supply under the nibs and in between the die cut sensor 9 Adjust the supply guides so they touch the supply Push up on the supply lever to lock the supply guides into place Nib SupplyLever DieCut Sensor Loading Supplies 2 15 ...

Page 32: ...your supply For supply that is more than two inches adjust the knobs to the wide setting For supply that is two inches or less adjust the knobs to the narrow setting For linerless supply use the narrow setting knobs are up For string tag supply use the wide setting knobs are down You must adjust both of the knobs to the same position If you experience ribbon smudging in cold dry environments adjus...

Page 33: ...n for printing High Energy Supplies require a ribbon able to withstand high temperatures If you are using thermal direct supplies do not load a ribbon If you are using high energy supply be sure to use a high energy ribbon See Using a High Energy Ribbon for more information If you want to use a high energy ribbon select high energy for the ribbon every time the printer is turned on See Ribbon in C...

Page 34: ...head tab until the assembly locks into place 4 Push the deflector tab down 5 Slide the extra ribbon core on the take up reel as far as it will go with the This End Out writing facing out Use your empty ribbon core as the take up core The take up core only fits on the take up reel one way An extra take up core is available by ordering part number 117961 Printhead Assembly Deflector Tab 3 2 Loading ...

Page 35: ...a few inches of ribbon from the bottom of the roll 8 Carefully feed the ribbon under both ribbon rollers and printhead as shown 9 Align the ribbon and make sure it is straight and centered throughout the path 10 Tape the ribbon to the take up core Do not tape the ribbon to the take up reel 11 Rotate the take up core until the leader is past the printhead Take upCore Take upReel RibbonRollers Loadi...

Page 36: ... E n e r g y R i b b o n High energy ribbon is an option for this printer It enables you to print on high energy TUFF MARK supplies When you select high energy ribbon for the printer setting you are setting the printer to a higher printing temperature Select this setting only after you have loaded a high energy ribbon and supply or it may damage your printhead Select a high energy ribbon every tim...

Page 37: ...inted N Do not use peel mode N No more than 20 of the supply should have print black coverage CAUTION The high energy ribbon may break or stick to the supply when more than 20 of the supply contains print N Only white high energy supply should be used for bar code printing N Reverse fonts cannot be used N A non printing area of at least 1 inch 2 54 mm must exist on the left and right edge of the r...

Page 38: ...3 6 Loading Ribbon ...

Page 39: ... Die Cut Ribbon No Yes High Energy Yes Speed 2 5 4 0 6 0 8 0 10 0 12 0 Default Default Feed Mode Continuous On Demand Continuous Backfeed Off On Extended Off Print Position 99 to 99 0 Supply Position 300 to 300 0 Margin Position 99 to 99 0 Cut Position 300 to 300 0 Dispense Position 50 to 200 65 Backfeed Distance 10 to 200 65 Separators No Yes Long No Skip Index No Yes No Contrast 699 to 699 0 SUP...

Page 40: ...nge the setting from the Main Menu select Setup then Supply If password protection in enabled press Feed Cut three times then press Enter Pause before you see the Setup Menu options Then follow these steps 1 Press l or r until you see SUPPLY l Supply Type r 2 Press Enter Pause to set the supply type option The current setting is displayed for example SUPPLY TYPE l Black Mark r 3 Press l or r to se...

Page 41: ...o set the ribbon option The current setting is displayed for example RIBBON l Yes r 3 Press l or r to see the other options After you display the option you want press Enter Pause Press Escape Clear until you see the Main Menu If you set the Ribbon option to Yes install a ribbon before printing If you want to use a high energy ribbon select high energy for the ribbon every time the printer is turn...

Page 42: ...To change the setting from the Main Menu select Setup then Supply Then follow these steps 1 Press l or r until you see SUPPLY l Speed r 2 Press Enter Pause to set the speed option The current setting is displayed for example SPEED l Default 3 Press l or r to see the other options After you display the option you want press Enter Pause Press Escape Clear until you see the Main Menu For additional h...

Page 43: ...u select Setup then Supply Then follow these steps 1 Press l or r until you see SUPPLY l Feed Mode r 2 Press Enter Pause to set the feed mode The current setting is displayed for example FEED MODE Continuous r 3 Press l or r to see the other option After you display the option you want press Enter Pause Press Escape Clear until you see the Main Menu Setting Supply Options 4 5 ...

Page 44: ...th the selected cut modes Refer to the optional Packet Reference Manual to learn how to define the Backfeed Control Packet Extended backfeed does not work with non indexed continuous supply mode Do not use backfeed normal or extended with supplies less than 0 75 inches We recommend using 0 5 inch gap supplies in peel mode when backfeed is disabled To change the setting from the Main Menu select Se...

Page 45: ...ess Feed Cut then press r twice 20 press Feed Cut again and press r three times 23 P r i n t Po s i t i o n This function adjusts where data prints vertically on the supply Adjust the print if it is too close to the top or bottom of the supply or overtypes the pre printed area One dot is 0 0049 inch N If the data is too close to the bottom increase the number N If the data is too close to the top ...

Page 46: ... Pos r 2 Press Enter Pause The current setting is displayed for example Enter print pos 99 99 0 3 Press l or r to change the print position Pressing l decreases the value moves the image down rincreases it moves the image up 4 Press Enter Pause when the number you need appears Press Escape Clear until you see the Main Menu 4 8 Setting Supply Options ...

Page 47: ...sily The adjustments are in dots 0 0049 inch N Increase the number to feed more supply out of the chute N Decrease the number to feed less supply out of the chute This option takes effect on the next label or tag printed Changing supply position may also affect print position To change the setting from the Main Menu select Setup Supply then Positioning Then follow these steps 1 Press l or r until ...

Page 48: ...049 inch which is the smallest measurement the printer recognizes The width of the print area depends on your supply size Maximum width is four inches When you move the image to the right or left on the supply avoid moving the image too close to either edge because it may not print Print too far to the left Print too far to the right N If the data is too close to the left side increase the number ...

Page 49: ...s it moves the image toward the right side of the supply 4 Press Enter Pause when the number you need appears Press Escape Clear until you see the Main Menu C u t Po s i t i o n This function adjusts where the tag is cut The printer adjusts the cut position according to the black marks on the supply You may need to adjust for aperature supplies Increase to move the cut up decrease to move the cut ...

Page 50: ...n Menu D i s p e n s e Po s i t i o n This function adjusts the stopping point of the label To change the setting from the Main Menu select Setup Supply then Positioning Follow these steps 1 Press l or r until you see POSITIONING l Dispense Pos r 2 Press Enter Pause DISPENSE POS 50 200 65 3 Press l or r to change the dispense position Pressing l decreases the value r increases it 4 Press Enter Pau...

Page 51: ... must be 30 dots 0 15 inches less than the dispense position to account for improper tearing of butt cut supplies You will have a 30 dot non print zone on your supply but this prevents exposed adhesive under the printhead To change the setting from the Main Menu select Setup Supply then Positioning Follow these steps 1 Press l or r until you see POSITIONING l Backfeed Dis 2 Press Enter Pause BACKF...

Page 52: ...r 928 stacker installed the batch separator is 3 66 inches long The name of the batch is shown on the batch separator Changing this setting only affects new formats sent to the printer To change the setting from the Main Menu select Setup then Supply Then follow these steps 1 Press l or r until you see SUPPLY l Separators r 2 Press Enter Pause to set the batch separators option The current setting...

Page 53: ...dministrator or the optional Packet Reference Manual for more information The skip index feature is useful when you have a single format that contains two labels such as a shelf label and a carton label When designing the format make sure text or graphics do not print in the gap of label rolls To change the setting from the Main menu select Setup then Supply 1 Press l or r until you see SUPPLY l S...

Page 54: ... check the bar code print quality High contrast settings may N require additional printhead cleaning N create bar code growth leading to reduced scanning 1 From the Main Menu press l or r until you see MAIN MENU l Setup r 2 Press Enter Pause You will be at the Setup menu Press l or r until you see SETUP l Contrast r 3 Press Enter Pause The current setting is displayed for example Enter contrast 69...

Page 55: ... test label and check the print contrast Press Enter Pause 6 Press Escape Clear until you see the Main Menu We recommend you check the bar code print quality with a bar code verifier If you do not have a bar code verifier or scanner check the bar code visually A bar code that is in spec has complete bars clear spaces and small alphanumeric characters look complete An in spec bar code may not look ...

Page 56: ...ditional set up procedures refer to your verifier s Operating Instructions for more information To enable the verifier from the Main Menu select Setup then Verifier Then follow these steps 1 Press l or r until you see VERIFIER l State 2 Press Enter Pause The current setting is displayed for example VERIFIER Disabled r 3 Press l or r to see the other option After you display the option you want pre...

Page 57: ...alues see your System Administrator The serial communication values are listed in the table below Option Choices Default Baud rate 1200 2400 4800 9600 19200 38400 57600 115200 9600 Word length 7 8 8 Stop bits 1 2 1 Parity None Odd Even None Flow control None Xon Xoff DTR CTS DTR Reset No Yes No SUPPLY CONTRAST DEFAULTS PORT SETTINGS MAIN MENU CANCEL ALL PRINT MODE REPEAT BATCH SETUP DIAG BATCH ENT...

Page 58: ...e r 2 Press Enter Pause The current setting is displayed for example BAUD RATE l 9600 r 3 Press l or r to display the baud rate you need then press Enter Pause Press Escape Clear until you see the Main Menu Wo r d L e n g t h To change the setting from the Main Menu select Setup Port Settings then Serial Comm Then follow these steps 1 Press l or r until you see SERIAL COMM l Word Length r 2 Press ...

Page 59: ...ss l or r until you see SERIAL COMM l Stopbits r 2 Press Enter Pause The current setting is displayed for example STOPBITS 1 r 3 Press l or r to display the number of stop bits you need then press Enter Pause Press Escape Clear until you see the Main Menu Pa r i t y To change the setting from the Main Menu select Setup Port Settings then Serial Comm Then follow these steps 1 Press l or r until you...

Page 60: ...nu select Setup Port Settings then Serial Comm Then follow these steps 1 Press l or r until you see SERIAL COMM l Flow Control r 2 Press Enter Pause The current setting is displayed for example FLOW CONTROL l DTR r 3 Press l or r to display the flow control you need then press Enter Pause Press Escape Clear until you see the Main Menu XON is 17 XOFF is 19 Set flow control to DTR for PC computers u...

Page 61: ... restored 9600 baud No parity 8 bit word length and 1 stop bit Press Escape Clear until you see the Main Menu Pa r a l l e l C o m m u n i c a t i o n s The parallel communications menu allows you to set the values for the active parallel port The values are listed in the table below Option Choices Default Port External Internal External Mode Compatible IEEE 1284 Compatible Centronics mode Po r t ...

Page 62: ...l you see the Main Menu M o d e To change the setting from the Main Menu select Setup Port Settings then Parallel Comm Then follow these steps 1 Press l or r until you see PARALLEL COMM l Mode 2 Press Enter Pause MODE Compatible r 3 Use l or r to select either Compatible or IEEE1284 Press Enter Pause Use compatible mode for a computer connection to the printer with a parallel cable Use IEEE 1284 f...

Page 63: ...ions to fit your daily operation using either the offline menus or the online configuration option After an option is selected in the online configuration or offline Setup Menu the option is saved when the printer is turned off SUPPLY CONTRAST DEFAULTS PORT SETTINGS MAIN MENU CANCEL ALL PRINT MODE REPEAT BATCH SETUP DIAG BATCH ENTRY BATCH OPTIONS FLASH MEMORY SCRIPTS MONETARY SIGN SECONDARY SIGN D...

Page 64: ...t English French German Spanish ES Japanese Portuguese Italian Swedish Spanish 2 MX Danish Dutch Finnish Norwegian English Flash Storage Disabled Enabled Disabled The monetary sign secondary sign and decimal places options are used in conjunction with option 42 Refer to the optional Packet Reference Manual for more information The settings for Monetary Sign Secondary Sign Slashed Zero and Decimal ...

Page 65: ...kka Austria 6 schilling India Rs rupee Russia 3 ruble Korea 4 won Thailand 5 baht China yuan Euro Dollar c euro dollar To change the setting from the Main Menu select Setup then Defaults If password protection in enabled press Feed Cut three times then press Enter Pause before you see the Setup Menu options Then follow these steps To exit an option without changing the setting press Escape Clear 1...

Page 66: ...gn 30 N If you set the secondary sign option to No prices under 1 00 will print like this 45 N If you set the secondary sign option to Yes prices under 1 00 will print like this 45 The same option applies to the appropriate secondary sign for monetary signs other than USA To change the setting from the Main Menu select Setup then Defaults Then follow these steps 1 Press l or r until you see DEFAUL...

Page 67: ...al in a price field In U S currency you might print prices like this 24 00 2 decimal places or like this 24 0 decimal places 1 Press l or r until you see DEFAULTS l Decimal Places r 2 Press Enter Pause The current setting is displayed for example DECIMAL PLACES l 2 r 3 Press l or r until you see the option you want Then press Enter Pause Press Escape Clear until you see the Main menu Setting Defau...

Page 68: ...s Then follow these steps 1 Press l or r until you see DEFAULTS l Slashed Zero r 2 Press Enter Pause The current setting is displayed for example SLASHED ZERO No r 3 Press l or r until you see the option you want Then press Enter Pause Press Escape Clear until you see the Main menu Po we r U p M o d e Power up mode lets you decide how your printer starts each time you turn it on If you want the pr...

Page 69: ...s which language displays on the printer s menu You can select English French German Spanish ES Japanese Portuguese Italian Swedish Spanish 2 MX Danish Dutch Finnish and Norwegian Some prompts may remain in English even if you select a different language To change the setting from the Main Menu select Setup then Defaults Then follow these steps 1 Press r until you see DEFAULTS l Prompt Set r 2 Pre...

Page 70: ... saved when the printer is turned off However flash memory storage is limited You must format flash memory before enabling this option Formatting flash memory is only required once during initial printer setup To change the setting from the Main Menu select Setup then Defaults Then follow these steps 1 Press r until you see DEFAULTS l Flash Storage 2 Press Enter Pause The current setting is displa...

Page 71: ...ware is updated you must format the flash memory Formatting flash memory is only required once during initial printer setup When you format flash memory the script and any downloaded TrueType fonts saved in the printer s flash memory are deleted and must be resent to the printer To format flash memory from the Main Menu select Setup Then follow these steps 1 Press l or r until you see SETUP l Flas...

Page 72: ...the Print Mode Ready menu C h e c k i n g A v a i l a b l e F l a s h M e m o r y If you receive errors when downloading a script or other packets make sure you have enough flash memory available When you format flash memory the script and any downloaded TrueType fonts saved in the printer s flash memory are deleted and must be resent to the printer To check available flash memory from the Main Me...

Page 73: ...flash memory permanently removes any deleted files from memory Periodically select this option to clean up the printer s memory Any deleted files are removed from memory when you pack flash To pack flash memory from the Main Menu select Setup Then follow these steps 1 Press l or r until you see SETUP l Flash Memory r 2 Press Enter Pause Press l or r until you see FLASH MEMORY l Pack Flash 3 Press ...

Page 74: ...ation N Formats graphics and check digits can be saved in flash but they are also duplicated in RAM Any packets saved in flash cannot exceed the memory available in RAM N Fonts are stored differently in flash For example the 9825 printer has very limited flash font memory and one TrueType font may exceed that limit If you print TrueType or double byte Asian fonts use a 9855 or 9860 printer with th...

Page 75: ...tch Entry mode and set default values for those prompts Customizing which prompts appear during batch entry can reduce the time it takes to enter data for a format If the optional knife is not installed you can prevent those prompts from appearing during batch entry mode If you set a new default value for an option that value is used even if the prompt is not displayed If you do not change a defau...

Page 76: ...6 14 Setting Defaults ...

Page 77: ...t a r t u p P r o c e d u r e s Before you can start using a script check the following items N Check to see if a script is already loaded in the printer See Viewing Script Information to continue N Format flash memory if needed See Formatting Flash Memory in Chapter 6 N Download a script to the printer if needed See Downloading a Script to continue MAIN MENU CANCEL ALL PRINT MODE REPEAT BATCH SET...

Page 78: ... Pause before you see the Scripts Menu options 3 Press l or r until you see SCRIPTS l Script Info r 4 Press Enter Pause What you see depends on the script If a script is not loaded you see No script loaded If a script is loaded you see the script name and version number for example MYSTORE Version 1 0 If a script is already loaded see Enabling a Script to continue If you need to download a script ...

Page 79: ... see SCRIPTS Load Script r 2 Press Enter Pause Script Load Ready Only one script can be loaded in the printer at a time When downloading a script if you receive an error N Check the available flash memory See Checking Available Flash Memory in Chapter 6 N Format flash memory See Formatting Flash Memory in Chapter 6 After downloading a script if the script does not appear to be loaded try formattin...

Page 80: ...3 Use l or r to select either Yes or No and press Enter Pause Selecting Yes starts the script Selecting No stops the script If you select Yes when you turn off the printer and turn it back on the script automatically starts Once the script is enabled you will see Print Mode S Ready The S in the lower left hand corner of the screen indicates the printer has a script loaded and enabled the script is...

Page 81: ... sure l Yes 3 Use l or r to select either Yes or No and press Enter Pause Selecting Yes deletes the current script The flash memory used by the script is not available for other scripts or fonts until the flash memory is reformatted However when you format flash memory you must resend the script and any downloaded fonts to the printer 4 Press Escape Clear until you see the Main Menu Using Scripts ...

Page 82: ... r 2 Press Enter Pause Enable Polling No r 3 Use l or r to select either Yes or No and press Enter Pause The default is No E n a b l i n g I m m e d i a t e C o m m a n d s Your System Administrator can use immediate commands to reset the printer or cancel and repeat batches To enable immediate commands 1 From the Script Menu press l or r until you see SCRIPTS l Immed Commands 2 Press Enter Pause ...

Page 83: ... batches You can also use the Monarch MPCL Toolbox utilities to create and download packets P r i n t i n g Before you print make sure the printer is connected and ready to receive data 1 Turn on the printer Your printer is ready to receive and print batches when you see PRINT MODE Ready 2 Download a format and a batch Refer to the optional Packet Reference Manual for information on downloading pr...

Page 84: ... batch are printed If you have purchased the optional peel module you must use on demand printing with peel mode If you are using peel mode remove the excess backing paper by pulling up across the saw toothed tear edge Make sure the backing paper tears at the edge Hold the leading edge of peeled labels when printing on stock longer than six inches The minimum feed length for peel mode is 1 5 inche...

Page 85: ...enu See Chapter 4 Setting Supply Options When you press Enter Pause you will see PAUSE MENU l Print Mode r You can press Enter Pause to resume printing or press l or r to display the Pause Menu options The following chart shows the Pause Menu options Re s t a r t i n g a B a t c h You can reprint a paused batch from the beginning using the original quantity 1 When you press Enter Pause you will se...

Page 86: ... all the batches waiting to print Before any format graphic or font in memory can be deleted you must cancel all batches You can cancel a batch by pressing Escape Clear while the batch is printing or you can use the Pause menu to cancel a batch 1 Press Enter Pause to interrupt printing PAUSE MENU l Print Mode r CANCEL BATCH CANCEL ALL PRINT MODE RESTART BATCH PAUSE MENU CANCEL BATCH CANCEL FORMAT ...

Page 87: ...paused batch press l or r until you see PAUSE MENU l Cancel All r and press Enter Pause Cancel Batches No r 4 You can N exit without canceling any batches Press Escape Clear or press r to display No and then press Enter Pause The printer returns to the Pause menu Press l or r to select another function from the Pause Menu or to return to Print Mode and print all the batches N cancel all batches in...

Page 88: ...raphic No r Press l or r then press Enter Pause Cancel Font No r Press r then press Enter Pause You return to the Pause menu If you select Yes these prompts delete ALL formats graphics and or fonts in the printer 5 Press l or r to select another function from the Pause menu or to return to Print mode Re p e a t i n g a B a t c h Before you start printing a new batch you can reprint the last batch ...

Page 89: ...increments until the entire batch has printed When it is finished you will see PRINT MODE Ready O f f l i n e P r i n t i n g Offline printing requires the optional keyboard which must be purchased separately Refer to your keyboard s Operating Instructions for more information about offline printing and batch entry Printing 8 7 ...

Page 90: ... Thermal Transfer 203 dpi only Not Supported Not Supported 12 0 ips Thermal Direct Thermal Transfer 203 dpi only Not Supported Not Supported 12 0 ips is the high speed option which must be purchased separately N The minimum label feed length is 0 75 inches 19 mm using 8 0 ips or higher N 94x5 emulation is not supported using 300 dpi N The maximum supply and image length with the optional 300 dpi p...

Page 91: ...fonts Refer to the optional Packet Reference Manual available on our Web site to learn how to reconfigure the printer s memory After reconfiguring memory resend the font format and batch packets This printer can accept a TrueType font file that has been converted to Hex or Run Length encoding using the version of Font Utility Font Utility is available on our Web site www servisource1 com Font Util...

Page 92: ...wever it is your responsibility to license the fonts you purchase and download to your printer Contact your font supplier for licensing information Additional fonts that are compatible with this printer can be purchased from The Electronic Font Foundry 11 Silwood Road Ascot SL5 OPY England 0 1344 875 201 www eff co uk 8 10 Printing ...

Page 93: ... a jam occurs the Fault light on the printer s front panel blinks To clear the jam 1 Turn off the printer and open the cover and printhead assembly 2 If necessary remove the label roll and ribbon 3 Remove the jammed labels and reload the label roll 4 Close the printhead assembly and turn on the printer 5 Press Feed Cut to position the supply under the printhead C l e a n i n g The rate and frequen...

Page 94: ...t as shown When you are using higher speeds with 203 or 300 dpi and or increased print contrast we recommend cleaning the printhead after each ribbon with isopropyl alcohol If you still notice build up on the printhead or black streaks on your supply use the enclosed printhead CLEAN STRIP 1 Turn off the printer and open the cover and printhead assembly 2 Remove the label roll and ribbon when clean...

Page 95: ... make sure the platen roller is clean all the way around After cleaning feed several inches of supply through without printing to remove any remaining isopropyl alcohol N call Service to clean the linerless red orange textured platen roller DO NOT use alcohol or solvents on linerless red orange textured platen rollers 5 Moisten a cotton swab with isopropyl alcohol Rub the cotton swab across the pe...

Page 96: ...nter dry before you reload supplies 10 Close the exit cover by pushing firmly on it Both latches will click into place 11 Close the cover and printhead assembly 12 Turn on the printer 13 Press Feed Cut to position the supply under the printhead Resend your format batch and check digit packets DieCutSensor SupplySensor 9 4 Care and Maintenance ...

Page 97: ...ife Ground yourself by touching some metal such as the printer s metal base before touching the printhead Clean the printhead to remove any salt or oil left from handling prior to operation To replace the printhead 1 Turn off the printer 2 Open the cover 3 Unlock the printhead by turning the retaining latch 4 Press forward and down on the two latches on top of the printhead assembly as shown The p...

Page 98: ...ch can damage the printhead or reduce its life Ground yourself by touching some metal such as the printer s metal base before touching the printhead 7 Carefully plug the cable into the new printhead 8 Align the new printhead with the tabs 9 Snap the printhead into place Donot touchhere 9 6 Care and Maintenance ...

Page 99: ...th a cotton swab dipped in isopropyl alcohol to remove any salt or oil left from handling 11 Let the printhead dry and reload your supplies 12 Close the printhead assembly and the cover Turn on the printer 13 Press Feed Cut to position the supply under the printhead Care and Maintenance 9 7 ...

Page 100: ...9 8 Care and Maintenance ...

Page 101: ... y S e t Pa s s wo r d You need a password to access diagnostic functions Press Feed Cut three times and then press Enter Pause C h e c k i n g t h e S o f t w a r e Ve r s i o n From the Diagnostics Menu press l or r until you see DIAGNOSTICS Version r Press Enter Pause You will see Model M9855 V 1 0 MAIN MENU CANCEL ALL PRINT MODE REPEAT BATCH SETUP DIAG BATCH ENTRY BATCH OPTIONS SCRIPTS VERSION...

Page 102: ...ration by packet A G The second label shows the model number software version stock count voltage print contrast printhead resistance number of bad dots and installed options The test label also shows an inch count for the high energy ribbon This information will help Technical Support diagnose the problem Refer to the optional Packet Reference Manual for more information about the test label You ...

Page 103: ... until you see USER DIAG Supply Quality r 3 Press Enter Pause If you have not printed any labels the message No data Press Enter appears You will also see the No data Press Enter message if you are using continuous non indexed supplies If you have printed labels since turning on the printer you will see Len Min Max OK l 1568 034 124 Y r The Len listing is the length of the loaded supply in dots Th...

Page 104: ... be entered before formats graphics or fonts can be deleted 1 From the Main Menu press l or r until you see MAIN MENU l Diagnostics 2 Press Enter Pause You will see Enter Password _ _ _ _ _ _ 3 Enter the password press Feed Cut three times and then press Enter Pause If you enter the wrong password you return to the Main Menu 4 From the Diagnostics Menu press l or r until you see DIAGNOSTICS l User...

Page 105: ...ection is enabled for formats graphics fonts and access to the Setup and Scripts menus You return to the User Diagnostics Menu 8 Press Escape Clear twice to exit to the Main Menu When password protection is enabled a password is not required to clear bathces but it is needed to clear formats graphics and fonts S e r v i c e D i a g n o s t i c s The Service Diagnostics menu can only be accessed by...

Page 106: ...rrectly Partially printed data Clean the printhead Send a corrected format packet Printing shadows or smears Clean the printhead Change supply Check ribbon Light printing Change supply Adjust the print contrast Check wide narrow knobs Check ribbon Heavy printing Clean the printhead Change supply Adjust the print contrast Check wide narrow knobs Check ribbon Voids in printing Clean the printhead Ch...

Page 107: ...ed Try formatting flash memory Then download the script again If you cannot fix a problem call Technical Support E r r o r M e s s a g e s You may receive the following types of error messages N Data Errors N Communication Errors Some errors numbered 400 438 and 500 574 are internal software errors Errors numbered 900 999 are hard printer failures If you cannot clear an error turn off the printer ...

Page 108: ...G5 for UNICODE 104 GB2312 for UNICODE 105 SJIS for UNICODE 106 GB2312 107 BIG5 437 DOS Page 437 850 DOS Page 850 852 Latin 2 855 Russian 857 Turkish 860 Portuguese 1250 Latin 2 1251 Cyrillic 1252 Latin 1 1253 Greek 1254 Turkish 1255 Hebrew 1256 Arabic 1257 Baltic or 1258 Vietnamese 025 Data length is too long 101 Format referenced by batch not in memory 400 Invalid character following 403 Field se...

Page 109: ... supply marks black mark sensor position and supply roll for binding Press Escape Clear and try to continue printing Change supply 750 Printhead is overheated Turn off the printer 751 Printer did not sense a black mark when expected For errors 751 753 check the supply tracking supply marks black mark sensor position and supply roll for binding Press Escape Clear and try to continue printing Change...

Page 110: ...t bar code fields to avoid bad dots You may need to press Escape Clear to continue printing Print a test label to confirm the number of bad dots 768 Printhead has more than 8 bad dots within the format area or is not connected Connect the printhead 772 Verifier failure The verifier detected three or more bad scans in a row Press Escape Clear to clear the error and continue printing The printer doe...

Page 111: ...kg Shipping Weight w metal cover 34 lb 15 5 kg Power Source 90 264 VAC with autoselect 50 60Hz Operating Limits For Thermal Transfer ribbon 40 to 95 F 4 to 35 C For Thermal Direct 40 to 104 F 4 to 40 C Storage 15 F to 120 F 9 C to 49 C Humidity 5 to 90 non condensing Printhead Thermal at 4 inches 102 mm wide 203 dpi 8 0 dots per mm OR 300 dpi 11 8 dots per mm This option must be purchased separate...

Page 112: ...aximum Print Area 4 0 inches x 16 0 inches 102 mm x 406 mm with 203 dpi 4 0 inches x 13 0 inches 102 mm x 330 mm with 300 dpi Ta g C u t D i m e n s i o n s Use these specifications for the 926 Knife Widths 0 75 inches to 4 0 inches 19 mm to 102 mm Lengths 1 2 inches to 16 0 inches 30 mm to 406 mm NOTE The maximum cut tag length using the stacker is 3 66 inches 93 mm Thickness 7 mils to 10 mils Cu...

Page 113: ...the tear bar Aperture supplies are tags or labels with holes or openings in them The supply is sensed using the holes The holes can be only on the edge or in the center of the supply Supply Types Thermal Transfer or Direct Supply Widths 0 75 inches 19 mm minimum 4 25 inches 108 mm maximum Supply Lengths 0 32 inch 8 mm minimum 0 75 inch 19 mm minimum for tags 1 2 inches 30 mm minimum for cutting ta...

Page 114: ...es 64 mm to 406 mm A 0 50 inch non print zone exists on the leading edge beginning of all labels S t r i n g Ta g S u p p l i e s Widths 0 90 inches 23 mm minimum 2 0 inches 51 mm maximum Lengths 0 78 inch 20 mm minimum 1 78 inches 45 mm maximum Thickness 5 5 to 16 mils String Loop Length 1 5 inches 38 mm maximum String Orientation Facing operator Wind Direction Face out Max Roll Diameter 9 375 in...

Page 115: ...es 58 mm standard or high energy 2 0 inches 51 mm 3 3 inches 84 mm 3 0 inches 76 mm 4 3 inches 110 mm standard or high energy 4 0 inches 102 mm Ribbon Length 23 600 inches 600 meters A b o u t R i b b o n s The width of the ribbon must be greater than the supply width Since some supplies are more abrasive to printheads than others using a ribbon wider than your supply helps protect the printhead R...

Page 116: ... 25 pin to 25 pin cable 118366 9 Pin F To 25 Pin M CD 1 20 DTR RD 2 2 TD TD 3 3 RD DTR 4 8 CD SGND 5 7 SGND DSR 6 6 DSR RTS 7 4 RTS CTS 8 5 CTS N C 9 1 Shield Drain Wire 25 Pin F To 25 Pin M FG 1 1 FS TD 2 2 TD RD 3 3 RD RTS 4 4 RTS CTS 5 5 CTS DSR 6 6 DSR SG 7 7 SG CD 8 8 CD N C 20 20 DTR A 6 Specifications ...

Page 117: ...3 or 4 widths N Monarch MPCL Toolbox utilities to configure the printer download fonts and design formats Available on our Web site www paxar com N External LAN Print Server Supports Ethernet and TCP IP RJ 45 Connector 10BaseT 11753101 BNC Connector 10Base2 11753102 N External Ethernet Print Server supports TCP IP 11753105 N Printhead CLEAN STRIP 120350 N Printhead Cleaning Pen 114226 N Cables 9 p...

Page 118: ...502 Corrugated Pad 1 00066102 Foam Pad Set 1 00065503 Corrugated Pad 1 00066105 Corrugated Pad 1 00065507 Foam Pad Set 1 Fa c t o r y I n s t a l l e d O p t i o n s N 7410 Print Server for 802 11b wireless networks also supports wired Ethernet printing N 300 dpi printhead 120552 N Internal TwinAx CoAx Protocol Converter 117532 also Service installable N Internal Ethernet Print Server supports TCP...

Page 119: ...figuration information on demand press the Test button on the side of the external Ethernet print server unit or use the configuration utility provided for your network operating system The configuration label prints in MPCL format The configuration label is best displayed using 4 wide by 6 long labels If the label is too small some information may print outside the label edges R F I n f o r m a t...

Page 120: ...B 4 Accessories Options ...

Page 121: ...d to indicate printer conditions and problems leader Wrap around a new roll of ribbon with printing on it on demand mode Mode in which the printer stops after each label to allow you to remove it print job batch Actual data printed on a label or tag The host may download the print job together with the format or as a separate packet The print job is also called a batch online Direct communication ...

Page 122: ...2 Glossary ...

Page 123: ... software version 10 1 cleaning peel bar 9 3 printhead 9 3 supply sensor 9 4 cleaning printer 9 1 clearing jams 9 1 common errors 10 8 communication errors 10 7 communication parameters baud rate 5 1 parity 5 1 start Xon character 5 1 stop Xoff character 5 1 stop bits 5 1 word length 5 1 communications parallel 5 6 contrast setting 4 16 currency 6 3 cut position 4 11 D default port settings 5 1 5 ...

Page 124: ...aring 9 1 L label specifications A 3 labels adjusting for width 2 16 clearing jams 9 1 linerless 2 9 test print 10 2 linerless labels 2 9 linerless supply specifications A 4 loading ribbon 3 2 locating supply sensor 9 4 M maintenance cleaning printer 9 1 margin adjusting 4 10 memory flash 6 8 mode offline 8 7 online 8 1 monetary sign defining 6 3 O offline mode 8 7 on demand printing 8 2 online mo...

Page 125: ... printhead replacement 9 6 printing considerations 8 8 error label 8 2 information 8 8 on demand 8 2 TrueType fonts 8 9 R radio frequency B 4 ribbon high energy 3 4 loading 3 2 supply options 4 3 ribbon specifications A 5 S selecting a function 1 7 sensor supply 9 4 separators supply options 4 14 setting communication parameters 5 1 contrast 4 16 print contrast 4 16 supply options 4 1 skip index 4...

Page 126: ...1 supply sensor 9 4 locating 9 4 T tag specifications A 3 tear bar 2 8 tear edge 2 7 test labels printing 10 2 troubleshooting 10 6 trueType fonts printing 8 9 V values communication 5 1 5 6 default 5 1 5 6 version of software 10 1 W word length 5 1 options 5 2 iv Index ...

Page 127: ......

Page 128: ......

Reviews: