background image

Specifications  

A-3


Using the Optional Stand 

Read the following if you purchased the optional printer 
stand.  The stand can be  

♦ 

used on a table top or wall-mounted. 

♦ 

adjusted to minimize glare on the handheld’s 
display 

♦ 

folded flat for storage. 
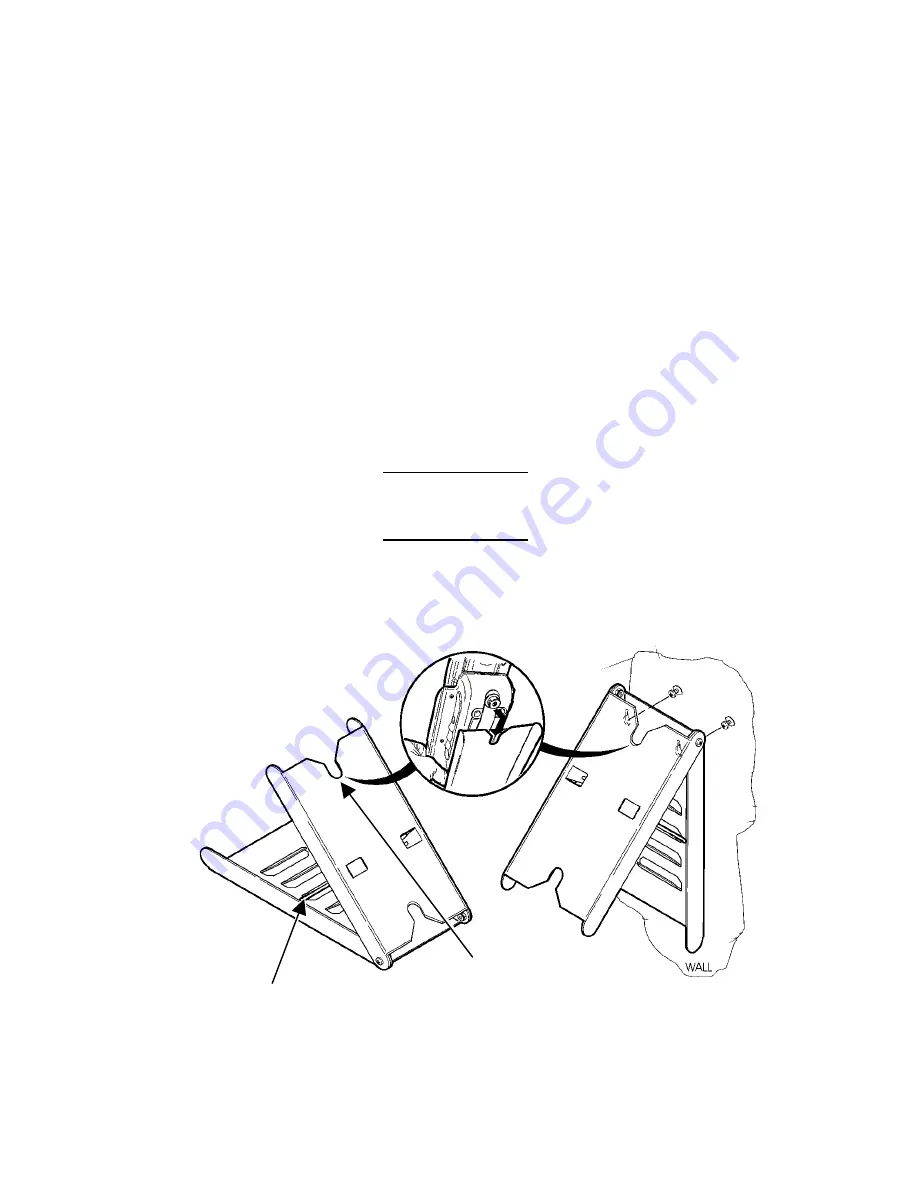
For a Table Top: 

1. 

Place the stand on the table top. 

2. 

Unfold the stand and lock into place with the wire bar. 

3. 

Slide the printer into the stand until the button 
catches in the stand. 


The button must be attached to the 

printer. 


4. 

Adjust the height of the stand by moving the wire bar 
into different grooves if you notice glare on the 
handheld’s display. 

Wire Bar 

Button catches here 

Summary of Contents for Handi Print 6017

Page 1: ...Monarch 6017 HandiPrint Printer TC6017OI Rev AC 4 04 2000 Paxar Americas Inc All rights reserved ...

Page 2: ...s uses and can radiate radio frequency energy and if not installed and used in accordance with the instruction manual may cause harmful interference to radio communications Operation of this equipment in a residential area is likely to cause harmful interference in which case the user will be required to correct the interference at his own expense CANADIAN D O C WARNING This digital apparatus does...

Page 3: ...e LED 1 7 Connecting the Printer 1 8 Attaching the Printer s Strap and Button 1 9 LOADING SUPPLIES 2 1 Tearing Supply 2 2 USING THE PRINTER 3 1 Printing 3 1 Using the Magnetic Stripe Reader 3 1 Scanning Bar Codes 3 3 Scanner Information 3 3 Scanning Tips 3 4 CLEANING 4 1 TROUBLESHOOTING 5 1 SPECIFICATIONS A 1 Printer Specifications A 1 Supply Specifications A 2 Options A 2 Using the Optional Stand...

Page 4: ...ii ...

Page 5: ...oaded in the printer a battery an elastic strap a mounting button and an AC power adaptor Programming Information You may need to refer to the Programmer s Manual available from our Web site www servisource1 com It provides an explanation of how to use the printer s command language Refer to the Symbol Web site www symbol com for the Symbol Application Programming Interface API documentation Refer...

Page 6: ... charging will actually prolong battery life and has no negative effects such as memory issues It is normal for battery capacity to decrease up to 20 over the first 300 cycles WARNING Use only Monarch chargers Monarch 9462 Single Station Charger or the Monarch 9464 Four Station Charger designed for lithium ion batteries when charging The battery might explode if placed on a different charger To or...

Page 7: ...more information about how to recycle batteries in your area visit www rbrc org Batteries can also be returned postage paid to ERC 200 Monarch Lane Door 39 Miamisburg OH 45342 CAUTION Do not disassemble short circuit heat above 80 C or incinerate the battery It may explode Installing the Battery One battery is included with the printer Similar to a cordless phone battery the printer s battery must...

Page 8: ...1 4 Getting Started 4 Unlock the battery door by sliding down the battery tab 5 Open the battery door 6 Insert the battery into the printer as shown 7 Press the battery into place Tab ...

Page 9: ...cordless phone battery the printer s battery must be charged before using it You can print while the battery is charging however the battery may not receive a full charge You can also charge the handheld while it is connected to the printer However the batteries printer and handheld may not receive a full charge WARNING Use only Monarch chargers Monarch 9462 Single Station Charger or the Monarch 9...

Page 10: ...de of the printer as shown under the symbol 2 Connect the angle plug into the AC power adapter 3 Plug the AC power adapter into an electrical outlet Charging time is approximately 1 5 to 3 hours It will take longer to charge the battery if you are printing while charging ...

Page 11: ... is fully charged Green On Printer is on and ready to accept data The LED is off when the printer is off and the battery is not charging Orange On If the battery charger is not connected there is a printer error The printer is not ready to accept data See your System Administrator to clear the error or remove the handheld from the printer and re connect the handheld to the printer If the battery c...

Page 12: ...n connector as shown The handheld s bottom lip fits snugly under the printer s cutout If your handheld has a strap you may remove the strap or keep it attached to the handheld allows for a more secure fit before inserting the handheld into the printer 14 Pin Connector Cutout Bottom Lip ...

Page 13: ...handheld This step is optional 2 Turn over the printer 3 Using the grommet provided secure the strap into the attaching hole 4 Thread the strap through the slot and secure the strap at the VELCRO tab Make sure the strap is adjusted to fit your hand 5 Using the self tapping Phillips screw provided secure the button to the strap grommet The screw threads itself while you tighten it Make sure the but...

Page 14: ...1 10 Getting Started ...

Page 15: ...ome limited graphics on thermal direct receipt paper See Appendix A Specifications for the width and thickness requirements 1 Open the supply cover by inserting your fingers into the rubber pull tab and pulling up firmly on the supply cover as shown Do not pull too hard on the rubber pull tab 2 ...

Page 16: ...on the supply between the printhead guides 4 Make sure some supply extends past the platen roller 5 Close the supply cover Tearing Supply The printer s supply door acts as a tear bar Tear down against the tear bar to remove receipts CAUTION The tear bar may have sharp edges Printhead Guide Platen Roller Tear Bar ...

Page 17: ...load from our Web site Refer to the printing instructions included with your print utility Make sure your printer s battery is charged before printing Using the Magnetic Stripe Reader The magnetic card stripe reader is a factory installed option that must be ordered when the printer is ordered This option requires special application software to read and process cards with a magnetic stripe such a...

Page 18: ...st be facing toward the handheld while it is passed through the reader The green LED on the printer indicates the following LED Indicator Status On Ready waiting for card Blinks once Error reading card s data Off Good swipe card s data read OR Not ready for card Refer to your application for more magnetic stripe reader information Stripe is facing toward handheld ...

Page 19: ...ing the button on the handheld Scanning buttons are identified by the symbol 3 If the bar code does not scan see Scanning Tips For more information about using the scanner cleaning the scanner and scanner safety refer to your handheld owner s manual Scanner Information The scanner is certified to be a Class II laser product with the United States DHHS Center for Devices and Radiological Health The...

Page 20: ... toward and away from the bar code to find the correct distance for a successful scan Aim the scanner at a slight angle to the bar code Keep the scanner window clean Move to a more dimly lit area if you have several unsuccessful scans Direct sunlight may cause unsuccessful scans Refer to your handheld owner s manual for more information about using the scanner ...

Page 21: ...e print as shown CAUTION Do not use sharp objects to clean the printhead This may damage the printer and require a service charge 1 Open the supply cover by inserting your fingers into the rubber pull tab and pulling up firmly on the supply cover 2 Remove the supply roll when cleaning the printhead 3 Moisten a cotton swab with isopropyl alcohol and clean the printhead as shown 4 Printhead ...

Page 22: ...nd run the cotton swab or dry cloth across it Make sure the platen roller is clean all the way around 5 Moisten another cotton swab with isopropyl alcohol Rub the cotton swab across the black mark sensor to remove any build up 6 Moisten another cotton swab with isopropyl alcohol Rub the cotton swab across the tear bar to remove any build up Black Mark Sensor Platen Roller Tear Bar ...

Page 23: ...lication may include a query for the battery voltage Refer to the Programmer s Manual for more information Make sure the supplies are loaded correctly and not upside down Verify communications between the handheld and printer by removing the handheld from the printer and re connecting the handheld to the printer or see your System Administrator The printer s duty cycle may be exceeded Allow a 10 s...

Page 24: ...e printhead Check or recharge the battery See Charging the Battery in Chapter 1 for more information Your System Administrator may need to adjust the print contrast Your handheld s application may include a print contrast adjustment Refer to the Programmer s Manual for more information ...

Page 25: ...3Amp Operating Limits Storage 41 to 104 F 5 to 40 C 4 to 140 F 20 to 60 C Operating Humidity Storage 20 to 85 non condensing 5 to 95 non condensing Printhead 3 inches 76 mm wide 203 dpi 8 dots per mm Printing Method Thermal Direct Print Speed Up to 2 0 inches per second for standard receipts NOTE The speed is dependent on the application Supported Fonts Bitmap Standard normal and bold Large normal...

Page 26: ... Sensing Black mark on the face of the supply Roll Diameters Inside 25 inches 6 mm Outside 1 5 inches 38 mm Maximum Print Area 2 85 inches 72 mm by 8 0 inches 203 mm NOTE Maximum length depends on format Options Magnetic Card Reader factory installed Printer Stand 120611 Belt Clip 120296 Monarch 9462 Single Station Battery Charger can be wall mounted Monarch 9464 Four Station Battery Charger WARNI...

Page 27: ...isplay folded flat for storage For a Table Top 1 Place the stand on the table top 2 Unfold the stand and lock into place with the wire bar 3 Slide the printer into the stand until the button catches in the stand The button must be attached to the printer 4 Adjust the height of the stand by moving the wire bar into different grooves if you notice glare on the handheld s display Wire Bar Button catc...

Page 28: ...nd against the wall 2 Use a pencil to mark inside the two keyholes for the screws or nails 3 Attach the screws or nails through the keyholes and into the wall 4 Slide the printer into the stand until the button catches in the stand 5 Adjust the height of the stand by moving the wire bar into different grooves if you notice glare on the handheld s display Keyhole ...

Page 29: ......

Page 30: ......

Reviews: