background image

39 | 

P a g e


Hard Drive Access for Units with Internal Antennas Installed


ESD Warning

: The internal components of the RT-12i tablet are sensitive to electrostatic discharge.  Please 

observe precautions for handling electrostatic sensitive devices, including proper grounding prior to opening 
the unit. 


1

.  Remove the power cable from the computer.  


2

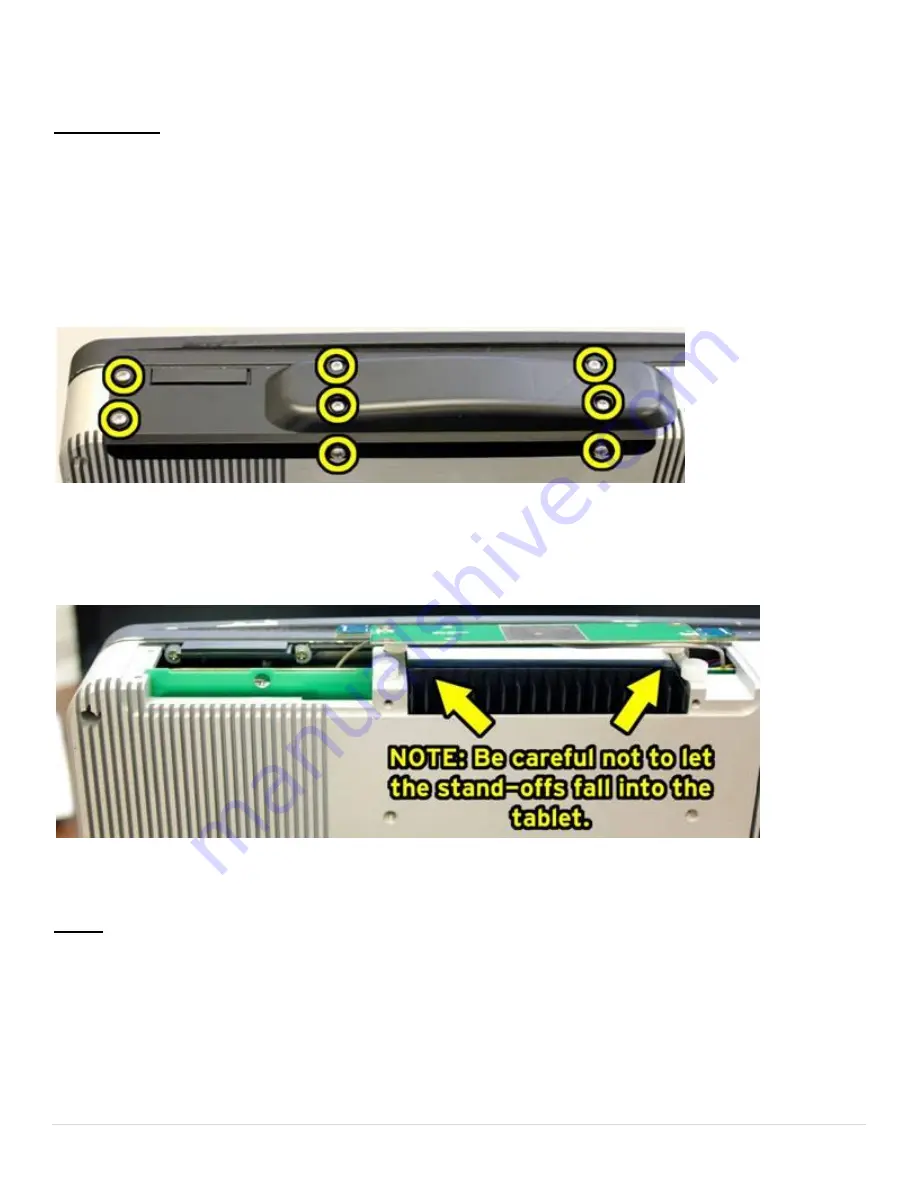
.  Remove the 8 screws circled below.  


3

.  Carefully remove the black plastic cover.  You will see the antenna board resting on nylon stand-offs.  Make 

sure the stand-offs do not fall into the tablet.  


4

.  While holding the antenna board out of the way, pull out the hard drive tray.  

NOTE

: An easy way to get it out is to insert a screw driver into the small hole in the tray and use the screw 

driver as a lever to unseat the hard drive tray.  


Summary of Contents for RT-12i

Page 1: ...1 P a g e PATROL PC 344 John Dietsch Blvd Unit 1 2 North Attleboro MA 02763 www patrolpc com 508 699 0458 RT 12i USER MANUAL ...

Page 2: ... and EMS vehicles your product was built to perform under a wide range of punishing field operating conditions We expect it will deliver years of reliable service to you Should you have any questions about our product we welcome your inquiries and calls at Patrol PC 344 John L Dietsch Blvd Units 1 2 North Attleboro MA 02763 508 699 0249 www patrolpc com ...

Page 3: ...ndows Images 13 Overview of RT 12i Bezel Buttons 14 Rear Panel Connections 15 Using the RTi Control Panel 16 Main Setup Tab 17 LCD Brightness Tab 19 Vehicle Control Tab 21 Speed Buttons Tab 24 Hot Keys Tab 27 Power Tab 29 System Info Tab 31 Options 33 Barcode Reader 34 Hard Drive Access No Internal Antennas 37 Hard Drive Access Internal Antennas 39 Certified Solid State Hard Drive 41 Troubleshooti...

Page 4: ...e AED PRODUCTS ARE NOT AUTHORIZED FOR USE AS MISSION CRITICAL COMPONENTS IN LIFE SUPPORT HAZARDOUS ENVIRONMENTS NUCLEAR AIRCRAFT OR SIMILAR APPLICATIONS WITHOUT THE SPECIFIC PRIOR WRITTEN APPROVAL OF THE PRESIDENT OF AED CUSTOMER SHALL ASSUME ALL LIABILITY IN SUCH APPLICATIONS Limitations of Liability UNDER NO CIRCUMSTANCES WILL AED BE LIABLE FOR AN INCIDENTAL OR CONSEQUENTIAL DAMAGES OR FOR ANY O...

Page 5: ...we will get back to you on the same day To Create a Support Account 1 Go to http www patrolpc com support login 2 Click Create Account You should now be at a screen similar to the one below 3 Fill in all fields Pick a username and password and store the information is a safe place for future reference Please ensure that your email address is correct so that we can notify you of any issues via emai...

Page 6: ...se mention which model is experiencing the problem the serial number what version of Windows it is running and the version of your RTi Control Panel Software If you have a screenshot or picture or text file that may help diagnose the issue you may attach it in the Attach File field Just click Choose File then navigate to and select the file you wish to attach to the support ticket 5 When you are f...

Page 7: ...he RT 12i in a vehicle Connect the power cable to an ALWAYS ON 12 Volt line that is connected directly to the vehicle battery DO NOT connect the power cable to a 12 Volt line that is shut off when the vehicle key is removed DO NOT connect the power cable to a charge guard or equivalent device DO NOT connect the power cable to a power converter ...

Page 8: ...ped With Fans If your unit is equipped with a fan ensure that it is installed in a location where there is sufficient clearance for air to flow into the fan on the back of the case and out of the air outlet on the top of the computer ...

Page 9: ...e usually a 12V DC un switched line and the red wire will connect to the control line of the device you wish to control When the computer is shut down the control line is interrupted and the voltage does not continue to the red wire When the computer is running the red wire will be carrying the control line voltage Power Specifications The control line voltage must be within 8 28 Volts DC The maxi...

Page 10: ...and Ram Mounting Systems Due to our clean all in one tablet design a typical Patrol PC install will take up less cockpit space will be more ergonomically friendly and easier to use will use less mounting hardware and require less installation labor saving you both time and money as compared to other multi piece or docked solutions To mount our tablet all you need is four screws and a mounting brac...

Page 11: ...n 2 Disconnect the positive power cable from the car battery 3 Splice the supplied power cable with 10 amp fuse with the always on power cable Connect the ground wire to a solid ground point 4 Re connect the positive battery terminal With a multi meter check the connector of the RT 12i power cable for 12 Volts DC and ensure that there are no shorts between the positive cable and ground 5 Install t...

Page 12: ...boots successfully shut down computer then secure the rear connector cover by screwing in the screws circled below 8 Mount the tablet and keyboard if required to the computer mount per manufacturer instructions Adjust the computer and keyboard position as needed ...

Page 13: ...t has this option 10 Intel Management optional 11 HD Solid State for units with solid state hard drives optional Installing the RTi Control Panel 1 Go to our website and download the latest RTi Control Panel at www patrolpc com ppc support downloads 2 Double click the downloaded file to install the RTi Control Panel 3 Choose the Typical Installation 4 When the installation is complete you may be p...

Page 14: ...o quickly set the brightness to the corresponding value 2 Assignable Buttons 1 4 Buttons can be assigned to various functions see Hot Keys Tab section 3 Status LED s Different LED s light when there is any hard disk wired network or wireless network activity as well as other functions see LCD Brightness Tab section 4 Power Button Press this button to turn on the computer This can also be used as t...

Page 15: ...n all units 1 Power Connector Connect the power cable here 2 Ethernet Ports Gigabit Ethernet Ports 3 Display Port Display port video output 4 USB Ports USB 2 0 ports 5 Micro HDMI Port Micro HDMI video output 6 Microphone In Jack 1 8 Microphone Input 7 Headphone Out Jack 1 8 Headphone Output ...

Page 16: ...grams Speakers Volume sliders buttons and mute function Power Turn off hibernate or put your computer to sleep LCD Off Turns off the LCD backlighting until the touch screen brightness slider volume slider mouse or track pad is touched More Info Information on the computer battery if it is installed Minimize Minimize the RTi control panel window Setup Change various computer settings ...

Page 17: ...h Administrator credentials can view or change the RTi Control Panel Settings Password Section If a password is desired to view and make changes to the RTi Control Panel settings type the desired password in both fields then press Set Password The next time you try to enter the Computer Setup page it will require a password to view and make changes to the RTi Control Panel settings To remove the p...

Page 18: ... check marked a button will be present in the RTi Control Panel window to put the computer into hibernate mode Shutdown If check marked a button will be present in the RTi Control Panel window to shut down the computer Ask for Confirmation If check marked a confirmation message will appear when trying to press the Sleep Hibernate or Shutdown buttons in the RTi Control Panel window Windows Setup Co...

Page 19: ... LED will blink once when the computer is starting up Sleeping When check marked the status LED will blink slowly when the computer is in a sleep state Charging When check marked the status LED will blink slowly if the battery is being charged if installed Delayed Shutdown Pending When check marked status LED will blink if an Auto Off Shutdown in pending Critical Shutdown Pending When check marked...

Page 20: ...s optional so if your unit does not have the ambient light sensor installed the buttons pertaining to the Auto Bright function will be grayed out Automatic LCD Brightness Adjust Speed Adjusts the speed at which the brightness of the screen changes when the amount of ambient light changes Enable Disable Turn Auto Bright On or Off Set Defaults Set the Default Adjust Speed and Brightness Graph Disabl...

Page 21: ...tically shuts down with a delay if desired You can also set a critical battery voltage at which the computer will shut down immediately to prevent excessive draining or damage to the battery Auto Computer On Turn on computer when vehicle is started When check marked the computer will automatically turn on when the system voltage reaches the specified value in the Auto On Off Threshold field Auto C...

Page 22: ...he system voltage goes below the threshold the computer will initiate a shutdown If the system voltage goes above the threshold the computer will turn on Sleep If the system voltage goes below the threshold the computer will go to sleep If the system voltage goes above the threshold once the computer is in sleep mode it will not attempt to wake up the computer Pressing the power button a button on...

Page 23: ...ge in between the engine on voltage and the engine off voltage a good starting point is 1 to 2 volts above the engine off voltage Set what function you wish to occur when the threshold is met Shutdown Sleep Hibernate NOTE This voltage setting may require fine tuning to get the results you want If you leave the car off over night and during that time the computer turns back on unexpectedly your Aut...

Page 24: ...nd what the buttons will launch Categories The field on the left contains Categories of Speed Buttons Each category can contain 6 speed buttons set in the Buttons field Add Add a new speed button category Rename Select a category and the click Rename to rename that category Delete Select a category and then click Delete to delete that category ...

Page 25: ...eate a new Speed Button 2 Pick a blank or already used button in the Buttons Field and click Edit to the right of it 3 You will see the Button Editor window 4 Type the desired name of the speed button into the Name field If you want this button to be hidden check mark Hide this button 5 Select which icon you wish to be displayed on the button No Icon Only the name will be displayed on the speed bu...

Page 26: ...ry go to 6B 6A In the Launcher field click Browse to navigate to and select the application you want to link to this button Click Remove if you no longer want this application to be linked to the speed button 6B You can make this speed button link to another speed button category by selecting the category in the Speed Button Set field Clicking Remove will remove this link 7 If you want the speed b...

Page 27: ...p Puts the computer in sleep mode when the Hot Key is pressed Logoff Logs off the current user account when the Hot Key is pressed Launch Launches an application Once selected the Browse field will be available Click Browse and browse to the desired application Brightness You can choose to Increment Decrement or Set Value to a specific Brightness Low is 1 High is 100 When Increment or Decrement is...

Page 28: ... Auto Bright function If you select Off the Hot Key will turn off the Auto Bright function Toggle will turn the Auto Bright function on and off with each consecutive Hot Key press Barcode Trigger Triggers the internal barcode reader if option is installed to begin scanning Show Hotkey Message When check marked a pop up message will appear when any assigned hotkey is pressed letting you know which ...

Page 29: ...ed When check marked the internal fan will be disabled 2 Speed When check marked the fan will only have two speeds low and high These speeds will be triggered according to the temperatures set in the Fan Setting field Variable When check marked the fan will gradually increase speed based on the fan settings as the computer temperature rises Fan Setting Low Fan Speed 20 to 99 Sets the lowest fan sp...

Page 30: ...nt the fan speed from changing too rapidly Fan Rise Speed 1 to 10 Sets how fast the fan speed increases 1 is faster 10 is slower Fan Fall Speed 1 to 10 Sets how fast the fan speed decreases 1 is faster 10 is slower Actual Speed Indicates the current speed in of the fan Tachometer Indicates the current RPM revolutions per minute of the fan Thermal Zone Temp Indicates the current temperature in C re...

Page 31: ...ll system settings Create a file that backs up all RTi Control Panel settings except for Speed Buttons and Hot Keys This file can be used to restore settings at a later time or each time the RTi Control Panel is started Backing Up System Settings This backup file can be useful when trying to deploy the same system settings on multiple RT 12i computers You can make the backup file on one computer t...

Page 32: ...occur only once 4 If you want to load the settings from it each time the RTi control panel is started for example every time the computer boots up you must alter the file slightly To alter the file navigate to the file then double click it You will get a message telling you there is no program to open the file Choose to open it in Notepad Scroll to the bottom of the file until you see INITONCE Del...

Page 33: ... Receiver A GPS receiver can be installed in your tablet You have the option of using an internal antenna or a SMA jack can be installed on the back of the unit so an external antenna can be connected Cover used when internal antennas are installed SMA Jack for external antenna Fingerprint Scanner A fingerprint scanner can be installed in your tablet Note The USB port circled in red will be unavai...

Page 34: ... that the barcode reader is scanning They stay lit for approximately 10 seconds before timing out and shutting off During these 10 seconds you scan the barcode you wish to scan The scanner also projects a green line to help assist in positioning the barcode Finding out the COM Port Number of the Barcode Reader Open the Windows Device Manager Under the Ports COM LPT category you should see a device...

Page 35: ...u should see a picture of the scanner as well as text in the Serial Model and Firmware Number fields 4 If you don t see any information written in the Serial Model and or Firmware number fields click the Port Settings icon near the top of the window A window will appear as shown below Verify that the COM port number matches what you noted in step 1 If it does not set the Port Number to the correct...

Page 36: ...ired barcode in front of the reader then press the Hot Key assigned to the barcode trigger The factory default is button 1 Some practice may be needed to find out the proper distance angle from the scanner you need for an appropriate scan You should see a green line projected onto the barcode Use this to help you position the barcode in the correct place If the scan is successful data from the bar...

Page 37: ...g proper grounding prior to opening the unit 1 Remove the power cable from the computer 2 Remove the 8 screws circled below 3 Remove the top cover The hard drive is now accessible Pull out the hard drive tray NOTE An easy way to get it out is to insert a screw driver into the small hole in the tray and use the screw driver as a lever to unseat the hard drive tray 4 To remove the hard drive from th...

Page 38: ...38 P a g e 5 Perform steps 1 4 in reverse order to re install the hard drive When securing the hard drive to the hard drive tray ensure that the wavy circuit traces shown below are facing the hard drive ...

Page 39: ...ning the unit 1 Remove the power cable from the computer 2 Remove the 8 screws circled below 3 Carefully remove the black plastic cover You will see the antenna board resting on nylon stand offs Make sure the stand offs do not fall into the tablet 4 While holding the antenna board out of the way pull out the hard drive tray NOTE An easy way to get it out is to insert a screw driver into the small ...

Page 40: ...e hard drive tray remove the four screws circled below 6 Perform steps 1 5 in reverse order to re install the hard drive When securing the hard drive to the hard drive tray ensure that the wavy circuit traces shown below are facing the hard drive ...

Page 41: ...s Below is a list of solid state hard drives that have been tested and approved for use with the RT 12i Intel SSDSA2CT040G3 2 5 320 Series 40GB Intel SSDSA2CW080G3 2 5 320 Series 80GB OCZ Technology AGT3 25SAT3 120G 2 5 Agility 3 SATA III 250 GB ...

Page 42: ...he car is passing through shaded areas If Auto Bright mode is enabled slow down your Adjust Speed in the LCD Brightness tab 5 Touch screen does not respond accurately to touch Run the Touch Screen Calibration from the Main Setup tab 6 Some or all of the status LEDs on the bezel don t seem to be working Verify that the desired LEDs are check marked in the LCD Brightness tab 7 The Auto Bright enable...

Reviews: