


INSTALLATION
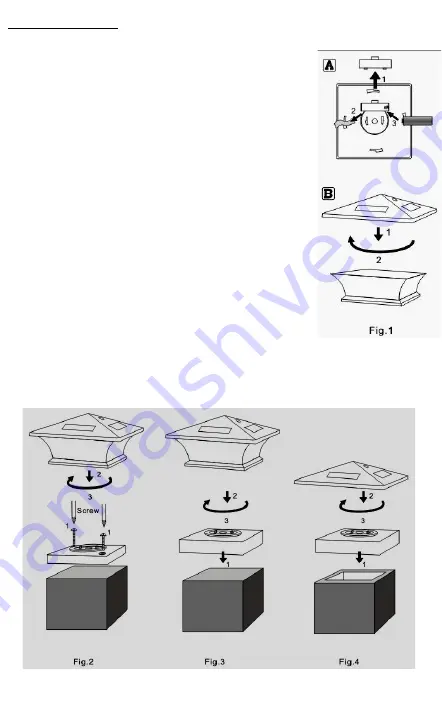
Remove the red pull tag under the Solar Housing.
Attach it to the lens by turning it clockwise until firmly
attached. (Fig. 1)
Screw the standard post mount bracket to the desired
wood post (Fig. 2)
OR
attach the Composite/PVC post
mount bracket to the Composite/PVC post by pushing
together. (Fig. 3). Attach the solar light with a clockwise
twist until you hear a "click".
To use the Routed Post Sleeve Design Option:
Remove the lens from the Solar Housing (if Attached)
by turning it counter-clockwise. You will not use the
lens for this application. Attach the Composite/PVC
post mount bracket to the Routed Post Sleeve by
pushing together (Fig. 4). Attach the Solar Housing to
Composite/PVC post mount bracket with a clockwise
twist until you hear a "click".
Note:
After you solar light charges under direct sunlight on
a sunny day, it will automatically turn on at dusk.
Your solar light should not be placed near night-
time light sources as streetlights might keep the light from automatically
turning on.
The post to be installed with your post cap should be higher than 1 foot
for the lantern to receive maximum sunlight.
REPLACING THE BATTERY
Step 1: Turn the solar housing counter-clockwise until it separates from the
lens. (Fig. 5)
Step 2: Remove the battery compartment lid by pushing the tab on it.
Remove the old battery. Replace with a new solar rechargeable "AA" battery
of the same mAh or higher. (Fig. 6)
Step 3: Attached the solar housing assembly to the lens with a clockwise
twist until you hear a "click". (Fig. 7)
Caution: Solar rechargeable batteries contain Nickel-Cadmium or Nickel-
Metal Hydride and must be recycled or disposed of properly. Do not mix old
and new batteries. Do not mix alkaline, standard (carbon-zinc), or
rechargeable batteries.
MAINTENANCE
Troubleshooting
Q: Light does not work.
A:
1. Make sure the red pull tag under the solar housing has been removed.
2. Make sure the battery connection is tight
3. Make sure the battery has been charged under direct sunlight
4. Make sure your light is not placed near other night-time light sources
5. Battery may need to be replaced. Replace with a new solar
rechargeable battery of the same size
Q: Short run time
A:
1. Battery may need to be replaced. Purchase a new solar rechargeable
battery at your nearest
MENARDS®
retail store.
2. Make sure the solar housing is clear from dust, snow and debris which
would prevent the battery from charging
3. Make sure the battery has been charged under direct sunlight
4. Make sure your light is not place near other light sources.


