Using the T
Using the Turbidity Sensor
urbidity Sensor
Use the Turbidity sensor to measure the turbidity level (cloudiness) of
a water sample.
Step 1: Pr
Step 1: Prepar
epare Solutions for Analysis
e Solutions for Analysis
When preparing solutions for analysis:
• Use the smooth cuvettes that do not have lines.
• Fill cuvettes ¾ full with the test solution and cap the cuvette.
• Clean the smooth sides of the cuvette using a lint-free wipe before
inserting it into the test chamber.
Step 2: Pr
Step 2: Prepar
epare a Blank Calibr
e a Blank Calibration Cuv
ation Cuvette
ette
Deionized water is used for the first calibration point. Fill one smooth
cuvette ¾ full with deionized water and cap the cuvette.
Step 3: Pr
Step 3: Prepar
epare a 100 N
e a 100 NTU Calibr
TU Calibration Cuv
ation Cuvette
ette
The 100 NTU solution is used for the second calibration point.
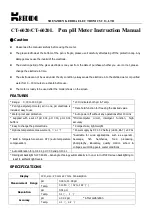
Figure 2. A cuvette with the 100 NTU label placed
over the cap with the expiration date label attached.
1. Fill one smooth cuvette ¾ full with the 100 NTU solution and cap
the cuvette.
2. Place a 100 NTU cuvette label over the cuvette cap as shown in
the figure.
3. Place an expiration date label on the 100 NTU Cuvette label.
Note:
Note: The 100 NTU standard sample should provide
accurate results (±7%) up to the expiration date.
Step 4: Set Up Data Collection
Step 4: Set Up Data Collection
SP
SPARK
ARKvue
vue
1. Turn on the Wireless Colorimeter and Turbidity sensor.
2. Open SPARKvue then click Sensor Data
Sensor Data
.
3. Select the Colorimeter that matches the device ID.
4. Toggle the Wireless Turbidity Sensor
Wireless Turbidity Sensor switch from disable
to
enable
.
Note:
Note: You may need to scroll down the list of
measurements to see the sensor.
5. Under Templates
Templates, select Digits
Digits.
P
PASCO Capst
ASCO Capstone
one
1. Turn on the Wireless Colorimeter and Turbidity sensor.
2. Open Capstone then click Hardware Setup
Hardware Setup
.
3. Select the Colorimeter that matches the device ID.
Note:
Note: You may be prompted to calibrate the sensor. If you
want to calibrate now, click Calibrate
Calibrate and proceed to the
Calibrate the Sensor
Calibrate the Sensor instructions. Otherwise, click Cancel
Cancel.
4. Toggle the Wireless Turbidity Sensor
Wireless Turbidity Sensor switch from disable
to
enable
.
5. Click Data Summary
Data Summary
.
6. Click and drag Turbidity (NTU)
Turbidity (NTU) to Digits
Digits
in the Displays palette.
7. Click Data Summary
Data Summary
to close the panel.
Step 5: Calibr
Step 5: Calibrate the Sensor
ate the Sensor
SP
SPARK
ARKvue
vue
1. Click Hardware Setup
Hardware Setup
then click
for the Wireless Turbidity
Wireless Turbidity
Sensor
Sensor.
Note:
Note: You may be prompted to calibrate the sensor. If so,
click Calibrate
Calibrate.
2. Insert the blank calibration cuvette into the test chamber and
close the cover.
3. Click Calibrate
Calibrate in item 3. A green check
will indicate that
calibration is complete.
4. Insert the 100 NTU Standard cuvette in the test chamber with the
arrow pointing toward the Turbidity sensor and close the cover.
5. Click Calibrate
Calibrate in item 4. A green check
will indicate that
calibration is complete.
6. Click Done
Done.
7. Close Hardware Setup
Hardware Setup.
P
PASCO Capst
ASCO Capstone
one
1. Click Calibration
Calibration
.
2. Select Wireless Turbidity Sensor
Wireless Turbidity Sensor from the list then click Next
Next.
3. Insert the blank calibration cuvette into the test chamber and
close the cover.
4. Click Calibrate
Calibrate. A green check
will indicate that the turbidity
sensor is calibrated.
5. Insert the 100 NTU Standard cuvette in the test chamber with the
arrow pointing toward the Turbidity sensor and close the cover.
6. Click Calibrate
Calibrate. A green check
will indicate that the turbidity
sensor is calibrated.
7. Click Finish
Finish.
8. Click Calibration
Calibration to close the panel.
Step 6: Collect Data
Step 6: Collect Data
SP
SPARK
ARKvue
vue
1. Insert a cuvette containing a test sample in the test chamber and
close the cover.
2. Click Start
Start
to begin data collection.
3. Click Stop
Stop
to end data collection.
4. Repeat the steps for additional test samples.
P
PASCO Capst
ASCO Capstone
one
1. Insert a cuvette containing a test sample in the test chamber and
close the cover.
2. Click Record
Record
to begin data collection.
3. Click Stop
Stop
to end data collection.
4. Repeat the steps for additional test samples.
Wireless Colorimeter and Turbidity Sensor | PS-3215
Product Guide
5
012-15830B