ParkerVision CameraMan 1-CCD Operation Manual Download Page 14

Page 12

CameraMan® 1-CCD Camera Control Keypad Operations Manual  •  © 1999 ParkerVision, Inc.

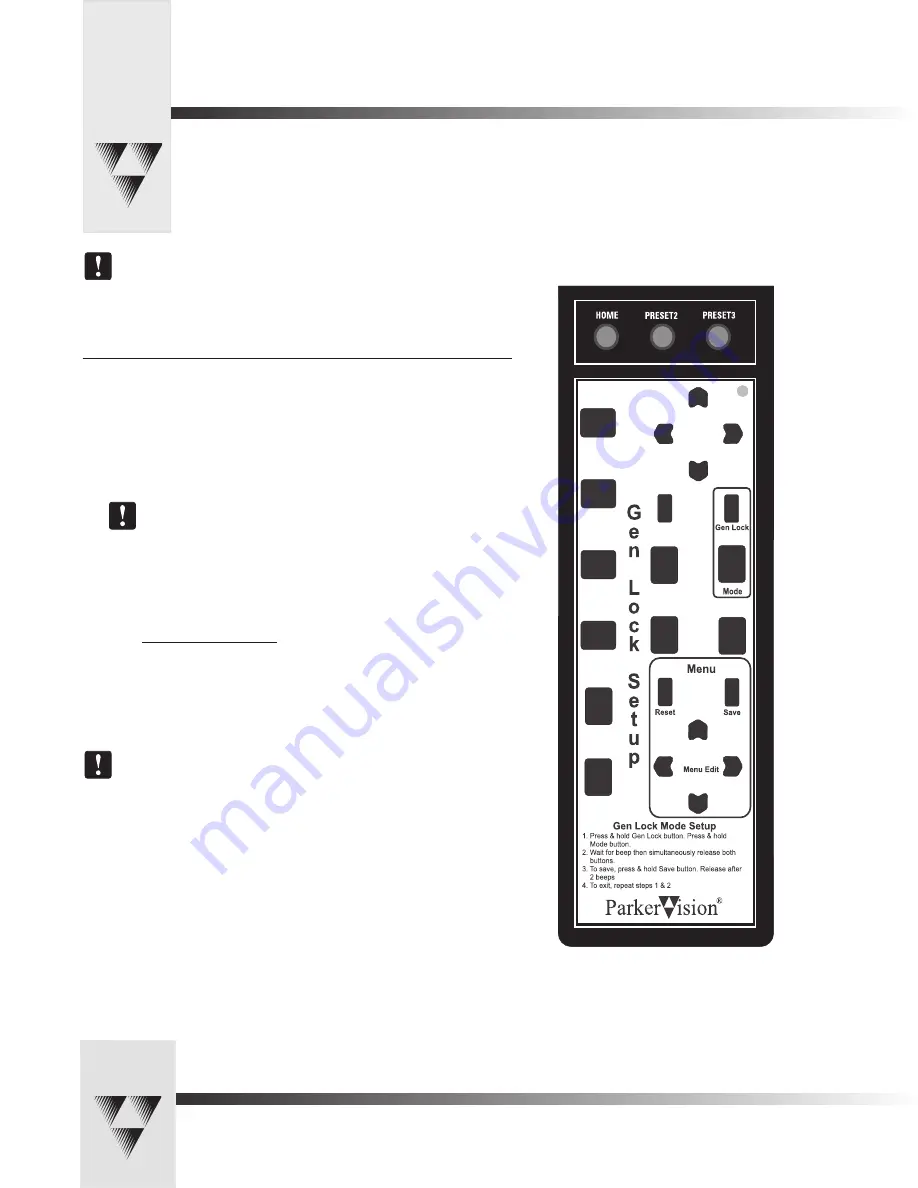
Setting Up Gen Lock with Your Control Keypad

You can adjust the Gen Lock settings to synchronize all video sources based on the sync pulses from one source, such as a remote 

camera. When you switch between cameras, you may detect a flicker on your monitor. Adjusting the Gen Lock settings enable you 

to remove the flicker for smooth transitions between cameras.


Place the 

Gen Lock Mode Setup

 card over the Keypad when adjusting Gen Lock. It 

provides the instructions below and highlights the buttons you will use.

Gen Lock Setup (with the overlay card)

The following procedure will enable you to adjust Gen Lock settings with the 

Gen Lock Setup


overlay card. 

1.   Press and hold down the buttons labeled 

Gen Lock

 and 

Mode

. After 2-3 seconds, 

you will hear a beep.

2.   Release the 

Gen Lock

 and 

Mode

 buttons. The 

Gen Lock Setup

 menu appears.


To reset the menu items to the default values, press the button labeled 

Reset

.

3.   Press the 

up

 and 

down Menu Edit

 arrows to move the arrow on-screen and to 

select the item you want to change.

4.   Press the 

left

 and 

right Menu Edit

 arrows to change the value for the following 

items:

Menu Item 

Values

MODE 


AUTO

 or 

INT

 (internal)

H-PHASE


-99°

 to

 +99°

SCFINE   

-99°

 to 

+-99°

5.   To save your changes, press the button labeled 

Save

.


The SC-PHASE is set using Dip Switch number 2:  

DOWN = 150°

 and 

UP = 180°.

6.   Press and hold 

Gen Lock

 and 

MODE

 to exit.

Summary of Contents for CameraMan 1-CCD

Page 1: ...CameraMan 1 CCD Camera Control Keypad Operations Manual...

Page 2: ...ter IMAGE and Digital RF 900 and are registered trademarks of ParkerVision Inc in the United States of America The terms CameraMan and ParkerVision are registered logos in the United States of America...

Page 3: ...intenance of your Camera Control Keypad This icon alerts you to tips or noteworthy suggestions in the operation use or maintenance of your Camera Control Keypad This icon refers you to the 1 CCD Gener...

Page 4: ...toIMAGE Button Used to enable camera to adjust the brightness automatically for each camera view t Enter Used to enter data or change a camera location preset t Location Preset Control Buttons 0 9 Use...

Page 5: ...ry again If a battery with a low charge is installed the keypad will emit a long beep If the batteries are inserted improperly it will not damage the keypad it simply will not work For Hard wired Mode...

Page 6: ...ications however in which you do not need to face the camera example 2 In these situations the default setting would work These applications require that you re orient the PAN arrows see below Some ex...

Page 7: ...change the maximum position settings 1 Select the camera you want to adjust see page 6 Multiple Camera Keypad Usage 2 Press and hold the ENTER button 3 While holding the ENTER button use the PAN TILT...

Page 8: ...amera Control Keypad to match the BASE UNIT ADDRESS on the first camera See page 3 for more information on setting the KEYPAD ADDRESS 3 Set the BASE UNIT ADDRESS on the second and third cameras to suc...

Page 9: ...or three will be received by camera one and sent to the proper camera using RS 485 communications 1 Make sure your cameras are daisy chained together See your 1 CCD CameraMan Installation and Operati...

Page 10: ...second and third cameras to successively follow the address that you used for the first camera Example Camera Base Unit Address Keypad Address 1 0 0 2 1 3 2 5 Set the RF Command configuration switch...

Page 11: ...ther IMAGE button the camera s image control automatically becomes a manual adjustment overriding autoIMAGE Manual Press and release the top IMAGE button sun to open the iris Press and release the bot...

Page 12: ...mera you want to program using the CAMERA SELECT buttons if you are using only one camera press CAMERA SELECT 1 2 Use PAN TILT arrows to move the camera to the desired location 3 If desired use ZOOM I...

Page 13: ...camera Adjusting Shutter Settings 1 Press Enter and ZOOM IN to adjust the Shutter UP 2 Press Enter and ZOOM OUT to adjust the Shutter DOWN Adjusting Gain Settings 1 Press Enter and IMAGE lighten sun t...

Page 14: ...th the overlay card The following procedure will enable you to adjust Gen Lock settings with the Gen Lock Setup overlay card 1 Press and hold down the buttons labeled Gen Lock and Mode After 2 3 secon...

Page 15: ...lease the 0 and 8 buttons The Gen Lock Setup menu appears To reset the menu items to the default values press button number 1 3 Press the up and down PAN TILT arrows to move the arrow on screen and to...

Page 16: ...ill not communicate with the CameraMan Camera in the hard wired mode Solution 1 Verify that the CameraMan Keypad Cable is connected from the PVI COM port on the back of the camera to the RJ 11 jack in...

Page 17: ...make a claim as provided above or continued use of the product shall constitute an unqualified acceptance of such product and a waiver by purchaser of all claims Product Warranty Registration Form The...

Page 18: ...Page 16 Notes 1999 ParkerVision Inc Meet Your Camera Control Keypad...

Page 19: ...1999 ParkerVision Inc Literature Part Number L1202101 ref LPMCCK01 Revision D 1...

Reviews: