


14
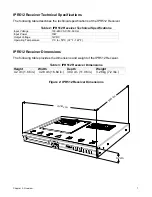
Chapter 4: Connection
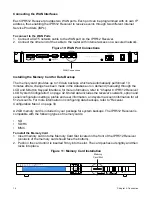
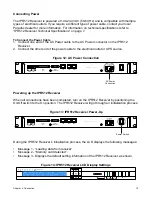
Connecting the WAN Interfaces
Each IPR512 Receiver provides two WAN ports. Each port can be programmed with its own IP
address, thus enabling the IPR512 Receiver to receive events through two different Internet
Service Providers (ISPs).
To connect to the WAN Ports
1. Connect a CAT5 network cable to the WAN port on the IPR512 Receiver.
2. Connect the other end of the cable to the router with internet access on a secured network.
Figure 10: WAN Port Connections
Installing the Memory Card for Data Backup
The memory card provides up to 10 data backups which are automatically performed 10
minutes after a change has been made in the database or on demand (manually) through the
LCD and 6-Button Keypad Interface, for more information, refer to “Chapter 6: IPR512 Receiver
LCD System Configuration” on page 42. Stored data includes the receiver’s network, option and
serial configuration settings, profile and user information, and system account information for all
512 accounts. For more information on configuring data backups, refer to “Receiver
Configuration Menu” on page 30.
A 2GB memory card is included in your package for system backups. The IPR512 Receiver is
compatible with the following types of memory cards:
•
SD
•
SD/HC
•
MMC
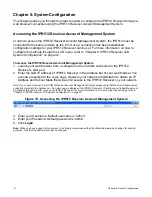
To install the Memory Card
1. Insert memory card into the Memory Card Slot located in the front of the IPR512 Receiver
(contacts of the memory card should face the bottom).
2. Push on the card until it is inserted firmly into the slot. The card pushes out slightly and then
locks into place.
Figure 11: Memory Card Installation
COM
1
(PC)
COM
2
(SERIAL OUT)
LAN
WAN
1
WAN
2
INPUT
TRIGGER
C
1 COM NO
OUTPUT
RELAY
I
O
P A R A D O X . C O M
WAN Connections
IP Monitoring Receiver
IPR512
Memory
Card Slot
Summary of Contents for IPR512
Page 1: ...IPR512 GPRS IP Monitoring Receiver V1 2 Operations Manual...
Page 63: ......


