background image

18

Basic

Operations

19

Basic

Operations

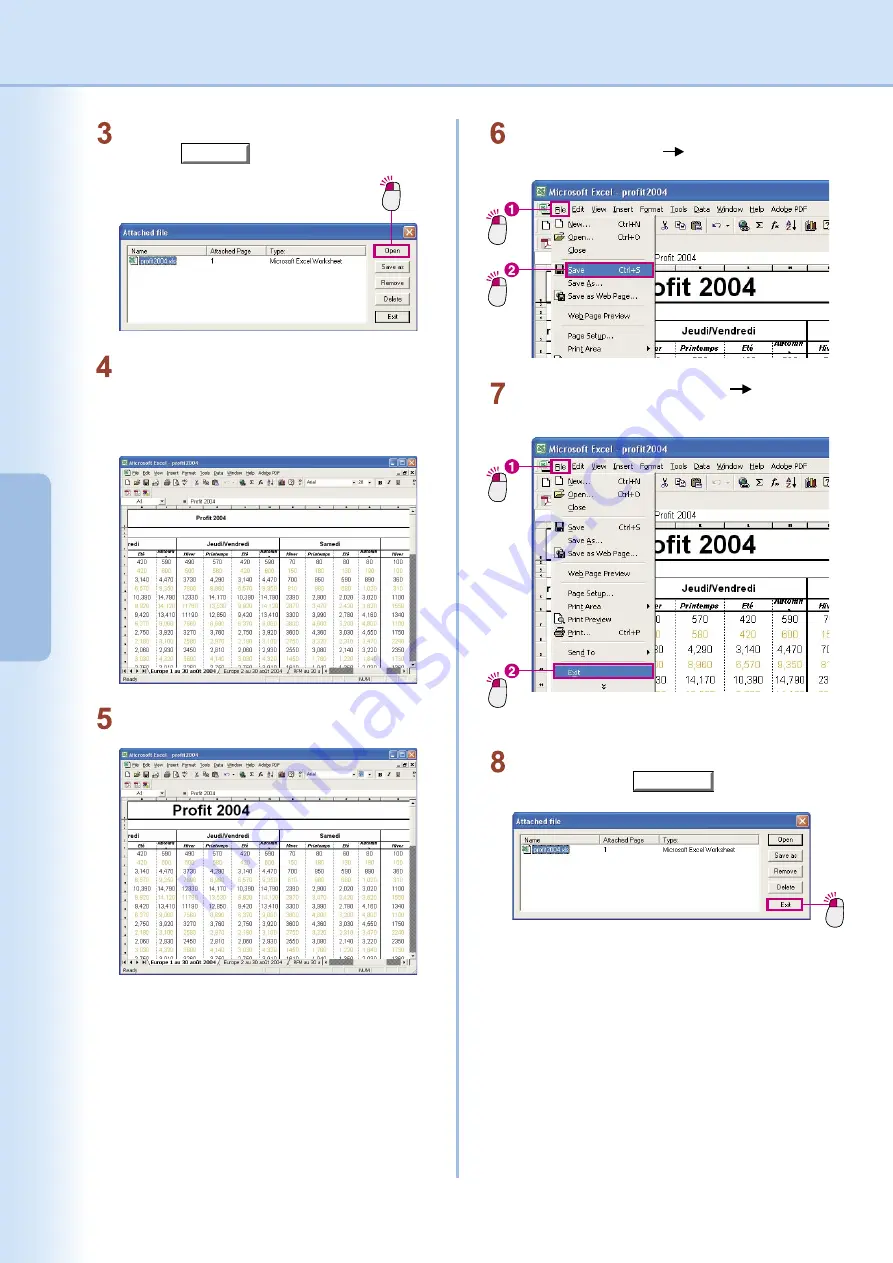
The 

Attached file

 window will appear.

Click the 

Open

 button to open the attached 

file.

Click

Click

Save the changes you made to the original 
document. Select 

File


Save

 from the menu.

Click

Make the text title on the first line larger.

Note:

In this example we are changing the font size of 

a document created in Microsoft Excel, but this is 

only for explanatory purposes. Depending on the 

situation, there may be many different things you 

will wish to change. While we will not go into the 

details of using Microsoft Excel, one important point 

to remember is how to save your changes when you 

are finished.

Microsoft Excel launches and the original 
document opens.
You will now be able to edit the original 
document.

Click

Click

Close the document. Select 

File


Exit

 from 

the menu.

You will be returned to the 

Attached file


window. Click the 

Exit

 button.

Click

Summary of Contents for Workio DP-C262

Page 1: ...ion System Requirements Basic Operations Document Management Editing Documents Menus Explanation Software Operating Instructions For Document Manager and Document Viewer Model No DP C262 C322 B Englis...

Page 2: ...nd the Agfa rhombus are registered trademarks of Agfa Gevaert N V registered in the U S Patent and Trademark Office and may be registered in other jurisdictions Monotype is a registered trademark of A...

Page 3: ...nts 21 Launch To Another Application 22 Image Printing 25 Document Management 26 Grouping Documents 26 Ungrouping Documents 29 Alternatively Grouping Document Pages 31 Creating and Deleting Folders 37...

Page 4: ...as moving copying and deleting the documents displayed in the Document Manager By registering applications in the Document Manager you can use any application to open a selected document Double click...

Page 5: ...ne of the biggest strengths of Document Manager and Document Viewer is its ability to manage document files created with applications such as Microsoft Word and Micorosoft Excel received Fax documents...

Page 6: ...indows XP Windows NT 4 0 Windows Server 2003 Interface 10Base T 100Base TX Ethernet port CD ROM Drive Used for installing the software and utilities from the CD ROM Free Disk Space 200 MB or greater 2...

Page 7: ...7 System Requirements Memo...

Page 8: ...n Folder Area Document Area Link Icons Status Bar Folder Area Displays a tree view of the folders in which the documents are stored Click on a folder to display its contents in the document area Link...

Page 9: ...the icon the document will open in the application used to create it If the document is several pages long a page bar will be displayed at the bottom of the icon The thumbnail image displayed will be...

Page 10: ...rting files on a computer or from the network The third method consists of using the device s scanner function to import documents Import Documents Using the Menu From the menu select File Open Click...

Page 11: ...s the document Drag Open the folder that contains the document to be imported and drag the document icon into the Document Manager s document area The imported document will appear in the document are...

Page 12: ...this folder The Document Manager will automatically create the folder when a scanner image is received for the first time Importing is only possible in raster format Only raster format can be used for...

Page 13: ...ighly recommended to create documents images for all vector format files NOTE What happens to the original vector format documents The original documents are saved in their original form Creating a do...

Page 14: ...or Microsoft Excel it can be difficult to cancel the file conversion process In this case use the Cancel button on the printing screen that appears after Microsoft Word or Microsoft Excel has started...

Page 15: ...how to rotate an image document imported with the scanner function Click Double click Click the Network Scanner Image folder and double click the image document you wish to rotate Document Viewer wil...

Page 16: ...age to another file or to save only a specified section of the file to another file Click Click Select File Save from the menu The file will be overwritten with the edited data Note This can also be a...

Page 17: ...e image document In the example below you can see that there is a small Microsoft Excel icon in the bottom right corner of the document s image thumbnail The following steps explain the overall proces...

Page 18: ...soft Excel but this is only for explanatory purposes Depending on the situation there may be many different things you will wish to change While we will not go into the details of using Microsoft Exce...

Page 19: ...e an attached file a new file will be automatically created 2 will be added to the original fine name so you can easily tell that it is a new file Click Click Select the newly created file and select...

Page 20: ...nt Viewer Trash Can It is not the Recycle Bin on the Windows desktop Emptying the Document Manager or Document Viewer Trash Can will not empty the Windows Recycle Bin Select the file that you want to...

Page 21: ...other the two documents will be grouped together as one document NOTE To arrange the icons in name order To arrange the icons in the order of their file names select Arrange Document from the View men...

Page 22: ...n Setup from the menu Click The External Application Setup dialog box opens Click the Add button The Add External Application dialog box opens Click the Browse button next to the Program File field Cl...

Page 23: ...button adds Microsoft Paint as a link icon Click The Microsoft Paint is added as a link icon Note You can also use the same procedure to add an Email link icon by setting the Application Type in the...

Page 24: ...Drag the document you want to open to the link icon Click A confirmation message appears Click the Yes button to open the document in the link icon application NOTE This example opens an image documen...

Page 25: ...procedure for printing from the Document Viewer is almost identical Select the file you wish to print Click the file you wish to print Click Click Select File Print from the menu Click The print dial...

Page 26: ...rag the icon for Document 1 1 page over the icon for Document 2 2 pages they will be grouped together as a single document and only Document 1 will remain In other words Document 1 serves as the group...

Page 27: ...by Dragging Documents Click Click Document 1 to select it Drag Drag Document 1 on top of Document 2 and release the mouse button Document 1 and Document 2 will be grouped together they now become Doc...

Page 28: ...bed into Document 1 NOTE Selection order is important Please remember the files will be piled in the order of your selection The first document you selected becomes the master file the grouped documen...

Page 29: ...h of the pages Another one is to ungroup only the page displayed by the document s icon creating a new document file consisting of only that page Ungroup All Document pages Click Select the document y...

Page 30: ...Page Click Click the page arrows at the bottom of the document to display the page that you want to ungroup from the document Click Click From the menu select Document UnGroup Current Page The display...

Page 31: ...y single side takes so it is more efficient to create two documents one with all of the odd pages and one with the even pages and then combine the two documents into one alternating the odd and even p...

Page 32: ...be created With reverse interleaving the pages from one document are taken from the beginning of the document and the pages from the other are taken from the end This type of interleaving is quite co...

Page 33: ...th the pages in the correct sequence For example if you have a document with pages 1 3 5 7 and 9 and another document with pages 2 4 6 8 and 10 you can use interleaving to group them into a single doc...

Page 34: ...Document Odd Document Odd Document Odd Document Odd Document Odd Document Odd Document Odd Document Odd Document Odd Document Click on the odd numbered document to select it and then select the even...

Page 35: ...at can only scan one side of the page at a time to combine the odd and even pages into a single document For example if you have one document with pages 1 3 5 7 and 9 and another document with pages 1...

Page 36: ...Document Click on the odd numbered document to select it and then select the reversed even numbered document while holding down the Ctrl key Both the odd and reversed even numbered documents will now...

Page 37: ...hlighted From the menu select File New Folder Click Enter a name for the folder Click The Create New Folder dialog box will appear Enter a name for the folder and click the OK button Check the new fol...

Page 38: ...the menu The Confirm Folder Delete message box will appear Use caution when deleting folders Document files are first placed in the Trash Can when they are deleted but folders are deleted without bei...

Page 39: ...page order Click Click From the menu select Document Page Rearrange Pages Click The Rearrange Pages Dialog box will appear Click the Reverse Order button The order of the document s pages will be rev...

Page 40: ...the file for which you want to see information From the menu select File Properties Click Click The properties of the first page will be displayed If the document is grouped it is possible to view the...

Page 41: ...41 Document Management Memo...

Page 42: ...cument area If using the menu select Document Open The Document Viewer will start and the selected image document will be displayed in its main window To start Document Viewer from the Start menu clic...

Page 43: ...you can also use this window to drag pages to new positions Page View Area Displays the image selected in the page view window Also displays information added with the Annotation function Size Bar Sl...

Page 44: ...ly viewed The scaling can be freely adjusted by dragging the size bar adjustment button It is also possible to specify a particular scale percentage by entering a value directly in the scale box Drag...

Page 45: ...ages in the Page View Area when moving the order of pages Click Click the page you want to move to select it Click Click From the menu select Page Move Page Select Page Enter the page number Click The...

Page 46: ...copy by dragging If you drag a thumbnail icon within the page list you can move the page Also if you hold the Ctrl button while dragging you can make a copy of the page Direct control with right clic...

Page 47: ...eleting Pages Delete unnecessary pages Click Click on the page you wish to delete to select it Click Click From the menu select Page Delete Page The Document Viewer dialog box will appear Click Yes to...

Page 48: ...he Window menu Correct Skew Adjusts a skewed image Eliminate Noise Removes noise from the image to make it clearer Enhance Edge Enhances the image s edges to make it sharper Brightness Contrast Adjust...

Page 49: ...nd click the Detect Skew button The skewed image will be automatically corrected Click the OK button on the Correct Skew dialog box to finish NOTE Previewing is a must It is recommended that you check...

Page 50: ...d making the corrections on that sheet of glass Both the original image and the corrections will be saved There are 11 functions that can be selected from Create Annotation under the Annotation menu T...

Page 51: ...ion area Enter text When you click outside the text insertion area the text you entered will be reflected on the image NOTE Adjusting the text insertion area You can move the text insertion area by dr...

Page 52: ...and then using the menu Click on the text Check the position of the square Click on the text and check the position of the square that represents the text input area Click Click From the menu select A...

Page 53: ...pes as well This section will use the toolbar buttons to draw Click the Ellipse button Click the button on the toolbar Drag Drag the cursor diagonally down and to the right starting from where the upp...

Page 54: ...It is also possible to use files containing stamp images such as personal seals that you have created by yourself Click the Stamp button Click the button in the toolbar Click Click The stamp propertie...

Page 55: ...k the Footer button Click the button in the toolbar The footer frame will be displayed at the bottom of the page Drag the frame to freely adjust its size Click the Date button Click the button in the...

Page 56: ...footer frame will disappear and the date will appear on all of the pages in the document NOTE The same steps can be used to add page numbers The same steps are used to insert both the date and page nu...

Page 57: ...nations The backed up folder is restored Backs up the documents stored in a folder Save as Saves a document into a file Rename Changes names of documents and folders Properties Undo Undo the last edit...

Page 58: ...another Makes a group of two or more pages of images you select Rotates the page 90 degrees clockwise Rotates the page 180 degrees Rotates the page 90 degrees counterclockwise Copies the All Pages of...

Page 59: ...n Runs respective applications specified as destinations Empty Trash Can Deletes all the document in Trash Can Selects a TWAIN compatible device to be used Imports an image from a TWAIN compatible dev...

Page 60: ...t All Pages Selects all pages Drag Mode Clip Mode Edit Mode Zoom In Zoom Out Fits to Page Width Fits to Page Height Makes display scale based on page height Makes display scale based on page width Zoo...

Page 61: ...it to a page Creates a line annotation and paste it to a page Label Creates a label annotation and paste it to a page Creates a text annotation and paste it to a page Stamp Creates a stamp annotation...

Page 62: ...EQUENTIAL DAMAGES OR LOSS OF PROFITS SUSTAINED BY THE CUSTOMER IN CONNECTION WITH THE USE OR APPLICATION OF THIS PANASONIC MACHINE SEE YOUR DEALER FOR DETAILS OF DEALER S WARRANTY USA Only WARRANTY Fo...

Reviews: