background image

Monitor 2, VGA Monitor:  

Display of live or recorded images (and setup menu)
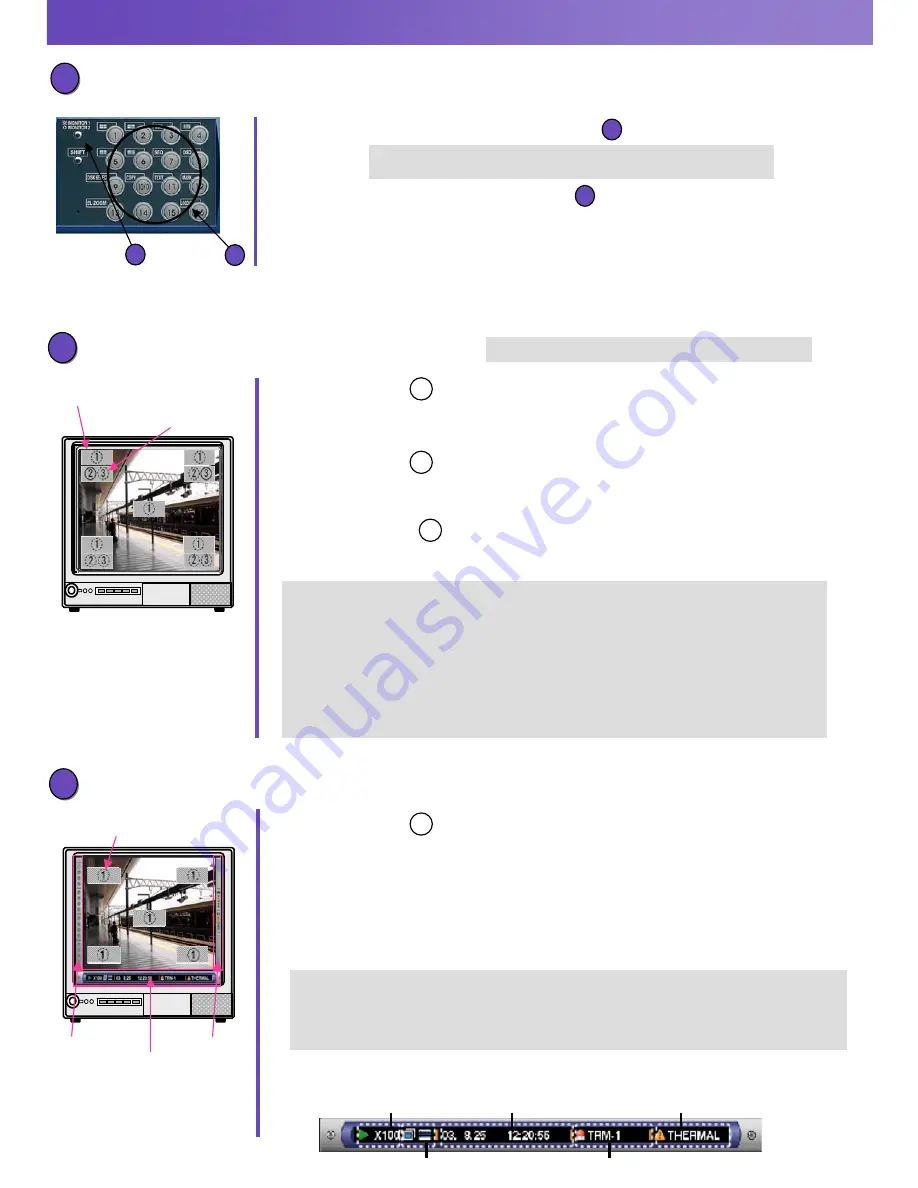
Camera Title

Displays the edited camera title.
Selectable positions: Upper left, upper right, lower left, lower right (Default), center.

Task Bar

Displays the current status. The task bar consists of the main bar, the left bar and the 
right bar. There are 3 different ways to display the task bar as follows.

Status on the Task Bar

Status Display Area

Live/Playback Time 

Display Area

Error Display Area

Copy / Delete Icons

Alarm Display Area

Event Display

Displays an alarm when an alarm occurred.
Selectable positions: Upper left, upper right (Default), lower left, lower right, center.

Event display depending on event.

VMD-*

:  When motion is detected by the motion detection function

LOSS-*

:  When video loss has occurred 

COM-#

: When a command alarm is supplied from a PC connected to the SERIAL

connector on the rear panel of this unit.

TRM-#

: When a signal is supplied form an external device such as a door sensor

to the ALARM terminal.

*: Camera number, #: Event 

number

Time Display

Displays the current time and date.
Selectable positions: Upper left (Default), upper right, lower left, lower right, center.

Monitor 1 

: Display of live images only

Camera Title

Displays the edited camera title.
Selectable positions: Upper left, upper right, lower left, lower right (Default), center.

Style 1: Displays only the main bar and the status is displayed on it.
Style 2: Displays the status on the main bar, the left bar and the right bar.
Style 3: Displays the status only on the main bar, and does not display information on 

the left and right bar.

Display

Display

The setup menu is displayed only on monitor 2.

Right bar

Left bar

Main bar

Camera Title

Camera title

Time / Event Display

Monitor of live images

(1)Press the MONITOR 1 / MONITOR 2     button to select the monitor

(2)Press a camera selection button

Live images from the selected camera will be displayed and the respective camera 
selection button will light green or blue.

Please check that the SHIFT button is not lit before pressing the camera selection button.

When monitor 1 is selected the indicator will light.
When monitor 2 is selected the indicator will not light.

Camera Title Display

1

3

2

1

Summary of Contents for WJHD316 - DIGITAL DISK RECORDER

Page 1: ... the power switch on the rear panel The OPERATE indicator will light and the system check will start The startup splash image to the left will be displayed on monitor 2 and VGA 3 Enter a user name and password by rotating the jog dial to select a character and by pressing the arrow buttons to move the cursor Cursor movement Arrow button Character input Jog dial Number input Camera selection button...

Page 2: ...a number Event number Time Display Displays the current time and date Selectable positions Upper left Default upper right lower left lower right center Monitor 1 Display of live images only Camera Title Displays the edited camera title Selectable positions Upper left upper right lower left lower right Default center Style 1 Displays only the main bar and the status is displayed on it Style 2 Displ...

Page 3: ...Move the cursor to select the recording event using the arrows button and rotate the jog dial to ON Press the SET button to determine the selection By text information Rotate the jog dial to select OFF WITH TEXT or WITHOUT TEXT Press the SET button to determine the selection By camera and channel Select camera channel numbers using the arrows button to apply filtering and complete by pressing the ...

Page 4: ...een the same numbers of split screens will be counted as marked points Marking on a 16 screen 16points will be marked simultaneously 2 2 Playback 2 Playback 2 3 Press the PLAY PAUSE button 2 Rotate the jog dial to select a desired marked time The LISTED indicator and the indicator on the PLAY PAUSE button will light and playback of the recorded image from the selected marked time will start 1 Pres...

Page 5: ...se the shuttle ring 5 If there is no next or previous recorded image current playback will continue 4 4 Useful Functions Useful Functions Multi Screen 2 Press the Shift button Button 1 4 split screen Button 2 7 split screen Button 3 9 split screen Button 4 16 split screen Button 5 10 split screen Button 6 13 split screen 7 3 Press a camera selection button 1 6 to select a desired multiscreen 4 To ...

Page 6: ...is unit can be performed on this tab Refer to Network Setup Instructions for further information Setup tab During live play display of the current time During playback display of the play time Current time play time display area Recorded images and live images will be displayed The setup menu will be displayed while setting up Image display area It is possible to mark playback points or skip to th...

Page 7: ... button to cancel the warning status The unit will start operation automatically after the UPS start power supply nn available disk space low FULL no available disk space The hard disk is almost full or completely full Press the ALARM RESET button to cancel the error or the warning status Initialize or replace the hard disk When initialized all recorded date will be deleted It is recommended to co...

Reviews: