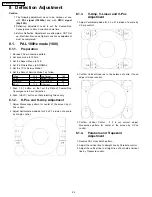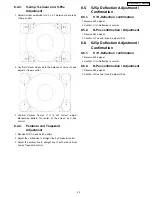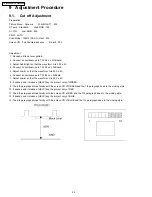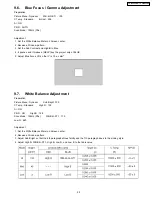
background image

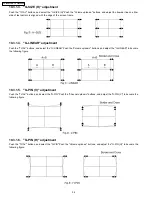
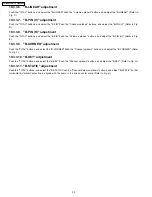
10.3.1.7. "G-CORNER" adjustment

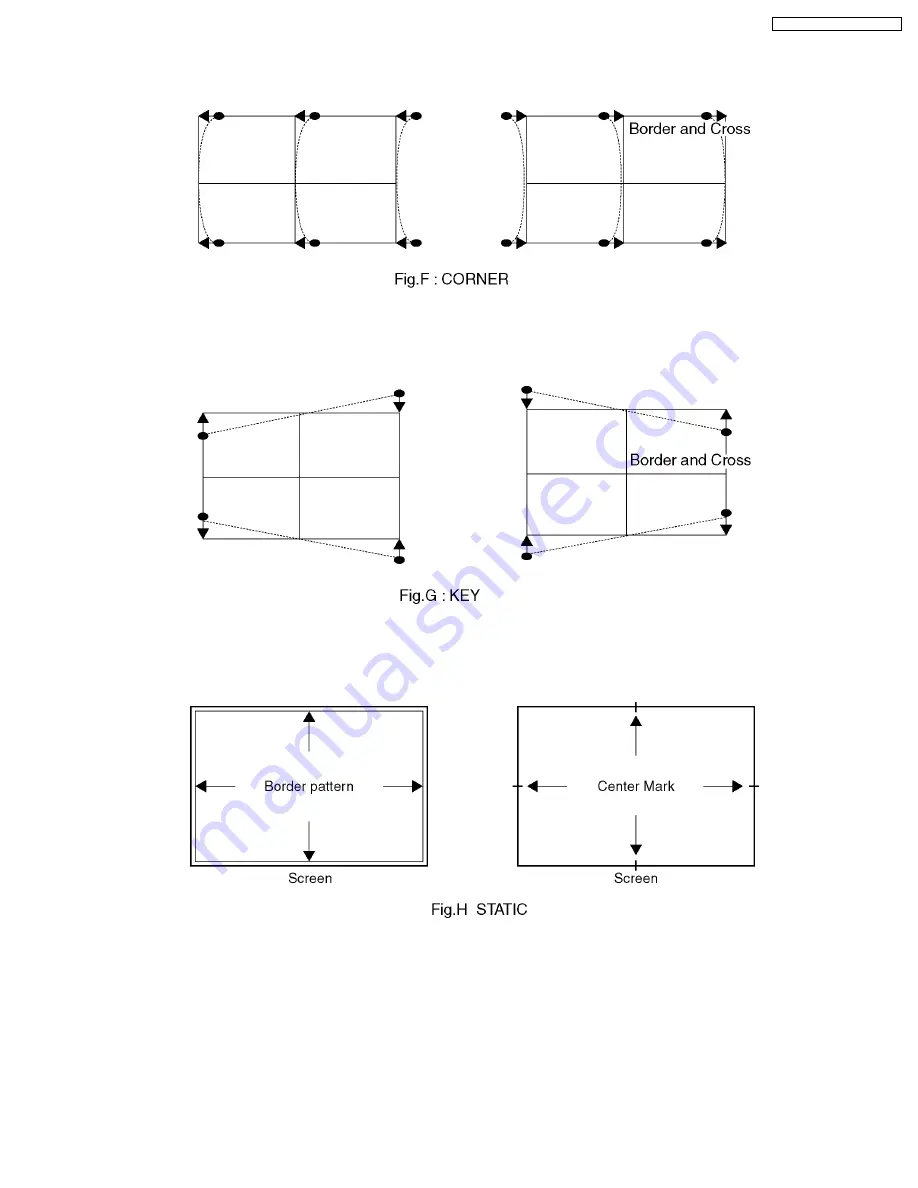
Push the "TV/AV" buttons, and select the "G-CORNER".Push the "Volume up/down" buttons, and adjust the "G-CORNER" to
become the following figure.

10.3.1.8. "G-KEY" adjustment

Push the "TV/AV" buttons, and select the "G-KEY".Push the "Channel up/down" buttons, and adjust the "G-KEY" refer to following
figure.

10.3.1.9. "G-STATIC" adjustment

Push the "TV/AV" buttons, and select the "G-STATIC".Push the "Channel/Volume up/down" buttons, and adjust "G-STATIC" so
that Horizontal & Vertical center line is aligned with the bump in the screen center mark.

35

TX-47P800HQ / TX-47P800HZ

Summary of Contents for TX-47P800HQ TX-47P800HZ

Page 1: ... Television Specifications Power Source AC 220 240 V 50 60 Hz Power Consumption Stand by condition 0 5 W Normal viewing 175 W Dimensions W H D 1298 mm 1207 5 mm 567 mm Mass Weight 62 kg Net Remote control Transmitter EUR511267 R6 AA Battery 2 Receiving System Receiving Channels Regular TV VHF BAND 2 12 PAL SECAM B K1 0 12 PAL B AUST 1 9 PAL B N Z ORDER NO ITD0308033C3 ...

Page 2: ... 100 Position DIRECT 125 Position Audio Output 40 W 20 W 20 W 10 THD Speaker System Woofer 13 cm 2 Squawker 12 cm 6 cm 2 Tweeter 5 cm 2 Headphones 3 5 mm Plug 1 Aerial Impedance 75 9 Unbalanced coaxial Video Audio Component Terminals AV 1 2 3 4 S Video In Y 1 V p p 75 9 C 0 3 V p p 75 9 DVD Y PB PR Video In 1 V p p 75 9 Audio In Approx 0 5 V 47 K9 Monitor Out Video Out 1 V p p 75 9 Audio Out Appro...

Page 3: ... Location of Lead Wiring 6 48 11 7 Location of Lead Wiring 7 48 11 8 Location of Lead Wiring 8 49 11 9 Location of Lead Wiring 9 49 12 Conductor Views 51 12 1 A Board 51 12 2 D Board 53 12 3 DC Board 56 12 4 DG Board 57 12 5 H Board 61 12 6 LG LR and LB Board 63 12 7 P Board 64 12 8 SG Board 66 12 9 SR and SB Board 67 12 10 U Board 68 12 11 G K and KA Board 70 13 Block Diagram 71 13 1 Audio Block ...

Page 4: ...sed metallic part has a return path to the chassis the reading should be between 4 M9 and 20 M9 When the exposed metal does not have a return path to the chassis the reading must be 1 3 Leakage Current Hot Check See Fig 1 1 Plug the AC cord directly into the AC outlet Do not use an isolation transformer for this check 2 Connect a 2k9 10W resistor in series with an exposed metallic part on the proj...

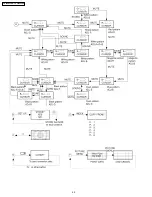
Page 5: ...lection High Voltage LR Board CRT Drive R LG Board CRT Drive G LB Board CRT Drive B SR Board VM Output R SG Board VM Output G SB Board VM Output B H Board Rear terminal U Board MPU DG Board Digital Core DC Board Convergence G Board Front Terninal K Board Power Switch KA Board Blue light 5 TX 47P800HQ TX 47P800HZ ...

Page 6: ...hart indicates disassembly items of the cabinet parts and circuit boards in order to find the items necessary for servicing when reassembling perform the procedures in the reverse order 3 1 Disassembly Flowchart 6 TX 47P800HQ TX 47P800HZ ...

Page 7: ... 2 Remove 2 screws 3 4 Speaker Ass y 1 Remove 10 screws Note Board ground wires may have to be disconnected to disassemble some boards All ground wires must be reconnected using jumper leads if necessary before power is applied to Receiver for service 7 TX 47P800HQ TX 47P800HZ ...

Page 8: ...rews 3 6 Screen 1 Remove 20 nails and remove 2 Screen Holders vertical side and 4 Screen Holders horizontal side 3 7 Mirror 1 Remove 3 screws 3 8 Rear Cover Upper 1 Remove the Cabinet Upper 2 Remove 2 screws 8 TX 47P800HQ TX 47P800HZ ...

Page 9: ...and the Bottom Rear Cover Ass y See Disassemble for Service 2 Unplug the defective CRT Dag GND from the CRT Board LBGND for LB LGGND for LG LRGND for LR 3 Remove lead wires DY VM coil and anode lead wire from holders as necessary 4 Remove the CRT Board from the defective CRT neck 5 Note position of yoke with centering tabs and remove from defective CRT 6 From the Top remove 2 screws from the defec...

Page 10: ...d VM coil with other CRT neck assemblies on CRT neck in the same order and position as removed from the defective CRT 13 Push yoke against bell of CRT and tighten the clamp just snug enough so it will not easily shift 14 Assemble CRT focus lens assembly to new CRT with 4 screws Make sure focus lens adjustment nut is in the same location as on other CRT focus lens Note Please assemble with screws i...

Page 11: ...each circuit board from A or D Board 2 Connect extension cables between individual circuit board and A or D Board Note Extension cable kit is supplied as service fixtures and tools Part No TZSC0724 4 3 Service Position for K Board 1 Remove the Speaker Grille 2 Remove the K Board by 4 screws 4 4 Service Position for KA Board 1 Remove the Speaker Grille 2 Remove the Terminal Door by 4 screws 3 Remov...

Page 12: ...4 5 Service Position for G Board 1 Remove the Speaker Grille 2 Remove the Terminal Door by 4 screws 3 Remove the G Board by 2 screws 12 TX 47P800HQ TX 47P800HZ ...

Page 13: ...to the Self Check mode press the down button on the customer controls at the front of the set at the same time pressing the HELP button on the remote control and the screen will show If the CCU ports have been checked and found to be incorrect or not located then will appear in place of O K 13 TX 47P800HQ TX 47P800HZ ...

Page 14: ...in Service Mode 6 1 How to enter SERVICE 1 1 In sound menu set BASS to MAX and set TREBLE to MINIMUM 2 Simultaneously press INDEX button on remote control and VOLUME DOWN button on the TV set 6 2 How to enter SERVICE 2 1 Set the channel to CH99 2 Press HOLD button on remote control Note To exit to Service mode press N or Power button on remote control 14 TX 47P800HQ TX 47P800HZ ...

Page 15: ...15 TX 47P800HQ TX 47P800HZ ...

Page 16: ...6 3 Option Descrition 16 TX 47P800HQ TX 47P800HZ ...

Page 17: ...17 TX 47P800HQ TX 47P800HZ ...

Page 18: ...18 TX 47P800HQ TX 47P800HZ ...

Page 19: ...ttern 17 Set scan mode to Progressive 18 Repeat step 6 9 19 Set scan mode to 100Hz 20 Repeat step 6 9 21 Apply monoscope pattern of PAL 1080i 50Hz 22 Repeat step 6 9 23 Proceed with Focus Adjustments 7 2 Electrical Focus Adjustment 1 Receive a monoscope pattern 2 Cover the Red and Blue CRT projecting Green only The electrical focus controls are located on the front Adjust the Green Focus VR for be...

Page 20: ...ope pattern line up with the screen center line 9 Cover the Green Red CRT lens projecting Blue only 10 Adjust blue centering magnets to position the center of the blue raster W2 away from the center of the green raster 11 Cover the Green Blue CRT lens projecting Red only 12 Adjust red centering magnets to position the center of the red raster W1 away from the center of the green raster 7 4 Centeri...

Page 21: ...djust for best green electrical focus with green electrical focus adjustment VR 7 Cover the Green Red CRT lens projecting Blue only 8 Repeat step 4 step 6 for blue electrical focus 9 Cover the Green Blue CRT lens projecting Red only 10 Repeat step 4 step 6 for red electrical focus 11 Receive an monoscope pattern 12 Cover the Red Blue CRT lens projecting Green only 13 If the center of the monoscope...

Page 22: ... that set the Data of Coarse Fine Convergence to Zero Correction 8 Push HELP button so that projecting Green only 8 1 2 H Pos and H Amp Adjustment 1 Adjust Monoscope pattern for center of the screen by H Pos control 2 Adjust Horizontal amplitude for 2 3 0 1 division of a scale by H Amp control 8 1 3 V Amp V Linear and V Pos Adjustment 1 Adjust Vertical amplitude for 2 3 0 1 division of a scale by ...

Page 23: ...onoscope pattern for center of the screen by H Pos control 2 Adjust Horizontal amplitude for 2 0 0 1 division of a scale by H Amp control 8 2 3 V Amp V Linear and V Pos Adjustment 1 Adjust Vertical amplitude for 2 0 0 1 division of a scale by V Amp control 2 Confirm Vertical Linear as to the balance of circle if need adjust V Linear control 3 Confirm Vertical Center if it is not correct adjust Mon...

Page 24: ...ertical Linear as to the balance of circle if need adjust V Linear control 3 Confirm Vertical Center if it is not correct adjust Monoscope pattern for center of the screen by V Pos control 8 4 NTSC Progressive mode 60p 8 4 1 Preparation 1 Receive NTSC monoscope pattern 2 Set scan mode to Progressive 3 Set the Aspect Menu to 16 9 4 Set the Picture Menu to NORMAL 5 Set the TV to Service Mode 1 6 Set...

Page 25: ...to straight line by Parabola control 3 Adjust the vertical line to straight line of both side Vertical line by Trapezoid control 8 5 525p Deflection Adjustment Confirmation 8 5 1 V H Deflection confirmation 1 Receive 525p signal 2 Confirm V H Deflection is normal 8 5 2 H Pos confirmation Adjustment 1 Receive 525p signal 2 Confirm H Pos and if need adjust H Pos 8 6 625p Deflection Adjustment Confir...

Page 26: ...m A is 200 2V 6 Connect an oscilloscope to TPLB1 on LB Board 7 Adjust Low B so that the waveform A is 200 2V 8 It pushes and it makes a HELP key the project only of GREEN 9 The 6th paragraph shines faintly with the screen VR of GREEN and the 7th paragraph does to the sinking style 10 It pushes and it makes a HELP key the project only of RED 11 The 6th paragraph shines faintly with the screen VR of...

Page 27: ...b Contrast so that the waveform A is 120 2V 4 Before G Limit Adjustment is attempted Sub Contrast adjustment must be completed 5 Adjust G Limit so that the waveform A is 116 2V 9 3 Sub Picture Contrast Adjustment Preparation Picture Menu Dynamic AI ON Adjustment 1 Receive a Colour Bar pattern 2 Connect an oscilloscope to TPLG1 on LG Board 3 Increment Decrement Video gain2 to adjust Sub Video level...

Page 28: ...rm is similar to Fig A 4 Receive a Rainbow NTSC 3 58Hz pattern on both of Main and Sub picture 5 Adjust Sub NTSC Tint 2 so that the peak of level of waveform is similar to Fig B 9 5 Sub Color Adjustment Preparation Picture Menu Dynamic P NR AUTO C Temp Standard Scan Mode 100Hz PAL AI ON ACL OFF Adjustment 1 Receive a PAL Colour Bar pattern 2 Connect an oscilloscope to TPLG1 on LG Board 3 Adjust Su...

Page 29: ...nly of BLUE 5 Adjust Blue Focus VR so that Y is 7 0 cd m2 9 7 White Balance Adjustment Preparation Picture Menu Dynamic Sub Bright 130 C Temp Standard High R 100 AI ON P NR ON High B 128 Scan Mode 100Hz PAL WB B G ST1 170 Low G 640 Adjustment 1 Set the White Balance Meter on Screen center 2 Receive a Window pattern 3 Adjust Sub Bright so that the 6th paragraph shines faintly and the 7th paragraph ...

Page 30: ...indow pattern 3 Adjust Sub Bright so that the 6th paragraph shines faintly and the 7th paragraph does to the sinking style 9 9 Blue Limit Adjustment Preparation Picture Menu Dynamic C Temp Standard AI ON P NR ON Scan Mode 100Hz PAL White Balance Adjustment has been adjusted Adjustment 1 Receive a Cross Hatch pattern 2 Connect an oscilloscope to TPLB1 on LB Board 3 Adjust B LIMIT so that the wavefo...

Page 31: ...vergence for each of the 50 100Hz and 60 120Hz inputs so that they are aligned with the other colours Helpful Hint All positions which have been adjusted are recorded within P 2 for NTSC data and P 3 for PAL data of the memory This data can be copied to P 4 memory area allowing you to perform the adjustment of P 2 NTSC and P 3 PAL To perform these adjustments push the SEARCH button on the remote c...

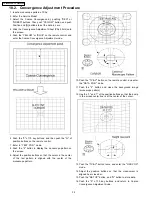
Page 32: ... the screen 9 Adjust the position buttons so that the cursor in the center of the test pattern is aligned with the center of the monoscope pattern 10 Push the TV AV button on the remote control and enter the DATA POS mode 11 Push the 5 button and close the background image monoscope pattern 12 Use the and of the position buttons so that the bump in the screen center line is at the center of the cu...

Page 33: ...nt mode Push the 2 button and select the Border and Cross pattern Push the MUTE button and select the Green colour 10 3 1 2 G SIZE V adjustment Push the TV AV buttons and select the G SIZE V Push the Channel up down buttons and adjust the upper and lower boarder line of test pattern is aligned with the edge of the screen frame 33 TX 47P800HQ TX 47P800HZ ...

Page 34: ...ttons and select the G LINEAR Push the Volume up down buttons and adjust the G LINEAR to become the following figure 10 3 1 5 G PIN V adjustment Push the TV AV buttons and select the G PIN Push the Channel up down buttons and adjust the G PIN V to become the following figure 10 3 1 6 G PIN H adjustment Push the TV AV buttons and select the G PIN Push the Volume up down buttons and adjust the G PIN...

Page 35: ...stment Push the TV AV buttons and select the G KEY Push the Channel up down buttons and adjust the G KEY refer to following figure 10 3 1 9 G STATIC adjustment Push the TV AV buttons and select the G STATIC Push the Channel Volume up down buttons and adjust G STATIC so that Horizontal Vertical center line is aligned with the bump in the screen center mark 35 TX 47P800HQ TX 47P800HZ ...

Page 36: ...ome a vertical line Refer to figure 10 3 2 3 R SKEW H adjustment Push the TV AV buttons and select the R SKEW Push the Channel up down buttons and adjust reference line become a horizontal line Refer to figure 10 3 2 4 R SIZE V adjustment Push the TV AV buttons and select the R SIZE Push the Channel up down buttons and adjust the upper and lower boarder line of test pattern is aligned with the edg...

Page 37: ...3 Blue Coarse Convergence Adjustment 10 3 3 1 Reparation Push the SOUND button and select the Blue Adjustment mode Push the 2 button and select the Border and Cross pattern Push the MUTE button and select the Cyan colour Push the POSITION button and adjust the B STATIC so that the Blue color of pattern is aligned with Green colour of pattern 10 3 3 2 B SKEW V adjustment Push the TV AV buttons and ...

Page 38: ...and adjust the B PIN H Refer to Fig E 10 3 3 9 B CORNER adjustment Push the TV AV buttons and select the B CORNER Push the Channel up down buttons and adjust the B CORNER Refer to Fig F 10 3 3 10 B KEY adjustment Push the TV AV buttons and select the B KEY Push the Channel up down buttons and adjust the B KEY Refer to Fig G 10 3 3 11 B STATIC adjustment Push the TV AV buttons and select the B STAT...

Page 39: ...justment point Then use the MULTI PIP to change from G EASY CURSOR to G EASY DATA 8 Use the Position Buttons to adjust each point so that the Green Crosshatch Pattern is aligned with the vertical and horizontal lines of the Convergence Adjustment Sheet 9 Push the MULTI PIP and with from G EASY DATA to G EASY CURSOR 10 Repeat step 7 9 to adjust the 9 adjustment points 11 Select the G POINT CURSOR m...

Page 40: ...the Green Conv Adj in 1 16 to perform the Red Convergence Adjustment 3 To store the data after the Red Convergence Adjustment has been completed push the MAIN MENU button and then the N button 10 4 3 Blue Convergence Adjustment 1 Push the MUTE button twice and change to the Blue Adjustment of cyan Colour 2 Repeat the same steps described for the Green Conv Adj in 1 16 to perform the Blue Convergen...

Page 41: ...Fine Convergence Control Chart 41 TX 47P800HQ TX 47P800HZ ...

Page 42: ...42 TX 47P800HQ TX 47P800HZ ...

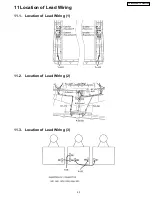
Page 43: ...11 Location of Lead Wiring 11 1 Location of Lead Wiring 1 11 2 Location of Lead Wiring 2 11 3 Location of Lead Wiring 3 43 TX 47P800HQ TX 47P800HZ ...

Page 44: ...11 4 Location of Lead Wiring 4 44 TX 47P800HQ TX 47P800HZ ...

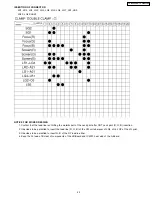
Page 45: ...part of the neck print after CRT neck print R G B insertion 2 It decides to be permitted to insert the lead line R G B of the VM coil wherever of LG5 LG6 LG7 of the LG print 3 It decides to be permitted to insert G B of the DY lead in either 4 Keep the Fo lead of B clear of components of the LB Board and IC2301 heat sink of the A Board 45 TX 47P800HQ TX 47P800HZ ...

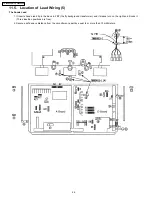
Page 46: ...lead tip in the back to FBT the fly background transformer and it makes turn on the right and it locks it Three insertion positions are free 2 Secure a safe space distance from the circumference part by equal to or more than 10 millimeters 46 TX 47P800HQ TX 47P800HZ ...

Page 47: ... A23 A49 Anode distributor R G B FBT D8 D5 DY R G B CY R G B D30 P1 P2 P4 Focus Pack R NOTICE FOR WIRE DRESSING 1 After insert R G B on CRT print confirm that wire should not touch to material parts of CRT print 47 TX 47P800HQ TX 47P800HZ ...

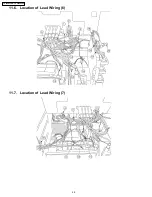
Page 48: ...11 6 Location of Lead Wiring 6 11 7 Location of Lead Wiring 7 48 TX 47P800HQ TX 47P800HZ ...

Page 49: ...11 8 Location of Lead Wiring 8 11 9 Location of Lead Wiring 9 49 TX 47P800HQ TX 47P800HZ ...

Page 50: ...50 TX 47P800HQ TX 47P800HZ ...

Reviews: