background image

16

Getting Started

3

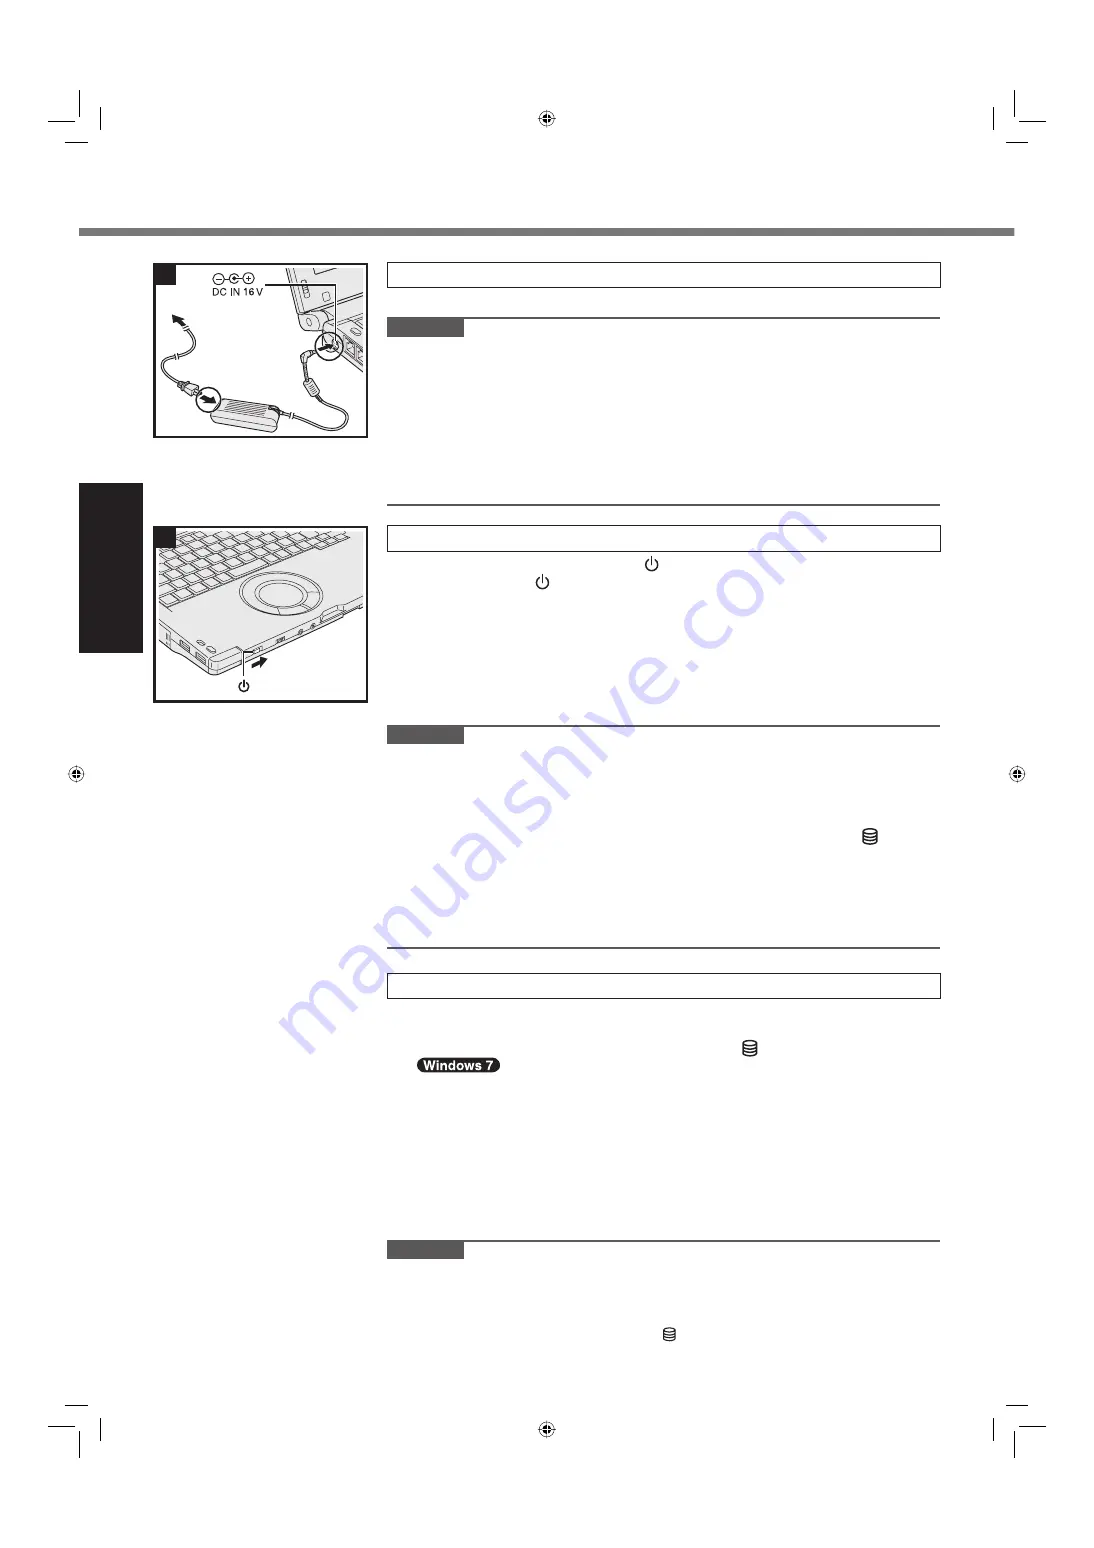
Connect your computer to a power outlet.


The battery charging starts automatically.

 CAUTION 

  Do not disconnect the AC adaptor and do not switch the wireless switch to on 

until the 

fi

 rst-time operation procedure is completed.

  When using the computer for the 

fi

 rst time, do not connect any peripheral device 

except the battery pack and AC adaptor.

  Handling the AC adaptor

  Problems such as sudden voltage drops may arise during periods of thunder 

and lightning. Since this could adversely affect your computer, an uninter-
ruptible power source (UPS) is highly recommended unless running from the 
battery pack alone.

Turn on the computer.

A

 Slide and hold the power switch   for approximately 1 second until the 

power indicator   lights.

 When the power is turned on, the power indicator lights. But, in the fol-

lowing cases, the power indicator may turn off once immediately after the 
power is turned on.

  After removing the battery pack and the AC adaptor and setting them 

again

  After sliding the power switch for four seconds or longer and turning off 

the power

 CAUTION 

  Do not slide the power switch repeatedly.

  The computer will forcibly be turned off if you slide and hold the power switch for 

4 seconds or longer.

  Once you turn off the computer, wait for 10 seconds or more before you turn on 

the computer again.

  Do not perform the following operation until the hard disk drive indicator   turns off.

  Connecting or disconnecting the AC adaptor

  Sliding the power switch

  Touching the keyboard, touch pad, screen, external mouse, or tablet buttons

  Closing the display

  Any changes from the default setting of the Setup Utility must not be made until 

the First-time Operation is completed.

5 Setup 

Windows.

  Follow the on-screen instructions.

 The computer restarts several times. Do not touch the keyboard or touch 

pad, and wait until the hard disk drive indicator   has turned off.

 After the computer is turned on, the screen remains black or unchanged for 

a while. This is not a malfunction. Wait for a moment until the Windows setup 

screen appears.

 During setup of Windows, use the touch pad and clicking to move the cursor 

and to click an item.

 Setup of Windows will take approximately 20 minutes.


Go to the next step, con

fi

 rming each message on the display.

 “Join a wireless network” screen may not appear.


You can set the Wireless Network after the setup of Windows is complete.

 CAUTION 

  You can change the user name, password, image and security setting after 

setup of Windows.

  Remember your password. If you forget the password, you cannot use Win-

dows. Creating a password reset disk beforehand is recommended.

  Wait until the hard disk drive indicator   has turned off.

4

First-time Operation

CF-C1mk1(US)(DFQW5397ZB)_OI_EN.i16   16

CF-C1mk1(US)(DFQW5397ZB)_OI_EN.i16   16

5/27/2010   9:58:39 AM

5/27/2010   9:58:39 AM

Summary of Contents for Toughbook CF-C1ADAAZ6M

Page 1: ...Basic 26 Appendix LIMITED USE LICENSE AGREEMENT 31 Specifications 33 LIMITED WARRANTY 36 Please read these instructions carefully before using this product and save this manual for future use For fur...

Page 2: ...uine Microsoft Windows XP Tablet PC Edition Service Pack 3 as Windows or Windows XP The computer screen supporting touching methods using digitizer pen stylus your fingers as the screen The Digitizer...

Page 3: ...lug is provided with this equipment This equipment is designed to be connected to the telephone network or premises wiring using a compatible modular jack which is Part 68 compliant See Installation I...

Page 4: ...omologu doivent tre coordon n es par un repr sentant d sign par le fournisseur L entreprise de t l communications peut demander l utilisateur de d brancher un appareil la suite de r parations ou de mo...

Page 5: ...e sauf s il s agit d un appareil sans fil pendant un orage lectrique Ceci peut pr senter un risque de choc lectrique caus par la foudre 3 Ne pas utiliser l appareil t l phonique pour signaler une fuit...

Page 6: ...or secure stowage area while driving Do not place the computer with wireless WAN modem in an area over an air bag or in the vicinity where an air bag may deploy Air bags inflate with great force and...

Page 7: ...function or trouble occurs immediately turn the power off and unplug the AC plug and remove the battery pack Then contact your technical support office for repair Do Not Touch This Product and Cable W...

Page 8: ...y pack CF VZSU66U with your product Use of battery packs other than those manufactured and supplied by Panasonic may present a safety hazard gen eration of heat ignition or rupture Do Not Connect a Te...

Page 9: ...sumable item If the amount of time the computer can be run by using a particular battery pack becomes dramatically shorter and repeated recharging does not restore its performance the battery pack sho...

Page 10: ...heck mark of En able audio enhancements in Advanced Click start All Programs SoundMAX Con trol Panel and select Microphone and then add a check mark for No Filtering in Microphone En hancements When u...

Page 11: ...ce Manual Hard Disk Drive L Pen Holder The pen included is already attached to the comput er at purchase M SIM Card Slot Only for model with wireless WAN Open the cover and inset a SIM card Insert the...

Page 12: ...play 180 degrees in the direction of the arrow while holding both sides Stop rotation when the display clicks into place NOTE The display cannot be rotated more than 180 degrees in the direction of th...

Page 13: ...olding both sides Stop rotation when the display clicks into place NOTE The display cannot be rotated more than 180 degrees in the direction of the ar row or in the opposite direction of the arrow Do...

Page 14: ...ap The hand strap is convenient for computing while standing To carry the computer put your hand between the computer and the hand strap to prevent if from falling and firmly hold the computer when us...

Page 15: ...l it clicks to the secured position CAUTION Make sure the latch is securely locked Otherwise the battery pack may fall when you carry the computer Do not touch the terminals of the battery pack and th...

Page 16: ...urn on the computer again Do not perform the following operation until the hard disk drive indicator turns off Connecting or disconnecting the AC adaptor Sliding the power switch Touching the keyboard...

Page 17: ...ation Only for model with digitizer AClick Start Control Panel Hardware and Sound Tablet PC Settings BClick Calibrate CClick Pen input DIf User Account Control is displayed click Yes EUsing the digiti...

Page 18: ...tery pack and the other for an optional bat tery pack If one of the two battery packs has remaining power you can replace the other battery pack without turning off the computer Reference Manual Batte...

Page 19: ...obtain longer operation time To access the Important Tips Double click on the desktop Alternatively click Start All Programs Panasonic On Line Manuals Important Tips Double click on the desktop Alter...

Page 20: ...g the computer Turn off the computer Remove all external devices cables PC Cards and other protruding objects Do not drop or hit the computer against solid objects Do not leave the display open Do not...

Page 21: ...ecomes warm while the screen saver is displayed set the screen saver to Windows XP Screen savers that use 3 D images or other complex images increase the CPU utilization rate Use recommended RAM modul...

Page 22: ...han a neutral kitchen cleanser e g a weak alkali cleanser may adversely affect painted surfaces CAUTION Do not use benzene thinner or rubbing alcohol since it may adversely affect the surface causing...

Page 23: ...he keyboard even a small amount be sure to perform the following steps Failure to perform these steps may result in damage to the computer The drain system will not provide complete protection against...

Page 24: ...s which you install into the CD DVD drive or port replicator 7 Select the Exit menu 8 When using CD DVD drive Select your CD DVD drive in Boot Override and press Enter When using port replicator Selec...

Page 25: ...off the computer 14 Turn on the computer l If the password is requested enter the Supervisor Password 15 Perform the First time Operation page 16 16 Start the Setup Utility and change the settings as...

Page 26: ...ed on the screen Turn off the computer and remove the RAM module then confirm whether the RAM module has compliant to specification When the RAM module has conformed to specifi cation install it again...

Page 27: ...for password when computer resumes from standby When logging on e g re suming the computer audio is distorted Perform the following steps to change the audio settings to prevent audio output A Right c...

Page 28: ...becomes black for a moment but this is not a malfunction You can use it Adjust the brightness of the screen with Fn F1 Fn F2 Remove and insert the AC adaptor While you are using motion video playback...

Page 29: ...n using the external mouse connect it correctly Restart the computer by using the keyboard Press and press two times and press to select Restart and press Enter Press U and R to select Restart If the...

Page 30: ...or longer to shut down the computer and then slide the power switch to turn it on If the application program does not work normally uninstall and reinstall the program To uninstall click Start Control...

Page 31: ...to such other party At the time of such a transfer you must also transfer all copies whether in printed or machine readable form of every Program and the related documentation to the same party or des...

Page 32: ...ouvez c der les Logiciels et en octroyer la licence une autre partie qu en rapport avec votre cession du Produit unique qui est accompagn par les Logiciels cette autre partie Au moment de cette cessio...

Page 33: ...200 dots Simultaneous Display on LCD External Display 7 65 536 16 777 216 colors 800 x 600 dots 1024 x 768 dots 1280 x 720 dots 1280 x 768 dots 1280 x 800 dots 6 Wireless LAN 8 Intel Centrino Advanced...

Page 34: ...Media Player 10 Microsoft Windows Movie Maker 2 1 Microsoft NET Framework 3 5 SP1 Icon Enlarger Power Saving Utility FAN Control Utility Economy Mode ECO Setting Utility Infineon TPM Professional Pack...

Page 35: ...ity of up to 32 GB and Panasonic SDXC Memory Card with a capacity of up to 64 GB Operation on other SD equipment is not guaranteed 16 Only for model with Smart Card Slot 17 Does not guarantee operatio...

Page 36: ...s must be approved by the wireless carrier prior to use Any use or attempted use of a wireless modem not approved and activated by the carrier for use on their network is strictly prohibited and is no...

Page 37: ...her foreign matter into the unit abuse ne glect installation maladjustment of consumer controls improper maintenance or modification use not in accordance with product use instructions Failures due to...

Page 38: ...IF YOU SHIP THE PRODUCT FOR WARRANTY SERVICE Carefully pack the product preferably in the original carton Include details of defect claimed and proof of date of original pur chase No liability is ass...

Page 39: ...TGL Temporary Guidance Leaflets No 36 EXP DITION DU PRODUIT POUR SERVICE SOUS GARANTIE Emballez soigneusement le produit de pr f rence dans son emballage d origine Joignez une description de la d fail...

Page 40: ...ng through the use of computers and other office equipment The program backs the development and dis semination of products with functions that effectively reduce energy consumption It is an open syst...

Reviews: