background image

12

G

e

ttin

g

 S

ta

rte

d

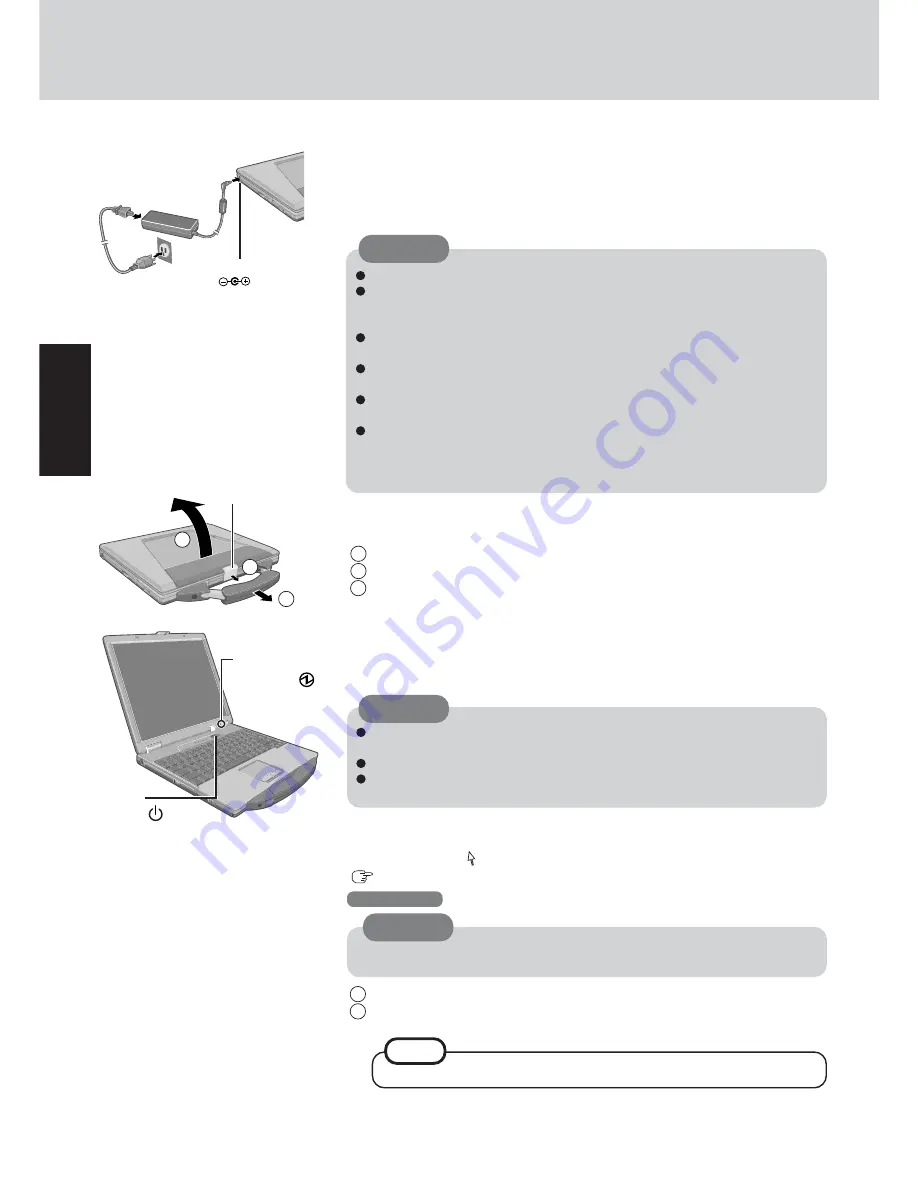
Connect your computer to a power outlet

CAUTION

Be sure the AC adaptor is connected until completing Step 

7

.

When using the computer for the first time, do not connect any peripheral de-
vice except the battery pack and AC adaptor to the computer.

Handling the AC adaptor

Do not twist or pull the AC power cord forcefully.  Doing so may damage the
connections.
Use only the specified AC adaptor with your computer.  Using an AC adaptor
other than the one supplied might damage the battery and/or the computer.
When the DC plug is not connected to the computer, disconnect the AC cord
from your AC wall outlet.
Problems such as sudden voltage drops may arise during periods of thunder and
lightning.  Since this could adversely affect your computer, an uninterruptible
power source (UPS) is highly recommended unless running from the battery
pack alone.

4

5

Open the display

1

Pull the carrying handle forward.

2

Lift up the latch.

3

Lift open the display.

CAUTION

6

Turn your computer on

Press the power switch and hold it for approximately one second until the power indi-
cator turns on before releasing it.

Do not press the power switch and hold it for more than four seconds; this will
cause the power to be turned off forcibly.
Do not press the power switch repeatedly.
Once the computer is powered off, you must wait at least ten seconds before
powering it on again.

7

Setup Windows

Moving the cursor ( ) or clicking buttons can be performed with the touch pad
(

 page 19).

Do not press any key or move the touch pad until [Windows 2000 Professional
Setup] is displayed.

CAUTION

Windows 2000

1

At the [Welcome to the Windows 2000 Setup Wizard], select [Next].

2

After reading the agreement, select [I accept this agreement] or [I don’t accept this
agreement], then select [Next].

 If [I don’t accept this agreement] is selected, the Windows setup will be aborted.

NOTE

First-time Operation

The battery pack will be charged automatically.
Charging Time: Approx. 3 hours
(Varies depending on the usage conditions.)

3

2

1

Latch

DC-IN Jack

DC IN 15.1-16.0 V

Power
Switch 

Power
Indicator 

Summary of Contents for Toughbook CF-73 Series

Page 1: ...Refer to page 20 on how to access the Reference Manual Reference Manual Read Me First LED Indicators Key Combinations Reference Manual Touch Pad Touchscreen Standby Hibernation Functions Security Meas...

Page 2: ...moderate injury WARNING WARNING indicates a hazard that may result in moderate or serious injury Windows 2000 Information for Microsoft Windows 2000 Professional users Windows XP Information for Micro...

Page 3: ...omply With FCC Standards 1 This equipment complies with CFR47 Part 68 rules On the computer is a label that contains among other information the FCC registration number and ringer equivalence number R...

Page 4: ...ccorder aux installations de l entreprise locale de t l communication Le mat riel doit galement tre install en suivant une m thode accept e de raccordement L abonn ne doit pas oublier qu il est possib...

Page 5: ...conformer aux r glements pertinents quant l limination des piles CONSERVER CES INSTRUCTIONS Information to the User This product and your Health This product like other radio devices emits radio frequ...

Page 6: ...peut tre restreinte par le propri taire du b timent ou les responsables de l organisation Par exemple ces situations peuvent inclure L utilisation de cet appareil bord d un avion ou Dans un autre mili...

Page 7: ...ally when plugs and or cables are connected to the rear of the computer Lithium Battery This computer contains a lithium battery to enable the date time and other data to be stored The battery should...

Page 8: ...k expose it to bumps or shocks deform disassemble or modify it Do Not Short Do not short the positive and negative con tacts Avoid Extreme Heat Cold and Direct Sunlight Do not charge use or leave the...

Page 9: ...commands data can still be read using special software In order to erase all data either have the data erased by a specialist at a charge or use the hard disk data erase utility included page 31 Note...

Page 10: ...ully charged battery When transporting a spare battery inside a package briefcase etc it is recommended that it be placed in a plastic bag so that its contacts are protected Do not carry the computer...

Page 11: ...uter may not operate properly Before using the battery pack carefully read Precautions Battery Pack page 8 2 Read the LIMITED USE LICENSE AGREEMENT page 29 Before removing the seal covering the power...

Page 12: ...he latch 3 Lift open the display CAUTION 6 Turn your computer on Press the power switch and hold it for approximately one second until the power indi cator turns on before releasing it Do not press th...

Page 13: ...sword is forgotten Windows cannot be operated You can create a password reset disk beforehand page 15 3 Select settings for your region then select Next 4 Enter your name and organization and then sel...

Page 14: ...er to its original state In this case contact Panasonic Technical Support The floppy disk drive must be the A drive NOTE USB Floppy Disk Drive Label on the top surface and insert the shutter side head...

Page 15: ...isk beforehand following the steps below 1 Connect the USB floppy disk drive optional CF VFDU03 to your computer 2 Select Start Control Panel User Accounts and select the account you used to logon 3 S...

Page 16: ...s happen allow the computer to cool down then switch the power on again If the computer still does not power on contact Panasonic Technical Support 3 2 1 Latch 1 Open the display 1 Pull the carrying h...

Page 17: ...are is being installed In this case because it is conceivable that a selection dialog box will be shown do not press Space or Enter to attempt to resume from this condition as doing so may trigger a s...

Page 18: ...n Functions 1 Save important data and close each application 2 Windows 2000 Select Start Shut Down Windows XP Select Start Turn Off Computer 3 Windows 2000 Select Shut down then select OK Windows XP S...

Page 19: ...ils or hard objects that can leave marks e g pencils and ball point pens Try to avoid having any harmful substances such as oil come in contact with the touch pad The cursor may not work properly in s...

Page 20: ...it Preferences Accessibility and then set Color Scheme to Use colors specified in document When the taskbar is hidden at the bottom portion of Acrobat Reader set the maximum display window size If a p...

Page 21: ...ad Replace the battery and run Setup to reconfigure the system 0251 System CMOS checksum bad Default configuration used System CMOS has been corrupted or modified incorrectly perhaps by an application...

Page 22: ...dow memory Invalid System Configuration Data Problem with NVRAM CMOS data I O device IRQ conflict I O device IRQ conflict error Operating System not found Operating system cannot be located on either...

Page 23: ...n a password has been set in the Setup Utility Enter Password does not appear when the computer resumes from the standby or hibernation mode If you want to use the security function when using the sta...

Page 24: ...e power saving mode To resume operation of your computer from the condition the power of the display is off for energy conservation purposes press any key unrelated to the direct triggering of a selec...

Page 25: ...off your computer After replacing the battery pack with a fully charged one turn your computer on Quickly save your data and power off your computer Remove the battery pack and discon nect the AC adap...

Page 26: ...bove occur log on with the administrator authority again not using the Fast User Switching function and try the operation once more Windows XP Press Ctrl Shift Esc to open Task Manager and close the s...

Page 27: ...is connected until the reinstallation procedure is completed Windows 2000 Select a number 1 Restore Windows R 2000 Professional to the whole HDD 2 Make two partitions for the operating system and dat...

Page 28: ...ive by the following steps Drive letters can only be changed when two or more parti tions have been created on the hard disk drive The name of the C drive cannot be changed We recommend that you make...

Page 29: ...oduct which was accompanied by the Programs to such other party At the time of such a transfer you must also transfer all copies whether in printed or machine readable form of every Program and the re...

Page 30: ...uvez assembler en sens inverse compiler en sens inverse ni retracer les Logiciels ni aucune de leurs copies de fa on lectronique ou m canique en tout ou en partie Vous ne pouvez utiliser copier modifi...

Page 31: ...ns After executing this utility the computer cannot be booted from the hard disk You will need the Product Recovery CD ROM and CD drive Procedure 1 Turn the computer off and set the CD drive in the mu...

Page 32: ...to DMA if available for Device 0 4 Double click Secondary IDE Channel for IDE ATA ATAPI controllers and perform as the step Do not enter the standby or hibernation mode while WinDVD is running Do not...

Page 33: ...ly be set with the same region code as the DVD Video In the case of any other DVD Video Confirm Region appears Select region code and select OK Play now begins Confirm Region may not be displayed for...

Page 34: ...ces USB Ports Sound is output from Card Speakers built into the back panel of the LCD screen To adjust the volume Fn F5 Fn F6 Speaker on off Fn F4 page 19 Touch Pad For enhanced portability and in the...

Page 35: ...desktop Battery Power Battery Pack RAM Module Slot Port Replicator Expansion Bus Connector Do not block or place the computer in a location that may prevent proper venti lation CAUTION For connecting...

Page 36: ...SO DIMM DDR SDRAM PC2100 Compliant Mini Dsub 15 pin female Dsub 9 pin male Miniature jack 3 5 DIA Miniature jack 3 5 DIA Impedance 32 Output Power 4 mW x 2 Dedicated 84 pin female 4 pin x 2 USB 2 0 De...

Page 37: ...Drive DVD 5 DVD 9 DVD 10 DVD 18 DVD R 3 3 95 GB 4 7 GB DVD RW 3 4 7 GB DVD RAM 3 4 2 6 GB 4 7 GB CD Audio CD ROM CD R 3 Photo CD VideoCD Enhanced Music CD CD RW 3 CD TEXT 8x speed Max 24x speed Max Op...

Page 38: ...defects in materials and workmanship under normal use for a period of sixty 60 days from the date of delivery thereof to you as evidenced by your purchase receipt This is the only warranty Panasonic...

Page 39: ...ure In the event of a defect in material or workmanship in the media during the sixty 60 day warranty period and you return it transportation costs prepaid to Panasonic Canada Inc Computer Products Ma...

Page 40: ...n participate voluntarily The targeted products are office equipment such as computers displays printers facsimiles and copiers Their standards and logos are uniform among participating nations As an...

Reviews: