background image

17

G

e

tt

in

g

 S

ta

rt

e

d

G

e

tt

in

g

 S

ta

rt

e

d

• Do not bend, drop, apply high pressure

or subject the Disk Media to strong
shocks.

• Do not store it in places with high

temperature, high humidity, a lot of dust,
or static electricity and strong
electromagnetic  waves.

• Keep the Disk Media’s contacts free from

dust, water or other foreign substances.
Do not touch them with your fingers, etc.

• Do not disassemble or deform the Disk

Media.

• Be sure to make a backup copy of

important data.

• Make sure that you do not insert the

Disk Media in the wrong direction.

• Do not, under any circumstances, eject

the Disk Media immediately after
pressing the SHUTTER Button (during
recording  of  an  image)  or  while  deleting
(when “PLEASE WAIT” is displayed).
This could damage the format of the Disk
Media  and  make  them  unusable.

• When the Disk Media does not eject after

pressing the EJECT Button, push the
Disk Media fully into the slot again and
then press the EJECT Button firmly.

• “NO DISK” will appear on the LCD

Viewfinder when the Disk Media is not
inserted.

• “DISK ERROR” will appear on the LCD

Viewfinder if the Disk Media is defective.

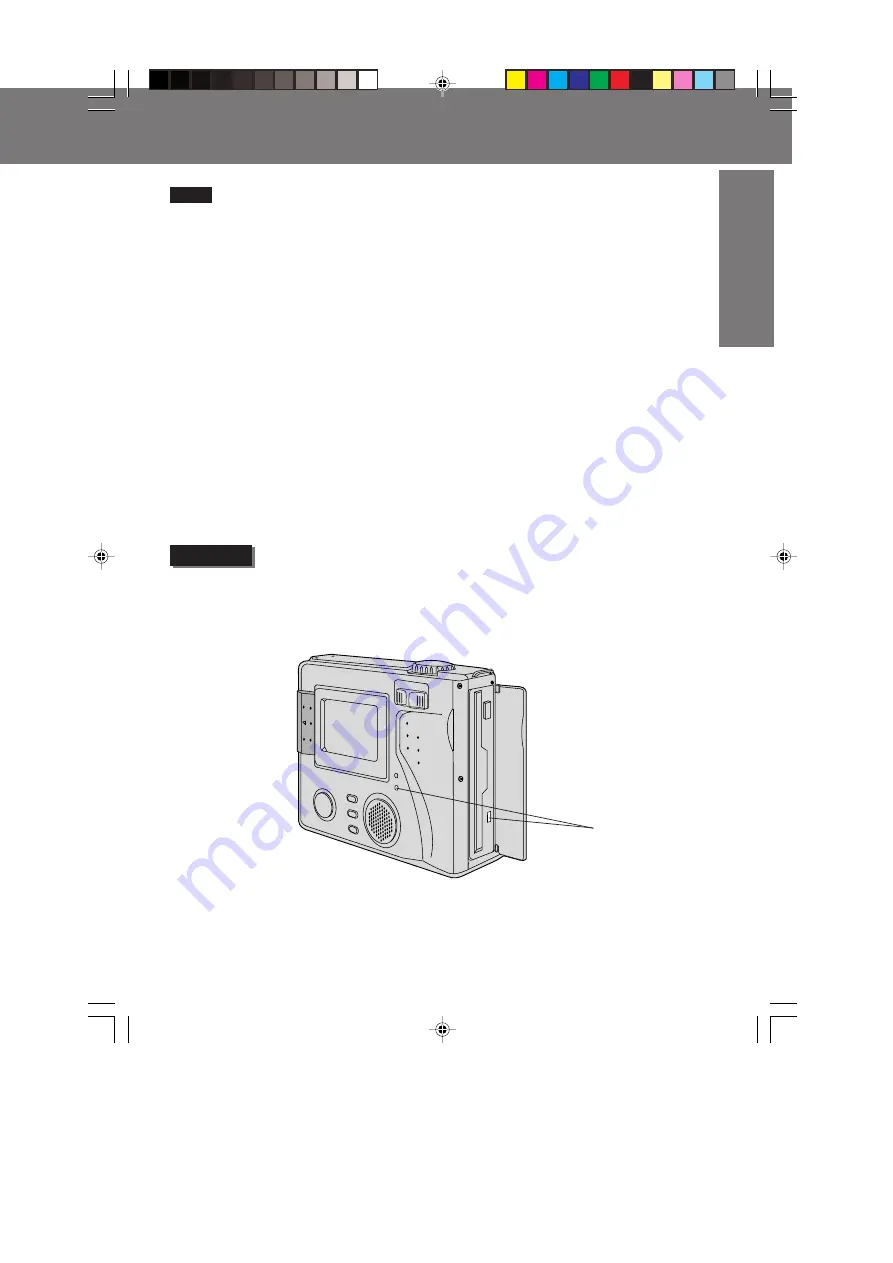
• The ACCESS LED lamp will flash when the Digital Camera is accessing the Disk Media.

Never expose this unit to strong vibrations or impacts while ACCESS LED lamp is
flashing. And, do not turn off the Power, take out a Disk Media, or remove the Battery
when ACCESS LED lamp is flashing.

For additional information regarding Imation SuperDisk products,
please  call  1-888-466-3456.

ACCESS LED

Caution

Inserting the SuperDisk™ Diskette or Floppy Disk

Inserting the SuperDisk™ Diskette or Floppy Disk

Note

SD5000. p15-17.p65

80/01/04, 11:37

17

Summary of Contents for SuperDisk PV-SD5000

Page 1: ...se call 1 800 272 7033 Before attempting to connect operate or adjust this product please read these instructions thoroughly and keep them for future reference Digital Camera Operating Instructions LSQT0287A SD5000 p 1 5 p65 80 01 04 11 36 1 ...

Page 2: ...ies Macintosh and iMac are registered trademarks of Apple Computer Inc QuickTime and the QuickTime logo are trademarks used under license QuickTime is registered in the US and other countries Adobe the Adobe logo PhotoDeluxe are trademarks of Adobe Systems Inc All product brand names are trademarks or registered trademarks of the respective holders 1 pc AC Adaptor LSSQ0239 with AC Cable VJAW0044 1...

Page 3: ...USE HAZARDOUS RADIATION EXPOSURE IF DIRECTED BE SURE TO OPERATE THE UNIT CORRECTLY AS INSTRUCTED WHEN THIS UNIT IS PLUGGED TO THE WALL OUTLET DO NOT PLACE YOUR EYES CLOSE TO THE OPENING OF THE DISC TRAY AND OTHER OPENINGS TO LOOK INTO THE INSIDE OF THIS UNIT USE OF CONTROLS OR ADJUSTMENTS OR PERFORMANCE OF PROCEDURES OTHER THAN THOSE SPECIFIED HEREIN MAY RESULT IN HAZARDOUS RADIATION EXPOSURE DO N...

Page 4: ...ing instructions should be read before the unit is operated 2 Retain Instructions The safety and operating instructions should be retained for future reference 3 Heed Warnings All warnings on the unit and in the operating instructions should be adhered to 4 Follow Instructions All operating and maintenance instructions should be followed 5 Cleaning Unplug this video unit from the wall outlet befor...

Page 5: ... Camera has been designed for outdoor use however it is not designed to sustain direct exposure to water rain sleet snow sand dust or a direct splashing from a pool or even a cup of coffee This action could permanently damage the internal parts of your Digital Camera Do not attempt to disassemble this unit There are no user serviceable parts inside Unplug your Digital Camera from the power supply ...

Page 6: ...ng 39 Time Lapse Recording 40 To Delete Specific Images 41 Multi Delete 42 Formatting the Disk Media 43 Multi Copy 44 To Copy All Images 45 Slide Show 46 Transferring Your Images Windows 47 Transferring Your Images Macintosh 55 SuperDisk Drive 62 Using the SuperDisk Drive Windows 63 Using the SuperDisk Drive Macintosh 65 Using the SuperDisk Drive 66 Print Mark 67 ForYour Information Digital Camera...

Page 7: ...Speaker VOL Button See pages 32 33 Select Button See pages 18 19 VOL Button See pages 32 33 Select Button See pages 18 19 Button See pages 31 32 34 Select Button See pages 18 19 REC REV Button See page 28 Button See pages 27 31 32 33 Select Button See pages 18 19 EJECT Button See page 16 Front View Rear View Lens Cap See page 15 MANUAL Button See pages 29 30 MANUAL Select Buttons See page 29 ACCES...

Page 8: ...pod Receptacle Used when securing the camera to a tripod Battery Compartment See page 13 Top View Bottom View LCDViewfinder See pages 21 22 24 31 32 Rear View MENU Button See pages 18 19 FLASH Button See pages 36 42 44 REC MODE Button See pages 21 22 24 25 27 29 To PC Terminal See pages 49 50 56 57 A V OUT Jack See page 35 DC IN Jack See page 14 SD5000 p 6 8 p65 80 01 04 11 36 8 ...

Page 9: ...gged Image File Format If the image is captured in 2X 3X Zoom or Burst Rec Mode the displayed image mode will be N Normal Battery Condition As the Battery is depleted the indication changes POWER LED will flash when battery is empty Print Number See page 67 Audio Displayed when image with AUDIO is played Not displayed when movie is played See page 32 Audio Displayed when image with AUDIO is record...

Page 10: ...k places TIME LAPSE See page 40 To set time lapse recording AUDIO See pages 22 24 To select audio recording ON OFF SELF TIMER See page 39 To set Self Timer BRIGHTNESS See page 31 To adjust LCD Viewfinder brightness OSD See pages 9 10 11 To select OSD display ON OFF RAPID See page 27 To select RapidFire mode ON OFF CLOCK SET See page 20 To set clock BEEP See page 26 To select beep mode when capturi...

Page 11: ...OPY See pages 44 45 To set copy PRINT MARK See page 67 To set print mark SLIDE SHOW See page 46 Playback images as slide show Press MENU to display MENU screen then select OSD ON If you select OFF OSDs will not be displayed Note LCD Monitor Indication LCD Monitor Indication Playback Menu On Screen Display Order 2 1 3 4 5 2 1 3 4 5 SD5000 p 9 11 p65 80 01 04 11 36 11 ...

Page 12: ...hing the Battery is fully charged Takes approx 1 hour 40 minutes 3 Remove the Battery Slide the Battery out and then lift up Battery Charging Confirmation Marker Use this marker as a reminder to yourself when the Battery is fully charged or in need of a charge This marker performs no function and is for your reference only The Battery is no longer serviceable if the operation time is very short ev...

Page 13: ...it the positive andnegative terminals Neverattempttodisassembleorreassemble theBattery To avoid damage to the Battery Do not drop or jar the Battery Use the Battery with specified models only If the Battery is used in extremely high temperatures asafetydevicewill automaticallypreventoperation To insure longer battery life While not in use remove Battery from the Digital Camera and AC Adaptor and s...

Page 14: ... Adaptor into an AC outlet Power Supply While not in use unplug the AC Adaptor from the AC outlet Use the supplied Panasonic AC Adaptor Do not connect AC Adaptor after turning POWER on When the DC Cable is connected during charging the power supply is given priority and charging will not be possible 1 2 2DC IN 3 4 Note Jack Cover AC Cable supplied AC Adaptor supplied DC POWER Cable supplied Using ...

Page 15: ...chment Rings 3 Reinsert the strap ends through their buckles Make sure the straps are not twisted 3 2 1 Min 1 inch 25 4 mm Adjust the Length Attaching the Camera Strap Attaching the Lens Cap Cord 1 Thread the Lens Cap cord through the Strap Attachment Ring 2 Run the Lens Cap through the cord loop and pull tight Removing the Lens Cap While pinching the sides of the Lens Cap pull the Lens Cap off Al...

Page 16: ...ks must be re formatted to DOS with this camera You can use this unit as a SuperDisk Drive See pages 49 56 The SuperDisk Diskette is only used for SuperDisk Drive To format the Disk Media see pages 62 65 Note A Floppy Disk not supplied which has been formatted to Windows on your Floppy Disk Drive can be used in the SuperDisk Drive See pages 62 65 When using a new Floppy Disk it is recommended that...

Page 17: ...played This could damage the format of the Disk Media and make them unusable When the Disk Media does not eject after pressing the EJECT Button push the Disk Media fully into the slot again and then press the EJECT Button firmly NO DISK will appear on the LCD Viewfinder when the Disk Media is not inserted DISK ERROR will appear on the LCD Viewfinder if the Disk Media is defective The ACCESS LED la...

Page 18: ...ess MENU to display MENU screen 3 Press or to select the item 4 Press or to set it 5 Press MENU to exit 1 1 Remove the Lens Cap Set POWER Switch to REC Turn the dial so that it clicks into position The POWER LED lamp lights up MANUAL REC mode POWER LED Example of Menu Screens How to operate the MENU screen When selecting REC mode 3 4 Select Button 1POWER Switch SD5000 p18 20 p65 80 01 04 11 38 18 ...

Page 19: ...ons are not available 4 Press or to set it 5 Press MENU to exit 1 1 Set POWER Switch to PLAY Turn the dial so that it clicks into position The POWER LED lamp lights up While REC is sufficient for normal recording select MANUAL REC when you want to make more precise settings The REC MANUAL REC and PLAY menus consist of multiple pages Press or repeatedly to scroll to the next or previous menu page R...

Page 20: ...ice to exit Clock starts when menu is exited Setting the Clock REC mode MANUAL REC mode PLAY mode Remove the Lens Cap Set the POWER Switch to REC MANUAL REC or PLAY See pages 18 19 Press MENU to display the MENU screen Before you begin 1 2 3 Select Button To make corrections repeat steps 1 3 The clock will continue to operate about 8 hours after the battery has been removed If you need to set cloc...

Page 21: ...a few seconds Images cannot be captured while REC flashes LCD Viewfinder The next image cannot be captured until the previously captured image is no longer displayed on the LCD Viewfinder Power shuts off if there is no activity over 1 minute with Battery as a power source to conserve power Press SHTR to turn power back on Do not subject unit to a strong impact during record or playback Unit may no...

Page 22: ...hen press or to select SLOW SHUTTER Press or to select ON MANUAL REC only See page 10 3Press ZOOM T or W to zoom In and Out Zoom magnification level is up to 3X LCD Viewfinder You can record audio with a still image The still image and audio can then be played back in the PLAY mode See page 32 3ZOOM Switch 2MENU Button 1REC MODE Button Remove the Lens Cap Set the POWER Switch to REC or MANUAL REC ...

Page 23: ...ot be captured while REC flashes 4 5SHTR SHUTTER Capturing Images Capturing Images The next image cannot be captured until the previously captured image is no longer displayed on the LCD Viewfinder Power shuts off if there is no activity over 1 minute with Battery as a power source to conserve power Press SHTR to turn power back on Do not subject unit to a strong impact during record or playback U...

Page 24: ...egin MIC LCD Viewfinder 2ZOOM Switch 1REC MODE Button If you select you can not record audio The next image cannot be captured until the previously captured image is no longer displayed on the LCD Viewfinder Power shuts off if there is no activity over 1 minute with Battery as a power source to conserve power Press SHTR to turn power back on Motion Image Rec Mode Burst Rec Mode REC MODE A Motion I...

Page 25: ...t quality resolution with no compression REC Mode Image Resolution Capacity w suppliedSuperDisk SF F N ZOOM 2X ZOOM 3X TIFF 2 048 1 536 2 048 1 536 1 024 768 1 024 768 640 480 320 240 1 024 768 2 048 1 536 Approx 240 images Approx 340 images Approx 1 000 images Approx 1 000 images Approx 1 500 images 12 seconds Approx 70 sets Approx 1 400 images Approx 12 images The number of images given for each...

Page 26: ...ows Once when you press REC MODE MENU MANUAL MANUAL SELECT or FLASH Buttons Once when an item is selected in Menu Twice when you press SHTR half way to adjust focus REC mode MANUAL REC mode PLAY mode Set the POWER Switch to REC MANUAL REC or PLAY See pages 18 19 Press MENU to display the MENU screen Before you begin You can select BEEP mode in the REC MANUAL REC and PLAY mode To change settings re...

Page 27: ...tured images are first stored in Camera memory This speeds up the processing time and allows you to capture the next image right away Capturing Images Capturing Images REC mode MANUAL REC mode RapidFire Page Remain 1REC MODE Button The Disk Media cannot be ejected until after the memory data has been written Press button to write the memory data to the Disk Media then eject the Disk Media Camera m...

Page 28: ... again with QUICK REC FD OFF or copy the recording REC flashes on the LCD Viewfinder while the Digital Camera is processing images Images cannot be captured while REC flashes When in REC or MANUAL REC mode you can confirm the last captured image by holding the button down However if the camera is turned off or if the disk was removed this feature will not work If Rapid Fire is set to ON this featu...

Page 29: ... you begin 1 Press REC MODE repeatedly to select recording mode SF F N ZOOM 2X 3X TIFF See page 25 2 Press MANUAL to enter Manual mode The current settings appear on the left side of the screen Each additional press of MANUAL selects Focus Exposure and Program AE mode mark shows selection 3 Press MANUAL Select or to select the desired setting in the current mode Please refer to the chart below The...

Page 30: ...125 seconds in the Preferred Shutter Speed mode Fixed at 1 500 seconds in the Preferred Shutter Speed mode All set items return to factory settings when power is turned off However settings are maintained if auto power shut off occurs after one minute with no activity or if camera is put back in MANUAL REC mode after being in AUTO REC PLAY or PC mode Selectable Exposure values and program Auto Exp...

Page 31: ...HTNESS screen 3 Press or to change the brightness of the LCD Viewfinder for brighter for darker 4 Press MENU twice to exit The original BRIGHTNESS will be restored when the Digital Camera is turned off The brightness level set in this menu is not related to the brightness of the captured image REC mode MANUAL REC mode PLAY mode Set POWER Switch to REC MANUAL REC or PLAY See pages 18 19 Press MENU ...

Page 32: ...button is released Playing Back Captured Images You can playback recorded images on the LCD Viewfinder For images recorded with audio a mark is displayed on the screen and audio is played back when SHTR is pressed With AUDIO Without AUDIO Set the POWER Switch to PLAY See page 19 Before you begin 1MENU Button 1 2 3 Select Button A still image with audio will be played The audio volume can be adjust...

Page 33: ...ume press VOL When an image captured in Motion Image Rec mode see page 25 is displayed a message like the one at right appears Playing Back Captured Images 1SHTR SHUTTER Set the POWER Switch to PLAY See page 19 Press MENU to display the MENU screen Before you begin If you select in the PLAY MENU you will be able to see Thumbnail images on the LCD Viewfinder each Thumbnail page will contain 9 image...

Page 34: ... Button 4 5 A C Select Button Zoom Playback 4Press to move back through the images on the page until the number of the desired image is highlighted 5Press or to go directly to the next or previous page of images 6Press SHTR to playback the selected image and to return to Manual Playback 6 DSHTR SHUTTER A Press MENU to display PLAY MENU and press or to select ZOOM B Press MENU to set display mode t...

Page 35: ...d the desired images See VCR manual TVMonitor Viewing Images on aTV Screen andTransferring Images to aVCR VIDEO IN VIDEO IN AUDIO IN AUDIO IN POWER POWER VOL VOL CH CH A V OUT A V Cable supplied A V Cable supplied A V Cable supplied Connect the A V OUT Terminal on the Camera and the AUDIO IN VIDEO IN on the VCR or TV using the A V Cable supplied VCR 1 3POWER Switch 1 1 2 2 4 Note For extended peri...

Page 36: ...twice during capturing The flash will light whenever you capture an image The flash will not light even when you capture an image MANUAL REC mode only The effective range of the flash is roughly 7 8 inches 20 cm to 9 8 feet 3 m If you are using the flash in very bright areas the image background may become dark Do not use the flash close to a person s face as it may be harmful to the eyes Especial...

Page 37: ...nment Aim the camera at white object important white object must fill entire LCD viewfinder Press SHTR button 2 Press MENU to exit Selected mode will appear on the LCD Viewfinder See page 9 During normal use Auto White Balance automatically maintains optimum color balance If this is not the case set manually Set the POWER Switch to MANUAL REC See page 19 Press MENU to display the MENU screen Befor...

Page 38: ...ire image is metered A small sphere in the center portion of the finder is metered This mode is useful for capturing back lit conditions such as when the subject is brightly lit 2Press MENU to exit Selected mode will appear on the LCD Viewfinder See page 9 According to the recording condition and purpose set light metering to measure exposure time Set the POWER Switch to MANUAL REC See page 19 Pre...

Page 39: ...ter The Self Timer setting returns to OFF mode each time an image is captured Repeat these steps each time Self Timer is used Self Timer Recording Self Timer Recording The Self Timer allows you to capture an image about 10 seconds after pressing the shutter Set the POWER Switch to REC or MANUAL REC See pages 18 19 Press MENU to display the MENU screen Before you begin REC Mode MANUAL REC Mode 2MEN...

Page 40: ...sh on the LCD Viewfinder while image is being processed Press MENU to exit this mode During time lapse recording even during non recording intervals the battery may become depleted Therefore using an AC Adaptor supplied is recommended During time lapse the ZOOM area is not displayed Time Lapse enables you to set the camera to automatically capture an image from once every minute to once every 24 h...

Page 41: ...ress SHTR to delete an image To delete other specific image pages repeat steps 3 4 Press MENU three times to exit Important While deleting images do not turn off the Digital Camera or unplug the AC Adaptor supplied because this will cause irreversible damage to the memory resulting in reduced image storage capacity 4MENU Button Set the POWER Switch to PLAY See page 19 Press MENU to display the MEN...

Page 42: ...HTR to set the selection The file number of the selected image is displayed in red To cancel a selection select the image and press SHTR again Press MENU three times to exit this menu 4Press FLASH to delete the selected images DELETE COMPLETE is displayed on the LCD Viewfinder Set the POWER Switch to PLAY See page 19 Press MENU to display the MENU screen Before you begin 3SHTR SHUTTER 1 2 3 Select...

Page 43: ...t FORMAT and press to display FORMAT menu 3 Press or to select YES To exit this menu press or to select NO and press SHTR 4 Press SHTR to format PLEASE WAIT will be displayed on screen as all images are deleted from memory Deletion is complete when NO IMAGE is displayed Important While PLEASE WAIT is displayed do not turn off the Digital Camera or unplug the AC Adaptor supplied because this will c...

Page 44: ...hile PLEASE WAIT is displayed do not turn off the Digital Camera or unplug the AC Adaptor supplied because this will cause irreversible damage to the memory resulting in reduced image storage capacity Set the POWER Switch to PLAY See page 19 Press MENU to display the MENU screen Before you begin 4SHTR SHUTTER If the memory capacity of the Disk Media that you want to copy to is not sufficient the f...

Page 45: ... because this will cause irreversible damage to the memory resulting in reduced image storage capacity When copying images from one disk to another the images are temporarily stored in camera memory before being copied to the target disk As the camera memory is only equal to about one Floppy Disk all the SuperDisk Diskette images cannot be stored and COPY ALL cannot be used If COPY ALL is selected...

Page 46: ... 2 Select Button Important While SLIDE SHOW is proceeding do not turn off the Digital Camera or unplug the AC Adaptor supplied because this will cause irreversible damage to the memory resulting in reduced image storage capacity SLIDE SHOW automatically stops after approx 20 minutes when SuperDisk is inserted SLIDE SHOW continues endlessly when Floppy Disk is inserted However if Super Fine mode im...

Page 47: ... the image data to Design rule for Camera File system format so that the Camera can read it The Design rule for Camera File system was standardized by the Japan Electronic Industry Development Association JEIDA with the main purpose of developing an environment in which image files such as those from Digital Still Cameras can easily be exchanged with other related devices QuickTime Installation Qu...

Page 48: ...t button on your desktop and then click Run When the Run box is open type in D Instmenu exe where D is the drive letter of your CD then click OK Exit from all applications and disable any virus protection applications USB Driver Installation Windows 2000 Note Note If installation cannot be done with steps on page 47 please follow the steps below The USB Driver software for Windows 2000 is currentl...

Page 49: ...le supplied must be connected as described in the above steps By using the included USB cable to connect to a PC you can use your SuperDisk camera as an external storage device Data transfer using USB cable is applicable only for Microsoft Windows 98 preinstalled PC with USB port Windows 2000 PC iMac iBook Power Macintosh G3 with USB port or Power Mac G4 and Mac OS version 8 1 or later TO PC Termi...

Page 50: ...e Disk Media into the SuperDisk Slot 2 Click Start Programs and the Image Viewing Software For example for PHOTODELUXE click Adobe PhotoDeluxe Home Edition 4 0 and Adobe PhotoDeluxe Home Edition 4 0 The initial screen of the Image Viewing Software is displayed When playing back Motion images start QuickTime Reading and Writing the Disk Media Personal Computer To PC Terminal Note Transferring Your ...

Page 51: ...image data and the MISC Folder is used to store Print Mark data Image data is stored in the 100_PANA folder with the file number starting from P1000001 When the 1000th image data is written the 101_PANA folder is created and the file number starts from P1010001 File numbers once deleted cannot be used If the file number is changed the Digital Camera cannot read the file 4 Open the image to view it...

Page 52: ...ed or decreased to make them suitable for Internet and E mail use To convert format for camera playback Images can be converted to JPEG format and to file names that can be played back on the PalmCam Set the POWER Switch to PC Before you begin Connect the Digital Camera to the PC using the supplied USB Cable Refer to page 49 for additional details PalmCam File Converter Note Transferring Your Imag...

Page 53: ...for detailed instructions When selecting To convert format for camera playback 4 Select the file to be converted 5 Select the drive in which the converted file is to be saved The Conversion results screen is displayed 6 Use Help of PalmCam File Converter 2 0 for detailed instructions Transferring Your Images Windows Transferring Your Images Windows SD5000 p52 57 p65 80 01 04 11 42 53 ...

Page 54: ... all applications and close all windows i e QuickTime PhotoDeluxe etc 2 Eject the Disk Media from the SuperDisk Slot See page 16 You can also remove the Disk Media by right clicking on the SuperDisk Drive icon in Windows Explorer and My Computer and then clicking on Eject 3 Disconnect the USB Cable supplied from your PC and change the POWER Switch on the Digital Camera setting from PC mode to anot...

Page 55: ...c OS ROM in the Mac OS 8 1 system folder is changed from 1 1 to 1 1 2 The USB Driver of the SuperDisk Drive is installed in the function expansion folder of the System folder Inquire about Mac OS and Firmware updates at the Apple Computer Inc web site http www apple com 1 Repeat steps 1 3 above 2 Double click on QT and QuickTime Installer 3 Follow the instructions as they appear on your Macintosh ...

Page 56: ...connected even after the PC has been started The USB Cable supplied must be connected as described in the above steps By using the included USB cable to connect to a PC you can use your SuperDisk camera as an external storage device TO PC Terminal USB Cable supplied USB Terminal 2 3 1 Data transfer using USB cable is applicable only for Microsoft Windows 98 preinstalled PC with USB port Windows 20...

Page 57: ... additional details USB Cable supplied 1 Insert the Disk Media into the SuperDisk Slot 2 Click Apple Menu Macintosh HD Adobe PhotoDeluxe 2 0 and Adobe PhotoDeluxe The initial screen of the Image Viewing Software is displayed When playing back Motion images start QuickTime Reading and Writing the Disk Media To PC Terminal Note Transferring Your Images Macintosh Transferring Your Images Macintosh Re...

Page 58: ...ital Camera Drive is recognized as the 3 5 FD Drive The Camera Disk consists of DCIM and MISC Folders The DCIM Folder is used to store image data and the MISC Folder is used to store Print Mark data Image data is stored in the 100_PANA folder with the file number starting from P1000001 When the 1000th image data is written the 101_PANA folder is created and the file number starts from P1010001 Fil...

Page 59: ...n to register a file from the file select dialog box When selecting To resize the image 5 Specify the save location Select Option and select the desired size from the following 3 options Then Select the Folder and select the store folder Set the POWER Switch to PC Before you begin Connect the Digital Camera to the Macintosh using the supplied USB Cable Refer to page 56 for additional details PalmC...

Page 60: ...ructions When selecting To convert format for camera playback 5 Select the store volume for converted files from the Volume list box 6 Click Convert to convert the selected file 7 Use Help of File Converter for detailed instructions Transferring Your Images Macintosh Transferring Your Images Macintosh SD5000 p58 60 p65 80 01 04 11 42 60 ...

Page 61: ...he SHTR button When the PC recognizes the Disk Media an icon like the one shown right is displayed on the desktop You can remove Disk Media from the Digital Camera by dragging and dropping the Disk Media icon on the desktop into the Trash icon While the PC is starting up the Disk Media cannot be removed even if the EJECT button on the Digital Camera is pressed When a damaged Disk Media is inserted...

Page 62: ...sh When a DOS formatted Floppy Disk is read by a Macintosh the PC File Exchange function will be necessary Adverse conditions such as those described below are confirmed in PC Exchange Ver 2 2 1 and also File Exchange Ver 3 0 Do not format a SuperDisk Diskette that is in the DOS format on a Macintosh If you use the DOS format with a Macintosh the SuperDisk Diskette will not be able to be read or w...

Page 63: ...the disk s files are open an error may occur on the display 1 Insert the Disk Media into the SuperDisk Slot 2 Click My Computer Click right mouse button on the 3 1 2 Floppy icon 3 Click FormatUtility for SuperDisk 4 Follow the instructions as they appear on your PC screen Using the SuperDisk Drive Windows Before Formatting Formatting the Disk Media SD5000 p61 64 p65 80 01 04 11 42 63 ...

Page 64: ...n CopyDisk is attempted the first time a Windows error message box may be displayed and CopyDisk may fail In this case switch the source Floppy Disk and the target Floppy Disk so that CopyDisk is performed from the Digital Camera to the Floppy Disk Drive By doing this CopyDisk will function properly Using the SuperDisk Drive Windows SuperDisk Drive SuperDisk Diskette Floppy Disk 2HD Floppy Disk 2H...

Page 65: ... click Erase Do not format the Disk Media under DOS format with Macintosh When using the Disk Media that was formatted to Mac OS standard format or Mac OS expanded format in the Digital Camera format again in the Digital Camera When File Sharing is used formatting may be impossible In this case either quit File Sharing or turn AppleTalk off in the control panel In Camera mode REC MANUAL REC PLAY o...

Page 66: ...his is normal so please wait for a while If the Disk Media is not inserted into the SuperDisk Drive FormatUtility for SuperDisk will not be displayed Insert the Disk Media After the busy light goes out right click on the SuperDisk icon According to the use limitations of QuickTime for Windows files stored in the SuperDisk Drive may not play back normally Unable to place in Suspend Resume mode Whil...

Page 67: ...ages 2 Press or to select the image page you want to mark for printing and press SHTR to stamp print mark A mark will appear on the image Press or to select number of copies to print up to 99 Repeat step 2 to stamp other images Press SHTR again to cancel print mark 3 Press MENU to exit this menu Print mark is based on DPOF Digital Print Order Format Stamp Print Marker Set the POWER Switch to PLAY ...

Page 68: ...tal Camera Accessory For ordering instructions see the Accessory Order Form page Accessory CGR B 202A1B PV FA52 PV H150 Description Lithium Ion Battery Lens Adaptor Protective Filter Kit System Carrying Case Price 100 00 69 95 49 95 Figure SD5000 p68 72 p65 80 01 04 11 43 68 ...

Page 69: ...CES COMPANY ACCESSORY ORDER OFFICE 20421 84th Avenue South Kent WA 98032 Ship To Mr Mrs Ms First Last Street Address City State Zip Phone Day Night 4 Shipping information UPS delivery requires complete street address 3 Method of payment check one Check of Money Order enclosed NO C O D SHIPMENTS VISA Credit Card MasterCard Expiration Date Discover Customer Signature Make Check or Money Order to MAT...

Page 70: ...y Delete some images before capturing images p 41 Auto shut off feature is on Set the POWER to OFF and then set to REC or MANUAL REC pp 18 19 21 Make sure the LCD Viewfinder brightness setting is adjusted properly p 31 The flash mode is set to OFF Change the flash mode p 36 SuperDisk Diskette FD is not inserted p 16 There are no images on the SuperDisk Diskette FD pp 21 24 Set the POWER switch to ...

Page 71: ...sk or change disks If the problem occurred while setting a COPY or PRINT MARK please try again If still WRITE ERROR repeat this procedure If PUSH SHTR TO FORMAT is displayed you may format the disk If PUSH SHTR TO FORMAT is not displayed the disk cannot be formatted Disks that can be formatted were once formatted under DOS or Mac If after second attempt to delete again DELETE ERROR is displayed th...

Page 72: ...t ALL COPY when SuperDisk is the source Please select COPY PAGE to copy Please open the Lens Cover More light should be provided or use flash to achieve better picture quality and color Indication FORMAT ERROR THIS DISK IS PROTECTED NOT ENOUGH MEMORY PUSH MENU TO EXIT NOT ENOUGH DISK SPACE CONTINUE SHTR EXIT MENU NOTAVAILABLEDISKSPACE CONTINUE SHTR EXIT MENU CANNOT COPY ALL THESUPERDISK PLEASEREMO...

Page 73: ...te Approx 240 images Super Fine mode Approx 340 images Fine mode Approx 1 000 images Normal Zoom 2X Approx 1 400 images mode Approx 1 500 images Zoom 3X mode 12 seconds Approx 70 sets mode Approx 12 images TIFF mode Image Format JPEG Design Rule for Camera File System Still ImageWith Audio JPEG QuickTime Motion Image QuickTime 320 pixel 240 pixel Still image with Audio Digital lnterface USB Video ...

Page 74: ...e is rendered This warranty only covers failures due to defects in materials and workmanship which occur during normal use and does not cover normal maintenance including but not limited to video and audio head cleaning The warranty does not cover damage which occurs in shipment or failures which are caused products not supplied by the warrantor or failures which result from accident misuse abuse ...

Page 75: ...h 29th Avenue Suite 102 Hollywood FL33020 MICHIGAN 37048 Van Dyke Avenue Sterling Heights MI 48312 MINNESOTA 7850 12th Avenue South Airport Business Center Bloomington MN55425 OHIO 2236 Waycross Road Civic Center Plaza Forest Park OH 45240 PENNSYLVANIA 2221 Cabot Blvd West Suite B Langhorne PA 19047 TEXAS 13615WelchRoad Suite 101 FarmersBranch TX75244 WASHINGTON 20425 84thAvenue South Kent WA 9803...

Page 76: ...3 34 Motion Image Playback 33 O On Screen Display OSD 9 P Playback 32 33 34 Playback Menu 11 POWER Supply 12 13 14 Print Mark DPOF 67 Q Quick Rec FD 28 R RapidFire 9 27 Rec Review 28 Recording Menu 10 Recording Mode 25 S Self Timer 10 39 Setting the Clock 20 Service Center Directory 75 Slide Show 46 Slow Shutter 10 21 22 Specifications 73 SuperDisk 2 16 SuperDisk Drive 62 63 64 65 66 T Transferrin...

Reviews: