background image

- 54 -

Select a playlist to preview and click the [Enter] button.


f

The 

[

Playlist edit

]

 screen is displayed.

Click the [Preview] button.


f

The preview mode selection screen is displayed.

Select a preview mode, and click the [Start] button.


f

When [WEB browser] is selected, the image is displayed on the web browser.


f

When [Projector] is selected, the image is displayed on the projection screen.

Note


f

In the following cases, the preview mode [Projector] cannot be selected.


g

During signage playback (schedule/slideshow)


g

When the input is other than signage playback


r

Preview mode [WEB browser]


f

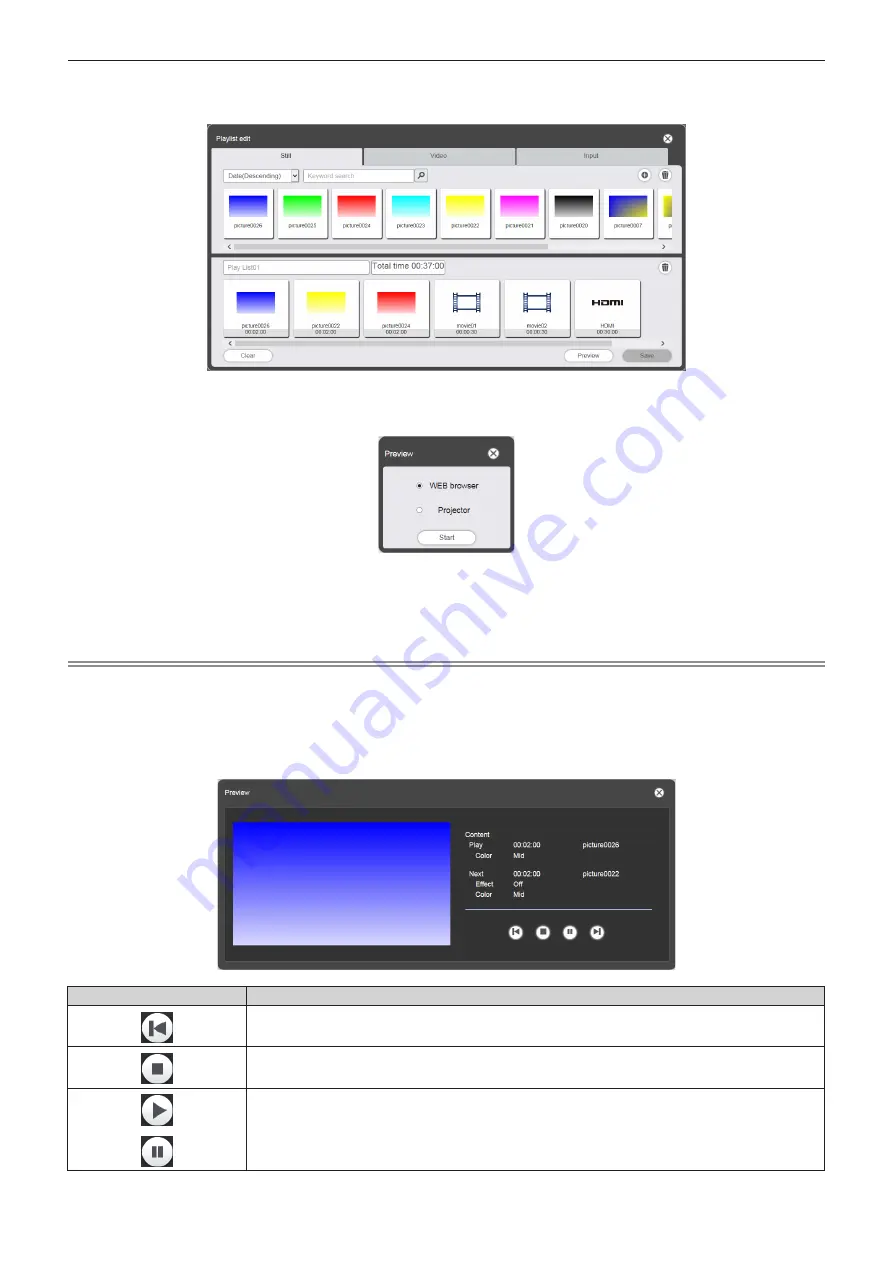
A preview screen like the following is displayed on the web browser.

Operation icon

Performance

Switches to the previous content.

Stops playback.

Starts or pauses playback. The icon display changes depending on the playback state.

Summary of Contents for PT-JX200 series

Page 1: ...s the signage playback function Content Manager For information other than the signage playback function see Operating Instructions Functional Manual DPQP1111ZC DLP Projector Commercial Use ENGLISH Model No PT JX200 series Operating Instructions Content Manager Manual ...

Page 2: ...ering the still image movie music content 42 Registering the power supply content 44 Editing the content 45 Deleting the content 46 Creating a playlist 47 Editing the playlist 49 Deleting the content registered in the playlist 50 Changing the setting of content registered in a playlist 51 Duplicating the playlist 52 Displaying the preview of playlist contents 53 Editing the timetable 56 Editing th...

Page 3: ...ng the playlist of direct play 91 Deleting the playlist of direct play 92 Editing the remote control ID assignment 93 Assigning the playlist to the remote control ID 93 Deleting the playlist from the remote control ID assignment 94 Check the playlist assigned to the remote control ID assignment 95 Delivering the registered playlist 96 Starting the direct playback 97 Setting up the conditions and s...

Page 4: ...ending on the OS or the computer used r rReference pages f f Reference pages in this manual are indicated as x page 00 References to the PDF manual on the supplied CD ROM are indicated as XXXX Operating Instructions Functional Manual r rTerms f f The part that is described as device in this manual and the software refers to the projector Model No PT JX200 series f f In this manual the SD memory ca...

Page 5: ...what to play back within the day Content Indicates the material to be used in the Content Manager There are four playback contents of still image movie external input music and two device control contents of brightness power supply Contents of still image movie music are registered in the Content Manager using still image movie music files Image content Indicates the inclusive term of three playba...

Page 6: ...rk properly For details on simultaneous playback refer to Playing the schedule simultaneously on multiple projectors x page 74 f f Extension mp4 Video codec H 264 MPEG 4 AVC Audio codec AAC f f Extension mpg mpeg Video codec MPEG 2 Audio codec MPEG 1 2 Audio Layer 2 2 Following movie files are not supported f f Files with the video codec of WMV7 WMV8 DivX or Xvid f f Uncompressed video f f Multi a...

Page 7: ...d f f Use the SD card with high data transfer speed If the data transfer speed is slow movie or music recorded in the SD card may not be played back properly or it may take time to display a still image Speed class Class 10 recommended f f For the SD card compatible with the device refer to Using SD cards Operating Instructions Functional Manual ...

Page 8: ...1 4 2 4 3 4 4 5 0 5 1 6 0 Google Chrome iOS 8 9 Safari 8 0 9 0 Computer environment required for connection Make sure to confirm the following settings before connecting the device to a computer r rLAN setting f f Computer with a built in LAN function g g Is the LAN function enabled f f Computer without a built in LAN function g g Is the LAN adaptor correctly recognized g g Is the LAN adaptor enab...

Page 9: ...n is possible while the Content Manager is used Logging in to the Content Manager Start up the web browser and log in to the Content Manager 1 Start up the web browser on the computer 2 Enter http xxx xxx xxx xxx signage in the URL entry field of the web browser f f xxx xxx xxx xxx is the IP address set in the projector f f The login screen is displayed 3 Click Login 4 Enter the user name and the ...

Page 10: ...ly f f When no SD card is inserted in the SD card slot or the projector cannot recognize the SD card the logout screen is displayed f f If the Content Manager screen is not displayed consult your network administrator f f The Content Manager of the projector can also be started from Wireless Manager ME6 3 which is image transfer application software compatible with Windows computers and Mac Panaso...

Page 11: ...ss the projector from the web browser Logging in to the Content Manager x page 9 Note f f In addition to the top menu screen you can also log out from schedule screen or slideshow screen Changing the login information Set the user name and password with administrator rights users rights respectively for logging in to the Content Manager 1 Click on the top menu screen f f The login setting screen i...

Page 12: ...w password again f f Clicking the Undo button will clear the already entered information 5 Click the Save button 6 When the confirmation screen is displayed click the OK button f f The set contents are registered in the SD card ...

Page 13: ... in to the Content Manager Start up the web browser and log in to the Content Manager 1 Start up the web browser on the computer 2 Enter http xxx xxx xxx xxx signage in the URL entry field of the web browser f f xxx xxx xxx xxx is the IP address set in the projector f f The login screen is displayed 3 Click Login 4 Enter the user name and the password f f The factory default setting of the user na...

Page 14: ...ick the Schedule menu on the top menu screen f f The schedule screen is displayed 2 Click the Timetable button f f The Timetable page is displayed 3 When the Still tab is selected click at the top right of the screen f f The Add content screen is displayed 4 Click on the Add content screen f f The file selection screen is displayed 5 Select the still image file to register and click the Open butto...

Page 15: ...lected still image file is registered in the SD card as a content Note f f To register a movie file as a content select the Video tab in Step 3 and to register a music file as a content select the Audio tab in Step 3 f f It is convenient to create a playlist when multiple contents are to be used repeatedly for multiple times in a specified order For details on creating the playlist refer to Creati...

Page 16: ...Drag and drop the registered still image content to the timetable at the bottom of the screen f f The Content registration screen is displayed 2 Perform various settings and click the Enter button f f Enter Start End or Duration on the Content registration screen 3 Save the timetable f f Enter the timetable name in the Timetable name field and click the Save button ...

Page 17: ... click the OK button f f The created timetable is registered in the SD card Note f f To register contents other than still image select the desired content tab before performing step 1 Next is the procedure for Registering timetable to the schedule ...

Page 18: ...the timetable on the schedule f f The timetable which specifies the date for daily varying playback content or specifies the day of week for the same content repeatedly played each week can be registered to the schedule For details refer to Registering a schedule x page 66 3 Register the timetable in the schedule f f Select the timetable to register to the schedule on the specified day or the day ...

Page 19: ...te f f From now to the twelve weeks ahead the daily varying timetables can be set in schedule Besides the same content for each week can also be set Next is the procedure for Starting the playback of schedule ...

Page 20: ...utton on the schedule screen f f The Operation page is displayed 2 Click the Play button f f The input of the projector automatically switches to signage and playback starts according to the registered schedule f f The Play button changes to the Stop button f f To stop the playback of the schedule click the Stop button ...

Page 21: ... f xxx xxx xxx xxx is the IP address set for the projector f f The login screen is displayed 3 Click Login 4 Enter the user name and the password f f The factory default setting of the user name is user1 user rights admin1 administrator rights and the password is panasonic lower case 5 Click the OK button f f When logging in with administrator rights you can use the user name and password set at f...

Page 22: ...ideshow screen is displayed 2 When the Still tab is selected click at the top right of the screen f f The Add content screen is displayed 3 Click in the Add content screen f f The file selection screen is displayed 4 Select the still image file to register and click the Open button 5 Enter the Content name and click the Enter button f f The still image file is registered in the Add content screen ...

Page 23: ...en is displayed click the OK button f f The selected still image file is registered as content to the SD card Note f f To register a movie file as a content select the Video tab in Step 2 Next is the procedure for Creating a slideshow ...

Page 24: ...e registered still image on the slideshow to the bottom of the screen f f Multiple contents cannot be registered at a time f f When registering the content to a slideshow the content inserting location cannot be specified After registering to the slideshow operate according to Changing the playback order of the content registered in slideshow x page 84 4 Click the Save button 5 When the confirmati...

Page 25: ...e f f When you pause playing still image content the playback time of the paused content is reset when it is resumed and played from the beginning In the case of movie content the playback resumes from the paused part f f If the content that first registered to the slideshow is still image content the initial play time of that still image content shortens compared with the set time ...

Page 26: ...etails refer to Delivering the registered playlist x page 31 Logging in to the Content Manager Start up the web browser and log in to the Content Manager 1 Starting up the web browser on computers other than the smartphones 2 Enter http xxx xxx xxx xxx signage in the URL entry field of the web browser f f xxx xxx xxx xxx is the IP address set in the projector f f The login screen is displayed 3 Cl...

Page 27: ...e here 1 Click the Direct play menu on the top menu screen f f The Remote control ID assignment screen is displayed 2 Click f f The Playlist edit screen is displayed 3 When the Still tab is selected click at the top right of the screen f f The Add content screen is displayed 4 Click on the Add content screen f f The file selection screen is displayed 5 Select the registered still image file and cl...

Page 28: ... content screen and register the content 7 When the content addition is completed click the Save button 8 When the confirmation screen is displayed Click the OK button f f The selected still image file is registered in the SD card Note f f To register the movie file as content select the Video tab in step 3 Next is the procedure for Creating a playlist for direct playback ...

Page 29: ...the screen 2 When various settings are completed click the Enter button f f Set the Duration and Effect in Add content screen and click the Enter button 3 Enter the playlist name and click the Save button 4 When the confirmation screen is displayed click the OK button f f The created playlist is registered in the SD card Next is the procedure for Assigning a playlist to remote control ID ...

Page 30: ...l ID assignment list at the bottom of the screen 2 When the remote control ID assignment is completed click the Save button 3 When the confirmation screen is displayed click the OK button f f The remote control ID is registered in the SD card f f The assigned playlist ID is displayed in the remote control ID assignment list Next is the procedure for Delivering the registered playlist ...

Page 31: ...screen is displayed 2 Download the created playlist as backup data f f For the backup procedure see Obtaining the backup of a schedule x page 71 f f For the target data select All schedule 3 Log out of the Content Manager of the projector f f For the log out procedure see Logging out from the Content Manager x page 11 4 Log in to the Content Manager of the duplication destination projector from th...

Page 32: ...enu DIRECT PLAY SETTING Operating Instructions Functional Manual 2 Press the number button on the remote control f f Press the same number button on remote control as the remote control ID assigned to the playlist The playlist playback will be started from multiple projectors Note f f The Playback destination group is played in All status when performing direct playback from remote control f f The...

Page 33: ...d schedule can be performed 2 Slideshow menu Performs the creation and editing of a slideshow Operation method of the slideshow x page 78 3 Direct play menu Plays the playlist on multiple projectors simultaneously If you log in from smartphone the Direct play screen will be displayed If you log in from client computers other than the smartphone Remote control ID assignment screen will be displayed...

Page 34: ...play the schedule confirmation screen Check the registered schedule Schedule confirmation screen x page 37 8 History icon Click this to display the history screen Check the played content History screen x page 37 9 Settings icon only for administrator rights Click this to display the schedule setting screen Perform system setting and data management Schedule setting screen x page 38 10 Projector t...

Page 35: ... name 2 Sort timetables Sets the display order of timetables Date Ascending Date Descending Displays timetables in the order of registration date ID Ascending ID Descending Displays timetables in the order of timetable ID Content name Ascending Content name Descending Displays timetables in the order of timetable name 3 Timetable ID Displays the timetable ID 4 Timetable Displays the contents regis...

Page 36: ...edit the timetable name 6 Timetable ID Displays the ID of the timetable being edited It is assigned automatically when a timetable is registered Click it to change the target timetable to be edited 7 Brightness content display icon This icon becomes yellow when selected and displays the registered brightness content in a timetable Click the icon again to cancel the selection then the icon color ch...

Page 37: ...e timetable name 5 Timetable ID Displays the timetable ID 6 Timetable Displays the content registered in a timetable 7 Display scale Sets the display scale of timetable History screen The history screen is displayed when clicking the history icon on schedule screen Note f f When the Record history checkbox on the System setting page x page 38 is check marked the playback history of the schedule wi...

Page 38: ... in the time slot where no brightness content is registered in the timetable 8 Record history Sets whether to record the schedule playback history If the checkbox is not marked the schedule playback will not be recorded to history History screen x page 37 9 Restart option As a condition to resume the paused signage playback sets enable disable of Power Image content 10 Fixed loading time Select wh...

Page 39: ...o the state before displaying the Data management page 5 Backup button Click this to save the selected backup target data into the client computer 6 Upload data Add button Adds the target data to upload Click this to display the file selection screen 7 Upload data deletion icon Click this to enter the deletion mode Select data you want to cancel upload and delete it 8 Upload data Displays upload t...

Page 40: ...n and set the time to start the content playback 5 Effect Set special effects used when changing the playback screen of still image content For details of the setting items refer to Effect x page 41 6 Color Select the color setting to be reflected when playing image content For details of the setting items refer to Color x page 41 7 Brightness Select the brightness to be reflected when playing ima...

Page 41: ...hen playing image contents still image movie external input High Makes the image bluish than the Mid setting Mid Sets the color appropriate for the overall movie image Low Makes the image reddish than the Mid setting User Reflects the adjusted User setting 1 in PICTURE menu COLOR TEMPERATURE 1 For the setting method refer to Adjusting white balance as desired under the PICTURE menu COLOR TEMPERATU...

Page 42: ... this to register a timetable for a certain day of the week Registering the content Registering the still image movie music content 1 Click the Schedule menu on the top menu screen f f The schedule screen is displayed 2 Click the Timetable button f f The Timetable page is displayed 3 Click the tab of the content to register in the timetable from the content selection tabs on the Timetable page f f...

Page 43: ...ntent name and Duration and click the Enter button f f Up to 24 characters can be entered to the Content name f f If a given name is different from the file name the file name itself will not be changed f f Duration can be entered only for still image content f f The content is registered on the Add content screen f f To continue adding content click on the Add content screen to register the conte...

Page 44: ...ver the SD card might not be able to accommodate 500 files depending on its capacity f f When the content name field is left empty and the Enter button is clicked it is saved with the preset file name Registering the power supply content 1 Click the Schedule menu on top menu screen f f The schedule screen is displayed 2 Click the Timetable button f f The Timetable page is displayed 3 Click the Pow...

Page 45: ...ager f f Multiple power supply contents cannot be registered in the same time slot f f To register the already registered power supply contents to the timetable the input of Start End and Duration can be omitted Editing the content Edit the setting of the still image movie music file registered on the Timetable page 1 Click the Schedule menu on the top menu screen f f The schedule screen is displa...

Page 46: ... content cannot be edited f f To change the content of the playlist refer to Editing the playlist x page 49 Deleting the content Delete the contents that are out of use 1 Click the Schedule menu on the top menu screen f f The schedule screen is displayed 2 Click the Timetable button f f The Timetable page is displayed 3 Click in the content list f f The mode changes to deletion mode f f Click the ...

Page 47: ... the content cannot be deleted Creating a playlist Register multiple still images movies external input contents together as a single content 1 Click the Schedule menu on the top menu screen f f The schedule screen is displayed 2 Click the Timetable button f f The Timetable page is displayed 3 Click the Playlist tab on the Timetable page f f The playlist is displayed in the content list 4 Click in...

Page 48: ...d for the movie external input content 7 Enter the playlist name in the Playlist name field f f Enter the playlist name in the Playlist name field Up to 24 characters can be entered 8 Click the Save button f f The created playlist is registered in the SD card Note f f Only image content still image movie external input can be registered in a playlist f f Up to 100 contents can be registered in one...

Page 49: ...f f The schedule screen is displayed 2 Click the Timetable button f f The Timetable page is displayed 3 Click the Playlist tab on the Timetable page f f The playlist is displayed in the content list 4 Click in the content list f f The mode changes to selection mode f f Click the Cancel button to exit the selection mode ...

Page 50: ...hen the playlist used by multiple direct play is edited the edited content is reflected on multiple direct play Deleting the content registered in the playlist Delete the content registered in the playlist 1 Click the Schedule menu on the top menu screen f f The schedule screen is displayed 2 Click the Timetable button f f The Timetable page is displayed 3 Click the Playlist tab on the Timetable p...

Page 51: ...list Change the settings of content registered in a playlist 1 Click the Schedule menu on the top menu screen f f The schedule screen is displayed 2 Click the Timetable button f f The timetable page is displayed 3 Click the Playlist tab on the Timetable page f f The playlist is displayed in the content list 4 Click in the content list f f The mode changes to selection mode f f Click the Cancel but...

Page 52: ...k the Save button to register the edited playlist in the SD card Duplicating the playlist Duplicate the registered playlist 1 Click the Schedule menu on the top menu screen f f The schedule screen is displayed 2 Click the Timetable button f f The Timetable page is displayed 3 Click the Playlist tab on the Timetable page f f The playlist is displayed in the content list 4 Click in the content list ...

Page 53: ...rd Displaying the preview of playlist contents Display the preview image of a playlist on the web browser or the projection screen 1 Click the Schedule menu on the top menu screen f f The schedule screen is displayed 2 Click the Timetable button f f The Timetable page is displayed 3 Click the Playlist tab of the content selection tab on the Timetable page f f The playlist is displayed in the conte...

Page 54: ... f When Projector is selected the image is displayed on the projection screen Note f f In the following cases the preview mode Projector cannot be selected g g During signage playback schedule slideshow g g When the input is other than signage playback r rPreview mode WEB browser f f A preview screen like the following is displayed on the web browser Operation icon Performance Switches to the prev...

Page 55: ...reen like the following is displayed on the web browser Operation icon Performance Stops playback Starts or pauses playback The icon display changes depending on the playback state Note f f When there is a blank period between contents the period is handled as one content and displayed in preview f f Regardless of the content setting still image content is played for 10 seconds movie external inpu...

Page 56: ... f Drag and drop the content to register in the timetable from the content list to the timetable at the bottom of the screen 5 Perform various settings and click the Enter button f f The content is registered in the timetable f f To continuously register content return to Step 3 and perform the procedure 6 Enter the timetable name f f Enter the name in the timetable name field Up to 24 characters ...

Page 57: ...with a gap of one minute or longer between the previous and next power supply content Creating a new timetable Create a new timetable 1 Click the Schedule menu on the top menu screen f f The schedule screen is displayed 2 Click the Timetable button f f A new timetable is displayed For methods to register a content to the timetable refer to Editing the timetable x page 56 f f To create a new timeta...

Page 58: ...ts 7 Click the Delete button 8 When the confirmation screen is displayed click the OK button f f The selected image content is deleted from the timetable f f The content is not deleted from the SD card even if that content is deleted from the timetable Deleting the music content registered in the timetable Delete the music content registered in the timetable 1 Click the Schedule menu on the top me...

Page 59: ...Cancel button to cancel the deletion mode 6 Select the music content to delete f f You can select multiple contents 7 Click the Delete button 8 When the confirmation screen is displayed click the OK button f f The selected music content is deleted from the timetable Deleting the brightness content registered in the timetable Delete the brightness content registered in the timetable 1 Click the Sch...

Page 60: ...ayed in white it is not selected Click the icon again 5 Click of the timetable f f The mode changes to deletion mode f f Click the Cancel button to exit the deletion mode 6 Select the brightness content to delete f f You can select multiple contents 7 Click the Delete button 8 When the confirmation screen is displayed click the OK button f f The selected brightness content is deleted from the time...

Page 61: ...from the drop down list 4 Click and select in the timetable f f The selected icon color changes to yellow f f When the icon is displayed in white it is not selected Click the icon again 5 Click in the timetable f f The mode changes to deletion mode f f Click the Cancel button to exit the deletion mode 6 Select the power supply content to delete f f You can select multiple contents 7 Click the Dele...

Page 62: ...er the timetable name and click the Enter button f f The timetable is duplicated Deleting the timetable Delete the registered timetable 1 Click the Schedule menu on the top menu screen f f The schedule screen is displayed 2 Click the Schedule button f f The Schedule page is displayed 3 Click at the top right of the screen f f The mode changes to deletion mode f f Click the Cancel button to exit th...

Page 63: ...ng is to be changed 5 Perform various settings and click the Enter button f f The setting of the content registered in the timetable is updated Note f f When you click the Enter button after changing Brightness of brightness content the content is registered in the SD card and displayed in the Content list Displaying the preview of timetable details Display the preview image of a timetable on the ...

Page 64: ...en there is a blank period between contents the period is handled as one content and displayed in preview f f Regardless of the content setting each content including blank periods is played for 10 seconds f f In the case of movie external input content only an icon is displayed on the preview screen instead of the actual image f f Image effects and color settings are not reflected in preview imag...

Page 65: ... playback start time of still image content is reflected f f For brightness content the one registered at the playback start time of image content still image movie external input is reflected f f The power supply content is not included in preview f f If paused during playback of still image content or during a blank period between contents the playback time of the content being paused is reset w...

Page 66: ...to register the timetable on the calendar f f The period setting and the schedule are updated f f When you click the Every week button the schedule for day of the week is displayed You can set the same timetable for a certain day of the week every week In this case the period in which the schedule can be registered is not restricted 5 Select a timetable and register the timetable ID in the schedul...

Page 67: ...Schedule menu on the top menu screen f f The schedule screen is displayed 2 Click the Schedule button f f The Schedule page is displayed 3 Click at the bottom right of the screen f f The mode changes to deletion mode f f Click the Cancel button to cancel the deletion mode 4 Select the day or day of the week to delete f f A check mark is displayed on the selected day or day of the week f f You can ...

Page 68: ...a schedule The contents of the timetable registered in the desired schedule is displayed 1 Click the Schedule menu on the top menu screen f f The schedule screen is displayed 2 Click the Schedule button f f The Schedule page is displayed 3 Click the day or day of week of which timetable you want to confirm the details f f The Assigned timetable screen is displayed ...

Page 69: ...e schedule Check the currently registered schedule 1 Click the Schedule menu on the top menu screen f f The schedule screen is displayed 2 Click f f The schedule confirmation screen is displayed 3 Click the desired day to check the schedule on the calendar f f The timetable display is updated Check the contents of the timetable set for the day ...

Page 70: ...d or the power v b button on the remote control or power supply control by a command is performed and then the input switches to signage Disable Signage playback does not resume even when power off on registered in the schedule is performed or the power v b button on the remote control or power control by a command is performed Image content Enable Signage playback schedule resumes at the playback...

Page 71: ...le Week and Schedule Date f f When All schedule is selected proceed to Step 7 5 Click f f The backup target week day selection screen or the backup target date selection screen is displayed 6 Select the date or week day in which the target schedule is registered and click the Enter button f f The timetable ID and the timetable name are displayed on the Data management page 7 Click the Backup butto...

Page 72: ...yed 3 Click the Data management tab f f The Data management page is displayed 4 Click the Add button to upload file f f The file selection screen is displayed 5 Select a backup file to upload and click the Open button f f The file name is displayed in the upload data list f f Go back to Step 4 to continue to add another backup file or go to Step 6 to cancel upload of a file and then when you finis...

Page 73: ...uploading of schedule is supported only by Windows computer or Mac f f The timetable ID registered when a schedule is uploaded may vary depending on the schedule registration situation of the uploading destination ...

Page 74: ...wer is supplied to the projector and the projector enters in the standby mode If the schedule is played back during this period a time lag of more than one second may occur between the projectors in the starting or ending timing of content playback f f To perform simultaneous playback use the following movie file as a movie content If you use the movie files other than the following simultaneous p...

Page 75: ...e PRIVATE folder in the root top most directory of the source SD card to the root in the destination SD card 3 Insert the SD cards containing data duplicated in Step 2 into the SD card slot of each projector for simultaneous playback Downloading uploading schedules using the Content Manager By using the Content Manager you can register the same schedules in other projectors while the SD card with ...

Page 76: ...chedules refer to Acquiring and Delivering a Signage Schedule in the Operating Instructions of Multi Monitoring Control Software Setting synchronization for the NTP server To perform simultaneous playback of the same schedule in multiple projectors continuously synchronize the projectors with the NTP server and adjust the date and time setting of target projectors The projector is equipped with th...

Page 77: ... the schedule f f When the projector is used as the NTP server approximately 15 minutes are required before completing synchronization if the time setting of the NTP server is changed Keep this in mind when operating the simultaneous playback of the schedule Enabling Fixed loading time Even when the time of the projectors for simultaneous playback is synchronized the loading time after starting pl...

Page 78: ... be perform Operation method of the schedule x page 33 2 Slideshow menu Performs the creation and editing of a slideshow 3 Direct play menu Plays the playlist on multiple projectors simultaneously If you log in from smart phone Direct display screen will be displayed If you log in from client computers except the smart phone Remote control ID assignment screen will be displayed Operation method of...

Page 79: ...ontents registered in a slideshow 7 Slideshow Displays the contents registered in a slideshow 8 Clear button only for administrator rights Click this to delete all contents registered in a slideshow 9 Settings icon only for administrator rights Click this to display the slideshow setting screen Make various settings of a slideshow Slideshow setting screen x page 80 10 Projector time Displays the t...

Page 80: ...ng items refer to Effect x page 41 2 Color Select the color setting to be reflected when playing a slideshow For details of the setting items refer to Color x page 41 3 Brightness Select the brightness to be reflected when playing a slideshow 4 Interval Sets the default playback time which is set when still image content is registered in a slideshow 5 Undo button Click this to undo the entered set...

Page 81: ...en is displayed 4 Select the content 1 file as a unit to register and click the Open button 5 Enter the Content name and click the Enter button f f Up to 24 characters can be entered in Content name f f Even when the content name is different from the file name the file name itself is not changed f f The content is registered on the Add content screen f f To continue adding content register conten...

Page 82: ... in the Content name field and the Enter button is clicked it is saved with the preset file name of the content Deleting the content used in slideshow Deleting unnecessary contents from SD card 1 Click the Slideshow menu on the top menu screen f f The slideshow screen is displayed 2 Click in the content list f f The mode changes to deletion mode f f Click the Cancel button to exit the deletion mod...

Page 83: ...reen is displayed click the OK button f f The selected content is deleted from the SD card Note f f If the content to be deleted is registered in a schedule slideshow interrupt multiple direct playback the content cannot be deleted ...

Page 84: ... the content to change the playback order in the slideshow 3 Click the Save button 4 When the confirmation screen is displayed click the OK button f f The setting of the edited slideshow is registered in the SD card Deleting the content registered in the slideshow Delete the content registered in the slideshow 1 Click the Slideshow menu on the top menu screen f f The slideshow screen is displayed ...

Page 85: ...ging the content setting of still image registered in slideshow Change the content setting of still image registered in slideshow 1 Click the Slideshow menu on the top menu screen f f The slideshow screen is displayed 2 Click the still image content registered in the slideshow f f The setting screen is displayed 3 Change Effect and Duration and click the Enter button f f Change the image effect an...

Page 86: ...ayback time of movie content in a slideshow is the required playback time of the movie content f f If the content that first registered to the slideshow is still image content the initial playback time of that still image content shortens compared with the set time ...

Page 87: ...erforms the creation and editing of a schedule Creating a new schedule or editing of previously created schedule can be performed Operation method of the schedule x page 33 2 Slideshow menu Performs the creation and editing of a slideshow Operation method of the slideshow x page 78 3 Direct play menu Plays the playlist on multiple projectors simultaneously If you log in from smart phone the Direct...

Page 88: ...t name 5 Playlist ID Displays the playlist ID 6 Playlist Displays the content registered in playlist 7 Remote control ID assignment Displays the playlist ID assigned for each remote control ID 8 Keyword search Click to enter the string to be searched and search the playlists saved in the PRIVATE folder in the SD card by the playlist name 9 Total time Displays the total time of the contents registe...

Page 89: ... the playlist assigned to the selected remote control ID 4 Content name Displays the content name displayed in the playback screen 5 Playback destination Sets the group for direct playback 6 Playlist edit icon Edits the registered playlist Editing the playlist to direct play x page 90 7 Duration Enters the direct playback time of the selected playlist 8 Content ID total contents 9 Moves to the nex...

Page 90: ...he playlist of direct play x page 91 4 Click the Save button f f The edited playlist is registered in the SD card Note f f Playlist is shared by schedules Please note that when the playlist used in the timetable of schedule is edited the edited content is also reflected in schedule Deleting the content registered in the playlist of direct play Delete the content registered in the playlist of direc...

Page 91: ... image effect f f The setting of the content in the playlist is changed f f The Effect can be set only for the still image content f f Return to the Playlist edit screen and click the Save button then the edited playlist is registered in the SD card Duplicating the playlist of direct play Duplicate the playlist to direct play 1 Click the Direct play menu on the top menu screen f f The Remote contr...

Page 92: ...mode f f Click the Cancel button to exit the deletion mode 3 Select the playlist to delete f f Multiple playlists can be selected f f To cancel the selection remove the check mark of the selected playlist 4 Click the Delete button 5 When the confirmation screen is displayed click the OK button f f The selected playlist is deleted from the SD card Note f f If the playlist to be deleted is assigned ...

Page 93: ... 1 Click the Direct play menu on the top menu screen f f The Remote control ID assignment screen is displayed 2 Select the playlist and register its ID to the remote control ID assignment f f Drag and drop the playlist ID to the remote control ID that is to be registered in the remote control ID assignment list 3 Click the Save button 4 When the confirmation screen is displayed click the OK button...

Page 94: ...ntrol ID to delete the assignment f f The selected remote control ID is displayed with check mark f f Multiple remote control IDs can be selected f f To cancel the selection remove the check mark of the selected remote control ID 4 Click the Delete button 5 When the confirmation screen is displayed click the OK button 6 Click the Save button f f The playlist assigned to the selected remote control...

Page 95: ...ote control ID to which the playlist to check is assigned f f The Assigned playlist screen is displayed f f The playlist can be duplicated by clicking on the Assigned playlist screen For details about the duplication operation refer to Duplicating the playlist of direct play x page 91 f f The playlist can be edited by clicking on the Assigned playlist screen For details about the editing operation...

Page 96: ...ssignment screen f f The top menu screen is displayed 2 Download the created playlist as the backup data f f For the backup procedure see Obtaining the backup of a schedule x page 71 f f For the target data select All schedules 3 Log out from the Content Manager of the projector f f For the log out procedure see Logging out from the Content Manager x page 11 4 Log in to the Content Manager of the ...

Page 97: ...Playback destination f f Group is the unit that simultaneously perform the playback using the multiple direct play function on multiple projectors connected to the network within the same segment f f About the group set at Playback destination refer to The playback image of multiple direct play x page 98 6 Click the Save button f f The set Group settings is registered in the SD card 7 Click the Pl...

Page 98: ... performed the projectors of the specified group start playing back r rWhen the Playback destination is set to All for playback Smartphone or computer Play the content on all projectors connected to the network within the same segment ABC ABC ABC ABC ABC ABC ABC Group image Group 1 Group 5 All Set to All Or r rWhen the Playback destination is set to Group 5 for playback Smartphone or computer ABC ...

Page 99: ... Click the Direct play menu on the top menu screen f f The Remote control ID assignment screen is displayed f f When it is operated on smartphone the Direct play screen is displayed Proceed to step 3 2 Click the Direct play button f f The Direct play screen is displayed 3 Click the Stop button f f The current direct playback is stopped Note f f The operation history remains on the Operation page e...

Page 100: ...owser f f xxx xxx xxx xxx is the IP address set in the projector f f The login screen is displayed 3 Click Login 4 Enter the user name and the password f f The factory default setting of the user name is user1 user rights admin1 administrator rights and the password is panasonic lower case 5 Click the OK button f f When logging in to the Content Manager by entering the default user name and passwo...

Page 101: ... If logging in from the client computer other than the smartphone click the Schedule menu on the top menu screen Click the Interrupt button on the Operation page the Interrupt play screen is displayed For details of the Operation page refer to x page 34 ...

Page 102: ...ent screen is displayed Operation method of the multiple direct play x page 87 2 Interrupt menu Interrupts the schedule or slideshow during playback and performs the playback of contents 3 Schedule menu Performs the creation and editing of a schedule Creating a new schedule or editing of previously created schedule can be performed Operation method of the schedule x page 33 4 Slideshow menu Perfor...

Page 103: ...l input content is displayed as an icon The contents being played in the slideshow are not displayed 5 Interruption schedule Displays registered interruption schedules 6 Operation button Click this to display the operational information page 7 Stop button Click this to stop interruption playback x page 109 8 Interruption schedule registration icon Register a new interruption schedule x page 106 9 ...

Page 104: ... Interrupted still image content being selected Displays the selected still image content 8 Return button Click this to return to the Interruption play screen 9 Use newly registered content button Click this to register the interruption playback that is the new still image 10 Specify Start time and End time button Click this to determine whether to set the time to start and end the interruption pl...

Page 105: ... existing registered content interrupting the signage playback schedule slideshow 1 Click the Interrupt menu on the top menu screen f f The Interrupt play screen is displayed f f If logging in from the client computer other than the smartphone click the Schedule on the top menu screen Click the Interrupt button on the Operation page the Interrupt play screen is displayed 2 Click f f The Interrupt ...

Page 106: ...red contents are limited to the still image content and the movie content f f After interruption playback the interruption schedule remains registered When Time of change of day x page 38 set in the System setting page has passed it is deleted from the interruption schedule f f If the current interruption is in played back or scheduled it is deleted and the new interruption is registered f f When ...

Page 107: ...or interruption f f If the check box of Specify Start time and End time button is marked you can enter the Start time and the End time 6 Click the Save button f f The interruption is registered in the SD card f f The selected still image content is registered in the SD card f f If the check box is not marked the interrupt playback will be started just after registering the interruption playback If...

Page 108: ...e Schedule menu on the top menu screen Click the Interrupt button on the Operation page the Interrupt play screen is displayed 2 Click f f The mode changes to deletion mode f f Click the Cancel button to exit the deletion mode 3 Click the Delete button 4 When the confirmation screen is displayed click the OK button f f The selected interruption schedule is deleted Note f f Even if the interruption...

Page 109: ... is no longer necessary during the interruption playback 1 Click the Interrupt menu on the top menu screen f f The Interrupt play screen is displayed f f If logging in from the client computer other than the smartphone click the Schedule menu on the top menu screen Click the Interrupt button on the Operation page the Interrupt play screen is displayed 2 Click the Stop button during the current int...

Page 110: ...ANDBY MODE of the projector is set to ECO or NETWORK and the projector is in standby status the Content Manager cannot be accessed Turn on the projector or change the STANDBY MODE setting of the projector to NORMAL and try again to access to the Content Manager For details about the STANDBY MODE setting refer to Operating Instructions Functional Manual r rCannot register content f f The still imag...

Page 111: ... Cisco in the United States and other countries and used under licence f f Google Google Chrome and Android are trademarks or registered trademarks of Google Inc The trademarks and product trademarks for various companies are fully respected even if they are not mentioned Please note that the and TM symbols are not specified in this manual Caution f f Unauthorized use or reproduction of part or al...

Page 112: ...Panasonic Corporation Web Site http panasonic net avc projector Panasonic Corporation 2016 M1016JG1116 ST ...

Reviews: