background image

Configuring the Printer Driver Settings

36

Windows 2000 (Administrator)

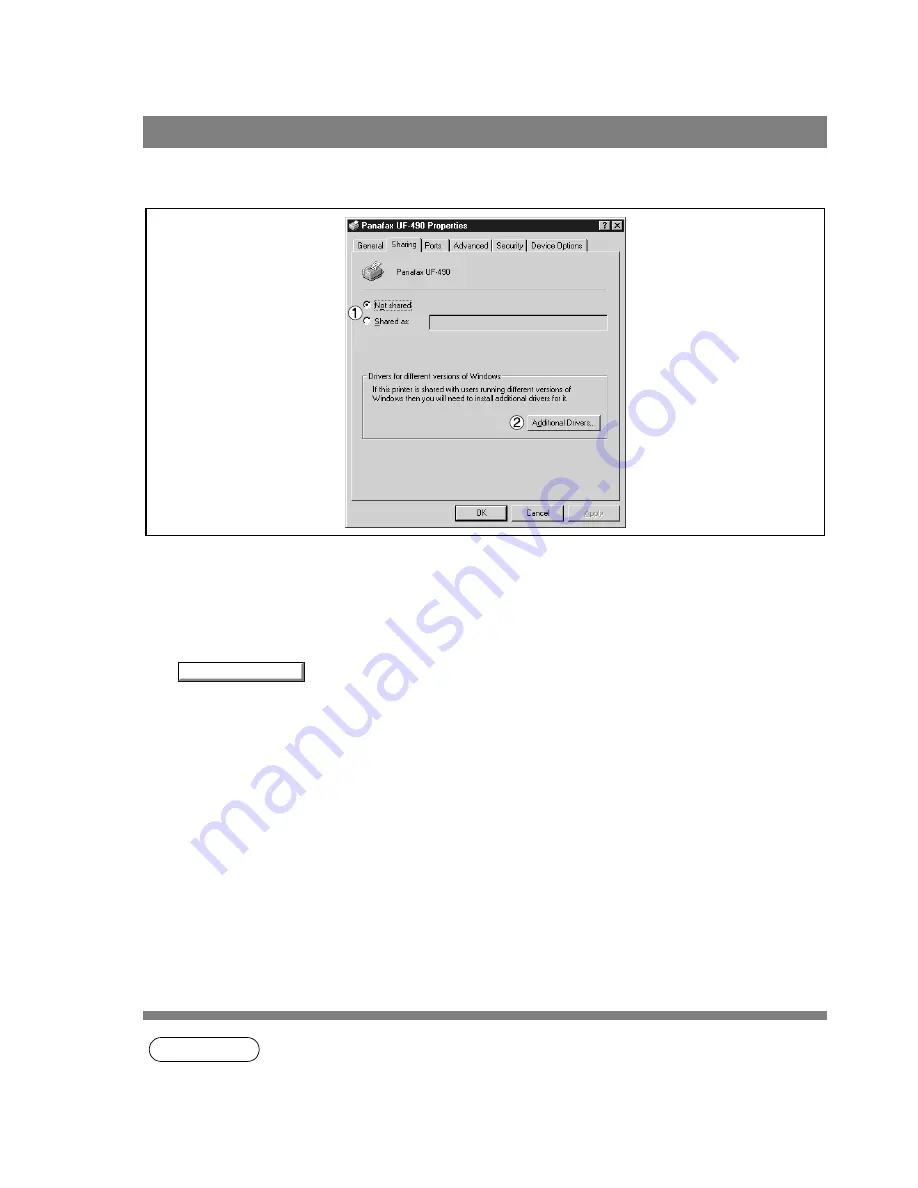
Sharing Tab

1. Not Shared/Shared As

Specify if this printer is displayed or used on a computer of other users.

For sharing a printer, specify the share name of a printer to be shared. A name specified here appears
when other users view the printer information on a network

2.

 button

Install additional printer drivers on the system.

When users running different versions of Windows share a printer, installing additional drivers avoids the
necessity for installing new drivers on their systems.

NOTE

1. If a printer is shared on a network, installing the printer driver on one print server allows other

computers to copy the driver automatically for use. Accordingly, a print server is required to
provide alternative printer drivers for other OS’s that may use the printer.

Additional Drivers...

Summary of Contents for Panafax UF-490

Page 1: ...ely and keep these operating instructions for future reference English Operating Instructions Before Use Printer Section Troubleshooting Class 2 Fax Modem Section Document Management System Section Do...

Page 2: ...F 490 525 590 790 890 990 These models are designed with the Energy Conservation in mind which will automatically goes into the Sleep mode when it is not in use for a period of time The factory defaul...

Page 3: ...Installing the Document Management System 51 Windows 95 98 Me NT 2000 51 Document Manager 56 Main Window 56 Basic Operations 58 Setting Plug in 60 File Menu 61 Edit Menu 66 View Menu 67 Document Menu...

Page 4: ...22 General Description 122 Sending Document 122 Managing the Personal Address Book 127 Receiving Document 131 Cover Sheet 132 Tool Bar 135 Setup Menu 136 Configuration Menu 138 Client and Server Setti...

Page 5: ...is connected 4 Consult the dealer or an experienced radio TV technician for help Warning To assure continued compliance use only shielded interface cable when connecting the facsimile machine paralle...

Page 6: ...Parallel Interface Connector Connect to the PC Parallel Interface Cable A cable does not come with the unit Use a cable of IEEE1284 specifications with a maximum length of 20 ft 6m Consult a service p...

Page 7: ...Use Parallel Interface Connector Connect to the PC Parallel Interface Cable A cable does not come with the unit Use a cable of IEEE1284 specifications with a maximum length of 20 ft 6m Consult a serv...

Page 8: ...Parallel Interface Connector Connect to the PC Parallel Interface Cable A cable does not come with the unit Use a cable of IEEE1284 specifications with a maximum length of 20 ft 6m Consult a service p...

Page 9: ...indows 95 98 Me NT 2000 1 Insert the Panasonic Document Management System CD ROM 2 Select your desired language 3 Click on the button 4 Click Printer Driver Note The Fax Gateway and Firmware Update Ut...

Page 10: ...Printer Driver 6 Select your machine s model s and click the button 7 Click the button if you would like to change your current default printer to the one that you are installing 8 Select your new def...

Page 11: ...nter icon s are added to the Printer folder NOTE 1 When installing on Windows NT 4 0 and Windows 2000 log onto the computer network with an account rights of Administrator 9 The required files are cop...

Page 12: ...s in the print dialog box of an application 2 Management tab of the color of property dialog box is not used for the UF 490 525 590 790 890 990 3 Sharing Tab in property dialog box is not displayed un...

Page 13: ...computer when sharing the printer the comment specified here will also appear on that computer However the comment displayed for an already set up user will remain unchanged even if the comment is mo...

Page 14: ...4 Timeout settings Not selected Specify the amount of time in seconds allowed to elapse before the printer becomes online If the printer is not online within this duration an error message will be di...

Page 15: ...plication Note Spooling by EMF format metafile compression may cause the following problems on some application software 1 Printing result is different from the screen display 2 Printing requires exce...

Page 16: ...hen other users view information about the printer on the network 3 Comment You can enter comment regarding a shared printer such as the type of printer and the location where it is installed When oth...

Page 17: ...one copy here and specify the number of copies in the Print dialog box of the application 5 Zoom 50 200 Specify an enlargement or reduction percentage when printing documents If enlargement reduction...

Page 18: ...ws 95 98 Me Handling Tab 1 Sorter Select whether to Stack or Sort when printing multiple copies 2 Output Order Specify the output order Ascending Descending 3 button Return all items in the Handling T...

Page 19: ...Art Use when printing originals containing line drawings or text 2 Resolution Select the printer resolution 300dpi 600dpi 3 Density Adjust the printing density Contrast and Brightness as desired 4 but...

Page 20: ...ct the number of available paper trays for the printer if an optional Paper Feed Module is installed 2 button Displays the version information about the printer driver NOTE 1 Device Options Tab is spe...

Page 21: ...operties to be specified by an administrator system manager 2 See Configuring the Printer Driver Settings User for details of user properties See page 29 Windows NT 4 0 Administrator 1 Log onto the co...

Page 22: ...e Specify the printer being used or a printer model that can be emulated with the printer being used 4 button Updates or modifies the printer driver 5 button This feature is not available on your mach...

Page 23: ...ion data and status data from computer Be sure to check this checkbox when installing status monitor See page 102 Printing may be disabled without checking on the checkbox 5 Enable printer pooling Pri...

Page 24: ...sent from the application to the printer 4 Hold mismatched documents The spooler compares document settings against printer settings and holds printing of a document if its settings Paper Size Orienta...

Page 25: ...me specified at this time will be displayed when other users view information about the printer on the network 3 Alternate Drivers Specify the operating systems of other computers that might share thi...

Page 26: ...ges 2 button Displays the persons who used this printer and how they used 3 button Set the ownership of the printer NOTE 1 In order to utilize these features you need to have selected Audit from User...

Page 27: ...lect it according to the details of data and your preference Halftone Pattern Select the pixel size to be used for halftones The greater the value the coarser the image would become However a larger v...

Page 28: ...resolution Luminance CIE Y Adjust the luminosity of the print image 3 button Displays the version information about the printer driver NOTE 1 Device Option Tab specifies device specific settings and s...

Page 29: ...cribes properties to be specified by a user upon executing a print operation on an application See Configuring the Printer Driver Settings Administrator for details of administrator properties See pag...

Page 30: ...log box of the application 4 Zoom 50 200 Specify custom zoom when printing a document by zooming in out at a desired rate If the zooming rate is specifiable in an application specify 100 same size her...

Page 31: ...User Printer Section Handling Tab 1 Sorter Select whether to Stack or Sort when printing multiple copies 2 Output Order Specify the output order Ascending Descending 3 button Return all items in the H...

Page 32: ...resolution 300dpi 600dpi 2 button Contrast Adjust the contrast of print images Brightness Adjust the brightness of print images Dark Picture Select this option in order to print dark images brighter N...

Page 33: ...ef value will intensify the contrast of the image but reduces the range of colors in between Picture Select a test pattern type Selecting the View check box will display halftone adjustment results in...

Page 34: ...s to be specified by an administrator system manager See Configuring the Printer Driver Settings for details of user properties See page 43 Windows 2000 Administrator 1 Log onto the computer network w...

Page 35: ...hen another user sets up this printer on his her computer After completion of setup however changing this comment does not update the location and comment appearing on users PCs 3 Model Model name of...

Page 36: ...on a network 2 button Install additional printer drivers on the system When users running different versions of Windows share a printer installing additional drivers avoids the necessity for installi...

Page 37: ...data from computer Be sure to check this checkbox when installing status monitor See page 102 Printing may be disabled without checking on the checkbox 5 Enable printer pooling Printer spool allows o...

Page 38: ...g a document from the program to the printer 6 Hold mismatched documents The spooler compares document settings against printer settings and holds printing of a document if its settings Paper Size Ori...

Page 39: ...r users Refer to Configuring the Printer Driver Settings for detailed settings See page 43 11 button Specify a print processor and data type to be used for printing The processor and data type define...

Page 40: ...isplayed Check the checkbox for permitting or prohibiting access Gray checkbox indicates inheritance of access permission 1 button Add or delete a user or group in the list 2 button Specify access to...

Page 41: ...e settings according to printing data and preference Halftone Pattern Select the pixel size to be used for halftones The greater the value the coarser the image would become However a larger value is...

Page 42: ...resolution Luminance CIE Y Adjust the luminosity of the print image 3 button Displays the version information about the printer driver NOTE 1 Device Options Tab specifies device specific settings and...

Page 43: ...s properties to be specified by a user upon executing a print operation on an application See Settings Printer Driver on Windows 2000 Administrator for details of administrator system manager properti...

Page 44: ...of the application 4 Zoom 50 200 Specify an enlargement or reduction percentage when printing documents If enlargement reduction can be set within the application indicate 100 here and specify the en...

Page 45: ...ser Printer Section Handling Tab 1 Sorter Select whether to Stack or Sort when printing multiple copies 2 Output Order Specify the output order Ascending Descending 3 button Return all items in the Ha...

Page 46: ...printer resolution 300dpi 600dpi 2 button Contrast Adjust the contrast of print images Brightness Adjust the brightness of print images Dark Picture Select this option to print dark images brighter Ne...

Page 47: ...ef value will intensify the contrast of the image but reduces the range of colors in between Picture Select a test pattern type Checking the View check box will display halftone adjustment results in...

Page 48: ...er selecting the print range to be printed and the number of copies click on to start printing While documents are being printed a printer icon appears on the System Tray near the clock on the bottom...

Page 49: ...s users guide for connection among computers 2 On Windows 95 98 Me a computer connected to a printer must have been set up to allow printer sharing by the following operations 1 Double click on the Ne...

Page 50: ...rinter server 1 Click the Start button point to Settings and then click Printers 2 Double click Add Printer in the printers folder Add Printer Wizard appears Click on the button 3 Select Network Print...

Page 51: ...System Windows 95 98 Me NT 2000 1 Insert the Panasonic Document Management System CD ROM 2 Click on the desired the language 3 Click on the button 4 Click Panasonic DMS Note The Fax Gateway and Firmwa...

Page 52: ...s 95 98 Me NT 2000 6 Verify the installation destination and click the button 7 Select your machine s model s and click the Add button Then click the button 8 Click the Typical button 9 Enter the prog...

Page 53: ...0 Document Management System Section 10 The required files are copied 11 Windows 95 98 NT only Click on the button 12 When the setup process is completed a message is displayed prompting you to restar...

Page 54: ...nd the installation is completed 13 Windows 95 98 NT only Check Yes I accept and Click on the button Note 1 After rebooting your PC the Microsoft Data Access Components is also automatically installed...

Page 55: ...Desktop See page 122 MFP Utilities Status Monitor Device status monitor See page 102 Configuration Editor See page 107 Phone Book Editor See page 113 3 By installing this software the system selects L...

Page 56: ...Document Manager 1 Title Bar Displays the title of a screen 2 Menu Bar Displays the menu of the Document Manager 3 Tool Bar Displays the tool buttons of the Document Manager Tool buttons correspond t...

Page 57: ...number and and buttons are displayed at the bottom of a thumbnail image for grouped documents configured with two or more pages Image data files A thumbnail image of the document is displayed Applica...

Page 58: ...llows selection of documents Dragging a mouse cursor on the screen or clicking with the Shift key held down allows selecting two or more documents at one time Editing documents Double clicking thumbna...

Page 59: ...d dropping it onto another document in a document folder results in grouping the two documents together Dragging a document and dropping onto a link icon activates an application corresponding to the...

Page 60: ...ottom of the window activates an application specified for the link icon and opens the image file The link icons can be Added Removed freely by selecting Launch to Another Application External Applica...

Page 61: ...reate a new shared folder Documents in shared folder can be shared through a network from different computers Released Shared Folder Released a shared folder Documents in shared folder will be release...

Page 62: ...nner Properties Display the file properties Backup Backs up the documents stored in the selected folder Acquire Image Using a scanner etc selected in Select Source import a document to a folder that i...

Page 63: ...92 for details of annotation Print Print a document selected in the document window Print Setup Specify layout and printing size for a document to be printed 1 Horizontal Position and Vertical Positio...

Page 64: ...pplication Clicking the Add button displays a dialog box to Add External Application 1 Name If an external application is specified the name in this field appears on a link icon 2 Application Type Spe...

Page 65: ...ny files Selecting documents and clicking the button restores documents that have been discarded Click the button to delete the selected document Empty Trash Can Deletes the files in the Trash Can If...

Page 66: ...to the clipboard Copy Copy a selected document onto the clipboard Paste Paste a document from the clipboard onto a selected folder Delete Delete a selected document from a folder to the Trash Can A c...

Page 67: ...ist Format Thumbnail Format Switch between list display and thumbnail display in the document window Arrange Folders Sort the document folders by name or date Arrange Document Sort the documents in th...

Page 68: ...Rotate the selected document Rotate Right Rotate 180 Degrees Rotate Left Group Makes a group of two or more selected documents The grouped documents are indicated by page number and and buttons at the...

Page 69: ...lly correct it Enhance Edge Enhance edge border of image Eliminate Noise Remove noise on a document Reverse Gradation Display image in reverse Page Select pages to be displayed in thumbnail among grou...

Page 70: ...rinters 2 Right click on Panasonic Document Manager and select Properties from the dropdown menu The Properties dialog box appears 3 Click on the button to save the settings and close the Properties d...

Page 71: ...s dialog box appears 3 Click on the button to return to the Printers folder Windows NT 4 0 Page Setup Tab Paper Size Sets the document paper size Orientation Sets the document orientation Color Appear...

Page 72: ...select Printing Preferences from the dropdown menu The Printing Defaults dialog box appears 3 Click on the button to return to the Printers folder Windows 2000 Layout tab Sets the document orientatio...

Page 73: ...h as photographs and produces smooth images The method although requiring somewhat large file sizes produces high quality images in comparison to the dither method Halftone image 4x4 8x8 dot dither Th...

Page 74: ...rightness for halftone or grayscale documents 8 Contrast valid only when halftone or grayscale is selected Adjust the contrast difference between dark and light for halftone or grayscale documents 9 I...

Page 75: ...entering a value Moving the slide bar in the direction reduces the difference between the highlight light portion and halftone Moving the slide bar in the direction reduces the difference between the...

Page 76: ...lftone or grayscale is selected Adjust the highlight and shadow by dragging the slide bar or entering a value Enhancing the highlight bright portion and the shadow dark portion makes clear shades on a...

Page 77: ...and click the button A preview scanned image is displayed in the preview window 5 Apply the following adjustments on the preview image Drag the scanning frame black frame on the preview window to spe...

Page 78: ...canning image with the view on preview image Preview scanning can be repeated any number of times 2 Image scanning is only possible by the PC that the device is connected to directly through the paral...

Page 79: ...gram provides various editing capabilities for documents with a wide selection of annotation functions Double clicking on the document thumbnail in the Document Manager screen or selecting Open in the...

Page 80: ...s the pages of the documents as thumbnails reduced image 5 Size Bar Adjusts the scaling of the display on the image window 6 Link Icon Dragging and dropping a document on a link icon activates the app...

Page 81: ...f the pages Image Editing The image displayed in the image window is edited with the menu below Edit menu Editing operations such as cutting copying pasting annotations added to an image Page Adjust P...

Page 82: ...cs and texts onto an image Annotations and the original image are displayed as one image Annotations are managed separately from image data Therefore the Document Viewer can switch between displaying...

Page 83: ...ument is saved as an ordinary image file under a specified name All page s Save all pages in the document Select page Save only the selected page Specified area Save only the portion specified in the...

Page 84: ...cument containing two or more pages pages from to can be specified for printing Print Setup Specify the layout printing size and printing of annotations for a document to be printed 1 Vertical positio...

Page 85: ...ging deleting the application Clicking the Add button displays a dialog box to Add External Application 1 Name If an external application is specified the name in this field appears on a link icon 2 A...

Page 86: ...sh Can and displays any pages Selecting page and clicking the button restores page that has been discarded Empty Trash Can Deletes the pages in the Trash Can If the page is emptied from the Trash Can...

Page 87: ...ration done Cut Delete a selected annotation from a folder and copy it to the clipboard Copy Copy a selected annotation onto the clipboard Paste Paste an annotation from the clipboard onto a selected...

Page 88: ...Page Width Fits the display to the page width Fits to Page Height Fits the display to the page height Full Page Fits the display to the page full size Original Size Returns the display to the origina...

Page 89: ...utomatically step through pages backwards Stop Stop automatic page advance Set up Set automatic page advance Move page Moves pages to the desired position Next page Move the current page to be posteri...

Page 90: ...e at the current position Replace Page Replace the current page with a new one Rotate Page Rotate Right Rotate the page 90 degrees clockwise Rotate 180 Degrees Rotate the page 180 degrees Rotate Left...

Page 91: ...Viewer 91 Page Menu Document Management System Section Copy Page to Clipboard Copy the entire page selected onto the clipboard Copy Select Area Copy Select Area To Clipboard Select All Pages Select A...

Page 92: ...ngle Creates a rectangular annotation and paste it to a page Ellipse Creates an ellipse annotation and paste it to a page White Block Creates a white rectangular solidly white painted rectangle annota...

Page 93: ...s by right clicking on a drawn text 2 For specifying the thickness and color of a line select a drawn line and then select Properties in the Annotation menu See page 92 Graphics Format Setup dialog bo...

Page 94: ...ox for text setup will appear Enter the text to display and then specify text color and font Line Creates a line annotation Select line annotation in the annotation menu or tool button and drag the mo...

Page 95: ...up menu that appears by right clicking on a drawn figure 2 For specifying the thickness and colors of the ellipse select the drawn ellipse and select Properties in the Annotation menu See page 92 The...

Page 96: ...d select Properties in Annotation menu See page 92 The Graphic Format Setup dialog box can be displayed also by selecting Properties in the pop up menu that appears by right clicking on a drawn figure...

Page 97: ...lect Properties in the Annotation menu See page 92 The Graphic Format Setup dialog box can be displayed also by selecting Properties in the pop up menu that appears by right clicking on a drawn label...

Page 98: ...a stamp Select the stamp annotation in the annotation menu or tool button and click the button Then drag the mouse in the image window to specify the area displaying the stamp dialog box Click the but...

Page 99: ...date annotation Select the date annotation in the annotation menu or tool button and drag the mouse in the image window to specify the area displaying the Properties dialog box Specify the format col...

Page 100: ...to be displayed 1 Font Name Specify the font here 2 Style Specify the font style 3 Size Specify the font size 4 Text Color Select the text color here 5 Text Align Specify the text alignment Opens the...

Page 101: ...de main toolbar Page Tool Bar Show hide page toolbar Annotation Tool Bar Show hide page adjustment toolbar Image Tool Bar Show hide page adjustment toolbar Status Bar Show hide statusbar Page List Sho...

Page 102: ...ected when starting Windows the error message shown above appears Verify the power source and parallel cable and then press the button 2 Connecting the device to a network server disables the status m...

Page 103: ...us Monitor Displays details about the current status of the device 3 Pop up when error occurs Selects whether or not a pop up error message box appears when an error occurs on the connected device Whe...

Page 104: ...ce If two or more items have been detected clicking buttons allows viewing all items 3 Control Panel Display Displays information as appear on the panel of the device If two or more items have been de...

Page 105: ...stem Section Configuration Tab 1 Model Displays the name and number of a connected device 2 Configuration Display a list with the current device configuration optional devices etc 3 Status Displays th...

Page 106: ...displays the type size and if there is any paper loaded in the paper tray A comment by the user can be entered freely in the Paper Type field NOTE 1 Changing the types of loaded paper does not change...

Page 107: ...display the configuration editor dialog box Each setting category appears as a folder on the left frame and the setting item appears on the right frame Main Window If the device is turned Off or not c...

Page 108: ...the Configuration Edit utility If the data has not been sent after being modified on the screen a confirmation message for sending the data is displayed NOTE 1 Only settings in the setting folder that...

Page 109: ...Configuration Editor 109 Document Management System Section Specify the originating party name and telephone number etc to be registered on the device for fax communications User Parameters Folder...

Page 110: ...Configuration Editor 110 Display or change the Fax Parameter Settings NOTE 1 The contents of the Fax Parameter differs depending on the model Fax Parameters Folder...

Page 111: ...Configuration Editor 111 Document Management System Section Display the Fax communication journal Journal Folder...

Page 112: ...Configuration Editor 112 When the Phonebook Folder is selected the Phone Book Editor utility will be started Phone Book Setting Shortcut Activation Folder...

Page 113: ...connected PC Retrieve Write Retrieve fax numbers in main unit to the PC or send fax numbers from the PC to the main unit Page 117 Open Save File Open or save fax numbers stored the PC Page 118 Insert...

Page 114: ...ation Procedure Click Start at the bottom left of the PC screen Select Programs Select Panasonic Select Panasonic Document Management System Select MFP Utilities Select Phone Book Editor Phone Book Ed...

Page 115: ...ted Dialing Number Telephone No Telephone number Up to 36 digits Station Name Station name Up to 15 characters Retrieve Retrieve phonebook information from the connected Page device Page 117 Write Sen...

Page 116: ...Phonebook Editor 116 Main Window Help Display an on line help screen Exit Close the phonebook editor software ONE TOUCH One Touch Key No Indication Description Reference 13 14 15...

Page 117: ...ers from the PC to main unit Retrieve Write 1 Click Retrieve 2 Click the button 3 A list of fax numbers in the machine is displayed Modify and add destination names and dial numbers on this screen 4 C...

Page 118: ...in the PC again Open Save File 1 Click Open File 2 Click the button 3 The File Open dialog box appears 1 Select a file from the list e g UF 790 pb 2 Click the button 4 The phonebook information store...

Page 119: ...ment System Section 5 Click Save File after the editing is completed 6 Click the button The phonebook information is saved in the PC 7 For Save File 1 Select an existing file from the list or enter a...

Page 120: ...diting the phonebook The steps for inserting lines is as follows Insert Entry 1 Ex Insert a line between the 2nd and 3rd lines Click the portion indicated as 2 Click Insert Entry A line is inserted as...

Page 121: ...t System Section The steps for deleting lines is as follows Delete Entry 1 Ex Delete the 3rd line Click the portion indicated as 2 Click Delete Entry The screen shown on the left appears Click The lin...

Page 122: ...copy locally before faxing it Note UF 890 990 is not available with this feature Sending a Document via Windows Application You can send a fax directly from any Windows Application by simply printing...

Page 123: ...ton to return to the Panafax Desktop window 4 From the Panafax Desktop window enter the recipient s Fax No Name and Company or select from your Personal Address Book Click the button to register the r...

Page 124: ...Panafax Desktop 124 Sending Document 6 Click on the button to start the transmission OK...

Page 125: ...Desktop main window Click on the Open File button to select a file for the transmission Note You may also attach the file by printing to the Panafax Desktop Driver from any Windows application as desc...

Page 126: ...ent 4 Click on the Personal Address Book tab and select the recipient s from the list Clock on the button to register the recipient s to the recipient list Then click the Send button 5 Click on the bu...

Page 127: ...al Address Book button to open the Phone Book dialog box 2 Click on the button 3 Contact Tab Name Enter the recipient s name Fax No Enter the fax number Call Type Select how the call should be dialed...

Page 128: ...h Abbreviated Dialing Numbers registered in the your machine are automatically uploaded in the Personal Address Book when activating the Panafax Desktop if the machine is corrected to your PC 5 Click...

Page 129: ...group of recipients follow the steps below Managing the Personal Address Book 1 Click on the Personal Address Book button to open the Phone Book dialog box 2 Click on the button 3 The Group Registrati...

Page 130: ...New Group Name dialog appears Enter the group name and click button 5 Select the desired recipients 6 Click the button to add the recipient s to the Member list To add another group repeat from step...

Page 131: ...tivated when receving a fax Otherwise the received fax cannot be uploaded to your PC even if the Fax Parameter No 63 is set to Upload Print or Upload Receiving Document When a fax is receive on the ma...

Page 132: ...Sets the size of the cover sheet Date Frame Inserts a date field Text Frame Inserts a text box Line Box Inserts a line or box Image Frame Inserts an existing image file bmp file Recipient Details Inse...

Page 133: ...eview of the cover sheet Show Status Bar Display the status bar Zoom Sets the ratio for the cover sheet editing screen Scale unit Sets the scale unit of measure cm inch Options menu Font Specifies the...

Page 134: ...134 Cover Sheet Setting the Usage of the Cover Sheet 1 Click on the Configuration button 2 The Options dialog box appears Show the tab 3 Select the Cover Sheet then set the usage Click the button Cov...

Page 135: ...the resolution and paper size for the transmission Also used to set the Cover sheet usage Open Used to select the file to be send Personal Address Book Used to open your personal address book Setup Us...

Page 136: ...ettings Tab Specify the local and long distance call access number and whether or not to apply it when dialing Sender Details Tab Used to identify yourself with various information on the Cover Sheet...

Page 137: ...tion type and directory folder path of the following components Scheduler Send Log Receive Log For details on setting up Client and Server connection please refer to the section of Client and Server S...

Page 138: ...mission The selectable page sizes are depending on the capability of the machine connected to your PC Resolution Tab Set the resolution to be used for the transmission The selectable resolutions are d...

Page 139: ...Panafax Desktop 139 Configuration Menu Document Management System Section Quality Tab Set the quality to be used for the transmission Others Tab Set the other preferences...

Page 140: ...y Client and Server Setting 1 Install the Panafax Desktop module of the Panasonic DMS on a networked computer to be designated as the Fax Server 2 Double click the Panafax Desktop shortcut icon on the...

Page 141: ...Click and restart the computer 4 After the computer has restarted double click the Panafax Desktop shortcut icon on the Windows Desktop 5 The Panafax Desktop window appears 6 From the Menu bar select...

Page 142: ...on Paper is loaded on the device properly Error message is not displayed on device The above points can be verified by printing a test page Refer to the following for procedures for test page printing...

Page 143: ...ument margin is not sufficient On the machine a margin of approx 5 mm or more is required at the sheet edge Recommended printing margin Adjust the margin correctly Characters and symbols not used in d...

Page 144: ...y that the power of the device is turned on Excessive data volume or number of pages may overflow the device s memory disabling data reception Increase the timeout setting value in properties for tran...

Page 145: ...145 Troublesshooting Appendix Printing Scanning Area Top 0 1 2 5 0 1 2 5 0 1 2 5 Bottom Unit inches mm...

Page 146: ...5 I O DATA3 23 GND 6 I O DATA4 24 GND 7 I O DATA5 25 GND 8 I O DATA6 26 GND 9 I O DATA7 27 GND 10 O nACK 28 GND 11 O BUSY 29 GND 12 O PE 30 GND 13 I SELECT 31 I nNIT 14 O nAUTOFD 32 O nFAULT 15 Not Us...

Page 147: ...High when paper is out SELECT Signal indicating that printer is under online status Printer is capable ofreceiving data when this signal is High nAUTFD Signal used for bi directional communication GN...

Page 148: ...x function software recommended WinFax PRO 10 0 Class 2 Fax Modem Installation Windows 95 98 Me 1 Install the Com Port Redirector component from the Panasonic DMS installation using the Custom install...

Page 149: ...on 4 Windows 98 Me only Click on the button 5 Windows 98 Me only 1 Select No the device isn t in the list 2 Click on the button This screen will only appear if a new device is found 3 Select No I want...

Page 150: ...tallation Windows 95 98 Me 6 1 Select Ports COM LPT 2 Click on the button 7 1 Select Communications Port 2 Click the button 8 1 Enter D English Pdms Setup Where D is your CD ROM drive 2 Click on the b...

Page 151: ...ss 2 Fax Modem 151 Installation Windows 95 98 Me Class 2 Fax Modem Section 10 Click on the button 11 Click the button 12 Click the button and restart the PC 13 Repeat steps from 1 to 3 Next Finish Yes...

Page 152: ...Me 14 Windows 98 Me only 1 Select No the device isn t in the list 2 Click on the button This screen will only appear if a new device is found 3 Select No I want to select the hardware from a list 4 C...

Page 153: ...1 Select Don t detect my modem I will select it from a list 2 Click on the button 1 Click the button 17 1 Enter D English Pdms Setup Where D is your CD ROM drive 2 Click on the button 18 1 Select the...

Page 154: ...Class 2 Fax Modem 154 Installation Windows 95 98 Me 19 1 Select Panasonic MFP Redirected Com Port COM3 COM number depends on the PC 2 Click on the button 20 Click the button Installation of the modem...

Page 155: ...WinFax PRO 10 0 Class 2 Fax Modem Installation Windows NT 4 0 1 Install the Com Port Redirector component from the Panasonic DMS installation using the Custom install if you haven t installed the PDMS...

Page 156: ...ms Setup Where D is your CD ROM drive 2 Click on the button 7 1 Select the Class 2 Fax Modem of your machine 2 Click on the button 8 1 Select the COM port shown at the bottom of the COM ports list 2 C...

Page 157: ...Installing the Panasonic Class 2 Fax Modem 157 Installation Windows NT 4 0 Class 2 Fax Modem Section 10 Close the Modems Properties screen...

Page 158: ...se PC fax function software recommended WinFax PRO 10 0 Class 2 Fax Modem Installation Windows 2000 1 Install the Com Port Redirector component from the Panasonic DMS installation using the Custom ins...

Page 159: ...odem Section 5 1 Select Add Troubleshoot a device 2 Click on the button 6 1 Select Add a new device 2 Click on the button 7 1 Select No I want to select the hardware from a list 2 Click on the button...

Page 160: ...Select Don t detect my modem I will select it from a list 2 Click on the button 10 Click the button 11 1 Enter D English Pdms Setup Where D is your CD ROM drive 2 Click on the button 12 1 Select the C...

Page 161: ...Fax Modem Section 13 1 Select the COM port shown at the bottom of the COM ports list 2 Click on the button 14 1 If a warning message for logo certification appears click the button and continue instal...

Page 162: ...MAGE INCLUDING BUT NOT LIMITED TO DIRECT INDIRECT SPECIAL INCIDENTAL OR CONSEQUENTIAL DAMAGES OR LOSS OF PROFITS SUSTAINED BY THE CUSTOMER IN CONNECTION WITH THE USE OR APPLICATION OF THIS PANASONIC F...

Reviews: