


One Time Setup (continued)
TV Operation
(Picture in Picture, Two Tuners)
(continued)
Timer Programming using VCR Plus+
®
System
TV Operation
(Picture in Picture, Two Tuners)
Display MAIN MENU.
Press ACTION.
Display SET CLOCK
screen.
1) Press
to select
“CLOCK”
2) Press ACTION
to display.
2
End setup.
Press ACTION twice.
• TIME ZONE ADJUST returns
to “0” if clock is set manually.
1
4
Case 1
Set TIME ZONE ADJUST.
Select TIME
ZONE ADJUST.
1) Press
to select.
2) Press to
subtract or add
hour(s) as
necessary.
3
• This unit’s calendar is accurately maintained
up to Dec. 31, 2089, 11:59 PM.
• Channel auto set selects normal TV or
Cable channels depending on your unit
hookup.
Notes
AUTO CLOCK SET
MANUAL
T I ME
E ZO
ZONE
ADJUS
JUST
T : 0
SELECT : KEY
SET : KEY
END : ACT I ON KEY
SET CLOCK
M A I N MENU
VCR
CLOCK
C H
SET : ACT I ON KEY
SELECT : KEY
T V
EX I T
C H
LANGUAGE
Display SET CLOCK
screen.
a
Press ACTION
to exit this
mode.
Set the clock manually.
b
Case 2
Clock Setup is Incomplete
Set the clock manually.
End setup.
Press ACTION twice
(Clock starts.)
c
PUSH ACT I ON TO SET CLOCK
AUTO CLOCK SET
I S I NCOMPLETE
SET : KEY
SELECT : KEY
END : ACT I ON KEY
SET CLOCK
DST : ON
SELE CT MONTH
TH
1 / /
1 / /
:
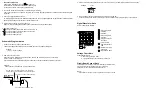
ACTION key on the unit
You can operate the
menu screen using unit
buttons.
To display the menu,
press STOP/EJECT and
REW together with no
tape inserted.
To exit the menu, repeat above with or
without tape inserted.
On Unit
STOP/EJECT
STOP/EJECT
REW/
REW/
ACTION
ACTION
Using
keys
: CH UP
: CH DOWN
: VOLUME UP
: VOLUME DOWN
Whenever the menu or
program screen is
displayed,
CHANNEL UP/DOWN
function as
and
VOLUME UP/DOWN
function as
only.
On Remote
On Unit
VOL
VOL
CH
CH
1) Press
to
select the month.
2) Press to set.
• Likewise set date, year, time,
and DST (Daylight Saving Time.)
To Make Corrections,
repeatedly press
to move
to error, then correct.
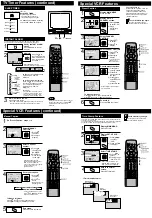
Check list before you begin.
All connections are made.
Your unit is plugged in.
1
Press POWER* on
the remote or unit.
Select a channel.
Use CH
or
NUMBERED
keys.
Adjust volume.
Press VOL
+ -
.
2
3
or
24
0 8
ABC
Basic TV Operation
Main Picture
Picture in Picture (PIP)
A
B
Press PIP.
< Example >
Picture in Picture (PIP) Operation
C
PIP screen is displayed
on the Main Picture
screen.
Return to the normal
screen.
Press PIP.
Select channel / Adjust Volume in PIP mode
In PIP mode, select a channel using CH
or NUMBERED keys and
adjust the volume using VOL + - for the Main Picture only. To adjust the
PIP, you must first press SWAP to switch it to the Main Picture.
CH 0 8
P I P CH 1 0
Main Picture CH
Position
PIP CH
Position
You can view two pictures simultaneously using two tuners and
picture in picture (PIP) display function.
Display Picture in Picture (PIP) screen
• PIP is not available in FM mode, while
V-Chip control is active, while a LINE input
has no signal, or while a blue-back (PROG,
ACTION, MENU) screen is displayed.
• PIP position and size you set will be retained.
• The MOVE and SWAP buttons are
inoperative when PIP screen is off.
Notes
Set PIP.
VIDEO IN
VIDEO IN
L-AUDIO IN-R
L-AUDIO IN-R
POWER
POWER
VOL
VOL
CH
CH
STOP/EJECT
STOP/EJECT REW/
REW/
PLAY/REPEAT
PLAY/REPEAT FF/
FF/
REC
REC
TIMER/FM
TIMER/FM
ACTION
ACTION
REC
REC ON TIMER
ON TIMER PROG TIMER
PROG TIMER
3
2
1
1
Display MAIN MENU.
Press ACTION.
Display SET UP TV screen.
1) Press
to select “TV.”
2) Press ACTION
to display.
2
M A I N MENU
T V
VCR
EX I T
CLOCK
C H
LANGUAGE
SET : ACT I ON KEY
SELECT : KEY
You can choose “NORMAL” or “SMALL” PIP size.
3
Select PIP SIZE .
1) Press
to
select
“PIP SIZE.”
2) Press to set
“NORMAL” or
“SMALL.”
SELECT : KEY
SET : KEY
END : ACT I ON KEY
SET UP TV
PIP SIZE
PIP SIZE
:
: NORMAL
NORMAL
LOCK
CAPT I ON
I NPUT SELECT : TUNER
V I DEO ADJUST
SET UP FM
SPEAKER : ON
Picture in Picture (PIP) SIZE Setup
4
End setup.
Press ACTION twice.
Move screen
SWAP Picture
FREEZE Picture into PIP
You can create a freeze frame PIP of the Main
Picture.
You can switch the PIP and Main Picture source.
You can move the PIP screen to four positions.
Select PIP position.
Press MOVE repeatedly to
select PIP position.
Initial Position
Swap the Picture source.
Press SWAP.
Freeze the
Main Picture.
Press FREEZE.
Still Picture
• A freeze frame PIP reverts to a normal (moving)
picture when the PIP and the Main Picture are
swapped.
• The FREEZE function works the same way
during playback.
Change PIP back
to a moving
picture.
Press FREEZE.
Notes
• With PIP displayed, each press of FREEZE will
freeze and unfreeze the PIP.
To remove PIP, press the PIP button.
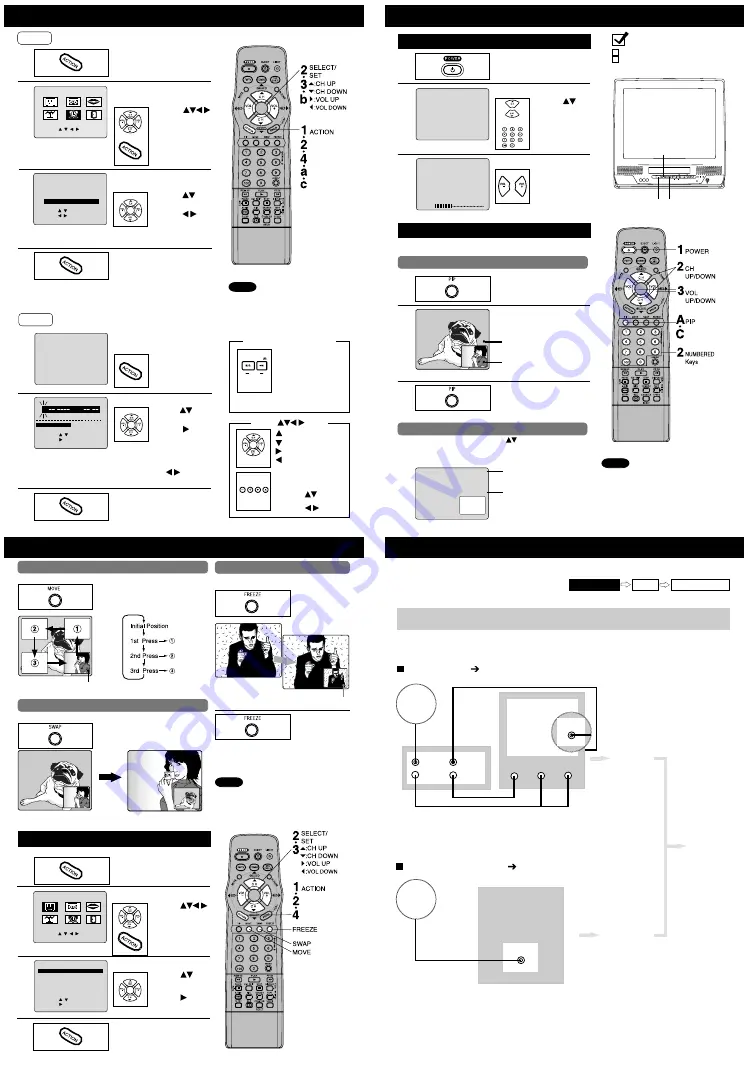
Process of Recording
Connection
Setup Programming
VCR Plus+ System is...
a feature that allows you to set most items of a
Timer Recording by simply entering a special
code number (PlusCode) found in TV GUIDE
and selected newspaper TV listings.
Choose your connection type from the following diagrams
CABLE BOX
UNIT
ANTENNA or CABLE
UNIT
Antenna
or
CABLE
UNIT
VHF/UHF
Set up on
VCR Plus+
Channel Setup
Section
Programming
on VCR Plus+
Programming
Section
Antenna
or
CABLE
OUT
IN
VIDEO
AUDIO
Cable Box
VIDEO IN
VHF/UHF
Rear
L-AUDIO IN-R
Set up on
Cable Box
Setup
Section
UNIT
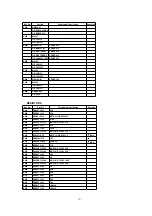
Summary of Contents for OmniVision PV-C2780-K
Page 8: ...Fig 1 3 Fig 1 4 8 ...
Page 26: ...Fig D5 6 1 2 1 Notes in chart 26 ...
Page 29: ...6 2 2 Inner Parts Location Fig J1 1 29 ...
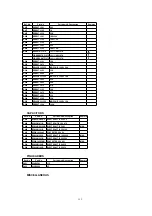
Page 30: ...6 2 3 EJECT Position Confirmation Fig J1 2 30 ...
Page 31: ...6 2 4 Grounding Plate Unit Full Erase Head and Cylinder Unit Fig J2 1 31 ...
Page 44: ...6 3 CASSETTE UP ASS Y SECTION 6 3 1 Top Plate Wiper Arm Unit and Holder Unit Fig K1 1 44 ...
Page 81: ...81 ...
Page 85: ...11 2 MECHANISM BOTTOM SECTION 85 ...
Page 86: ...11 3 CASSETTE UP COMPARTMENT SECTION 86 ...
Page 87: ...11 4 CHASSIS FRAME SECTION 1 87 ...
Page 88: ...11 5 CHASSIS FRAME SECTION 2 88 ...
Page 89: ...11 6 PACKING PARTS AND ACCESSORIES SECTION 89 ...


