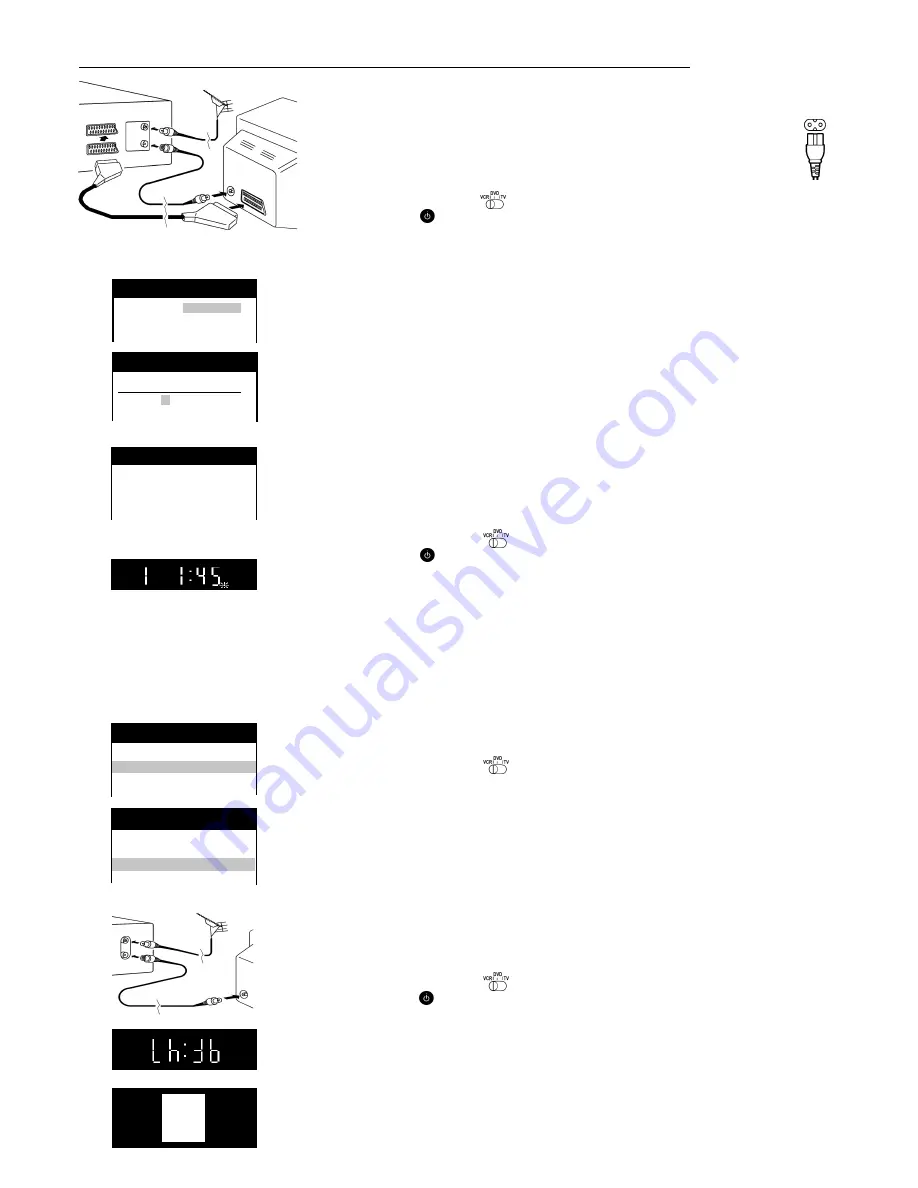
background image

3

VCR / DVD

  Aerial

(not supplied)

21-pin scart lead

(not supplied)

RF coaxial lead

(supplied)

AV1

RF IN

RF OUT

AC mains lead

(supplied)

Setting up

VCR

Ch:36

On Screen Display


VCR display

TV

VCR / DVD

RF Coaxial lead 

(supplied)

TV

(not supplied)

Set up the connections shown here and connect the mains lead (supplied) to your AC IN.

The RF (radio frequency) coaxial lead must be connected for TV reception,
even if the video recorder is already connected with a 21-pin scart lead.

For more information about the remote control buttons and cursors see pages 4-5.

Manual download start

Set the AV channel of the TV.

Set the remote control to VCR  

.

Press 

|MENU|

Select [Tuning] 

Access by pressing 

|ENTER|

Select [Download]

Press 

|ENTER|

Confirm by pressing 

|ENTER|

When the channel indication stops flashing on the VCR display, the downloading is complete.

AC  IN~

On Screen Display

Automatic Setting without Q Link

Set the remote control to VCR 

Switch on the unit


 and the [Country] setting menu will appear.

Use the cursors 


 on the remote control to select your country.

After pressing

 |ENTER|

, all the TV stations which can be received will be tuned automatically in about 5 minutes.

If the menu  [Clock setting] appears, use the cursors 


 or the numeric buttons

on the remote control to set the Time and Date manually.

To end this procedure, press 

 |ENTER|

.

To cancel this settings press 

 |EXIT|

.

Note: 

If the selection for the Country menu does not appear after switching on the unit, you can restart

the automatic setting; see page 10. An incorrect setting of time or date (observe summer- and wintertime)
will influence the timer recording.

Connect the TV only with a RF coaxial lead

You must ensure that the video output channel is adjusted to the input channel of the TV.
Please also read the operating instructions for your TV.

Set the remote control to VCR  

.

Switch on the unit


Press 

|MENU| 

for about 7 seconds until the number of the channel appears

on the VCR display. The pre-setting is channel 36 (NV-VHD1 EC) 38 (NV-VHD1 EE).

Tune the TV until the test screen appears. A distorted picture on the 

channel

 can be reduced

by adjusting the unit and the TV to another channel.

Use the 

|CH|

 button or the numeric buttons to select the channel number (e.g. channel 39).

Tune the TV until the test screen appears.

To store this adjustment, press


|ENTER|


.

After that, please continue with the 

Automatic Setting

 with the [Country] setting menu.

Automatic Setting with Q Link

If your TV is equipped with Q Link or with a similar function from other manufacturers (see note),
the TV programme positions can be downloaded with a fully-wired 21-pin scart lead (not supplied).
The programme positions must be tuned on the TV first.

Connect the scart lead.

Set the AV channel of the TV.

Set the remote control to VCR  

.

Switch on the unit   .

Downloading of the TV data starts.

When the channel indication stops flashing on the VCR display, the downloading is complete.

Note about


R

: The following systems from other manufacturers have a similar function to Q Link from

Panasonic. List of registered trademarks: Q Link (Panasonic), DATA LOGIC (Metz), Easy Link (Philips),
Megalogic (Grundig), SMARTLINK (Sony)


VCR display

RQTD0035-A

                                 Panasonic     VCR

Clock setting

Clock setting  :  MAN.
Time

: 20:30:24

Date

: 21.03.01

                                   Panasonic     VCR


     Country

Belgien

Deutschland

Belgique

Österreich

Belgiê

Portugal


Panasonic VCR

Download

                                   Panasonic     VCR


    Download

Download in
progress,
please wait.
Position               49

                                    Panasonic    VCR

Tuning

Manual
Auto-Setup Restart
Download
Shipping condition

                                     Panasonic    VCR


Main menu

Timer recording
Tuning
Clock setting
Other settings

Summary of Contents for NV-VHD1EC

Page 1: ...guage codes Remote Control codes 23 Index Specifications 24 Warning and Precautions 2 Setting up 3 VCR DVD Controls 4 VCR DVD Operations 5 VCR Recording 6 VCR Playback VCR Functions 8 VCR Tuning 10 Connecting External Equipment 11 DVD Easy Setup 13 DVD Operation 14 DVD Playback 15 DVD Settings 17 DVD OSD Menu 19 Information about the player 20 Information about the VCR 21 Troubleshooting 22 PAL RQ...

Page 2: ...Electricandmagneticfields Lightningstrikesduringthunderstorms disconnectmainsandaerialplugs Instructions for inserting remote control batteries The lifetime of the battery is about 1 year depending on the frequency of use Do not use one old and one new battery or different types of batteries together e g one alkali and one zinc carbon battery Only insert batteries which contain no toxic materials ...

Page 3: ... adjusted to the input channel of the TV Please also read the operating instructions for your TV Set the remote control to VCR Switch on the unit Press MENU for about 7 seconds until the number of the channel appears on the VCR display The pre setting is channel 36 NV VHD1 EC 38 NV VHD1 EE Tune the TV until the test screen appears A distorted picture on the channel can be reduced by adjusting the ...

Page 4: ...t line next page General Operations Standby on switch Presstoswitchtheunitfromontostandbymode or vice versa In standby mode the unit is still consumingasmallamountofpower EXIT a menu Switch the screen format between the wide screen and other formats DVD display Operate REPLAY Function Press this button during playback Toselecttheinputpressthisbuttonrepeatedly VCR channel A1 A2 A3 front input or dc...

Page 5: ...eremotecontrol Display time Tape counter or Remaining tape time Pressthisbuttonrepeatedly Reset the Tape counter Pressthisbutton Wheninsertingacassette the counter is reset to 0 00 00 Forward Search Backward Search Slow motion playback Keep this button pressed down while paused Slow playback forward Slow playback backward Resumenormalplaybackbypressing Playback 9 Playback indicated by 9 VHS Index ...

Page 6: ...splay VCR Display Timer recording with On Screen Menu With the On Screen Menu you can programme Timer recordings up to 16 programmes SwitchonandsettheTVtothevideooutputchannelandinsertacassettewithanintacterasurepreventiontabintotheVCR Switch the remote control to VCR Press PROG CHECK to display Timer recording menu and press ENTER Setthechannel Pos Youcanusethecursors ontheremotecontroltomovearou...

Page 7: ...hange entry with Press ENTER to store these changes Press EXIT to quit the menu or press TIMER to switch the VCR to Standby mode VCR Recording Synchronous recording DVD VCD CD MP3 To copy synchronous from the DVD VCD CD or MP3 to a VHS tape Switch the remote control to DVD Set the beginning of the scene with Playback9 and Pause Switch the remote control to VCR Select the Disc channel dc by pressin...

Page 8: ...e removed the cassette or the power supply was interrupted the Intro Jet Scan will be activated when pressing the SEARCH button VHS Index Search System To quickly find the beginning of a programme press forward INDEX or press backward INDEX This function only works on playback mode or in stop mode Depending on how many times you press these INDEX buttons up to a maximum of 20 times the VCR will se...

Page 9: ...U Select Othersettings Access by pressing ENTER Select Audio playback Selecttheinputfield Selectthesettings Store by pressing ENTER Press EXIT For tapes recorded with audio dubbing function select MIX to hear the mono and Hi Fi audio track together While playback you can select the sound track with the AUDIO button NORMAL only original sound OSD L R only dubbing sound mono OSD MIX original sound a...

Page 10: ...he original settings of the VCR Shipping condition Press MENU Select Tuning Access by pressing ENTER Select Shippingcondition Press ENTER Confirm by pressing ENTER DisconnecttheunitfromACmains for one minute Note Audio mode only for NV VHD1EE If there is no sound or if it is distorted youcantrytoadjustthe Audiomode byselecting I DK or BG Tosetgenerally theRFCsystemthesameasTVsystemoftheconnectedTV...

Page 11: ...CODER Toconnect anexternaldecoder Connecting a Receiver WithsomeSatellite orDigitalReceiversitispossibletostartaTimer recording with a 21 pin scart lead not supplied by using EXT LINK function Please read the operating instructions for your Satellite or DigitalReceiverforfurtherinformation Set the Channel to Decoder Press MENU Select Tuning Access by pressing ENTER Access Manual by pressing ENTER ...

Page 12: ...theSETUPmenu AUDIO asfollows PCMDownconversion Yes DolbyDigital PCM DTSDigitalSurround Off MPEG PCM Note VCR audio signal is not connected to DVD OUT terminal Insert fully with this side facing up Connecting an Active subwoofer You can enjoy more powerful bass by connecting an active subwoofer Turn the BASS function to BASS PLUS ON to boost the output from the subwoofer see page 17 Adjust the volu...

Page 13: ...assword MPEG Select Yes whenyouconnecttheplayertoaunitwithabuilt inMPEGdecoder Dolby Digital Methodofcodingandcompressionofmorechannelaudiosignals developedbyDolbyLaboratories Alargeamountofaudioinformationcanberecordedononedisc DolbyDigitalisusedinmanycinema digitaltelevisionprogrammes DVDsandvideogamesaroundtheworld Select Yes whenyouconnecttheplayertoaunitwithabuilt inDolbyDigitaldecoder DTS Di...

Page 14: ...k 9 9 9 9 9 to restart playback Note You cannot move backwards with VIDEO CD during slow motion Fast Forward and Rewind SEARCH DVD VCD CD Press SEARCH during playback the speed of search increases by up to 5 steps by pressing the button repeatedly for MP3 only 1 step possible DVD Operation Playback Switch remote control to DVD Press VCR DVD OUTPUT to select DVD output Press 5 OPEN CLOSE on the uni...

Page 15: ...en the unit is turned off or the disc tray is opened Clear the PLAYLIST Press PLAY MODE while stopped Select CLEAR LIST Press ENTER Press EXIT RANDOM playback Press PLAY MODE while stopped Select RANDOM Press ENTER to exit RANDOM mode press two times Stop Chapter review DVD Press9 9 9 9 9 for 5 sec during playback of a DVD Thebeginningofeachchapter starts for some seconds Playback starts from the ...

Page 16: ...ay is flashing Playback restarts from the position you stopped it Cancel the Resume function Press Stop during playback Press Stop until disappears from the DVD s display Note The resume function does not work if the playback time is not displayed The position is cleared when the disc tray is opened or the unit is switched to standby Replaying a scene DVD VCD CD MP3 Press REPLAY during playback Th...

Page 17: ...ADVANCEDSURROUND BASS CINEMAand DIALOGUEENHANCERtobestoredandrecalledwithjustonebuttonpress Storing the settings in memory Press and hold the button ONE TOUCH MEMORY until MEMORYON onthedisplayappears The settings remain in the memory even if you turn the unit off To cancel Pressthebutton ONETOUCH MEMORY to set the factory preset MEMORYOFF appears in the display Recalling the settings Press the bu...

Page 18: ...78 Original Subtitle language Automatic Off DVD Menu language English 6978 Child lock Off On Level All 1 8 DVD Settings Use the Zoom function to expand widescreen pictures to fill more of the television screen only for DVD Video in 4 3 Letterbox style RQTD0035 A DISC VIDEO AUDIO DISPLAY DEMO EASYSET to select to access Menu DISC VIDEO AUDIO DISPLAY DEMO EASYSET PCM Down conversion Yes Dolby Digita...

Page 19: ...ing playback When you have connected an active subwoofer Makes the dialogue in movies easier to hear Normal Cinema User Adjustthecontrasttosuityourpreference Adjust the vertical position of OSD bar on the screen Makes possible to have a surround like effect if you are using only 2 front speakers Turn Advanced Surround off if it causes distortion If there are several titles tracks on a DVD VCD or C...

Page 20: ...actively on the television using the menu screen This unit can playback Video CDs with playback control Title Chapter DVD s are divided up into large sections titles and smaller sections chapters The numbers allocated to these sections are called title numbers and chapter numbers Track Video CDs and CDs are divided up into sections called tracks and the numbers allocated to these sections are call...

Page 21: ...p extremely fast and is stopping softly in very short time Q Link WithanEuroAVconnectionandwiththeQLinkfunctiontheVCRisabletocommunicatewiththeTV copyingautomaticallythetuningpositionsoftheTV afterfinishingtheplayback theVCRwillswitchautomaticallyintoStandbymodeifyouswitchoftheTV one touch on DIRECT TV REC and the VCR will record the film you are watching on the TV if you insert a tape into your V...

Page 22: ...cart selectioniscorrectfortheTVinput Automatic Clock correction is not working correctly Clock setting is on manually MAN Set clock to AUTO see page 9 There is no programme with clock signal available Set the clock manually see page 9 The picture or the sound is distorted The TV reception is not adjusted Readjust the reception see page 3 The sound is distorted Set the sound system see page 10 The ...

Page 23: ...rati 7185 Hausa 7265 Hebrew 7387 Hindi 7273 Hungarian 7285 Icelandic 7383 Indonesian 7378 Interlingua 7365 Irish 7165 Italian 7384 Japanese 7465 Javanese 7487 Kannada 7578 Kashmiri 7583 Kazakh 7575 Kirghiz 7589 Korean 7579 Kurdish 7585 Laotian 7679 Latin 7665 Latvian 7686 Remote Control codes Thisremotecontrolsettingallowsyoutooperatemanyfunctionsof TVsfromdifferentbrands If the TV cannot be opera...

Page 24: ... 23 ONE TOUCH MEMORY 17 OPTICAL 12 13 Page OPEN CLOSE 5 Optical digital audio lead 12 13 20 Password 13 PAL 60 18 Pan Scan 13 18 20 PBC Play Back Control 16 20 PCM Down conversion 12 18 PDC 6 21 Picture distorted 3 23 Playback 5 8 14 15 20 PLAY MODE 15 Playback Off Timer 8 POSITION MEMORY 16 PROG CHECK 6 7 Programme List 8 Programme playback 15 Progress Indicator 19 Q Link 3 6 21 Random playback 1...

Reviews: