5
10
9
12
11
1
2
3
4
5
6
7
8
19
20
15
17
16
13 14
18
Preparation
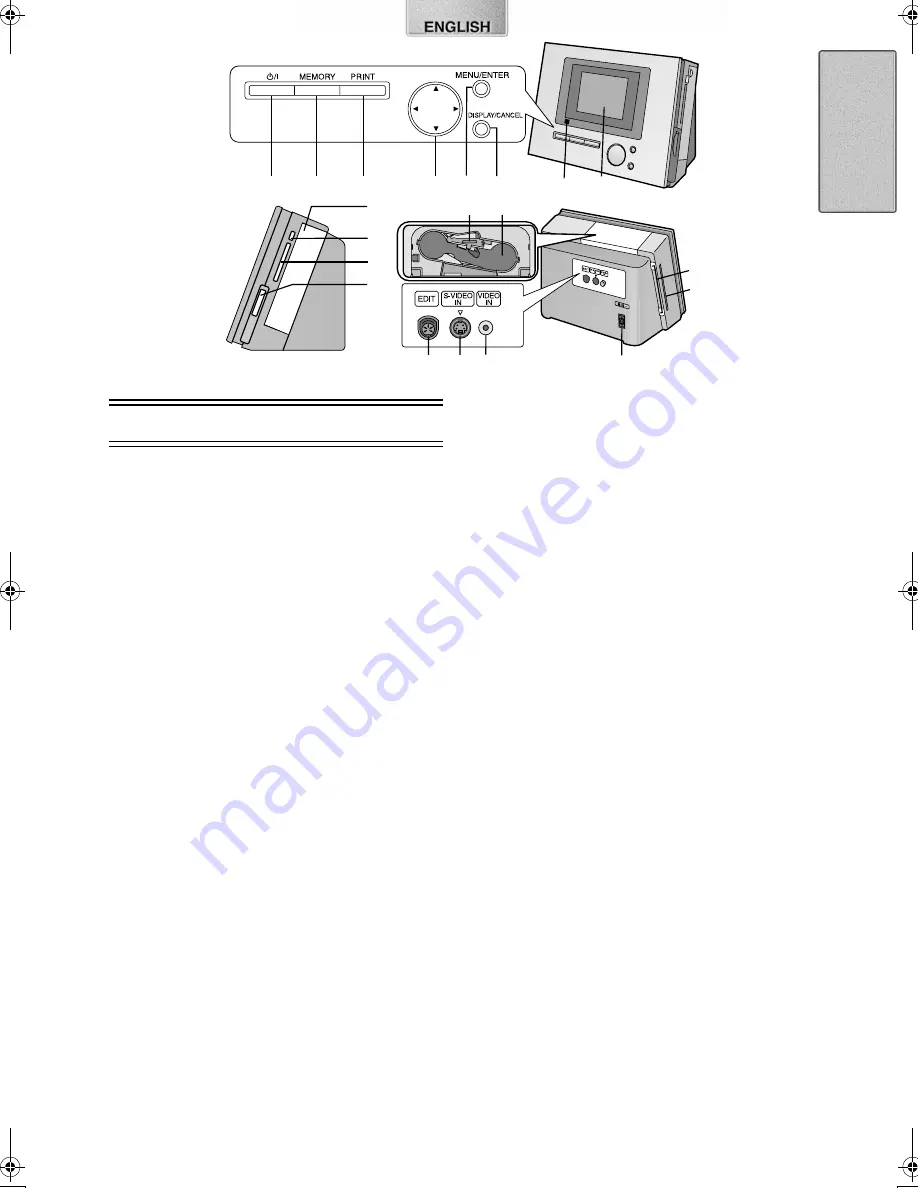
Controls and Components
1
Power Button [
Í
/|]
Press to turn Digital Photo Printer on/off. When
you turn the power on, the LCD Monitor lights
up and the STAND BY lamp turns off. When
you turn the power off, all images in the Digital
Photo Printer’s memory are deleted.
2
MEMORY Button
Press this button to store the displayed image in
the printer’s memory. When storing fast moving
images to memory, the memory image may
shake. Pressing the button once more will stop
the movement, and [FIELD] will display at the
lower-left part of the screen.
3
PRINT Button
Press this button to print images.
4
2134
Buttons
Use these buttons to select MENU choices and
card images.
5
MENU/ENTER Button
Use this button to display the MENU screen.
Use also to enter various selections.
6
DISPLAY/CANCEL Button
DISPLAY Button:
Changes the image display on a card between
a Single Screen Display and an Index Display.
Use to re-record images to memory.
CANCEL Button:
Use to cancel printing and other such
processes.
Use to exit MENU.
7
STAND BY Lamp [
Í
]
When the Power Cable is connected, the
STAND BY lamp lights up. Printer is on STAND
BY.
8
LCD Monitor
9
Paper Cassette Insert Location
10
PC Card Eject Button
Use to eject PC cards.
11
PC Card Insert Location
12
SD Memory Card/MultiMedia Card Insert
Location
13
Ink Cassette Eject Lever
Pull forward to eject ink cassettes.
14
Ink Cassette Insert Location
15
System Socket
When connected to a Panasonic Digital Video
Camera with Edit Cable VW-K5E (sold
separately), the printer can automatically
search and print a still image marked with a
photo index signal. For details, refer to the
Digital Video Camera’s manual. In addition,
when connected to a VCR or a Digital Video
Camera that has a system socket, pressing the
Memory Button will display the still screen.
16
S-VIDEO IN Socket
Connect the video device’s S-VIDEO OUT
socket with an S-VIDEO Cable. Pictures with a
higher quality than those from the VIDEO IN
Socket can be obtained. We recommend using
this socket when connecting with devices that
have S-VIDEO outputs.
17
VIDEO IN Socket
Connects the video device’s VIDEO OUT
socket with a VIDEO Cable.
18
Power Socket
Connects the Power Cable (included).
19
Paper Guard Installation Hole
20
Paper Removal Port
9063‑VP430.book 5 ページ 2001年8月31日 金曜日 午後9時9分


