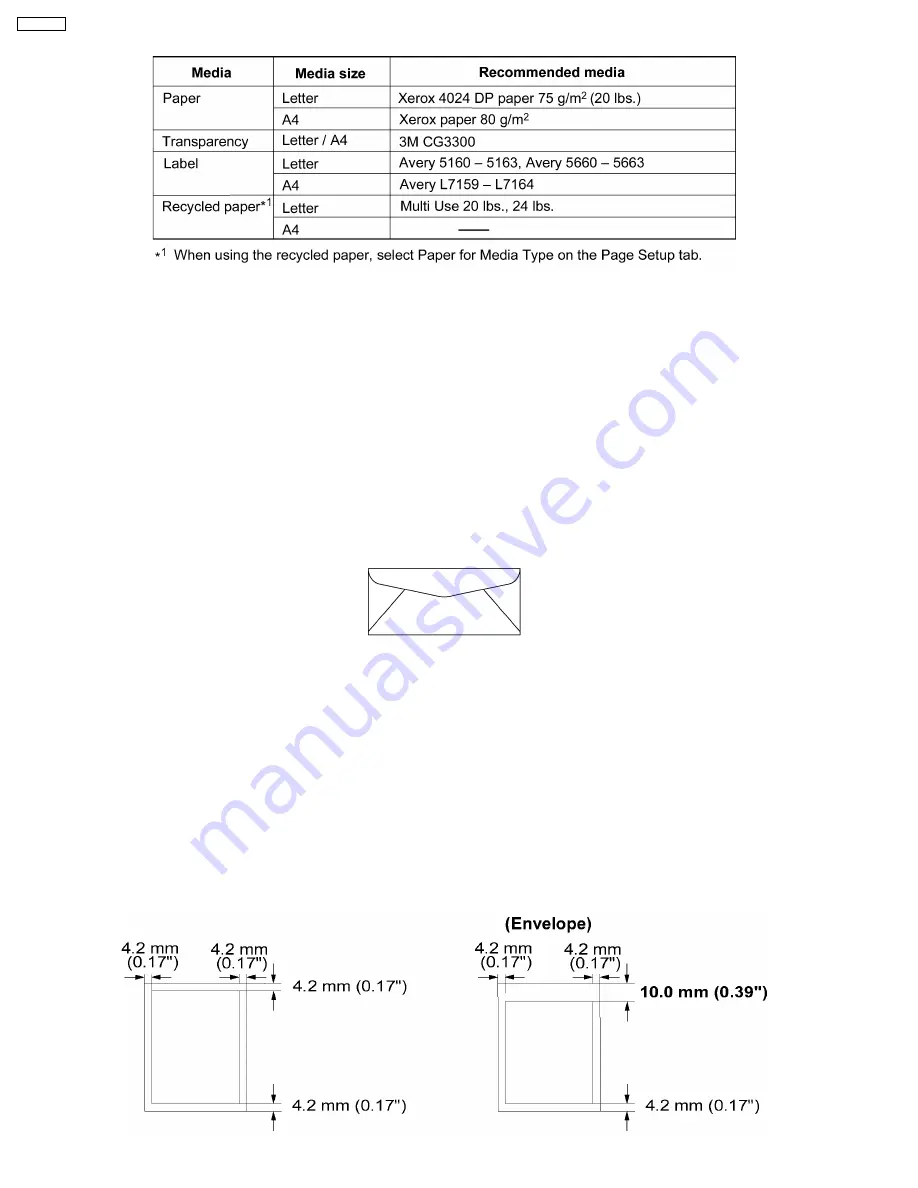
Recommended Media
Transparency:
·
To avoid damaging the printer, do not use ink jet transparency.
·
Transparencies and adhesive material of labels should be stable at 205°C ( 400°F ), the printer’s maximum temperature.
·
Re-using transparencies that have been fed through the printer once ( for example, after jams or if the transparency is ejected
without being printed ) can reduce the life of the consumables and paper path components.
·
When using transparencies, if the print quality is poor, print on the other side.
Labels:
·
With any label stock, the labels must completely cover the backing material.
Envelope:
It is recommended that you purchase only high quality envelopes with diagonal seams, as shown in the diagram below:
High quality envelopes have the following characteristics:
·
A thin, sharply creased leading edge
·
Paper weight of 90 g/m
2
( 24 lbs. )
·
Flat, free of curls, wrinkles, nicks, etc.
Note:
Wrinkles may occur, even when using high quality envelopes.
1.1.4.2. Margins and Print Area
The image ( print area ) is printed a bit smaller than the media size. 4.2 mm ( 0.17” ) is required for top, bottom and side margins.
It may be needed to adjust the page margins in the application software to match the allowable printarea.
8
KX-P7100
Summary of Contents for KX-P7100
Page 2: ...2 KX P7100 ...
Page 4: ...1 Introduction 1 1 Specifications 1 1 1 Printer 4 KX P7100 ...
Page 5: ...1 1 2 Paper 5 KX P7100 ...
Page 6: ...1 1 3 Interface Options Accessories and Supplies 6 KX P7100 ...
Page 10: ...10 KX P7100 ...
Page 11: ...1 3 Parts Identification 1 3 1 Front Side View 1 3 2 Rear Side View 11 KX P7100 ...
Page 12: ...1 4 Component Layout and Paper Path 12 KX P7100 ...
Page 13: ...1 5 Electrical Components and Sensor Boards 13 KX P7100 ...
Page 14: ...1 6 Switches and Solenoids 14 KX P7100 ...
Page 48: ...48 KX P7100 ...
Page 72: ...4 5 3 Engine I F Communication 72 KX P7100 ...
Page 80: ...KX P7100 80 ...
Page 99: ...9 1 3 User Error 99 KX P7100 ...
Page 100: ...9 1 4 Call for Service 100 KX P7100 ...
Page 101: ...9 2 Initial Troubleshooting Flowchart 101 KX P7100 ...
Page 102: ...9 3 No Operation 102 KX P7100 ...
Page 103: ...9 4 Print Quality 9 4 1 White Vertical Line in Print 103 KX P7100 ...
Page 104: ...9 4 2 Blank Print 104 KX P7100 ...
Page 105: ...9 4 3 Dark Vertical Line in Print 105 KX P7100 ...
Page 106: ...9 4 4 Dark Horizontal Line in Print 106 KX P7100 ...
Page 107: ...9 4 5 Dirty Background 107 KX P7100 ...
Page 108: ...9 4 6 All black Print 108 KX P7100 ...
Page 109: ...9 4 7 Light Print 109 KX P7100 ...
Page 110: ...9 4 8 Ghosting 110 KX P7100 ...
Page 111: ...9 4 9 Black or White Dots 111 KX P7100 ...
Page 112: ...9 4 10 Toner Spatter 112 KX P7100 ...
Page 113: ...9 5 Paper Jam 9 5 1 Media Tray Empty or Misfeed 113 KX P7100 ...
Page 114: ...9 5 2 Jam at A 114 KX P7100 ...
Page 115: ...9 5 3 Jam at B 115 KX P7100 ...
Page 116: ...9 5 4 Jam at C 116 KX P7100 ...
Page 117: ...9 5 5 Jam at D E 117 KX P7100 ...
Page 118: ...9 6 Call Service 9 6 1 E20 118 KX P7100 ...
Page 119: ...119 KX P7100 ...
Page 120: ...9 6 2 E30 120 KX P7100 ...
Page 121: ...9 6 3 E31 121 KX P7100 ...
Page 122: ...9 6 4 E32 122 KX P7100 ...
Page 123: ...9 6 5 E50 123 KX P7100 ...
Page 124: ...9 6 6 E54 9 6 7 E71 124 KX P7100 ...
Page 125: ...9 6 8 E73 9 6 9 E81 125 KX P7100 ...
Page 126: ...10 Replacement Parts List with Lubrication Guide 10 1 Exterior 126 KX P7100 ...
Page 134: ...10 4 1 Fuser Unit 134 KX P7100 ...
Page 141: ...10 9 Main Control Board Component Side View 141 KX P7100 ...
Page 142: ...Parts Side View 142 KX P7100 ...


