background image

13

Setup (Base Unit)

For fax advantage assistance, call 1-800-435-7329.

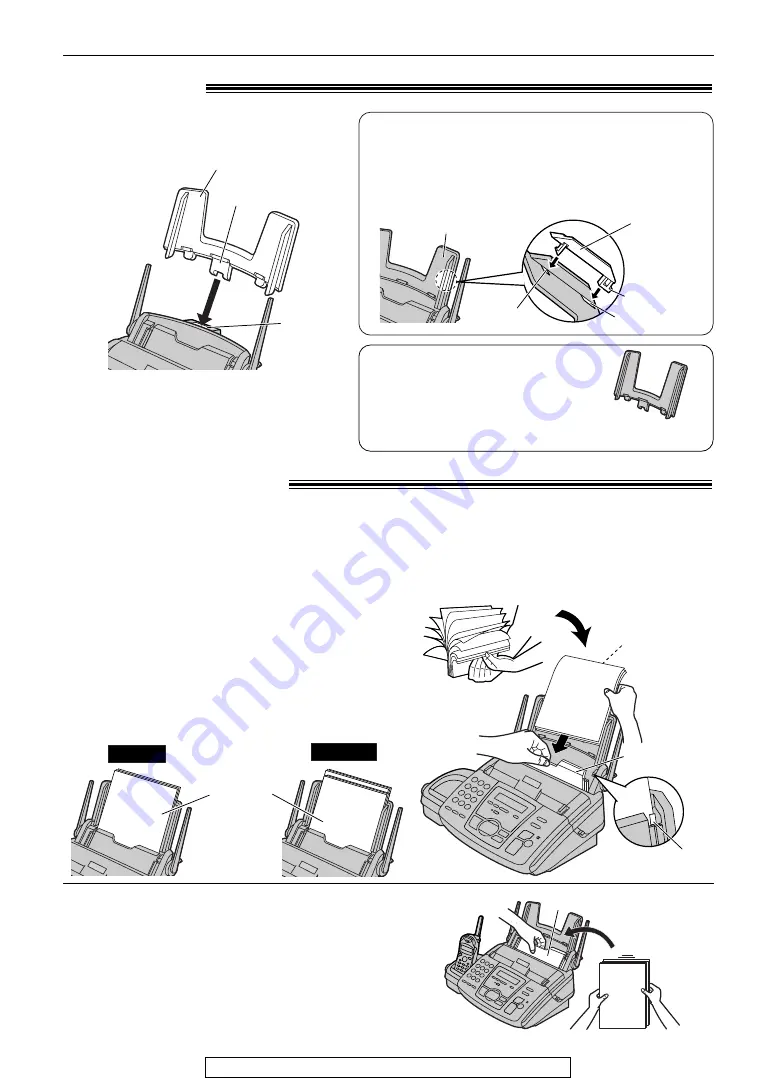
Recording paper

!

1

Fan the stack of paper to prevent a paper
jam.

2

Pull the tension plate forward and hold open
while inserting the paper.

The paper should not be over the tab.

If the paper is not inserted correctly,
readjust the paper, or the paper may jam.

Tension plate

Tab

Side to be printed
face down.

Stack of 
paper

Correct

Incorrect

To add paper

1. Pull the tension plate forward and hold open while

removing all of the installed paper.

2. Add paper to the stack of paper you removed and

straighten.

3. Fan the stack of paper.

4. Pull the tension plate forward and hold open while

inserting the paper.

Tension plate

Letter, legal or A4 size recording paper can be loaded. The unit can hold up to 50 sheets of 
60 

g

/m

2

to 75 

g

/m

2

(16 lb. to 20 lb.) paper or 30 sheets of 90 

g

/m

2

(24 lb.) paper.

See the note for paper specifications on page 97.
For superior results, we recommend Hammermill

®

Jet Print paper.

Tab

Slot

Paper tray

Paper tray

!

Insert the tab on the paper tray into the
slot on the back of the unit.

Note:

Do not place the unit in areas where the
paper tray may be obstructed (i.e. by a 
wall, etc.).

To use legal size paper

Please purchase a legal paper tray,
Model No. KX-FA51 (p. 8) and install
as shown on the left.

A4 paper 
guide

Upper slot

Lower slot

Bottom tab

Paper tray

To use A4 size paper

Insert the bottom tab on the A4 paper guide into the

lower slot. Press the guide into the upper slot.

Change the recording paper size (feature #16 on 

page 69).

KX-FA51
Legal paper tray

Summary of Contents for KX-FPG176

Page 1: ...n the U S A FOR FAX ADVANTAGE ASSISTANCE CALL 1 800 HELP FAX 1 800 435 7329 E MAIL TO consumerproducts panasonic com for customers in the U S A or Puerto Rico REFER TO www panasonic com for customers in the U S A or Puerto Rico Compact Plain Paper Fax with 2 4GHz Cordless and Answering System Operating Instructions Model No KX FPG176 ...

Page 2: ...telephone facsimile date and time of transmission identification of the business entity or person s sending the facsimile and telephone number of the business entity or person s To program this information into your unit complete all the instructions on pages 15 to 18 Note that the images of copied or received documents will remain on the used ink film Use discretion when disposing of the used ink...

Page 3: ...e unit and the handset using wireless radio waves For maximum distance and noise free operation the recommended base unit location is Away from electrical appliances such as a TV personal computer or another cordless phone In a HIGH and CENTRAL location with no obstructions such as walls Raise the antennas vertically ...

Page 4: ...an authorized service center when service is required Opening or removing covers may expose you to dangerous voltages or other risks Incorrect reassembly can cause electric shock when the unit is subsequently used 13 Unplug this unit from the wall outlet and refer servicing to an authorized service center when the following conditions occur A When the power supply cord or plug is damaged or frayed...

Page 5: ...under running water Keep the handset away from salt water Avoid exposure to prolonged high humidity Since water in headset jack may cause damage close the headset jack cover when the optional headset is not in use When the optional headset is connected do not use the handset with wet hands If the handset is wet wipe with a soft dry cloth The base unit is not designed to be splash resistant Do not ...

Page 6: ... 44 Faxes TEL mode answering all calls manually 46 FAX ONLY mode all calls are received as faxes 47 TEL FAX mode receiving phone calls with ring signals and faxes without ring signals when you are near the unit 48 Extension telephone 50 Pager call when the unit receives a fax or voice message 50 Distinctive Ring Using with a voice mail service 51 Making and Phone calls making 22 Answering Calls Ph...

Page 7: ...5 Directory Specifications Technical data about this product 96 Index Program index 97 Index 98 Programmable Features Answering Device Setup TAD FAX mode receiving phone calls and faxes automatically 54 Greeting Recording your own greeting messages 55 Erasing your own recorded greeting messages 56 Memo Message Leaving a message for others or yourself 56 Incoming Listening to recorded messages usin...

Page 8: ...to 1 800 237 9080 Include your name shipping address and telephone number credit card type number expiration date and your signature order part number and quantity Internet Visit our web site http www panasonic com store for customers in the U S A or Puerto Rico ONLY If you have any questions about internet orders please contact us at E mail panasonicdirect panasonic com Telephone 1 201 348 7292 1...

Page 9: ... for assistance as follows 7 How to use the copier function 8 Frequently asked questions and answers 9 Explanation of error messages shown on the display 10 List of available reports 11 How to use the Caller ID service 3 Press w PRINTING CALLER ID PRESS SET REPORTS PRESS SET ERRORS PRESS SET Q and A PRESS SET COPIER PRESS SET Overview Document guides Speaker Left side of the unit Paper tray Back c...

Page 10: ...access special telephone services such as call waiting p 31 or for transferring extension calls To adjust volume p 21 To search for a stored name p 30 40 To select the features or feature settings during programming p 67 To navigate to the next operation To initiate fax transmission or reception To store a setting during programming To stop an operation or cancel programming To mute your voice to ...

Page 11: ...lling up the center part Center part Front cover 2 Push the back cover open button green on the right side of the unit OR Push the back cover open lever green inside of the unit Back cover open button green Back cover open lever green OR 3 Open the back cover For first time installation of the supplied ink film skip to step 6 ...

Page 12: ...llowing will be displayed while the unit is checking that there is no slack in the ink film Display PLEASE WAIT Dotted area Front cover Display Back cover 1 2 5 For replacement only Remove the stoppers and tags from the new ink film Find the T shaped gear blue Tags New ink film T shaped gear blue Stopper Stopper 6 Insert the blue core of the front ink film roll into the right slot of the unit Inse...

Page 13: ...er Tension plate Letter legal or A4 size recording paper can be loaded The unit can hold up to 50 sheets of 60 g m2 to 75 g m2 16 lb to 20 lb paper or 30 sheets of 90 g m2 24 lb paper See the note for paper specifications on page 97 For superior results we recommend Hammermill Jet Print paper Tab Slot Paper tray Paper tray Insert the tab on the paper tray into the slot on the back of the unit Note...

Page 14: ... of a surge protector The following types are available TELESPIKE BLOK MODEL TSB TRIPPE MFG CO SPIKE BLOK MODEL SK6 0 TRIPPE MFG CO SUPER MAX PANAMAX or MP1 ITW LINX Caution When you operate this product the power outlet should be near the product and easily accessible To use the fax machine with a computer on the same line We recommend you use separate wall jacks for the fax machine and the compu...

Page 15: ...ting the openLCR Features The openLCR service will automatically set the date and time No set up by user is necessary Note You can enter the number by pressing or in steps 4 and 5 In this case press to move the cursor The accuracy of the clock is approximately 60 seconds a month 6 Press w The next feature will be displayed 7 Press p YOUR LOGO PRESS SET 1 Press p Display 2 Press or until the follow...

Page 16: ...ss 2 2 times Cursor 2 Press 4 6 times 3 Press 5 6 times 4 Press to move the cursor to the next space and press 5 6 times 5 Press w The next feature will be displayed 6 Press p YOUR FAX NO PRESS SET LOGO Bill LOGO Bil LOGO Bi LOGO B LOGO AAAAAAAAA YOUR LOGO PRESS SET SYSTEM SET UP PRESS NAVI I H 16 Setup Base Unit For fax advantage assistance call 1 800 435 7329 Setting your logo ...

Page 17: ...he dial keys you can select characters using or 1 Press or until the desired character is displayed 2 Press to move the cursor to the next space The character displayed in step 1 is inserted 3 Return to step 1 to enter the next character Display order of characters Capital alphabet Lower case alphabet Number Symbol Pressing Pressing Hyphen button To insert a hyphen Insert button To insert one char...

Page 18: ...FAX NO PRESS SET SYSTEM SET UP PRESS NAVI I H Hyphen FLASH CALL WAIT SET MENU Delete STOP Display Note You can enter your facsimile telephone number by pressing or in step 4 If you use or press to move the cursor The button replaces the digit with a and the button replaces it with a space Example using the dial keypad 234 5678 Press 234 5678 To enter a hyphen in a telephone number press Ռ To corr...

Page 19: ...enter programming p 26 To stop viewing p 32 To page the base unit p 24 25 To erase an item p 29 To erase caller information p 34 To redial the last number dialed from the handset To insert a pause during dialing To receive a fax p 46 To adjust volume p 21 To search for a stored name p 30 To view caller information p 32 Backlit LCD display The lighted display will stay on for a few seconds after pr...

Page 20: ...lashes on the handset display Display Recharge the handset battery for more than 15 minutes or the display will continue showing the above indication Recharge battery Automatic security code setting Whenever you place the handset on the base unit the unit will automatically select one of a million security codes These codes help to avoid unauthorized use of your telephone line by another cordless ...

Page 21: ... is set to off When a call is received the unit will not ring and will display the following Ringer pattern You can select one of three ringer patterns Change the setting feature 17 on page 69 The ringer pattern you selected will sound when the unit receives a call INCOMING CALL RINGER OFF RINGER OFF OK YES SET NO STOP Adjusting base unit volume Speaker volume 8 levels high to low are available Wh...

Page 22: ...e If short beeps sound when you press ë move closer to the base unit or lay the handset on the base unit Then try again If ë is pressed while the base unit is in use the call will be switched to the handset and the base unit is disconnected With the handset Phone calls making 1 Press NO Display 2 Dial the telephone number Example 3 When the other party answers talk into the microphone 4 When finis...

Page 23: ...ed talking press NO With the handset DIGITAL SP PHONE Microphone Auto talk feature Handset You can answer a call by just lifting the handset off the base unit without pressing ë This feature is set to off To activate this feature proceed as follows Make sure the handset is idle 1 Press œ Display 2 Press 2 times to select Talk switching 3 Press 0Auto0talk Off GF H Save HTalk0switching GF H Yes HSav...

Page 24: ...k into the microphone 4 Handset When finished talking press â INTERCOM Intercom Paging the base unit from the handset 1 Handset Press â The base unit will ring You can then talk with the base unit user Handset display Example 2 Base unit Answer through the microphone Base unit display 3 Handset When finished talking press â INTERCOM PAGING Intercom 00 01 12 LOCATOR INTERCOM Microphone INTERCOM Bas...

Page 25: ...ase unit 1 Handset During an outside call press â to page the base unit The handset user can talk with the base unit user The outside call will be put on hold Handset display Example Base unit display If there is no answer on the base unit press ë to return to the outside call INTERCOM1HOLD 1234PAGING Intercom1hold 00 01 12 ...

Page 26: ...gram Tom0Jones 3334444 F Edit H Save 3334444 IH G Next Enter0phone0no Enter0name Tom0Jones IH G Next Enter0name IH G Next Directory 00220items HSave0directory 0Ringer0volume GF H Yes CLR FUNCTION EXIT Keys Characters 1 Space _ A B C a b c 2 D E F d e f 3 G H I g h i 4 J K L j k l 5 M N O m n o 6 P Q R S p q r s 7 T U V t u v 8 W X Y Z w x y z 9 0 Note To enter another character using the same numb...

Page 27: ...nt to enter a hyphen press Ռ 6 Press w To program other items repeat steps 3 to 6 7 Press p to exit the program NAME STORE PRESS SET REGISTERED NO 5552233 NO NAME Alice STORE PRESS SET NAME STORE PRESS SET DIRECTORY SET NAVI BROAD Hyphen Delete SET MENU STOP FLASH CALL WAIT Helpful hint You can confirm the stored items on the telephone number list p 88 Note When the following is displayed in step...

Page 28: ...234567 Directory0list GF 0H Caller s0list Items stored in the handset and the base unit are for common use and can be edited from both the handset and the base unit 5 Press Example If you do not need to edit the telephone number skip to step 7 6 Edit the telephone number For further details see page 26 7 Press Example 8 Press 9 Press œ to exit the program Jane 6789453 F Edit H Save 1234567 IH G Ne...

Page 29: ...DELETE To cancel erasing press DELETE OK YES SET NO STOP NAME Peter EDIT DELETE Peter EDIT PRESS MENU Peter 9876543 DIRECTORY MAILBOX H Using the base unit Note You can use the following method to erase 1 Press Confirm that there are no documents in the document entrance 2 Press or until the desired item is displayed 3 Press h 4 Press w 5 Press w The stored name and number are erased DELETED Erasi...

Page 30: ......

Page 31: ...istance call Long distance LONG1DISTANCE Private caller PRIVATE1CALLER Out of area OUT1OF1AREA Note If the unit is connected to a PBX Private Branch Exchange system you may not receive the caller information Consult your PBX supplier If the unit cannot receive caller information the following will be displayed To confirm caller information using the Caller ID list The unit will store information f...

Page 32: ......

Page 33: ...number 1 Local telephone number 4 3 1 added area code omitted 1 added and area code omitted Display while viewing When the unit could not receive a name When no calls have been received NO CALLER DATA NO NAME RCVD This means this call has already been viewed or answered Using the base unit To stop viewing Press after step 2 2 Press to search from the most recent caller information Press to search ...

Page 34: ...ress or Example 2 Press Ñ 3 Press to select All clear 4 Press or Ñ 111All1clear 0Exit HAll clear GF H Yes HExit 0All clear GF H Yes 0 new0call GF000H Directory You can erase all or specific caller information Once erased it cannot be accessed from either the handset or the base unit Erasing all caller information using the handset ...

Page 35: ...the program ERASE COMPLETED ALL ERASE OK YES SET NO STOP CALL LIST ERASE PRESS SET CALLER SET UP PRESS SET Erasing specific caller information using the base unit 1 Press b Example 2 Press or until the desired item is displayed Example 3 Press h Example To erase other items repeat steps 2 and 3 4 Press to exit the program 1 NEW CALL PRESS NAVI DELETED SAM LEE 12 10A Jul20 2 NEW CALLS PRESS NAVI CA...

Page 36: ...LLS PRESS NAVI Note You can confirm the stored items on the telephone number list p 88 The unit can only store a name of up to 10 characters long To edit a name and number see page 28 Into the base unit 1 Handset is off the base unit Press or Handset is on the base unit Lift the handset and press or Example 2 Press or until the desired item you want to store is displayed Example 3 Press 4 Press to...

Page 37: ...s been received Talking to the other party after fax transmission or reception You can talk to the other party after a fax message is completed This will save the added expense and time of making another call This feature only works when the other party s fax machine is equipped with a voice contact feature 1 If the other party initiates voice contact your unit will sound a distinctive ring and th...

Page 38: ...LP Document guides STOP To select the resolution Select the desired resolution according to the type of document STANDARD For printed or typewritten originals with normal sized characters FINE For originals with small printing SUPER FINE For originals with very small printing This setting only works with other compatible fax machines PHOTO For originals containing photographs shaded drawings etc U...

Page 39: ...copied document Sending a fax with the voice guide You can send documents by following the voice guide 1 Press l 2 times 2 Press w 3 Follow steps 1 to 6 on page 38 After transmission the voice guide will turn off automatically Quick scan feature This feature is helpful when you want to send the document then take it for other uses To use this feature activate feature 34 on page 71 1 Insert the doc...

Page 40: ... START Document guides STOP Before using this feature program the desired names and telephone numbers into the directory p 26 27 Fax auto redial If the line is busy or if there is no answer the unit will automatically redial the number up to 2 times This feature is also available for delayed transmission feature 25 on page 70 During redial the following will be displayed Display To cancel redialin...

Page 41: ... 1 Press p repeatedly until the following is displayed Display 2 Press to select BROAD 3 Press or until the desired item is displayed Example 4 Press w Example To program other items repeat steps 3 and 4 up to 20 items 5 Press w to exit the program Note If you program the wrong item press after step 4 to erase the item Confirm the stored items by printing a broadcast programming list p 88 REGISTER...

Page 42: ...to the broadcast memory 1 Press Confirm that there are no documents in the document entrance Display 2 Press or until the following is displayed 3 Press p 4 Press to select ADD 5 Press or until the desired item you want to add is displayed Example Mary 1 584 372 4123 BROADCAST ADD DELETE BROADCAST EDIT PRESS MENU DIRECTORY MAILBOX H MENU STOP SET 6 Press w Example To add other items repeat steps 5...

Page 43: ...splay 3 Press or until the following is displayed 4 Press w The document will be fed into the unit and scanned into memory The unit will then transmit the data to each item calling each number sequentially After transmission the stored document will be erased automatically and the unit will automatically print a broadcast sending report BROADCAST SEND PRESS SET DIRECTORY MAILBOX H ...

Page 44: ...eive calls You have to set this This is how the unit will operate You have a separate telephone line just for faxes FAX ONLY mode p 47 Turn AUTO ANSWER on by pressing PQ The arrow is shown on the right of the display When receiving calls All incoming calls will be answered as faxes ...

Page 45: ...ng calls You have to answer all calls manually To receive a fax document press j for each fax you are receiving Ring Ring Ring Mostly phone calls TEL FAX mode If you are near the unit and want to use it to receive phone calls yourself and receive faxes automatically see pages 48 and 49 ANSWER ANSWER AUTO AUTO PLAY PLAY MESSAGES MESSAGES O ON N MEMORY MEMORY CALLS CALLS When the fax machine detects...

Page 46: ...temporarily activate the answering device The greeting message will then be played and the other party can then send a fax Up to 30 sheets of printed paper can be held Remove the printed paper before it exceeds 30 sheets Fax reception in memory When a printing problem is detected the unit will temporarily store the received document into memory While the document is in memory the display will show...

Page 47: ...ving calls the unit will automatically answer all calls and only receive fax documents PICKUP RCV FAX AFTER 3 RINGS Line 1 Phone calls Line 2 Faxes Only a fax machine is connected Activating FAX ONLY mode Note If the arrow is already shown on the right of the display and you wish to change the ring setting turn the arrow off once then on again by pressing PQ and follow the instructions in step 3 T...

Page 48: ...depends on TEL FAX delayed ring setting See bottom of next page The call is connected Phone call Fax calling tone A call is received The fax machine will automatically receive documents without ringing Answer the call If the call is not answered this message will be played Then the fax machine will activate the fax function for a case in which the other party s fax machine does not send a fax call...

Page 49: ...s Duration depends on TEL FAX delayed ring setting See below The call is connected Fax calling tone A call is received The fax machine will automatically receive documents without ringing Answer the call If the call is not answered this message will be played Then the fax machine will activate the fax function for a case in which the other party s fax machine does not send a fax calling tone The e...

Page 50: ...ntered a message in step 8 your pager will only display 11 or 22 8 Press w The default code 07734 will show Hello on your pager If you want to change this message enter your message up to 30 digits 9 Press w The unit will dial the stored number 10 Check that your pager received the pager test call 11 Press NO PAGER TEST MSG 07734 Extension telephone To the same line Extension telephone Note You ca...

Page 51: ...ify the assigned ring pattern 1 Press p Display 2 Press then 31 3 Press or to select the ring pattern assigned by the telephone company A Standard ring one long ring B Double ring two short rings default setting C Triple ring short long short rings D Other triple ring short short long rings OFF Turns off the feature 4 Press w 5 Press p SETUP ITEM RING DETECTION MODE B SYSTEM SET UP PRESS NAVI I H ...

Page 52: ... for other uses To use this feature activate feature 34 on page 71 The document will be fed into the unit and scanned into memory The unit will then print the data If the document exceeds the memory capacity p 96 copying will be canceled and this feature will be turned off automatically To stop copying Press To select the resolution Select the desired resolution according to the type of document F...

Page 53: ...of the document printing it on two pages ZOOM 100 COLLATE H To reduce a document 1 Press after step 3 on page 52 Display 2 Press to select 92 86 or 72 then press y See the right table for the recommended reduction rates Note If the appropriate reduction rate is not selected the document may be divided and the top of the second sheet will be deleted If the image at the bottom of the document is not...

Page 54: ...time is low erase unnecessary messages p 57 For the voice memory capacity of incoming messages see page 96 While an incoming call is being recorded you can monitor it through the speaker If this feature is not required set feature 67 to off p 74 SET AUTO ANSWER 1 Make sure that feature 77 is set to TAD FAX p 75 2 If the arrow is not shown on the right of the display turn it on by pressing PQ The u...

Page 55: ...ETING PRESS SET You can record your own greeting messages for TAD FAX and TEL FAX modes When receiving a call your own greeting message will be played instead of the pre recorded message The recording time will be limited to 16 seconds We recommend you record your message within 12 seconds to make it easier to receive faxes Suggested messages TAD FAX greeting message This is your name business and...

Page 56: ...l be played GREETING ERASED ERASE GREETING YES SET NO STOP TEL FAX GREETING PRESS SET TAD GREETING PRESS SET Erasing your own recorded greeting messages SET ERASE STOP To leave a private message for yourself or someone else you can record a voice memo This memo can be played back later either directly or remotely 1 Press t Display 2 Press w A long beep will sound 3 Speak clearly about 20 cm 8 inch...

Page 57: ...the message the previous message will be played To play back a specific message press or and search for the message you want to listen to To skip a message Press to play the next message To stop playback Press If you press LM within 1 minute the unit will resume playing the rest of the messages Voice time day stamp During playback a synthesized voice will announce the time and day of the week that...

Page 58: ...d messages using the handset When there are no new messages The voice guide will be heard Press 5 or wait 4 seconds to listen to all the messages When voice memory is full The voice guide will be heard after playing the messages Erase some or all of the messages To repeat a message Press 1 while listening to the message If you press 1 within 5 seconds of the beginning of the message the previous m...

Page 59: ...te operation card Please cut out and carry this card for assistance when using the remote operation Mailbox Remote Operation Notice of Remote Operation Fold here Recording a message in a mailbox 1 Call your unit 2 Press and the mailbox no 1 or 2 3 Leave a message Retrieving messages from a mailbox 1 Call your unit 2 Press and the mailbox no 1 or 2 3 Enter the mailbox password 4 Press the remote co...

Page 60: ...ges Listening to recorded messages When there are new messages The voice guide will tell you the number of new messages and they will be played automatically To repeat a message Press 1 If you press 1 within 5 seconds of the beginning of a message the previous message will be played To skip a message Press 2 To repeat only the new messages Press 4 To listen to all the messages Press 5 Voice guide ...

Page 61: ...sfer phone number is not set Skipping the greeting message Press 0 during the greeting message playback The unit will skip the rest of the greeting message Erasing a specific message Press 4 while listening to the message you want to erase A long beep will sound The unit will then play back the next message Erasing all the messages Press 5 to erase all the messages A long beep will sound Other rem...

Page 62: ...rson who knows the password can retrieve a message from a mailbox This feature is useful when you share this unit with other people To use a mailbox 1 Record your own TAD FAX greeting message p 55 Suggested message This is your name We are unable to answer right now To send a fax start transmission To leave a message speak after the beep To leave a private message press and the desired mailbox num...

Page 63: ...ining recording time Example 6 When finished recording press The unit will repeat your message Adjust the volume using or 7 Press p BOX1_REC 15s BOX1_REC 16s BOX1_GREETING RECORD_______ BOX2_GREETING CHECK________ BOX1_GREETING CHECK________ SYSTEM_SET_UP PRESS_NAVI I H MENU SET Microphone STOP To check the mailbox greeting message 1 For mailbox 1 Press p 55 For mailbox 2 Press p 56 2 Press or to ...

Page 64: ...back See page 57 for details To repeat a message To skip a message To stop playback To change the playback speed To erase a specific message To erase all the messages in a mailbox 1 Press 2 times 2 Press or until the desired mailbox number is displayed Example 3 Press h 4 Press w BOX1 ERASE OK YES SET NO STOP PRESS REC ERASE PLAY MAILBOX1_ _01 SET STOP PLAY MESSAGES ERASE RECORD Listening to recor...

Page 65: ...w recorded messages When voice memory is full 3 new messages Voice guide example Listening to recorded messages using the handset 1 Call your unit from a remote touch tone telephone 2 Press and the desired mailbox number 1 or 2 during TAD FAX greeting playback If you have recorded your own mailbox greeting message it will be played 3 Enter the mailbox password default setting 555 If you have progr...

Page 66: ...e call using the remote operation To use this feature program the transfer telephone number first feature 60 on page 74 and set the unit to TAD FAX mode 1 An incoming voice message is recorded in your unit 2 Your unit calls the transfer telephone number 3 Answer the call with the transfer telephone 4 Your unit will play the transfer greeting message This message can be changed see below 5 Enter th...

Page 67: ...s and the 2 digit code number 3 Follow steps 3 to 5 above See programming tables for code numbers p 68 75 To cancel programming Press p to exit the program For basic features p 68 69 Press or until the desired feature is displayed For advanced features p 70 75 Press or until the following is displayed then press w and press or until the desired feature is displayed The current setting of the featu...

Page 68: ...lts p 39 SENDING REPORT MODE ERROR ERROR ON OFF The default setting is in bold type This setting is also available after activating FAX ONLY mode p 47 06 Changing the ring setting in FAX ONLY mode To change the number of rings before the unit answers a call in FAX ONLY mode FAX RING COUNT RINGS 3 1 2 3 4 Changing the ring setting in TAD FAX mode To change the number of rings before the unit answer...

Page 69: ... ringer pattern The selected ringer pattern will sound during setting 17 Setting the ringer pattern RINGER PATTERN MODE A A B C VOX Unlimited 1 MIN Up to 1 minute ID 111 1 Follow steps 1 and 2 on page 68 2 Enter any 3 digit number except a number using 0 or 7 3 Press w 4 Press p VOX 1 MIN 10 Changing the incoming message recording time RECORDING TIME MODE VOX Setting the remote operation ID REMOTE...

Page 70: ...ure before starting transmission This feature makes sending documents easier as the transmission speed is slowed down OVERSEAS MODE MODE ERROR Settings How the unit operates 25 Sending a fax at a specific time This feature allows you to take advantage of low cost calling hours offered by your telephone company The setting can be reserved to take place up to 24 hours in advance DELAYED SEND MODE OF...

Page 71: ...nd this feature will be turned off automatically Setting the quick scan To scan the document into memory before sending copying This is helpful when you want to remove the document for other uses QUICK SCAN MODE OFF 36 Receiving other size documents If the size of the document sent by the other party is as large as or larger than the recording paper the unit can reduce and print the document Selec...

Page 72: ...57 58 64 The beeps will stop 43 Setting the recording time alert To alert you with beeps when there is less than 60 seconds of remaining recording time REC TIME ALERT MODE OFF ON OFF How to set menu options Note Step 3 may be slightly different depending on the feature See page 67 for more details Programming table cont 1 Press p 2 Press or until the following is displayed then press w and press o...

Page 73: ...IENDLY RCV MODE ON ON OFF ON You do not have to press j for fax reception Voice guidance examples Start transmission Transmission is complete Transmission has failed Transmission has been interrupted Start reception etc Setting the fax voice guidance If you wish to hear the voice guidance see right at each fax transmission reception set this feature to ON To hear the voice guidance only when fax t...

Page 74: ...then press w and press or until the desired feature is displayed ADVANCED MODE PRESS SET 3 Press or until the desired setting is displayed 4 Press w 5 Press p Programming table cont Code Settings How the unit operates 1 Follow steps 1 and 2 above 2 Press or to select ON 3 Press w 4 Enter the transfer telephone number 5 Press w 6 Press p This feature can be turned on off from a remote location p 61...

Page 75: ... 49 for details 1 Follow steps 1 and 2 on page 74 2 Press or to select YES 3 Press w 4 Press w again 5 Press p You can confirm the status of the other party s machine If the ring back tone continues the other party s machine may not be a facsimile or may have run out of paper Check with the other party The connecting tone volume cannot be adjusted 76 Setting the connecting tone If you often have t...

Page 76: ...ception error occurred because of a problem with the other party s fax machine Check with the other party MEMORY FULL The document was not received due to memory being full NO DOCUMENT The document was not fed into the unit properly Reinsert the document and try again OTHER FAX NOT RESPONDING The other party s fax machine is busy or has run out of recording paper Try again The document was not fed...

Page 77: ...the document FAX IN MEMORY The memory is full of received documents due to a lack of recording paper or a recording paper jam Install paper or clear the jammed paper When performing memory transmission the document being stored exceeds the memory capacity of the unit Transmit the entire document manually FAX MEMORY FULL When making a copy the document being stored exceeds the memory capacity of th...

Page 78: ... OUT A transmission error occurred Try again TRANSMIT ERROR Handset Display message There is no space to store new items in the directory Erase unnecessary items p 29 The handset has lost communication with the base unit Move closer and try again Lay the handset on the base unit and try again The power cord is disconnected Plug in the power cord ÀÃ or XY was pressed while the base unit was in use ...

Page 79: ...ing though the paper is inserted The paper is inserted halfway Insert it correctly p 13 and press w to clear the message The other party complains they only hear a fax tone and cannot talk FAX ONLY mode is set Tell the other party the number is only used for faxes Change to TAD FAX mode p 54 TEL mode p 46 or TEL FAX mode p 48 If you use a distinctive ring service turn AUTO ANSWER off so that the f...

Page 80: ...n p 20 The handset does not ring The ringer volume is set to off Press in step 4 on page 21 The display shows the following and an alarm tone sounds when I press ë XY or ÀÃ The handset is too far from the base unit Move closer and try again Lay the handset on the base unit and try again The power cord is disconnected Plug in the power cord Static sound cuts in out fades Interference from other ele...

Page 81: ...mplains that letters on their received document are distorted or not clear If your line has special telephone services such as call waiting the service may have been activated during fax transmission Connect the unit to a line that does not have these services The extension telephone on the same line is off the hook Hang up the extension telephone and try again Try copying the document If the copi...

Page 82: ...er printing I cannot receive documents by pressing à on the handset Press à until a single beep is heard The memory is full of received documents due to a lack of recording paper or a recording paper jam Install paper or clear the jammed paper The other party complains that they cannot send a document The memory is full of received documents due to a lack of recording paper or a recording paper ja...

Page 83: ...While operating the answering device from the handset a series of tones is heard Someone is calling you from outside Press ë to answer the outside call The remote operation will be terminated I cannot operate the answering device with the handset Someone is operating the answering device You are too far from the base unit Move closer to the base unit ABC Original Copy If a power failure occurs The...

Page 84: ...x reception or copying the recording paper has jammed and the display will show the following Display __PAPER1JAMMED 2 Push the back cover open button green on the right side of the unit OR Push the back cover open lever green inside of the unit OR Back cover open lever green Back cover open button green Front cover Center part 4 Remove the jammed recording paper 3 Open the back cover ...

Page 85: ...tor Groove Battery leads 4 Replace the handset cover on the handset Be sure to charge the new battery for about 6 hours before use p 20 1 2 Attention A nickel cadmium battery that is recyclable powers the product you have purchased At the end of its useful life under various state and local laws it is illegal to dispose of this battery into your municipal waste stream Please call 1 800 8 BATTERY f...

Page 86: ...h a cloth moistened with isopropyl rubbing alcohol and let all parts dry thoroughly 4 Clean the glass with a soft and dry cloth 5 Close the front cover securely 6 Connect the power cord and the telephone line cord Power cord Telephone line cord If misfeeding occurs frequently or if dirty patterns or black bands appear on a transmitted document or on the original of a copied document clean the docu...

Page 87: ...87 Cleaning For fax advantage assistance call 1 800 435 7329 Thermal head Dotted area Center part Back cover open lever green Front cover Back cover Back cover open button green OR Black sheets ...

Page 88: ...t settings of the basic and advanced programming features p 68 75 Telephone number list provides you with names and telephone numbers which are stored in the directory Journal report keeps records of fax transmission and reception This report will be printed automatically after every 30 fax communications feature 22 on page 70 Printer test list allows you to check the print quality of your unit If...

Page 89: ... TO ANY CUSTOMER OR ANY OTHER THIRD PARTY WITH RESPECT TO ANY OF THE SERVICES PROVIDED BY OPENLCR NOR ASSUME NOR CREATE ANY OTHER OBLIGATION OF ANY KIND ON BEHALF OF OPENLCR 1 Press í Display 2 Press 0 3 Press 3 4 Press w The OPENLCR indicator will turn off LCR IS OFF TO DISABLE LCR PRESS SET TO DISABLE LCR PRESS 3 SET OPENLCR PRESS NAVI I H To set openLCR from ON to OFF Setting openLCR to OFF and...

Page 90: ...hen the rate table download is completed the OPENLCR indicator will stop flashing but will remain lit up and the display will show the following DOWNLOAD OK DOWNLOAD IN PROCESS TO ENABLE LCR PRESS SET TO ENABLE LCR PRESS 1 SET OPENLCR PRESS NAVI I H To set openLCR from OFF to ON To stop downloading 1 Press Display 2 Press w CANCEL DOWNLOAD YES SET NO STOP ...

Page 91: ...3 Press w The OPENLCR indicator will flash and your fax machine will automatically receive the rate table When rate table download is completed the OPENLCR indicator will stop flashing but will remain lit up and the display will show the following DOWNLOAD OK DOWNLOAD IN PROCESS NEW RATE TABLE PRESS SETT OPENLCR PRESS NAVI I H ...

Page 92: ...nd program the basic features and navigator directory you can download this data on your fax machine 1 Press í Display 2 Press or until the following is displayed or press 3 3 Press w DOWNLOAD OK DOWNLOAD IN PROCESS DATA FROM WEB PRESS SETT OPENLCR PRESS NAVI I H ...

Page 93: ...mer an opportunity to maintain uninterrupted service CAUTION Any changes or modifications not expressly approved by the party responsible for compliance could void the user s authority to operate this device When programming emergency numbers and or making test calls to emergency numbers 1 Remain on the line and briefly explain to the dispatcher the reason for the call before hanging up 2 Perform ...

Page 94: ...isuse abuse neglect mishandling faulty installation misapplication set up adjustments improper operation or maintenance alteration modification power line surge improper voltage supply lightning damage signal reception problems rental use of the product or service by anyone other than a PASC Factory Servicenter or a PASC authorized Servicenter or damage that is attributable to acts of God LIMITS A...

Page 95: ... 102 Hollywood FL 33020 GEORGIA 8655 Roswell Road Suite 100 Atlanta GA 30350 ILLINOIS 1709 North Randall Road Elgin IL 60123 MASSACHUSETTS 60 Glacier Drive Suite G Westwood MA 02090 MINNESOTA 7850 12th Avenue South Airport Business Center Bloomington MN 55425 OHIO 2236 Waycross Road Civic Center Plaza Forest Park OH 45240 PENNSYLVANIA 2221 Cabot Blvd West Suite B Langhorne PA 19047 TEXAS 13615 Wel...

Page 96: ...ent Copy Approx 45 W When copying a 20 black document Maximum Approx 135 W When copying a 100 black document Power supply 120 V AC 60 Hz Fax memory capacity Approx 25 pages of memory transmission Approx 28 pages of memory reception Based on the ITU T No 1 Test Chart in standard resolution Voice memory capacity Approx 18 minutes of recording time including greeting messages Handset Operating enviro...

Page 97: ...tion 51 34 Quick scan 39 52 71 Paper specifications Recording paper size Letter 216 mm x 279 mm 81 2 x 11 Legal 216 mm x 356 mm 81 2 x 14 A4 210 mm x 297 mm 81 4 x 1111 16 Note Do not use the following types of paper Paper with a cotton and or fiber content that is over 20 such as letterhead paper or paper used for resumes Extremely smooth or shiny paper or paper that is highly textured Coated dam...

Page 98: ...messages 76 Connecting tone Feature 76 75 Connections 14 Copy 52 Collation 53 Enlarge 53 Reduce 53 D Date and time Feature 01 15 68 Delayed transmission Feature 25 70 Dialing mode Feature 13 69 Directory Making a phone call 30 Selecting characters 17 26 Sending faxes 40 Storing 26 27 Display Contrast Feature 39 71 Error messages 76 78 Distinctive ring service Feature 31 51 71 Document size 39 E Er...

Page 99: ...3 Remote operation card 59 60 Remote operation ID Feature 11 69 Reports Broadcast programming 88 Broadcast sending 43 Caller ID 31 88 Journal 39 88 Power down 83 Printer test 88 Sending 39 Setup 88 Telephone number 88 Reset Feature 80 75 Resolution 38 52 Ring detection Feature 31 51 71 Ring setting FAX ONLY Feature 06 68 Silent fax Feature 30 71 TAD FAX Feature 06 68 TEL FAX Feature 78 75 Ringer p...

Page 100: ...uded with the returned product Any unit that is replaced by Panasonic and not shipped with proper proof of purchase by you will be subject to a minimum 100 00 charge The original unit must be properly packaged in the same manner as the replacement unit utilizing the packing materials provided Damage due to improper or inadequate packing will be charged to you as an out of warranty cost If our 1 80...

Reviews: