background image

23

R

Q

T8

512

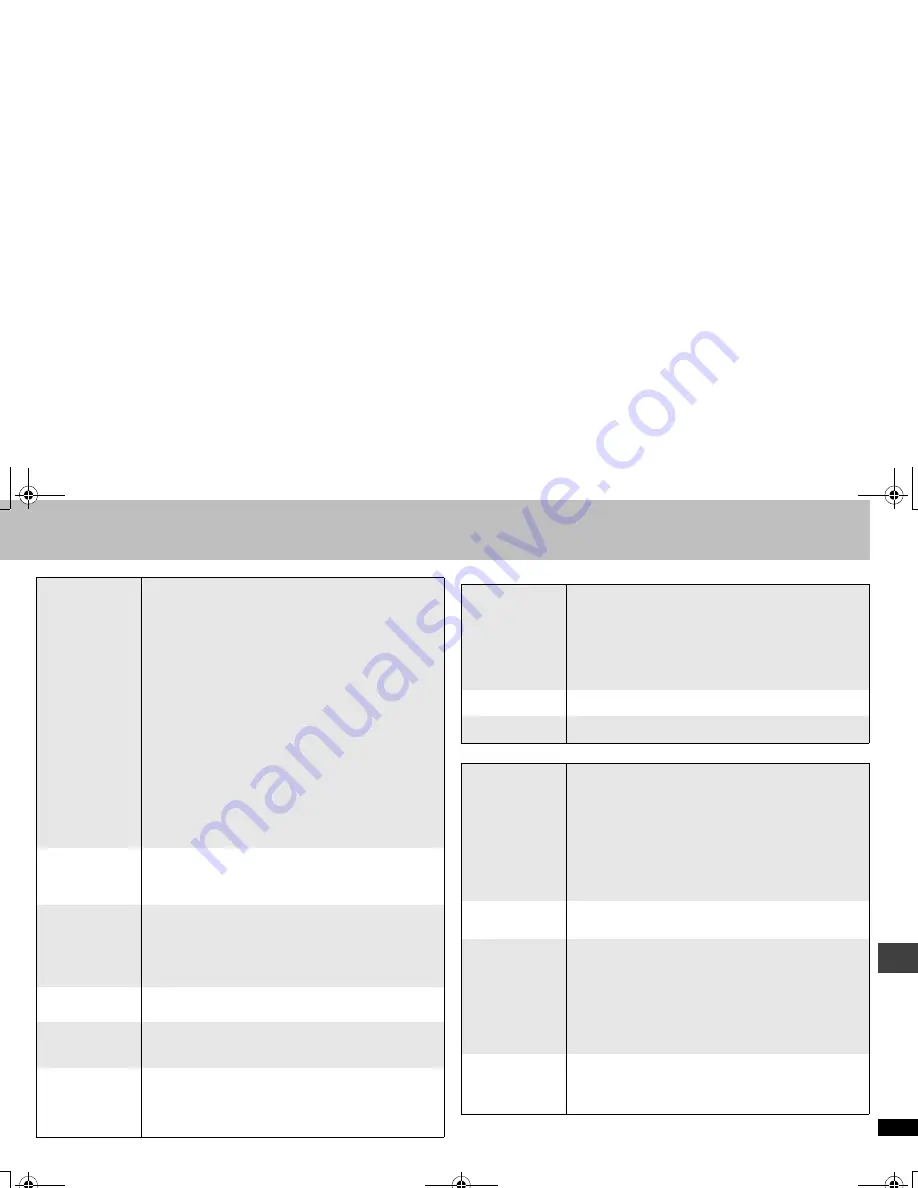
Picture incorrect

Progressive video

Sound incorrect

Picture distorted.

Ensure that the unit is not connected through a video cassette recorder. 

(6)

Have you selected an item in “Video Output Mode” (

page 

17, Picture Menu) that is incompatible with the connected 
equipment? Depending on the current connection status, 
perform corresponding steps.

When connecting to a television that is incompatible with 
progressive output using the COMPONENT VIDEO 
OUTPUT terminal:
Press and hold [CANCEL] until the picture displays 
correctly. The settings will return to “480i”.

When connecting to a television with an HDMI cable:
Press and hold [CANCEL] until the picture displays 
correctly. The settings will return to “480p”.

When connecting to an amplifier with an HDMI cable, and 
to a television that is incompatible with progressive output 
using the COMPONENT VIDEO OUTPUT terminal:
1.Disconnect the HDMI (remove the cable/switch off the 

amplifier). 

2.Press and hold [CANCEL] until the picture displays 

correctly. The settings will return to “480i”.

3.Set “Video Output” to “Off” in the “HDMI” tab. 

(20)

4.Connect the HDMI (connect the cable/switch on the 

amplifier).

Picture size 
doesn’t fit the 
screen.

Change “TV Aspect” in “Video” tab. 

(19)

Use the television to change the aspect. If your television 
does not have that function, change “4:3 Aspect” in Display 
Menu. 

(18)

Change the Zoom setting. 

(13)

The television may 
display incorrectly 
or colors appear 
faded.

PAL discs cannot be played. (You can play DVD-Audio; 

however, still pictures may be displayed enlarged.)

Connect to a progressive output compatible television to enjoy 

progressive video.

Picture may not be seen when more than 4 devices are 

connected with HDMI cables. Reduce the number of 
connected devices.

Menu not displayed 
correctly.

Restore the zoom ratio to 

a

1.00. 

(13)

Set “Subtitle Position” in Display Menu to “0”. 

(18)

Set “4:3 Aspect” in Display Menu to “Normal”. 

(18)

Auto zoom 
function does not 
work well.

Turn off TV’s zoom function.

Use the other preset aspect ratios or manual adjustment. 

(13)

Zoom function may not work well, especially in dark scenes 
and may not work depending on the type of disc.

Video is not 
output from HDMI 
AV OUT.

Change the HDMI video output settings by using either of 
the procedures below.

– Connect the television using VIDEO OUT or S VIDEO OUT 

terminal, then set “Video Output” to “On” in the “HDMI” tab. 

(20)

– Press and hold [CANCEL] until the picture is displayed. 

The settings will change to “On”.

There is ghosting 
when progressive 
output is on.

This problem is caused by the editing method or material 
used on DVD-Video, but should be corrected if you use 
interlace output. Change “Video Output Mode” in Picture 
Menu to “480i”. 

(17) 

When connecting with HDMI AV OUT terminal, connect with 
the other terminals and change the settings in the following 
order:

1. Select “Video Output”(“HDMI” tab) to “Off”. 

(20) 

2. Select “Video Output Mode”(Picture Menu) to “480i”. 

(17) 

Pictures not in 
progressive output.

If the unit is connected to the television through VIDEO OUT 
or S VIDEO OUT, output will be interlace.

Closed captions 
not displayed.

When progressive output or HDMI output is on, closed 
captions will not be displayed.

Sound distorted.

Select “Off” in “Advanced Surround”. 

(12)


Set “Attenuator” in Audio Menu to “On” if it causes distortion 
with AUDIO OUT connections. 

(18)

Noise may occur when playing WMA files.

The disc may have restrictions on the method of audio 

output. With some multi-channel discs, unless the number of 
connected speakers is the same as the disc’s channel 
specification, audio will not be output properly. Refer to the 
disc’s jacket for more information. 

[DVD-A]

With HDMI AV OUT connections, audio may not be output 

from other terminals in the way that was set.

Match the speaker settings with the connected equipment. 

(20)

Piercing noise 
comes from the 
speakers.

If you have connected a digital amplifier which does not 
include decoder, be sure to select “PCM” in “Dolby Digital” or 
“DTS Digital Surround” in “Audio” tab. 

(20)

Effects do not 
work.

None of the audio effects work when the unit is outputting 
bitstream signals from the DIGITAL AUDIO OUT or HDMI AV 
OUT terminal. 

(8)

Some audio effects do not work or have less effect with 
some discs.

Night Sound Mode, H.Bass, Advanced Surround, Multi Re-

master and Sound Enhancement do not work if you have 
changed the play speed.

With HDMI AV OUT connections, HDCD discs are played as 
normal CDs.

No sound

There may be a pause in sound when you change the play 
speed.

Audio may not be heard when more than 4 devices are 

connected with HDMI cables. Reduce the number of 
connected devices.

T

roub

le

shooti

ng guide

RQT8512-P.fm  Page 23  Saturday, January 21, 2006  10:17 AM

Summary of Contents for DVD-S52S

Page 1: ...ons completely Please keep this manual for future reference If you have any questions contact 1 800 211 PANA 7262 The warranty can be found on page 29 La referencia rápida en español se puede encontrar en la página 30 31 Region number The player plays DVD Video marked with labels containing the region number 1 or ALL 2 4 1 ALL 1 Example MULTI FORMAT PLAYBACK See page 4 for details Operations Refer...

Page 2: ...e 1 Read these instructions 2 Keep these instructions 3 Heed all warnings 4 Follow all instructions 5 Do not use this apparatus near water 6 Clean only with dry cloth 7 Do not block any ventilation openings Install in accordance with the manufacturer s instructions 8 Do not install near any heat sources such as radiators heat registers stoves or other apparatus including amplifiers that produce he...

Page 3: ...to alert the user to the presence of important operating and maintenance servicing instructions in the literature accompanying the appliance RISK OF ELECTRIC SHOCK DO NOT OPEN The socket outlet shall be installed near the equipment and easily accessible The mains plug of the power supply cord shall remain readily operable To completely disconnect this apparatus from the AC Mains disconnect the pow...

Page 4: ...all cases due to the type of discs the condition of the recording the recording method and how the files were created page 5 Tips for making data discs 1 This unit can play CD R RW recorded with CD DA or Video CD format WMA MP3 JPEG This unit also plays HighMAT discs 2 Discs recorded on DVD video recorders or DVD video cameras etc using Version 1 1 of the Video Recording Format a unified video rec...

Page 5: ...ratch proof protectors or covers Do not use the following discs Discs with exposed adhesive from removed stickers or labels rented discs etc Discs that are badly warped or cracked Irregularly shaped discs such as heart shapes Format Disc Extension Reference WMA CD R RW WMA wma Compatible compression rate between 48 kbps and 320 kbps You cannot play WMA files that are copy protected This unit is no...

Page 6: ... COMPONENT VIDEO IN AUDIO IN R L VIDEO IN IN S VIDEO Audio video cable included With VIDEO IN or S VIDEO IN S video cable With COMPONENT VIDEO IN Video cables When using this connection the audio cable red and white plugs should also be connected You can connect the audio cable to the 2 channel audio input terminals of an analog amplifier or system component to enjoy stereo sound Audio video cable...

Page 7: ...It is not compatible with the HDMI Control Function CEC Should you connect equipment that does not support CPPM page 28 Glossary the audio from the CPPM copy protected DVD Audio cannot be output from HDMI AV OUT terminal Connect the audio cable L R of the Audio Video cable to an HDMI compatible AUDIO IN terminal 2 Multi channel speakers To enjoy digital high definition video and high quality audio...

Page 8: ...ower when the unit is not to be used for a long time unplug it from the household AC outlet AC IN or STEP 2 The remote control Batteries Insert so the poles i and j match those in the remote control Do not use rechargeable type batteries Do not mix old and new batteries use different types at the same time heat or expose to flame take apart or short circuit attempt to recharge alkaline or manganes...

Page 9: ...use Stop 1Power ON 2Open the disc tray 3Load the disc 4Start play Remote control sensor Load double sided discs so the label for the side you want to play is facing up DVD RAM Remove discs from their cartridges before use Skip DVD VR Can also skip to the markers Stop The position is memorized when flashes on the display Press 1 PLAY to resume Resume play Press to clear the position Even after the ...

Page 10: ...ess PLAY MODE several times 2 Press the numbered buttons to select the items left Enter number Repeat this step to program other items 3 Press 1 PLAY Selecting all the items on the disc or in the title or group Press ENTER and 3 4 to select ALL then press ENTER again to register Changing the program Press 3 4 to select an item To change an item repeat step 2 To clear an item press CANCEL or select...

Page 11: ...epending on the disc s recording If the sound is distorted or there is noise set to Off This does not work when Night Sound Mode above is on Displaying current playback condition Reviewing titles programs to play DVD VR DVD V Except iR iRW Normal playback only QUICK OSD Main unit Quick OSD Chapter Title Time 0 00 22 1 1 Program Playback e g DVD V Playback condition Current position Elapsed play ti...

Page 12: ...Press 3 4 to select Play Menu and press 1 4 Press 3 4 to select Repeat and press 1 5 Press 3 4 to select an item to be repeated and press ENTER Depending on the disc the items that can be selected will differ Press QUICK REPLAY to skip back a few seconds This may not work depending on the disc s recording This does not work with R RW Convenient when you want to skip commercials etc During play pre...

Page 13: ...t leftiFront right 3 Front leftiFront rightiCenter This feature expands a letterbox picture to fit the screen Press ZOOM to select the preset aspect ratio or Auto Just Fit Zoom DVD VR DVD V VCD Auto 4 3 Standard European Vista 16 9 Standard Cinemascope2 Cinemascope1 American Vista Depending on the disc the preset aspect ratio may not be displayed MPEG4 Standard Original Full Fine adjustments Manua...

Page 14: ...NU Playing programs playlists DVD VR Playing the programs Playing a playlist Only when the disc contains a playlist Playing a scene PLAY LIST DIRECT NAVIGATOR Direct Navigator 11 1 WED 0 05 Monday feature AM AM PM PM PM 1 1 1 MON 1 05 Auto action 2 2 2 TUE 2 21 Cinema 3 3 3 WED 3 37 Music 4 4 10 THU 11 05 Baseball 5 Date No On Contents RETURN to select to exit 0 9 T i t l e 11 1 0 00 01 City Pengu...

Page 15: ...U Press 2 to erase a character Erase the asterisk to search for the titles starting with that character 5 Press 1 to select Find and press ENTER The search result screen appears 6 Press 3 4 to select the content or group and press ENTER Playing data discs WMA MP3 JPEG MPEG4 MENU TOP MENU Playing items in order Playback Menu Playing from the selected item Navigation Menu Playback Menu ENTER to sele...

Page 16: ...icture To switch still picture Thumbnail To show thumbnail images Subtitle page 13 Changing subtitles Marker VR To recall a marker recorded on DVD Video recorders Angle page 13 Angle select Rotate Picture page 13 Still picture rotation Slideshow To turn on off slideshow To change the slideshow timing 1 Fast 5 Slow When using Slideshow Skip Rotate picture may not work correctly depending on the pla...

Page 17: ...ill return to 480p Output from the COMPONENT VIDEO OUT terminal will be 480p With HDMI connection When Video Output is set to Off page 20 HDMI tab or other connections 480i interlace 480p progressive When you select 480p and a confirmation screen appears select Yes only if connecting to a progressive output compatible television Transfer Mode If you have chosen 480p 720p or 1080i left select the m...

Page 18: ... YCbCr 4 4 4 YCbCr 4 2 2 RGB page 13 Changing soundtracks Shows the maximum channel number of the connected equipment page 17 Video Output Mode page 17 HDMI Color Space All possible outputs are displayed The current output for Audio Stream Video Format and Color Space will be underlined When Off is selected in Audio Output page 20 HDMI tab will be displayed in Audio Stream and Max Channel Confirmi...

Page 19: ...orded on them 0 Lock All To prevent play of discs without ratings levels When setting a ratings level a password screen is shown Follow the on screen instructions Do not forget your password A message screen will be shown if a DVD Video exceeding the ratings level is inserted in the unit Follow the on screen instructions TV Aspect Choose the setting to suit your television and preference 4 3 Pan S...

Page 20: ...nhanced When the black and white images are not distinct Video Output This setting is irrelevant when connected through the VIDEO or S VIDEO OUT terminal On Select this when connected through the HDMI terminal Video is output from the HDMI terminal Video is also output from the COMPONENT VIDEO OUT terminal but only in 480p progressive Off Select this when connected through the COMPONENT VIDEO OUT ...

Page 21: ...d find the difference in the relevant table and change to the recommended setting 1 Press 3 4 2 1 to select an item and press ENTER 2 Press 3 4 to change the content and press ENTER To finish the speaker setting Press 3 4 2 1 to select Exit and press ENTER Changing the speaker setting to suit your speakers Speaker presence and size a ms ms L Exit LS R SW C RS 0 0 0 0 LS RS Exit Front L Center Fron...

Page 22: ... password Reset all the settings to Factory Preset While stopped press and hold QUICK OSD and on the unit and then also press and hold OPEN CLOSE on the unit until Initialized disappears from the television Turn the unit off and on again All settings will return to the default values It takes time before play starts Play may take time to begin when an MP3 track has still picture data Even after th...

Page 23: ... of the procedures below Connect the television using VIDEO OUT or S VIDEO OUT terminal then set Video Output to On in the HDMI tab 20 Press and hold CANCEL until the picture is displayed The settings will change to On There is ghosting when progressive output is on This problem is caused by the editing method or material used on DVD Video but should be corrected if you use interlace output Change...

Page 24: ...ber following U70 will depend on the state of this unit The HDMI connection acts unusually The connected equipment is not HDMI compatible The HDMI cable is too long The HDMI cable is damaged The operation is prohibited by the unit or disc Cannot play group xx content xx Cannot display group xx content xx You are trying to play incompatible group or content 5 Group xx content xx is protected You ar...

Page 25: ...haracteristics as the original parts Unauthorized substitutes may result in fire electric shock or other hazards 4 Safety check After repairs or service ask the servicer to perform safety checks to confirm that the unit is in proper working condition For product information or assistance with product operation Refer to Customer Services Directory on page 29 Product information Maintenance Clean th...

Page 26: ... protection technology that is protected by method claims of certain U S patents and other intellectual property rights owned by Macrovision Corporation and other rights owners Use of this copyright protection technology must be authorized by Macrovision Corporation and is intended for home and other limited viewing uses only unless otherwise authorized by Macrovision Corporation Reverse engineeri...

Page 27: ...udio 4 Hz to 20 kHz 2 S N ratio CD Audio 115 dB 3 Dynamic range DVD linear audio 102 dB CD Audio 98 dB 4 Total harmonic distortion CD Audio 0 0025 Digital audio output Optical digital output Optical terminal Coaxial digital output Pin jack HDMI AV output 19 pin HDMI Ver 1 2a EDID Ver 1 3 Pickup Wave length 662 nm 785 nm Laser power CLASS II CLASS I Power supply AC 120 V 60 Hz Power consumption 11 ...

Page 28: ...cture films Video Recorded at 30 frames 60 fields per second Generally appropriate for TV drama programs or animation HDCD High Definition Compatible Digital HDCD encoded CDs sound better because they are encoded with 20 bits as compared with 16 bits for all other CDs HDMI High Definition Multimedia Interface HDMI is a next generation digital interface for consumer electronic products Unlike conve...

Page 29: ...age modification or commercial use such as hotel office restaurant or other business rental use of the product or service by anyone other than a Factory Servicenter or other Authorized Servicer or damage that is attributable to acts of God THERE ARE NO EXPRESS WARRANTIES EXCEPT AS LISTED UNDER LIMITED WARRANTY COVERAGE THE WARRANTOR IS NOT LIABLE FOR INCIDENTAL OR CONSEQUENTIAL DAMAGES RESULTING F...

Page 30: ...tly to TV PR PB R L Y DIGITAL AUDIO OUT PCM BITSTREAM PR PB Y DIGITAL AUDIO OUT PCM BITSTREAM Please connect OPTICAL AUDIO IN R L VIDEO IN Televisor Cable de audio vídeo incluido Parte posterior del aparato HDMI IN Cable HDMI Televisor Parte posterior del aparato AC IN Cable de alimentación de CA incluido A una toma de CA Referencia rápida en español RQT8512 P fm Page 30 Saturday January 21 2006 1...

Page 31: ... durante la pausa Hasta 5 pasos Pulse 1 PLAY para reiniciar la reproducción VCD Cámara lenta en sentido de avance solamente MPEG4 Cámara lenta No funciona Salto DVD VR También puede saltar a marcadores Salto de grupo WMA MP3 JPEG MPEG4 No funciona durante la pausa Cuadro a cuadro durante la pausa DVD VR DVD V VCD VCD Sentido de avance solamente Selección de elemento en pantalla Vuelta a la pantall...

Page 32: ...sume play 9 Rotate Picture 13 SSetup 19 Sound Enhancement 18 Soundtrack 13 Subtitle 13 TTime Slip for play only 16 Top Menu 10 15 ZZoom 13 If you see this symbol Information on Disposal in other Countries outside the European Union This symbol is only valid in the European Union If you wish to discard this product please contact your local authorities or dealer and ask for the correct method of di...

Reviews: