background image

14

RQT8697

Enjoying higher quality audio and video

Reproducing more natural audio (Multi Re-master)

[DVD-VR] [DVD-V] 

(recorded with 48 kHz only)


[VCD]


[CD]

:

 This feature gives you a more natural 

sound by adding higher frequency signals not recorded on the disc, for example, playing DVD-Video 
recorded with 48 kHz at 96 kHz.

[WMA]


[MP3]


(recorded with other than 8 kHz, 16 kHz or 32 kHz)

:

 reproduces the frequencies lost 

during recording to give you a sound closer to the original.

This feature does not work when H.Bass (

 below) or Advanced Surround (

page 11) is on.

This feature does not work with 

[MP3] 

on DVD-RAM or DVD-R/RW.

When connecting with a digital optical cable (

page 25), the actual output sampling frequency 

depends on “PCM Digital Output” setting in “Audio” tab (

page 21).

Enjoying heavy bass with the speakers (H.Bass)

 [DVD-V]

Providing the suitable picture quality for enjoying movies (Cinema1/Cinema2)

Cinema1: 

Mellows images and enhances detail in dark scenes.

Cinema2: 

Sharpens images and enhances detail in dark scenes.

Reducing noise in pictures (Depth Enhancer/MPEG DNR)

Depth Enhancer

: Reduces the rough noise in the background to give a greater feeling of depth.

MPEG DNR

: Smoothes block noise and reduces the smudging that appears around contrasting sections of the picture.

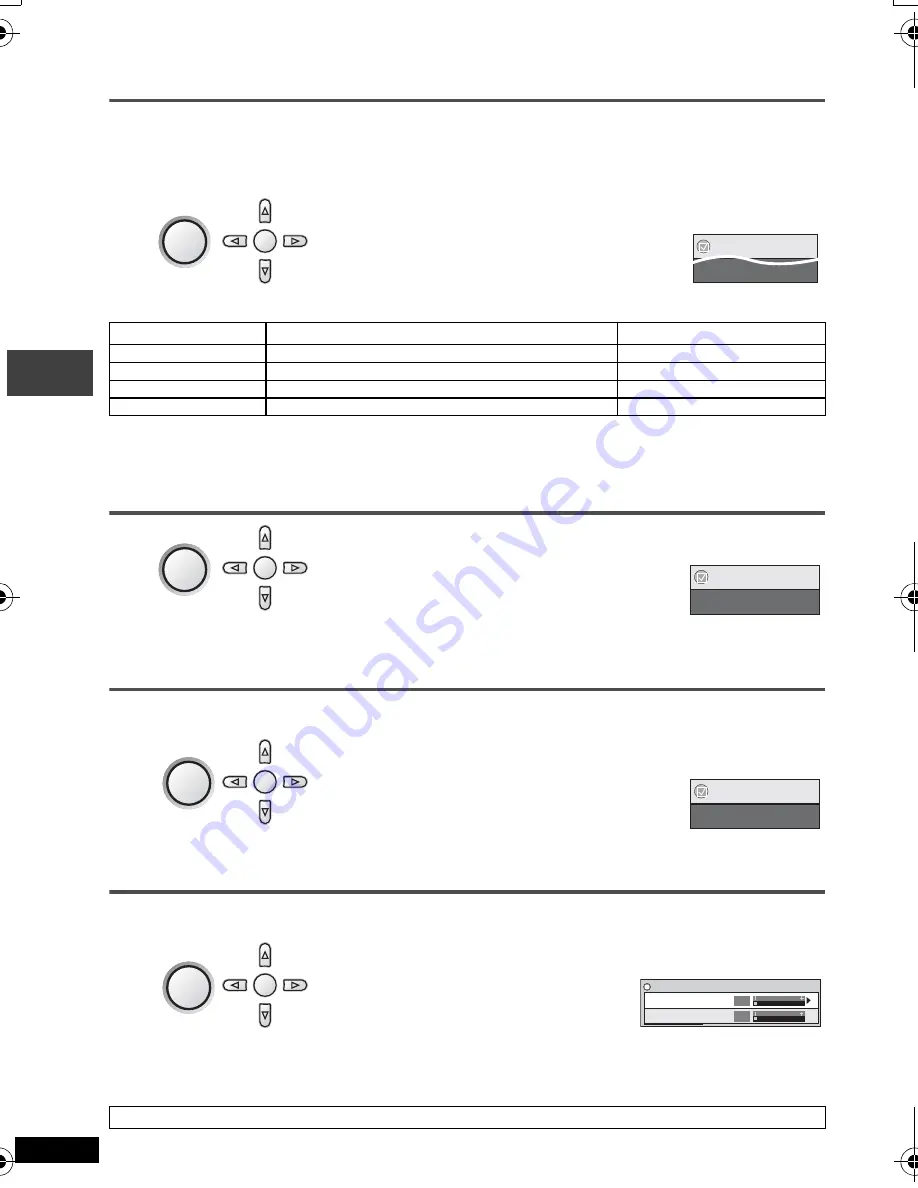
1

Press [

34

] to select “Other Settings”.

2

Press [

1

] then [

34

] to select “Audio Menu”.

3

Press [

1

] then [

34

] to select “Multi 

Re-master”.

4

Press [ENTER] and [

34

] to select “1”, “2” or “3”.

5

Press [ENTER].

To exit the screen : 

Press

 [RETURN].

Setting

Type of music 

[

[DVD-V]


[CD]


(LPCM)]

Effect level 

(Other discs)

1

High tempo (e.g., pop and rock)

Light

2

Various tempos (e.g., jazz)

Medium

3

Low tempo (e.g., classical)

Strong

Off

Off

Off

1

Press [

34

] to select “Other Settings”.

2

Press [

1

] then [

34

] to select “Audio Menu”.

3

Press [

1

] then [

34

] to select “H.Bass”.

4

Press [

1

] then [

34

] to select “On” or “Off”.

5

Press [ENTER].

To exit the screen : 

Press

 [RETURN].

If the sound is distorted or there is noise, set to “Off”.

1

Press [

34

] to select “Other Settings”.

2

Press [

1

] then [

34

] to select “Picture Menu”.

3

Press [

1

] to select “Picture Mode”.

4

Press [

1

] then [

34

] to select 

“Cinema1” or “Cinema2”.

To exit the screen : 

Press

 [RETURN].

1

In the procedure 2

s

(

 above, Cinema1/Cinema2), 

select “User” and press [ENTER].

2

Press [

34

] to select “Picture 

Adjustment”and press [ENTER].

3

Press [

34

] to select “Depth 

Enhancer” or “MPEG DNR”.

4

Press [

2


1

] to change the setting. 

(Depth Enhancer

: 0 to 

i

4, 

MPEG DNR: 

0 to 

i

3)

To exit the screen : 

Press

 [RETURN].

The above indicated features may not work depending on the disc’s recording.

DISPLAY

1

Press once.

ENTER

2

 Menu

Multi Re-master       1

1

Press once.

DISPLAY

ENTER

2

 Menu

H.Bass

Off

DISPLAY

1

Press once.

ENTER

2

 Menu

Picture Mode

Cinema1

DISPLAY

1

Press once.

ENTER

2

Picture  Adjustment 

Depth Enhancer

Depth Enhancer

0

MPEG DNR

0

Enj

o

ying hi

gher quali

ty

 audi

o and 

vi

deo

p2‑31.fm  Page 14  Thursday, February 23, 2006  12:25 PM

Summary of Contents for DVD-LS912

Page 1: ...hasing this product For optimum performance and safety please read these instructions carefully Before connecting operating or adjusting this product please read the instructions completely Please keep this manual for future reference Operations in these instructions are described mainly with the main unit but you can do the operations on the remote control if the remote controls are the same Unle...

Page 2: ...affic hazard and is illegal in many areas You should use extreme caution or temporarily discontinue use in potentially hazardous situations Even if your headphones or earphones are the open air type designed to let you hear outside sounds don t turn up the volume so high that you can t hear what s around you Do not rest the unit on your lap for a long time while using it The unit can become hot an...

Page 3: ...ayer Do not use the player outside if it is snowing or raining The battery pack is not waterproof Do not get dirt sand liquids or other foreign matter on the terminals Do not touch the plug terminals i and j with metal objects Do not disassemble remodel heat or throw into fire Do not store the battery pack in temperature over 60 oC 2 Button type battery Lithium battery Insert with poles aligned Do...

Page 4: ...e some functions cannot be used 4 A process that allows play on compatible equipment To play a disc that is displayed as Necessary on this unit the disc must first be finalized on the device it was recorded on 5 Closing the session will also work Disc Logo Indicated in these instructions by Remarks Discs that cannot be played DVD Audio Version 1 0 of DVD RW DVD ROM CD ROM CDV CD G SACD and Photo C...

Page 5: ... DVD R RW 11 02 12 22 05 24 44 1 and 48 kHz CD R RW 8 11 02 12 16 22 05 24 32 44 1 and 48 kHz Compatible compression rate between 32 kbps and 320 kbps This unit is not compatible with ID3 tags JPEG DVD RAM DVD R RW CD R RW JPG jpg JPEG jpeg JPEG files taken on a digital camera that conform to DCF Standard Version 1 0 are displayed Files that have been altered edited or saved with computer picture ...

Page 6: ...se this unit without charging while connecting the AC adaptor and the AC mains lead You can also use this unit without charging while connecting Car DC Adaptor page 24 Connecting the included Car DC Adaptor To conserve power This unit consumes 0 3 W of power even when turned off When the unit is not going to be used for a long time disconnect the AC mains lead from the household mains socket The u...

Page 7: ...ery included Range of use 4 Adjusting the LCD angle Battery pack Play at room temperature using headphones LCD brightness level LCD Off j5 0 5 factory preset CGR H701 DVD LS91 3 2 1 5 5 CGR H712 DVD LS912 6 4 3 10 CGR H713 optional 10 7 5 15 screen Recharge Appears automatically when there is only a few minutes of charge remaining 3 1 2 30o 30o Aim at the sensor Maximum range is up to 7 m _ facing...

Page 8: ...ress 1 ON to restart play Stop The position is memorized when Press PLAY to resume play appears on the screen Press 1 ON to resume Resume play Opening the disc lid or pressing OFF while Press PLAY to resume play appears on the screen cancels the memorized position Turn unit off Press and hold until OFF is displayed 4 Adjust the volume 1 Open the lid 2 Insert a disc and close the lid Click into pla...

Page 9: ...o the menu Menu operation Press 3 42 1 to select an item and press ENTER to confirm Frame by frame DVD VR DVD V VCD While paused press 2 1 VCD 1 only Group skip WMA MP3 JPEG MPEG4 DivX Press 3 4 Does not work while paused Turn unit on off You cannot turn on the unit with the remote control if the unit is powered by the battery pack Play Press and play begins Skip Press 9 DVD VR Can also skip to th...

Page 10: ...ect the item and 2 1 to change the setting BRIGHT Dims or brightens the picture s5 to 5 COLOUR Adjusts the shade of the picture s color s5 to 5 To exit the screen Press RETURN Press several times to select the content to be repeated To exit the screen Press RETURN 1 Press 34 to select Other Settings 2 Press 1 then 34 to select Play Menu 3 Press 1 then 34 to select A B Repeat 4 Press ENTER at the s...

Page 11: ...round below Multi Re master page 14 and Sound Enhancement page 19 Audio Menu do not work Digital output switches to PCM 96 kHz sampling frequency is converted to 48 kHz This may not work depending on the disc s recording To exit the screen Press RETURN This function is effective only when Monitor Priority is set to Video Output page 20 Video tab Press to select SP 1 Natural SP 2 Enhanced HP 1 Natu...

Page 12: ...be shown for subtitles that are not displayed DVD VR with subtitle on off information Press to select On or Off On or Off only can be selected Subtitle on off information cannot be recorded using Panasonic DVD Recorders Angle select DVD V with multiple angles Still picture rotation JPEG Press to select the angle or rotate the still picture Displaying current playback condition Quick OSD MPEG4 DivX...

Page 13: ...e whole program Select Clear all and press ENTER The whole program is also cleared when the unit is turned off or the disc lid is opened Random play To exit the program or random mode Press PLAYMODE several times while stopped PLAYMODE PLAYMODE While stopped Press to change PLAY PLAY Choose a title and chapter No Time Title Play Clear Clear all Chapter 1 1 1 Press to select an item page 9 Enter nu...

Page 14: ...34 to select Other Settings 2 Press 1 then 34 to select Audio Menu 3 Press 1 then 34 to select Multi Re master 4 Press ENTER and 34 to select 1 2 or 3 5 Press ENTER To exit the screen Press RETURN Setting Type of music DVD V CD LPCM Effect level Other discs 1 High tempo e g pop and rock Light 2 Various tempos e g jazz Medium 3 Low tempo e g classical Strong Off Off Off 1 Press 34 to select Other S...

Page 15: ... 1 05 Auto action 2 2 2 TUE 2 21 Cinema 3 3 3 WED 3 37 Music 4 4 10 THU 11 05 Baseball 5 Date No On Contents RETURN to exit Title to select TOP MENU 1 2 0 00 01 City Penguin 1 2 3 0 01 20 Ashley at Prom 2 3 4 1 10 04 Formula one 3 4 5 0 10 20 Soccer 4 5 6 0 00 01 Baseball 5 Date No TotalTime T i t le P l ay l i s t RETURN to exit 6 7 0 00 01 City Penguin 6 7 8 0 01 10 Ashley at Prom 7 8 9 0 13 22 ...

Page 16: ...nd press ENTER While the menu is displayed Press 34 to select All Audio Picture or Video and press ENTER To display exit the screen Press TOP MENU Press 3421 to select the group and press ENTER To play content in the group in order Press ENTER To start play from the selected content Press 34 to select and press ENTER ENTER Playback Menu ENTER to select and press All Total 436 Audio Total 7 Picture...

Page 17: ...press Press to stop play you press 9 or 6 5 etc and arrive at another content or the start of the content being played Resume play page 8 Stop does not work This product is licensed under the MPEG 4 Visual patent portfolio license for the personal and non commercial use of a consumer for i encoding video in compliance with the MPEG 4 Visual Standard MPEG 4 Video and or ii decoding MPEG 4 Video tha...

Page 18: ...show Time Slip indicator 2 Press 34 to select the time and press ENTER Press and hold 34 to alter faster To change remaining elapsed time display Video To display pixel number DivX fps frame per second is also displayed Audio page 12 Changing soundtracks To display the current bitrate or sampling frequency Number Select VCD with playback control To enter number Press and hold 34 to alter faster Th...

Page 19: ...On Off Subtitle Position 0 to 60 in 2 units Subtitle Brightness Auto 0 to 7 Just Fit Zoom Motion pictures To expand the letterbox picture to fit the screen Press 34 to select the preset aspect ratio or Auto DVD VR DVD V VCD Auto 4 3 Standard European Vista 16 9 Standard Cinemascope2 Cinemascope1 American Vista Depending on the disc the preset aspect ratio may not be displayed MPEG4 DivX Standard O...

Page 20: ...s unit Video Output When connected to a television TV Aspect Choose the setting to suit your television and preference 4 3 Pan Scan Regular aspect television 4 3 The sides of the widescreen picture are cut off so it fills the screen unless prohibited by the disc 4 3 Letterbox Regular aspect television 4 3 Widescreen picture is shown in the letterbox style 16 9 Widescreen television Use the televis...

Page 21: ... When Initialised appears on the screen wait for about 10 seconds Press ENTER and turn the unit off and on again No Manufactured under license from Dolby Laboratories Dolby and the double D symbol are trademarks of Dolby Laboratories DTS and DTS 2 0 i Digital Out are trademarks of Digital Theater Systems lnc Language code list Abkhazian 6566 Afar 6565 Afrikaans 6570 Albanian 8381 Ameharic 6577 Ara...

Page 22: ... the back of the seat in a location that interferes with the driver s view or operation of the car in a location that interferes with the operation of an airbag in a location that interferes with the driving instruments Make sure that the bracket belt is securely fastened and check the lock on the unit In the event of an accident sudden acceleration or braking the unit could become loose and cause...

Page 23: ...onitor in the open position as shown in the illustration to the right to prevent abnormal audio or damage resulting from vibrations in the car The angle of the monitor can be adjusted up to about 30o Diagram of attached bracket The angle of the monitor may shift while driving due to vibration etc Depending on the type of headrest you may not be able to attach the bracket 23 cm or less 1 2 Releasin...

Page 24: ...eing used and if a battery pack is attached to this unit it will start recharging which uses more power Do not use the Car DC Adaptor for long periods when the engine is not running Turn the unit off before stopping the engine while using Car DC Adaptor otherwise resume play page 8 may not work Leave some slack in the cord No responsibility will be taken for damage that occurs due to faulty instal...

Page 25: ... unit 2 Press AV SELECT to switch to AUX AUX lights on the unit s display The unit does not turn off automatically while AUX mode is on Turn the unit off when you have finished using it AUDIO OPT OUT AUDIO OPT OUT Left side of this unit Digital optical cable not included Do not bend sharply Align and insert AV amplifier with Dolby Digital DTS logo OPTICAL IN Connect the 6 speakers to the amplifier...

Page 26: ...r cases or cartridges when you are not using them Do not use the following discs Discs with exposed adhesive from removed stickers or labels rented discs etc Discs that are badly warped or cracked Irregularly shaped discs such as heart shapes What kind of equipment is necessary to enjoy 5 1ch audio Connect to an AV amplifier that has 5 1ch audio output terminals displaying the Dolby Digital DTS lo...

Page 27: ...ed in these operating instructions 4 The unit may not be operating properly due to lightning static electricity or some other external factor Turn the unit off and then back to ON Alternatively turn the unit off disconnect the power source AC or battery pack and then reconnect it Condensation has formed Wait 1 to 2 hours for it to evaporate No response when remote control buttons pressed Check tha...

Page 28: ...played correctly Restore the zoom ratio to a1 00 19 Set Subtitle Position in Display Menu to 0 19 Auto zoom function does not work well Use the other preset aspect ratios or manual adjustment 19 Zoom function may not work well especially in dark scenes and may not work depending on the type of disc Sound distorted Select Off in Advanced Surround 11 Move unit away from mobile phones Noise may occur...

Page 29: ...The number appearing after H depends on the problem Turn the unit off and on again Alternatively turn the unit off disconnect the power source AC or battery pack reconnect the power and turn the unit on again If the service numbers fail to clear note the service numbers and consult your dealer Cannot display group xx content xx You are trying to play incompatible groups or content 5 Authorization ...

Page 30: ... 7 2 V Exclusive battery terminal Power consumption using included AC adaptor 13 W Unit only 10 W Power consumption in Standby mode using included AC adaptor approx 0 3 W Power consumption in Recharge mode using included AC adaptor 13 W AC adaptor Power source AC 100 to 240 V 50 60 Hz Power consumption 28 W DC output 12 V 1 5 A Car DC Adaptor DC output 12 V 2 A Vehicle with 12 V battery only Batte...

Page 31: ...NNEBYGGET KABINETT ELLER ET ANNET LUKKET STED HVORVENTILASJONSFORHOLDENE ER UTILSTREKKELIGE SØRG FOR AT GARDINER ELLER LIGNENDE IKKE FORVERRER VENTILASJONSFORHOLDENE SÅ RISIKO FOR ELEKTRISK SJOKK ELLER BRANN FORÅRSAKET AV OVERHETING UNNGÅS APPARATETS VENTILASJONSÅPNINGER MÅ IKKE DEKKES TIL MED AVISER BORDDUKER GARDINER OG LIGNENDE PLASSER IKKE ÅPEN ILD SLIK SOM LEVENDE LYS OPPÅ APPARATET BRUKTE BA...

Page 32: ...peed 11 Playback Menu 16 Playlist 15 Programs 15 Program Random play 13 Quick OSD 12 Re initialise Setting 21 REPEAT 10 Resume play 8 Rotate Picture 12 Setup 20 Sound Enhancement 19 Soundtrack 12 Subtitle 12 Time Slip for play only 18 TOP MENU 9 15 16 This product incorporates copyright protection technology that is protected by method claims of certain U S patents and other intellectual property ...

Reviews: