background image

6-3  Configuring the Machine with Tools Mode

155

Custom Presets

6

Select Screen Layout.

Select Change Settings in Default Screen.

 Select Change Settings.

Select the screen to be displayed as the default screen and
select Save.

For example, select Customised Features.

For models with the printer feature,
the screen displayed differs.

Summary of Contents for DP-6000

Page 1: ...0 7000 Options DA FS700 MA700 XT700 TR700 Operating Instructions For Copier Before operating this copier please read these instructions completely and keep this operating guide for future reference Th...

Page 2: ...Parts of this manual are subject to change without prior notice We welcome any comments on ambiguities errors omissions or missing pages Never attempt any procedure on the machine that is not specifi...

Page 3: ...emit hazardous laser radiation Since radiation emitted inside the machine is completely confined within the protective housings and external covers the laser beam cannot escape from the machine durin...

Page 4: ...size of each original 5 5 Loading Mixed Size Originals Mixed Size Originals Making a copy with altered dimensions You can make copies by changing the length width of your document 4 4 Reducing Enlargi...

Page 5: ...y found on copies made with the document cover open or when the copies are made from bound documents A Left Right Edges Top Bottom Edges A A Shadow 5 8 Erasing the Edges and Copying All Edge Erase Cop...

Page 6: ...ou can copy an image and repeat it on a paper 5 16 Repeating an Image Repeat Image Creating mirror images You can create a copy containing the mirror image of a document by reversing its orientation 5...

Page 7: ...onal finisher is installed 4 8 Stapling Stapling 4 9 Punching Holes Punching Enhancing the sharpness of a photo You can enhance or reduce the sharpness of a photo 5 13 Enhancing Sharpness Sharpness Ma...

Page 8: ...to load the documents Read this chapter before loading documents on the copier Chapter 4 Basic Features This chapter describes the basic copying operations and nice to know applications so that users...

Page 9: ...drum toner cartridges checking the meters and cleaning the machine Read this chapter when necessary Chapter 9 Using the Auditron Feature This chapter explains the Auditron feature of this copier Audit...

Page 10: ...viii Conventions The manual uses the following conventions...

Page 11: ...mmable Electric shock Pinched fingers Prohibited No fire Do not tear down Do not touch Instructions Unplug Ground Earth Precautions for installation and relocation Do not place the machine in a hot hu...

Page 12: ...The specifications that apply to your machine depend on your machine configuration Connect the power plug only to a properly rated power outlet Otherwise it can cause fire or electric shocks If in dou...

Page 13: ...switch then the power switch to the position Do not attempt to rework pull bend chafe or otherwise damage the power cord Do not place a heavy object on the cord A damaged cord can cause fire or elect...

Page 14: ...ne covers that are secured with screws unless specifically instructed in this manual A high voltage component can cause electric shocks Do not try to alter the machine configuration or modify any part...

Page 15: ...r remaining in the cartridge can cause an explosion and you can get burnt Never throw a toner cartridge into an open flame It can cause an explosion and you can get hurt Never throw developer or a dev...

Page 16: ...ith plenty of clean water Consult a doctor if necessary If toner adheres to your skin wash it with soap and water then rinse it well If you inhale toner exit the area immediately and gargle with plent...

Page 17: ...in Japan In the case of the following items not only counterfeiting but also reproducing any items with a similar appearance shall be punishable currencies foreign currencies national bonds local bon...

Page 18: ...opyrighted works including those that have been fixed as electronic information by means of telecommunication networks such as Internet facsimile and email and to upload copyrighted works to interacti...

Page 19: ...auto shut off time is set at 60 minutes and above See Time Outs in 6 1 List of Custom Preset Functions of this guide for details Sleep mode feature This product has a power saving feature which switc...

Page 20: ...e Touch Panel Display 8 1 4 Entering Password When the Auditron Feature is Enabled 13 1 5 Saving Power 15 Chapter 2 Loading Paper 2 1 What Paper to Use 18 Weights of paper 18 Paper size and tray loadi...

Page 21: ...originals 61 4 7 Collating Copy Output Output Finishing 64 4 8 Stapling Stapling 67 4 9 Punching Holes Punching 70 4 10 Resetting the Copy Sets and Feature Settings to Their Defaults 73 Resetting the...

Page 22: ...s 140 Feature Defaults 141 Audio Tones 142 Original Size Defaults 143 Original Paper Size Sensing 143 Time Outs 144 R E Presets 144 Change of Access Number 145 Screen Layout 145 System Setup 146 Image...

Page 23: ...ptying the Punch Scrap Container 208 8 8 Checking the Billing Meter 210 8 9 Making Clean Copies 212 Chapter 9 Using the Auditron Feature 9 1 Auditron 216 9 2 Displaying the Auditron Administration Mod...

Page 24: ...Components and Their Functions 2 1 2 Switching On and Off 6 1 3 Using the Touch Panel Display 8 1 4 Entering Password When the Auditron Feature is Enabled 13 1 5 Saving Power 15 1 Getting to Know You...

Page 25: ...that the edge of each set is placed to the left or right of the previous copy set to allow easy separation Open this cover to clear paper jams Load paper stock in these trays Open this door to clear p...

Page 26: ...the toner image on the drum to the paper Pull out this unit to clear paper jams Toner Cartridge Contains toner image forming powder Breaker Switch Controls the power supply to the machine Once leakage...

Page 27: ...the Settings Meter Check screen or screen for setting printer specifications if the printer function is installed You can also check the meter reading Press this button to interrupt the current copy...

Page 28: ...ess this button to delete a wrong character entry and stop a copy or print job Use the keys to enter the number of sets to be copied or numeric values for feature settings 11 12 Communicating Indicato...

Page 29: ...breaker switch is normally set to the I position However when it is not used for an extended period of time or when it is to be relocated switch it to the O position Switching on the power Turn the p...

Page 30: ...s available for models with only the copy function See Time Outs in 6 1 List of Custom Preset Functions on how to change the settings The Auto Power Off feature is not available for models with the pr...

Page 31: ...n is used to explain the respective parts of a screen In this section the touch panel display will be referred to as the display Feature Status Mark The status of a feature is indicated by a mark Mess...

Page 32: ...Customised Features Features Menu or Stored Jobs button located on the right of the display The corresponding screen of the selected button will be displayed The factory default screen when you switc...

Page 33: ...1 Getting to Know Your Copier Selecting a feature Touch a displayed button to select a feature or value See Chapters 4 to 6 for details When the feature name is displayed on the button When there is...

Page 34: ...eturns all the selected features and values to their original settings when the screen was first displayed Cancels all the selected features and values of the displayed screen and returns to the previ...

Page 35: ...on pop up screen Error message screen An error message screen will be displayed when it is time to replace one of the consumables or when an error will result if you continue to use the copier This sc...

Page 36: ...eature The Auditron feature allows you to control the number of copies that a department account user can make by assigning a password to the user The diagram shows the relationship between the Passwo...

Page 37: ...ion Mode See 9 7 Defining Automatic Display of the Password Entry Screen for details Procedure When the password screen is being displayed enter your password by using the keypad Each input digit is r...

Page 38: ...is lit To copy press the Power Saver On Off button The Power Saver light is unlit and Power Saver mode is cancelled Sleep Mode The power of the fuser unit is cut The display is unlit The Power Saver...

Page 39: ...last copy job or action is set as 15 minutes and 60 minutes respectively These time out periods can be changed See Time Outs in 6 1 List of Custom Preset Functions for details For models which come wi...

Page 40: ...2 1 What Paper to Use 18 2 2 Storing and Handling Paper 20 2 3 Loading Paper 21 2 4 Changing the Paper Tray Size 25 2 Loading Paper...

Page 41: ...For curled paper uncurl them before loading You cannot make two sided copies onto paper smaller than 5 5x8 5 Tray Valid Paper Sizes Paper Tray Capacity Tray 1 A5 A5 B5 A4 5 5 x 8 5 8 5 x 11 1000 shee...

Page 42: ...perforated paper with the holes toward the back of the tray Types of special media The types of media for the respective trays are as shown below Tray Trays 2 to 4 Tray 5 Bypass Special medium Transp...

Page 43: ...the following when handling paper Do not combine and load paper left over from different reams into a tray Do not use folded or wrinkled paper Do not load mixed size paper into a tray Always fan trans...

Page 44: ...paper to trays 1 to 4 tray 5 bypass and tray 6 high capacity feeder Add paper to trays 1 to 4 according to the procedures shown below Procedure Pull out the empty tray until it stops When pulling out...

Page 45: ...per 22 2 Loading Paper Push the tray in slowly until it stops The message Ready to copy Press Start to continue or press C button to cancel the job appears on the display once you have properly replen...

Page 46: ...ted When copies are made by placing the original on the document glass there may be a loss of image due to error in size detection As such enter the size of the original with the Original Size feature...

Page 47: ...Max fill line Load paper in tray 6 high capacity feeder optional by following the procedures below Procedure Pull the tray out slowly until it stops When pulling out a paper tray do it slowly If pull...

Page 48: ...pulled out with too much force the tray can hit and injure your knees Remove any paper still in the tray Pinch and hold the release on the lever as shown in the diagram Then push the lever to the rea...

Page 49: ...the release on the lever again and push the lever forward until it touches the edge of the paper Paste the new paper size label on the front of the tray Push tray 1 in slowly until it stops After chan...

Page 50: ...ocedures shown below to make the changes Procedure Pull out the tray that you want to change until it stops When pulling out a paper tray do it slowly If pulled out with too much force the tray can hi...

Page 51: ...m the tray and use a screwdriver to fasten the screws as shown in the diagram Check that the guides are locked at the holes with the screws tightened Then re load the paper Paste the new paper size la...

Page 52: ...elect Paper Sizes If you made a mistake while entering the access number press the Clear C button to clear and re enter The factory default access number is 11111 Changing the access number of the adm...

Page 53: ...reset paper size is measured in inches select Inch Size Then select the desired paper size Select Save once and Close twice Select Exit Tools The paper size of the selected tray is changed The tray ca...

Page 54: ...ll tray 6 high capacity feeder out slowly until it stops When pulling out a paper tray do it slowly If pulled out with too much force the tray can hit and injure your knees Remove any paper still in t...

Page 55: ...rew Place the paper against the bottom right corner of the tray Paste the new paper size label on the front of the tray Push the tray in slowly until it stops When pushing back tray 6 high capacity fe...

Page 56: ...3 1 Documents 34 3 2 Loading Documents 36 3 Loading Documents...

Page 57: ...paper Observe the precautions described in the following sections when loading documents in the DADF or when placing them on the document glass Loading documents in the DADF Do not hold on to a docume...

Page 58: ...g the DADF the paper sizes which can be automatically detected by the machine are A5 A5 B5 B5 A4 A4 8 5 x 11 8 5 x 11 B4 A3 11 x 17 and 8 5 x 13 However using Tools Mode you can change A5 to 5 5 x 8 5...

Page 59: ...documents or more 50 documents can be loaded each time but documents can be added for continuous scanning up to a total of 700 sheets 350 sheets for two sided copying During the scanning of the first...

Page 60: ...ent When copying highly transparent documents such as tracing paper or transparencies stains on the document cover may also be copied To prevent this cover the document with a piece of white paper the...

Page 61: ...Copy without Rotation is already selected If Copy Anyway is selected the copy will be made based on the document size detected by the machine and the selected features Sometimes image loss may result...

Page 62: ...dependent X Y 49 4 5 Copying on One Side 2 Sided 56 4 6 Copying on Two Sides 2 Sided 59 4 7 Collating Copy Output Output Finishing 64 4 8 Stapling Stapling 67 4 9 Punching Holes Punching 70 4 10 Reset...

Page 63: ...am below This diagram shows their locations on the control panel as well as the features that they have You will find it useful to familiarise yourself with the respective locations of the icons and b...

Page 64: ...s number of sets Clear All For clearing and returning the selected settings to their default values Stop For stopping a copy job Start For starting a copy job Interrupt For interrupting the current jo...

Page 65: ...no paper or the machine is unable to detect the size of the document Follow the displayed instructions A message will appear on the display if the selected tray has no paper Follow the displayed instr...

Page 66: ...fits onto the selected paper Preset percentage change You can select one of the seven preset ratios Variable percentage change Variable You can specify a reduction or enlargement ratio between 25 400...

Page 67: ...if necessary Enter the required number of sets by using the keypad and press Start The copies are made at 100 Chapter 3 Loading Documents for information on how to load documents The factory default...

Page 68: ...ss Start The copies are made according to the ration that matches the paper size specified in Step 2 Chapter 3 Loading Documents for information on how to load documents The factory default for Reduce...

Page 69: ...acity feeder and finisher installed The factory default for Reduce Enlarge is 100 Reduce Enlarge can also be selected on the Features Menu screen Chapter 3 Loading Documents for information on how to...

Page 70: ...finisher installed Variable percentage change Variable You can make copies by selecting a ratio between 25 400 Procedure Load the document On the Basic Features screen select Reduce Enlarge Select Var...

Page 71: ...res if necessary Enter the required number of sets by using the keypad and press Start The copies are made according to the ratio specified in Step 4 Some features cannot be selected together with thi...

Page 72: ...machine from the input measurements of the document and the desired copy Automatic X Y percentage change Auto Fit The machine will make copies of the originals by calculating the X and Y ratios so th...

Page 73: ...ios that you have entered Procedure On the Basic Features screen select Reduce Enlarge Select Independent X Y Select Variable X Y The factory default for Reduce Enlarge is 100 Reduce Enlarge can also...

Page 74: ...to Top or Head to Left Select the corresponding document orientation of the original loaded Select Head to Top or Head to Left Select Save twice Select other features if necessary Enter the required n...

Page 75: ...efault for Reduce Enlarge is 100 Reduce Enlarge can also be selected on the Features Menu screen The screen on the right has the tray 6 high capacity feeder and finisher installed The machine will mak...

Page 76: ...tered all the measurements for the document and paper size Some features cannot be selected together with this feature See Appendix B Possible Combinations of Features for details Check that there is...

Page 77: ...ight has the tray 6 high capacity feeder and finisher installed Select Cancel to cancel the settings The machine will make copies of your original by calculating the X and Y ratios so that the image c...

Page 78: ...document orientation of the original loaded Select Head to Top or Head to Left Select Save twice Select other features if necessary Enter the required number of sets by using the keypad and press Star...

Page 79: ...e sided copies from one sided documents or two sided documents To make one sided copies from a two sided document use the DADF Procedure On the Basic Features screen select 2 Sided The screen on the r...

Page 80: ...ment if you have selected 2 1 Sided Head to Head When all sides of a document have the same orientation Head to Toe When the orientation of side two is the reverse of side one The factory default is 1...

Page 81: ...ils Chapter 3 Loading Documents for information on how to load documents For 2 1 Sided copying use the DADF Load the original in the orientation of Head to Top or Head to Left Select the corresponding...

Page 82: ...ettings for front and back pages differ You cannot make two sided copies on paper that is over 28lbs You can make two sided copies from one or two sided documents However to make two sided copies from...

Page 83: ...ad to Head When all sides of a document have the same orientation Head to Toe When the orientation of side two is the reverse of side one Load the original in the orientation of Head to Top or Head to...

Page 84: ...ill be made a one sided copy If you place the document on the document glass then you have to repeatedly place each page and press Start to make two sided copies If the last scanned page is side one s...

Page 85: ...the copies Head to Head When all sides of a document have the same orientation When the copy result is where sides one and two have the same orientation Head to Toe When the orientation of side two of...

Page 86: ...oad the original in the DADF Load the original in the orientation of Head to Top or Head to Left Select the corresponding document orientation of the original loaded Select Head to Top or Head to Left...

Page 87: ...number of collated sets is output if you load your originals into the DADF and press Start Collating Copy Output Output Finishing If the optional offset catch tray is installed each set is offset fro...

Page 88: ...ollated sets from the originals loaded onto the DADF select Uncollated When the finisher is installed select Large Output if your output is more than 500 copies The output will be delivered to finishe...

Page 89: ...original and press Start Scanning continues After the last original has been scanned select End Job Copying starts and the specified copy output is discharged Continuous scanning is valid up to a tota...

Page 90: ...of Y is the same Possible combinations are A5 and A4 B5 and B4 A4 and A3 8 5 x 11 and 11 x 17 Stapling and Large Output cannot be selected for interrupting copy job If the punch scrap container is fu...

Page 91: ...le For example select Top Left top left button Load the original in the orientation of Head to Top or Head to Left Select Cancel to cancel the settings The screen on the right has the tray 6 high capa...

Page 92: ...he screen See 4 11 Stopping a Copy Job for details You cannot press the Start button if a message requesting you to replace the staple cartridge is displayed In this case replenish the staple cartridg...

Page 93: ...ge For B4 A3 11 x 17 size holes cannot be punched on the long edge Also when punching B5 A4 8 5 x 11 size paper check that the paper of orientation is loaded in the tray Punching holes on paper of mix...

Page 94: ...t Collated Finishing Then select On for Punching Select Top Side Left Side or Right Side For example select Left Side left button The screen on the right has the tray 6 high capacity feeder and finish...

Page 95: ...ter than A4 Remove the copies from finisher tray 2 then press Start to resume copying Load the original in the orientation of Head to Top or Head to Left Select the corresponding document orientation...

Page 96: ...ol panel to clear all settings and return them to their defaults Resetting the number of copy sets Procedure Press Clear C The number of sets to be copied returns to 1 Resetting the feature settings P...

Page 97: ...dure Press Stop The current copy job is stopped temporarily The screen below is displayed A waiting copy job that uses the Auto Start feature is also stopped temporarily Press Clear C or Clear All or...

Page 98: ...ghts up indicating that the current copy job has been interrupted Load the documents of the interrupting job Select other features if necessary Enter the required number of sets by using the keypad an...

Page 99: ...ments and select Start to continue scanning If there are no additional documents to be scanned select End Job But when Stapling 1 2 Sided Multi Up N Up is selected scanning cannot be continued by addi...

Page 100: ...arencies Transparency Separators 99 5 10 Selecting the Original Orientation Original Orientation 102 5 11 Rotating and Copying in Different Directions Image Rotation 104 5 12 Selecting the Original Si...

Page 101: ...o make a copy that matches the document type 5 3 Making a Copy according to Original Type Original Type 2 Sided Select this option to make two sided or one sided copies 4 5 Copying on One Side 2 Sided...

Page 102: ...ored Jobs Select this option to register defined copy jobs in the Job Memory 5 21 Job Memory Operations Edge Erase Copy All Select this option to make copies with the document cover open or to make co...

Page 103: ...oad the document Select Features Menu Then select Lighter Darker Adjusting Copy Density Lighter Darker After you have adjusted the copy density you can still darken the copy by increasing the toner le...

Page 104: ...of sets by using the keypad and press Start The copies are made according to the copy density value selected in Step 3 The factory default for Lighter Darker is Normal Select Cancel to cancel the sett...

Page 105: ...f you have selected Text or Text Photo you can choose to remove the background color of texts and so forth by enabling the Background Suppression feature Procedure Load the document Select Features Me...

Page 106: ...o remove the background color When the document consists of mainly photographs Select Photo Confirm the settings and select Save Select other features if necessary Enter the required number of sets by...

Page 107: ...d Features 5 The Multi Up N Up feature allows you to use the DADF to copy two four or eight sheets of documents onto one copy Copying Several Documents onto One Copy Multi Up N Up Two four or eight sh...

Page 108: ...duced to fit and copied onto the selected paper Procedure Select the tray with the desired paper size loaded from Basic Features screen under Paper Supply Select Features Menu Then select Multi Up N U...

Page 109: ...rientation of Head to Top or Head to Left Select the corresponding document orientation of the original loaded then select Save Select Head to Top or Head to Left Confirm the settings and select Save...

Page 110: ...sizes and scan them all at the same time Copies of these documents are output according to the sizes of their originals Alternatively you can choose to make copies of these documents on a selected pap...

Page 111: ...s by using the keypad and press Start Copies are made according to their respective document sizes Some features cannot be selected together with this feature See Appendix B Possible Combinations of F...

Page 112: ...nlargement Paper Supply and Reduce Enlarge can also be selected from the Features Menu Procedure Load all documents such that they are properly inserted in the DADF On the Basic Features screen select...

Page 113: ...en Bottom Copying Facing Pages onto Separate Sheets Book Copying This feature can only be used when the document is placed on the document glass The division section binding shift section of the origi...

Page 114: ...ons of Features for details Loading documents in the DADF in 3 2 Loading Documents on how to load documents If you have also selected 2 Sided the following will result Left Page Then Right The left pa...

Page 115: ...e document is shifted to match the centre of the paper for copying Setting margin Margin is set by shifting the document top bottom left or right between 1 432 mm at 1 mm intervals for copying Setting...

Page 116: ...reen on the right has the finisher installed Procedure Select Features Menu Then select Image Shift Select Side 1 Select the position to shift the document to For example set a left margin of 10 mm Se...

Page 117: ...ct Save The factory default is Head to Top See 5 10 Selecting the Original Orientation Original Orientation for the details The direction of image shift up down left right is determined by the documen...

Page 118: ...the document or adjust Reduce Enlarge Select other features if necessary Enter the required number of sets by using the keypad and press Start Copies are made according to the image shift settings mad...

Page 119: ...ying onto whole area of paper Copy All Amount of erase is 0 mm and the entire page is copied Erasing the Edges and Copying All Edge Erase Copy All The Edge Erase default value can be changed by using...

Page 120: ...e edges select Variable Erase If you have selected Variable Erase use to select a value for Top Bottom Edges 2 50 mm Left Right Edges 2 50 mm and Centre Erase 0 50 mm For example select Top Bottom Edg...

Page 121: ...oad document in the orientation of Head to Top or Head to Left Select the corresponding document orientation of the original loaded and select Save Select Head to Top or Head to Left Confirm the setti...

Page 122: ...and loaded in the same orientation The sizes must be either A4 or 8 5 x 11 The Transparency Separators feature allows you to make copies on transparencies and output them with blank sheets of paper i...

Page 123: ...Confirm the selection of the tray loaded with transparencies and the tray containing paper to be used as separators To change tray settings select Paper Tray Settings If not changing tray settings pr...

Page 124: ...copied Press Start Copies are made on the transparencies and they are delivered with separators inserted between them If Blank Sep N Sets is selected the number of sets entered for distribution copies...

Page 125: ...s Menu Then select Original Orientation Selecting the Original Orientation Original Orientation The default value of Original Orientation can be changed by using Tools Mode The factory default is Head...

Page 126: ...Head to Top or Head to Left Select Save Select other features if necessary Enter the required number of sets by using the keypad and press Start Copies are made in the orientation selected in Step 3...

Page 127: ...ed in DADF When document is loaded on the document glass and Auto is selected for Paper Supply and Auto for Reduce Enlarge When document is loaded on the document glass and document size is input When...

Page 128: ...ad and press Start Copies are delivered with images automatically rotated if the orientations of the document and the paper are different Some features cannot be selected together with this feature Se...

Page 129: ...is useful for measuring the size of the document The document area to be copied differs as follows when the document is loaded onto the DADF or the document glass Selecting the Original Size Original...

Page 130: ...ss to determine the size of your original When is pressed continuously the screen changes rapidly Procedure Load the document Select Features Menu Then select Original Size Select the desired original...

Page 131: ...ginal Type Procedure Load the document Select Features Menu Then select Next Page Enhancing Sharpness Sharpness Chapter 3 Loading Documents for information on how to load documents The default value f...

Page 132: ...arper and Softer Confirm the settings and select Save Select the other features if necessary Enter the required number of sets by using the keypad and press Start Copies of the document image are made...

Page 133: ...of the document In the case of a color document the negative copy is achieved by reversing the brightness of the document Procedure Load the document Select Features Menu Then select Next Page Select...

Page 134: ...cessary Enter the required number of sets by using the keypad and press Start Copies in the form of negative images of the document are made by reversing its black and white regions or brightness Some...

Page 135: ...you to make copies containing mirror images of your documents Procedure Load the document Select Features Menu Then select Next Page Select Mirror Image Creating Mirror Images Mirror Image Chapter 3...

Page 136: ...ct Save Select other features if necessary Enter the required number of sets by using the keypad and press Start A mirror image of the document is copied Some features cannot be selected together with...

Page 137: ...he method of specifying the document size The Repeat Image feature allows you to reduce the document image and repeat it on a single sheet of copy paper The same image can be repeated up to six times...

Page 138: ...both short and long edges Load the document on the document glass Load in the document the orientation of Head to Top or Head to Left Select the corresponding document orientation of the original loa...

Page 139: ...t Save Select other features if necessary Enter the required number of sets by using the keypad and press Start Copies are made with required number of repetitions selected in Step 4 Paper Supply and...

Page 140: ...reen on the right has the finisher installed The Book Duplex feature allows you to make duplex copies of a bound document The copies are assigned a page numbering sequence which is the same as the bou...

Page 141: ...e Then Right Right Page Then Left Top Page Then Bottom Place the bound document on the document glass as shown in the following diagram 3 2 Loading Documents on how to load documents on the document g...

Page 142: ...mbinations of Features for details Confirm the settings and select Save Select other features if necessary Enter the required number of sets by using the keypad and press Start Load the next document...

Page 143: ...for example colored heavy weight paper and insert them as the first page of the copies made Procedure Load the document Select Features Menu Then select Next Page Chapter 3 Loading Documents for info...

Page 144: ...ay to be used and select Save The factory default is No Covers Select Cancel to cancel the settings Auto cannot be selected for Paper Supply Select the same size and orientation of paper used for cove...

Page 145: ...the body pages If another tray is selected in Step 6 load paper in that tray Select other features if necessary Enter the required number of sets by using the keypad and press Start Copies with covers...

Page 146: ...will only be copied after the sample set is confirmed Procedure Load the document Select Features Menu Then select Next Page Select Sample Set Chapter 3 Loading Documents for information on how to loa...

Page 147: ...or details Check that On is selected Confirm the settings and select Save Select other features if necessary Enter the required number of sets by using the keypad and press Start Only one set is copie...

Page 148: ...Creation 125 Added Features 5 The Booklet Creation feature enables one sided or two sided documents to be copied as a booklet Procedure Load the document Select Features Menu Then select Next Page Cre...

Page 149: ...entation For example select Left Bind and Head to Left Orientation of document and copied image 1 indicates the first page of the originals and 3 indicates the third page An odd number page is copied...

Page 150: ...ill be copied as the back cover of the booklet Confirm the settings and select Save Select other features if necessary Enter the required number of sets by using the keypad and press Start Copies are...

Page 151: ...ings in the job memory There are two methods and both allow you to achieve the same purpose Using Stored Jobs Using the Settings Meter Check button Using Stored Jobs Procedure Use the Basic Features s...

Page 152: ...number to save the selections You can select a number from 1 8 For example select 5 Enter a job memory name of not more than 18 characters See Text Input Method on the next page for more information...

Page 153: ...numeric To enter symbols Select Symbol To delete a character Select Backspace To enter a blank space Select Space Bar To enter lowercase or uppercase characters Select Shift Case Example To enter 2 Up...

Page 154: ...omised Features screen and Features Menu screen to select the features that you wish to save in Stored Jobs Chapter 4 Basic Features and Chapter 5 Added Features for details The screen on the right is...

Page 155: ...Name Select a job from job numbers 1 8 in order to change its name For example select 5 Enter a job name of not more than 18 characters See Text Input Method for more information on how to enter the n...

Page 156: ...ng the job Select a job number to overwrite the contents of a registered job Select Yes when the following screen is displayed The job is overwritten by the new contents This section explains the proc...

Page 157: ...number from 1 8 to delete For example select 3 Select Yes Select Close until the default screen is displayed The screen on the right is when the Auditron feature is enabled See Chapter 9 Using the Aud...

Page 158: ...or the details Stored Jobs cannot be selected when an interrupt job is in progress Copying by using the job memory This section describes the procedures for performing copying jobs by accessing the jo...

Page 159: ...eter Check Select Document Copy Counter The following types of copies are not recorded by the counter Blank paper inserted by the machine In the case of two sided copying the machine will automaticall...

Page 160: ...opy Counter 137 Added Features 5 Select Reset to return the Number of Originals Scanned and Number of Copies Made counters to 0 Check the readings Select Close until the default screen is displayed Th...

Page 161: ......

Page 162: ...6 6 1 List of Custom Preset Functions 140 6 2 Displaying the Tools Mode Screen 147 6 3 Configuring the Machine with Tools Mode 149 6 Custom Presets...

Page 163: ...ze amongst those that can be loaded in tray 1 as the paper size for APS Select Enable if APS is to be used If not select Disable Paper Sizes for APS Copy Enable Disable Paper Sizes Set the paper size...

Page 164: ...9 Interleaving Blank Sheets between Transparencies Transparency Separators 2 3 4 5 Bypass Reduce Enlarge Select the default value for the Reduce Enlarge feature on the Basic Features screen and the Fe...

Page 165: ...when a fault is detected for example the machine has run out of paper or paper is jammed in the machine Select the default value for the method of copy output 4 7 Collating Copy Output Output Output A...

Page 166: ...Sensing Available Options Paper Tray A5 5 5 x 8 5 Document Glass Size 1 A6 Document Feeder Size 1 A5 5 5 x 8 5 Document Feeder Size 2 A4 8 5 x 11 Document Feeder Size 3 A4 8 5 x 11 Document Feeder Si...

Page 167: ...isable 2 min Enter the time for the settings of the features to return to their default values after some settings have been changed If this time is longer than one minute then enter the time in minut...

Page 168: ...e or when Clear All is pressed Configuring a screen default basic customised in 6 3 Configuring the Machine with Using Tools Mode Basic Features Customised Features Features Menu Stored Jobs Define th...

Page 169: ...cument glass is used to make copies select the copy method if the orientation of the size detected by the machine is different from the paper orientation If you select No the Size Mismatch Warning scr...

Page 170: ...Enter the access number of the System Administrator by using the keypad and select Confirm Each input digit is represented by an asterisk Displaying the Tools Mode Screen If you made an error while e...

Page 171: ...The default screen re appears If default time of System Admin Mode Exit Timer is defined in Time Outs the machine will exit the mode once the set time has elapsed and the default screen will be re di...

Page 172: ...anging the access number of the administrator Configuring a screen default basic customised Selecting the feature defaults This section describes the procedures for selecting the feature defaults The...

Page 173: ...and select Confirm Each input digit is represented by an asterisk Select Feature Defaults Use to select Lighter Darker Select Change Settings You can also select Lighter Darker directly by touching i...

Page 174: ...Tools Mode 151 Custom Presets 6 Select the default value of Lighter Darker For example select Darkest Select Save Select Close until the screen shown in Step 4 is displayed Select Exit Tools The defau...

Page 175: ...e access number make sure that you keep a record of the new number Procedure Press Settings Meter Check Select Tools Mode Enter the access number of the System Administrator and select Confirm Each in...

Page 176: ...nter the access number again and select Enter Select Close until the screen shown in Step 4 is displayed Select Exit Tools The new access number of the System Administrator becomes valid If you made a...

Page 177: ...it returns to the ready mode from the power saver mode or when Clear All is pressed The factory default screen is the Basic Features screen Procedure Press Settings Meter Check Select Tools Mode Ente...

Page 178: ...6 Select Screen Layout Select Change Settings in Default Screen Select Change Settings Select the screen to be displayed as the default screen and select Save For example select Customised Features Fo...

Page 179: ...to the two buttons Feature Buttons 1 and 2 Display 3 Features Assign the features to Feature Button 1 Feature Button 2 and Feature Button 3 Display 4 Features Assign the features to Feature Button 1...

Page 180: ...onfirm Each input digit is represented by an asterisk Select Screen Layout Select the number of features to be displayed on the Basic Features screen and select Change Settings For example select Disp...

Page 181: ...6 to 8 when necessary to assign the required features to all the basic buttons Select Close until the screen shown in Step 4 is displayed Select Exit Tools You can also select the basic button directl...

Page 182: ...een You can assign a maximum of eight buttons on this screen The eight buttons of Customised Features are arranged as follows Procedure Press Settings Meter Check Select Tools Mode Enter the access nu...

Page 183: ...can also select the customised button directly by touching it Select Screen Layout Select Change Settings in Customised Features screen Use to select the desired customised button Select Change Setti...

Page 184: ...8 when necessary to assign the required features to all the customised buttons Select Close until the screen shown in Step 4 is displayed Select Exit Tools The buttons are displayed on two pages Use o...

Page 185: ......

Page 186: ...7 1 Troubleshooting 164 7 2 Paper Jams 168 7 3 Document Jams 183 7 4 Stapler Faults 189 7 Troubleshooting...

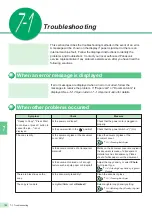
Page 187: ...position Is the power cord loose Symptom Check Measure Ready to Copy Press Start to continue or press C button to cancel the job is not displayed Check that the power cord is plugged in properly Is th...

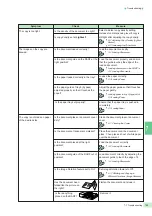
Page 188: ...the DADF at the right position Load the document properly and ensure that the guide touches the edge of the loaded document Loading documents in the DADF in 3 2 Loading Documents Loaded the paper cor...

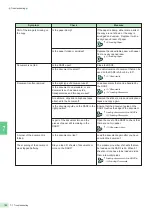
Page 189: ...p either some parts of the copy are not shown or the copy is smudged and unclear Replace it with a newly opened ream of paper 2 3 Loading Paper Is the paper folded or wrinkled Replace the undesirable...

Page 190: ...le to start there is a job in the queue Select Job Status Stop to check is displayed Press Job Status Stop and select the job Press Clear C or Clear All to cancel the job To resume the job press Start...

Page 191: ...messages will continue to be displayed even after you have removed the jammed sheet of paper from a particular location Follow the instructions on the display to locate the other jammed sheets of pap...

Page 192: ...mmed at tray 5 bypass Paper Jam Remove all paper from Tray 5 Bypass and reload If this message persists pull out Tray 5 and push in the tray again Remove the jammed paper by following the procedures s...

Page 193: ...efore clearing the paper jam After the jam is cleared Ready to copy Press Start is displayed Procedure Remove the jammed paper which is fed halfway from the tray If the paper is torn check that there...

Page 194: ...pen tray 5 bypass by the grip on the left Move the centre lever towards you and pull out the tray until it stops Remove the jammed paper Push the tray all the way in Procedure B Open the top cover of...

Page 195: ...7 2 Paper Jams 172 Troubleshooting 7 Lift the jammed paper Close the top cover Procedure C Pull out tray 6 high capacity feeder Remove the jammed paper Push tray 6 high capacity feeder all the way in...

Page 196: ...right section of the machine When these messages appear follow the instructions in Steps 1 and 2 to remove the jammed paper When these messages appear follow the instructions from Steps 1 to 5 Proced...

Page 197: ...the inner cover completely until you hear the click sound Close the lower right cover of the machine If the cover is not closed completely error messages will continue to be shown on the display and t...

Page 198: ...fer unit to the right until it is in the horizontal position Then pull the transfer unit out slowly until it stops When pulling out the transfer unit be careful that your fingers are not hurt by the p...

Page 199: ...aper Do not put your fingers inside the transfer unit You may get hurt Never touch a labelled area found on or near the fuser unit You can get burnt Remove the jammed paper while lifting lever 1 If th...

Page 200: ...ed pull out the transfer unit halfway and then push it in again Close the front door If the door is not closed completely error messages will continue to be shown on the display and the machine will n...

Page 201: ...llow the instructions from Steps 1 to 4 to remove the jammed paper When these messages appear follow the instructions in Step 1 and after Step 5 to remove the jammed paper Procedure Remove the jammed...

Page 202: ...not resume its operation If sheets of papers are still jammed at other locations other error messages will be displayed Ready to copy Press Start to continue or press C button to cancel the job is dis...

Page 203: ...instructions below to remove the jammed paper Procedure Hold the handle of the finisher and open its top cover Remove the jammed paper If the jammed paper could not be removed easily turn knob 8 anti...

Page 204: ...edure Lift cover 9 at the output area of the finisher as indicated in the diagram Remove the jammed paper If the cover is not closed completely error messages will continue to be shown on the display...

Page 205: ...paper Close the front door When the message is still displayed even though the jammed paper is removed move cover 9 up and down again If the cover is not closed completely error messages will continu...

Page 206: ...ve the jammed document After you have removed the jammed document follow the instructions on the display and load your document again in the DADF e u e Document jam at the feeding point of the DADF Th...

Page 207: ...F A torn wrinkled or folded document will cause it to be jammed at the DADF In such a case place the document directly on the document glass Remove the jammed document Close the left cover of the DADF...

Page 208: ...nt Close the inner cover Then close the left cover of the DADF until you hear a click sound Check if the document is torn wrinkled or folded If not follow the instructions on the display and re load t...

Page 209: ...cument tray If the following messages are shown refer to the descriptions in the previous section to remove the jammed sheet of document from the feeding point of the DADF When that is done remove the...

Page 210: ...wrinkled or folded If not follow the instructions on the display and re load the document in the DADF A torn wrinkled or folded document will cause it to be jammed at the DADF In such a case place the...

Page 211: ...rn the knob to the right to remove it Put the DADF slowly back in place Check if the document is torn wrinkled or folded If not follow the instructions on the display and re load the document in the D...

Page 212: ...ng page to troubleshoot problems such as faulty stapler and bent staples Contact your local authorized Panasonic service representative if the staples are stapled on the copies in the manner as shown...

Page 213: ...remove the jammed staples When removing jammed staples take care not to injure your fingers If the staples could not be removed push in the direction of the arrow to remove the staples Contact your lo...

Page 214: ...7 4 Stapler Faults 191 Troubleshooting 7 Push the staple cartridge in until the orange lever returns to its original position Close the front door of the finisher...

Page 215: ......

Page 216: ...sing the Toner Level 198 8 4 Replacing the Toner Cartridge 200 8 5 Replacing the Drum Cartridge 203 8 6 Replacing the Staple Cartridge 206 8 7 Emptying the Punch Scrap Container 208 8 8 Checking the B...

Page 217: ...film roller sections The document cover is the part where the DADF belt is If the document cover or glass is dirty copies made will also be dirty and it may affect the automatic sensing of document si...

Page 218: ...e rollers total 18 Clean them by gently turning the rollers with the cloth Cleaning the DADF film roller sections If the film and roller sections of the DADF are dirty they will cause document jams an...

Page 219: ...ean the rollers by turning them Close the inner cover Then close the left cover of the DADF until you hear a click sound Lift the DADF slowly Use a moistened and soft cloth to clean the film section a...

Page 220: ...them in the following places Hot and humid places Near a fire Under direct sunlight Dusty places Follow the instructions and warning notes on the boxes or containers of the consumables when using the...

Page 221: ...the copy density However normally there is no need to use this feature because the toner quantity of the developer unit is automatically adjusted by the machine Procedure Press Settings Meter Check S...

Page 222: ...199 Daily Care 8 The following screen will be displayed for 40 seconds and the toner level will be adjusted during this time No copy job can be done during this time After the toner level is adjusted...

Page 223: ...on and you can get burnt Use Panasonic recommended toner cartridges as non recommended ones may affect quality and performance of the machine Procedure Check that the machine has stopped and open the...

Page 224: ...and remove it from the toner cartridge holder Never touch a labelled area found on or near the fuser unit You can get burnt Gently shake the new toner cartridge from left to right Align the mark on t...

Page 225: ...nd turn it to the right until it stops Hold the orange lever and swing it back to the original position until you hear a click sound Close the front door If the door is not closed completely error mes...

Page 226: ...n the front door Replacing the Drum Cartridge When the drum cartridge needs to be changed the message The Drum Cartridge needs to be replaced soon Please call for service will be displayed If copying...

Page 227: ...pull out about half of the drum cartridge while pressing the orange button at the top of the drum cartridge Never touch a labelled area found on or near the fuser unit You can get burnt Hold the hand...

Page 228: ...al position until you hear a click sound Turn the green lever anti clockwise until the click sound is heard Close the front door Turn the power switch to the position to switch on the power Check that...

Page 229: ...cal authorized Panasonic servive representative when ordering a new staple cartridge Close Use Panasonic recommended staple cartridges as non recommended ones may affect quality and performance of the...

Page 230: ...e used staple case Insert a new staple case into the staple cartridge Pull to remove the tab of the staple case as shown in the diagram Push the staple cartridge back to its original position until yo...

Page 231: ...punch scrap container out from the machine make sure that all the scraps are emptied before you put the container back You should remove the container while the power is on If you switch off the powe...

Page 232: ...the finisher You must dispose of all the scraps in the container even if you have just pulled the container out a little This is because the machine will sense that the container has been pulled out...

Page 233: ...ges when making copies by using Book Duplex feature Separators for transparencies when the Transparency Separators feature is used Jammed papers or partially done copies as a result of machine fault P...

Page 234: ...8 8 Checking the Billing Meter 211 Daily Care 8 Check the reading Select Close until the default screen is shown The Settings Meter Check screen clears and the default screen re appears...

Page 235: ...Confirm that plain paper is loaded in any of the trays other than tray 5 bypass Press Settings Meter Check Select Fuser Cleaning The paper which is fed for fuser cleaning depends on the sizes of pape...

Page 236: ...o begin The following screen is displayed while the fuser cleaning is in progress No copy job can be done during this time After the end of fuser cleaning the Fuser Cleaning screen re appears Select C...

Page 237: ......

Page 238: ...9 3 Confirming the Account Data 220 9 4 Editing the Account Data 223 9 5 Deleting the Account Data 227 9 6 Enabling Disabling Auditron 229 9 7 Defining Automatic Display of the Password Entry Screen 2...

Page 239: ...ord to each account user The relationship between the Password Entry screen and a normal screen is as shown below Using the Auditron Mode In the Auditron Administration Mode select On for Auditron Mod...

Page 240: ...he Auditron feature You can choose to enable disable the Auditron Mode Select On for Auditron Mode on the Auditron Setup screen to enable it When power is switched on after exiting from the Settings M...

Page 241: ...number of the Auditron Administrator and select Confirm Each input digit is represented by an asterisk The Auditron Administration Mode screen is displayed Displaying the Auditron Administration Mode...

Page 242: ...on Feature 9 Exiting the Auditron Administration Mode Review CE Data is used only by Panasonic Customer Engineer This section explains the procedure for exiting the Auditron Administration Mode screen...

Page 243: ...onfirming data of own account This section explains the procedures for confirming the copy volume and copy limit of the user s own account Procedure Press Settings Meter Check Select Accounts Meter Ch...

Page 244: ...copy volume password and copy limit of every account Procedure Press Settings Meter Check Select Auditron Admin Mode Enter the access number of the Auditron Administrator and select Confirm Each inpu...

Page 245: ...nt number that you wish to review by using the buttons The Password Copy Limit and Copy Volume are displayed Select Close Select Exit Auditron The Password Entry screen is displayed Review CE Data is...

Page 246: ...Admin Mode Enter the access number of the Auditron Administrator and select Confirm Each input digit is represented by an asterisk Editing the Account Data The screen on the right has the Auditron mod...

Page 247: ...ng changing account password Select Key In Password For an Account No which has already been defined its password copy limit current copy volume are displayed For an undefined Account No its default v...

Page 248: ...l copy limit must be within the range of 1 000 to 9 999 000 in increments of 1 000 copies The defined copy limit is displayed Select Save If you made a mistake while entering the password press the Cl...

Page 249: ...9 Clearing the current copy volume Select Reset Select Close Select Exit Auditron The Password Entry screen is displayed The diagram on the right shows an Account No which has already been defined The...

Page 250: ...y the copy volume or copy limit Procedure Press Settings Meter Check Select Auditron Admin Mode Enter the access number of the Auditron Administrator and select Confirm Each input digit is represented...

Page 251: ...ccounts together Select only All Copy Volumes or All Copy Limits to delete either the copy volume or copy limit of all accounts Select Yes The defined data disappears Select Close Select Exit Auditron...

Page 252: ...witched on Procedure Press Settings Meter Check Select Auditron Admin Mode Enter the access number of the Auditron Administrator and select Confirm Each input digit is represented by an asterisk Enabl...

Page 253: ...tron 230 Using the Auditron Feature 9 Select Auditron Setup Select On or Off Select Close Select Exit Auditron The default screen is displayed if you have selected Off Review CE Data is used only by P...

Page 254: ...Press Settings Meter Check Enter the access number of the Auditron Administrator and select Confirm Each input digit is represented by an asterisk Defining Automatic Display of the Password Entry Scre...

Page 255: ...nutes in 1 second minute increments by using the buttons Select Save and then Close Select Exit Auditron The Password Entry screen is displayed Select Disable if you want to disable the Password Entry...

Page 256: ...lect Auditron Admin Mode Select Auditron Admin Mode Enter access number of the Auditron Administrator and select Confirm Changing the Auditron Access Number The screen on the right has the Auditron mo...

Page 257: ...e new access number and select Enter Enter the same number again for confirmation and select Enter Select Close Select Exit Auditron The Password Entry screen is displayed To change the access number...

Page 258: ...A Specifications 236 B Possible Combinations of Features 239 C Stapling 243 Appendix...

Page 259: ...ions W 620 x D 778 x H 1080 mm or W 24 4 x D 30 6 x H 42 5 Minimum Space Main body Tray 5 Bypass Extended Output Tray Requirements W 1293 x D 778 mm or W 50 9 x D 30 6 Weight Main body Weight o 185 kg...

Page 260: ...edge up to 4mm 0 2 both up to 4mm 0 2 Output Tray Capacity 500 sheets First Copy Output Time 2 7 sec Document is on document glass and paper is A4 from Tray 1 2 8 sec for models with printer function...

Page 261: ...B4 A3 8 5 x 11 8 5 x 13 8 5 x 14 8K 267 X 388 MM 11 x 17 Number of sheets 50 sheets Punching Valid sizes B5 A4 8 5 x 11 B4 A3 11 x 17 Staple Cartridge Staple Case Capacity 5000 staples x 3 box Tray 6...

Page 262: ...B Possible Combinations of Features 239 Appendix B Possible Combinations of Features...

Page 263: ...B Possible Combinations of Features 240 Appendix B...

Page 264: ...B Possible Combinations of Features 241 Appendix B...

Page 265: ...B Possible Combinations of Features 242 Appendix B...

Page 266: ...3 B6 B6 B5 B5 B4 B4 5 5 x 8 5 5 5 x 8 5 8 5 x 11 8 5 x 11 8 5 x 13 8 5 x 13 8 5 x 14 8 5 x 14 11 x 17 11 x 17 Top Right Cannot be loaded in tray Cannot be stapled O Cannot be stapled Cannot be loaded...

Page 267: ...Top Right Cannot be loaded in tray Cannot be stapled Cannot be stapled O Cannot be loaded in tray Cannot be loaded in tray Cannot be stapled O Cannot be loaded in tray O Cannot be loaded in tray Canno...

Page 268: ...99 Copy All 96 Copy limit 217 Copy volume 217 Copying 51 sheets of documents 36 Covers 120 Custom Preset 140 Customised Features screen 9 D DADF 2 Deleting a job 133 Deleting the account data 227 Dis...

Page 269: ...er Switch 2 Program Ahead 76 Punching 70 R R E Presets 144 Reduce Enlarge 43 Reduction or enlargement 43 Repeat Image 114 Replacing the Drum Cartridge 203 Replacing the Staple Cartridge 206 Replacing...

Page 270: ...ES OR REPRESENTATIONS EXPRESSED OR IMPLIED TO CUSTOMER WITH RESPECT TO THIS PANASONIC MACHINE INCLUDING BUT NOT LIMITED TO ANY IMPLIED WARRANTY OF MERCHANTABILITY OR FITNESS FOR A PARTICULAR PURPOSE P...

Reviews: