15
RQT9135
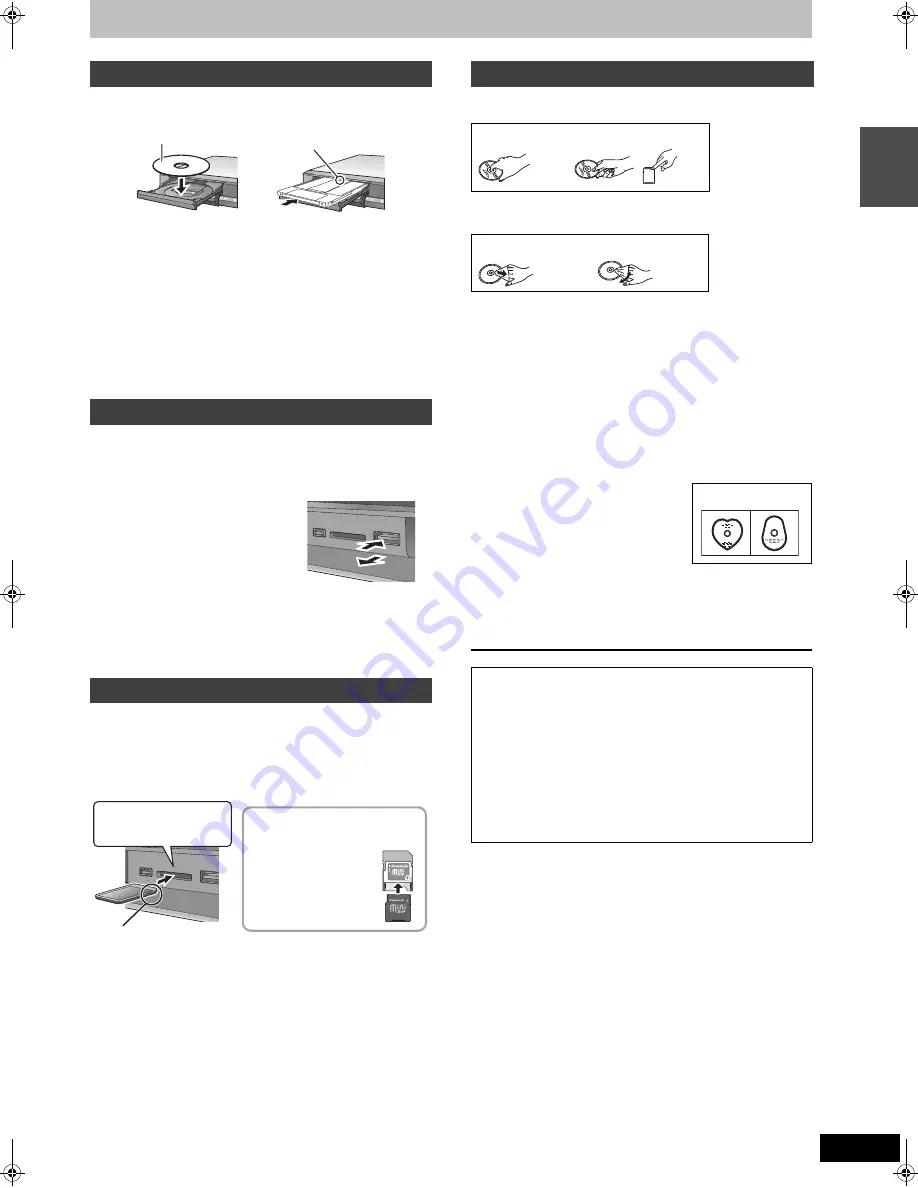
Media handling (Disc/USB memory/SD card)
1
Press [
<
OPEN/CLOSE] to open the tray.
2
Press [
<
OPEN/CLOSE] to close the tray.
Automatic drive select function
[DVD-V] [CD]
≥
If the unit is recording to the HDD or stopped, it automatically
switches to the DVD drive when a disc is inserted.
≥
If you eject a disc and close the disc tray, the HDD drive is
automatically selected.
[Note]
≥
When using 8 cm disc, remove the disc from the cartridge.
≥
[RAM]
It is not possible to record or play continuously from one side
of a double sided disc to the other. You will need to eject the disc
and turn it over.
Inserting the USB memory
When the USB memory is flashing, the USB memory is being read
from. Do not turn off the unit or remove the USB memory. Such
action may result in malfunction or loss of the USB memory’s
contents.
≥
Before inserting any USB memory to
this unit, ensure that the data stored
therein has been backed up.
≥
Check the orientation of the USB
connector and insert it straight in.
≥
Insert an USB device while the unit is
stopped, so the “USB device” screen is
displayed. Select an item and press
[OK] to switch to the USB-related
operations (
➡
56, 58).
Removing the USB memory
≥
Complete all USB-related operations and pull the USB memory
straight out.
≥
If a USB memory being accessed is pulled out, then the data may
be damaged.
When the card indicator (“SD”) on the unit’s display is flashing, the
card is being read from or written to. Do not turn off the unit or
remove the card. Such action may result in malfunction or loss of the
card’s contents.
≥
Inserting foreign objects can cause a malfunction.
Inserting the card
Removing the card
1
Press on the centre of the card.
2
Pull it straight out.
Automatic drive select function
≥
If you insert an SD card while the unit is stopped, the “SD Card”
screen is displayed. Select an item and press [OK] to switch to the
SD drive (
➡
56, 58).
≥
If you remove an SD card, the HDD drive is automatically selected.
∫
How to hold a disc or card
Do not touch the recorded surface or the terminal surface.
∫
If there is dirt or condensation on the disc
Wipe with a damp cloth and then wipe dry.
∫
Handling precautions
≥
Do not attach labels or stickers to discs. (This may cause disc
warping and un-balanced rotation, rendering it unusable.)
≥
Write on the label side of the disc only with a soft, oil-based felt
pen. Do not use ballpoint pens or other hard writing implements.
≥
Do not use record cleaning sprays, benzine, thinner, static
electricity prevention liquids or any other solvent.
≥
Do not use scratch-proof protectors or covers.
≥
Do not expose the terminals of the card to water, garbage or other
strange things.
≥
Do not drop stack, or impact discs. Do not place objects on them.
≥
Do not use the following discs:
– Discs with exposed adhesive from removed stickers or labels
(rental discs, etc.).
– Discs that are badly warped or cracked.
– Irregularly shaped discs, such as heart
shapes.
≥
Do not place in the following areas:
– In direct sunlight.
– In very dusty or humid areas.
– Near a heater.
– Locations susceptible to significant difference in temperature
(condensation can occur).
– Where static electricity or electromagnetic waves occur.
≥
To protect discs from scratches and dirt, return them to their cases
when you are not using them.
Inserting discs
Inserting, removing the USB memory
Inserting, removing the SD card
Insert label-up.
∫
Cartridge disc
Insert label-up with the
arrow facing in.
Insert fully.
ADAPTER
If you are using a
miniSD card or a
microSD card, insert
it into the adaptor
that comes with the
card.
Insert and remove
this adaptor from the
unit.
Press on the centre of the
card until it clicks into
place.
Insert the card label up with
the cut-off corner on the right.
e.g., miniSD
Disc and card care
The manufacturer accepts no responsibility and offers no
compensation for loss of recorded or edited material due to a
problem with the unit or recordable media, and accepts no
responsibility and offers no compensation for any
subsequent damage caused by such loss.
Examples of causes of such losses are
≥
A disc recorded and edited with this unit is played in a DVD
Recorder or computer disc drive manufactured by another
company.
≥
A disc used as described above and then played again in this
unit.
≥
A disc recorded and edited with a DVD Recorder or computer
disc drive manufactured by another company is played in this
unit.
DO
DO NOT
DO
DO NOT
DO NOT
HDD (Ha
rd di
sk dr
ive) handli
n
g c
a
re
/Unit ca
re
/M
edia
handling (Disc
/US
B
memor
y
/S
D
car
d)
DMRXW300GN-RQT9135-L_eng.book 15 ページ 2008年4月30日 水曜日 午後6時11分


