background image

54

RQT9126

Copying Titles  (Advanced)

Preparation:

 Insert a disc and video cassette that you can use for 

copying (

¼

 73, 74).

 Confirm that there is enough remaining disc space.

 When copying an NTSC tape to a DVD, change the “TV 

System” to “NTSC” in the Setup Menu (

¼

 67).

This unit cannot record NTSC signals to discs that 
already have PAL signal recordings.

Copying Titles  (VHS 

¼

 DVD)

[VHS]


[RAM] [-R] [-R]DL] [-RW‹V›] [+R] [+R]DL] [+RW]

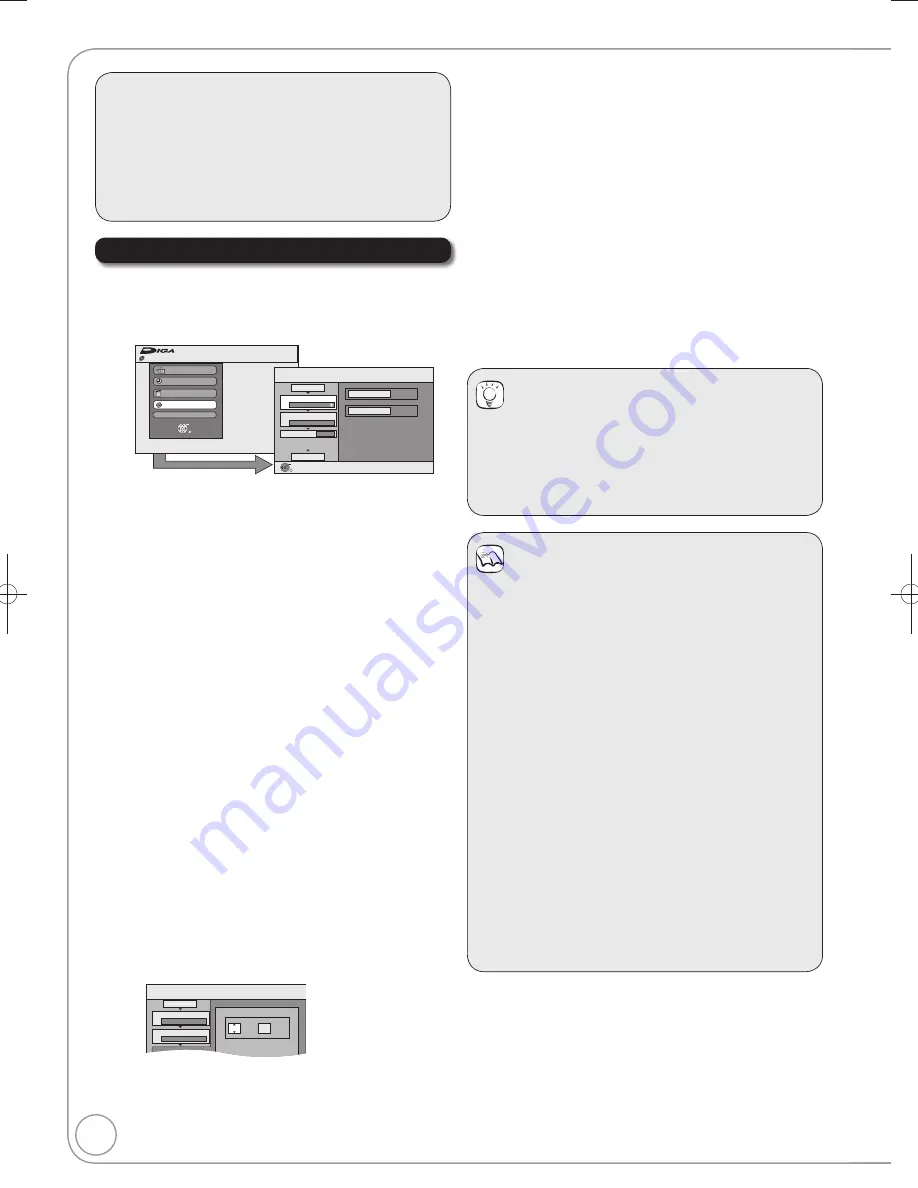
  Press [FUNCTION MENU].

 Press [

,

] to select “Copy”, then press [OK].


Disc Protection Off

FUNCTION MENU

Recording

Playback

Delete

To Others

OK

RETURN

Copy

DVD-RAM

Copy

VHS

DVD

1

2

3

Source

Destination

Cancel All

Copy Direction

Copy Mode

Copy Time

Start Copying

VHS 

DVD

VHS-Video      Sp

2:00

Select the copy direction.

OK

RETURN

– If you are not going to change the registered list, press [

several times (

¼

 step 

).

  Set the copy direction.

– If you are not going to change the copying direction, press 

[

] (

¼

 step 

).

 Press 

[

,

] to select “Copy Direction”, then press [

].

 Press 

[

,

] to select “Source”, then press [OK].

 Press 

[

,

] to select “VHS”, then press [OK].

– “Destination” is automatically set to “DVD”.

 Press 

[

] to confi rm.

  Set the recording mode.

– If you are not going to change the recording mode, press [

(

¼

 step 

).

 Press 

[

,

] to select “Copy Mode”, then press [

].

– “Format” is automatically set to “VHS-Video”.

 Press 

[

,

] to select “Recording Mode”, then press [OK].

 Press 

[

,

] to select the mode, then press [OK].

 Press 

[

] to confi rm.

 Set “Copy Time”.

– If you are not going to change the setting (

¼

 step


).

Setting the unit to copy according to the set time

 Press 

[

] to select “Copy Time”, then press [

].

 Press 

[

] to select “Time Setting”, then press [OK].

– Setting the unit to copy all the content on the video cassette

 Press 

[

] to select “Off”, then press [OK].

 Press 

[

] to confi rm.

– Setting the copying time

 Press 

[

] to select “On”, then press [OK].

 Press 

[

] to select “Copy Time”, then press [OK].


Copy

Min.

1

2

3

Hour

00

2

Cancel All

Copy Direction

Copy Mode

Copy Time

VHS 

DVD

VHS-Video     SP

Set the time a few minutes
longer. 

   Press [

] to select “Hour” and “Min.”, then press 

[

] to set the recording time.

 Press 

[OK].

 Press 

[

] to confi rm.

– You can also set the recording time with the numbered buttons.

  Press [

,

] to select “Start Copying”, then press [OK].

 Press [

] to select “Yes”, then press [OK] to start 

copying.

[VHS] 

 [-R] [-R]DL] [-RW‹V›] [+R] [+R]DL]


Press [

,

] to select “Copy & Finalise” or “Copy 

Only”, then press [OK].

– If “Copy & Finalise” is selected

After fi nalising, the discs become play-only and you can also 
play them on other DVD equipment. However, you can no 
longer record or edit.

– Copying is automatically stopped when the tape reaches the 

end, the remaining capacity of the disc is fi lled.

 Tips

To stop copying

Press and hold [RETURN] for 3 seconds.
(You cannot stop while fi nalising)

To return to the previous screen

Press [RETURN].

 Notes

 To play DVD-R, DVD-R DL, DVD-RW (DVD-Video format), 

+R and +R DL on other players, it is necessary to finalise 
them after copy.

About FR mode
When “Time Setting” is set to “Off” in step 

 left:

 The recording mode is automatically selected by 

estimating the remaining capacity of the disc for 
copying of only the recorded parts in the video cassette 
(unrecorded parts will not be recorded).

 When you press [OK] to start copy, the tape is 

automatically fast-forwarded to the end and then fast-
rewound to the beginning before the copying is actually 
started. It may take time to start copy. If the remaining 
capacity of the disc is insuffi cient, the copying will be 
stopped in the middle.

 The recording is divided into titles every time the tape 

index signals are detected.

When “Time Setting” is set to “On” in step 

 left:

 The recording mode is automatically determined by 

estimating the remaining capacity of the disc for copying 
of the contents equivalent to the recording time set 
from the start point of the copying on the video cassette 
(unrecorded parts will also be recorded).

 The recording is not divided into titles.

DMR-EZ48V̲EB.indb   54

DMR-EZ48V̲EB.indb   54

2008/04/04   16:39:37

2008/04/04   16:39:37

Summary of Contents for Diga DMR-EZ48VEB

Page 1: ...96 Declaration of Conformity No 5138 16th November 2007 Notice for DVB functions This DVD Recorder is for viewing and recording free to view channels only not Pay TV or encrypted channels unless connected to an external source capable of receiving Pay TV or encrypted channels This unit does not have an analogue broadcast tuner This unit has the capability for DVB specifications But future DVB serv...

Page 2: ...A VIERA remote control DIGA SVIDEO IN 2 VIDEO MONO AUDIO R L Linked operations with the TV You can set the Timer Recordings on Digital STB Satellite Receiver when it is connected to this unit with SCART cable EXT LINK 27 Linked timer recordings with external equipment Features Digital Switchover Starting in late 2007 and ending in 2012 TV services in the UK will go completely digital TV region by ...

Page 3: ...ector cover How to replace the fuse The location of the fuse differ according to the type of AC mains plug figures A and B Confirm the AC mains plug fitted and follow the instructions below Illustrations may differ from actual AC mains plug 1 Open the fuse cover with a screwdriver Fuse cover Figure A Figure B 2 Replace the fuse and close or attach the fuse cover Figure A Figure B Fuse 5 ampere Fus...

Page 4: ...ing the Playlist View 52 Creating Playlists 52 Editing Playlists Chapters 52 E t i T t 48 Advanced Editing Caution for AC Mains Lead 3 Remote Control Information 5 Watching Television 16 Watching Satellite Programmes 16 Playback 17 Playing Discs 17 Playing a Video Cassette 17 Recording Television Programmes 18 Timer Recording 19 Copying Titles 20 Copying Titles VHS DVD 20 Copying Titles DVD VHS 21...

Page 5: ...back Issues Operation 87 Playback Issues VHS Picture 88 Playback Issues VHS Sound 88 Playback Issues VHS Play 88 Recording Issues Recording Timer Recording Copying External input 89 Recording Issues VHS Recording 90 Editing Issues DVD 91 Glossary 92 Safety Precautions 93 Specifications 94 Index Back cover Frequently Asked Questions 76 Setup 76 Discs 76 Recording 77 TV Guide 77 DVB T 77 Messages 78...

Page 6: ...TTL Show subtitles 44 Transmission window TV operations 69 Channel select Change pages in the TV Guide list TRACKING V LOCK 18 34 42 Show timer recording list 30 Input select Tuner AV1 AV2 AV3 DV 16 27 28 Skip approx 1 minute forward 37 Exit the menu screen Show the TV Guide screen 16 19 34 Show FUNCTION MENU window 45 By using the FUNCTION MENU window you may access the main functions Playback Re...

Page 7: ... output terminals 71 72 Video output terminal 71 S VIDEO output terminal 71 AV2 EXT 21 pin Scart terminal 9 10 70 Connection of an external unit AV1 TV 21 pin Scart terminal 8 9 10 70 TV set connection Serial number Aerial output terminal 8 9 70 Aerial input terminal 8 9 70 Timer recording indicator 19 On When a timer recording programme is registered and a recordable disc or video cassette is ins...

Page 8: ...hold mains socket Use of the supplied RF coaxial cable To prevent interference patterns from appearing on your TV use only the supplied RF coaxial cables when you connect this unit to your TV and aerial outlet or aerial cable Keep the RF coaxial cables as far away as possible from other cables Do not roll up the RF coaxial cables 21 pin Scart terminal AV1 Scart terminal TV 1 Audio output CH2 R 2 A...

Page 9: ...rom a Satellite Receiver 27 AC IN RF IN RF OUT OPTICAL DIGITAL AUDIO OUT PCM BITSTREAM COMPONENT VIDEO OUT OUT OUT VIDEO AUDIO L R PR PB Y S VIDEO AV 2 A A EXT T T AV A A 1 V TV AC IN RF RF IN IN RF RF OUT OUT AV 1 TV AV 2 EXT Rear of this unit Rear of TV Rear of satellite receiver AV 1 Step 4 Step 5 Step RF IN AV 5 Step 5 Step 3 Step 2 Step The RF coaxial cable cannot be used for showing pictures...

Page 10: ...on HDMI compliant cables cannot be utilized Rear of TV 21 pin Scart cable not supplied Basic Connection When connected to an HDMI compatible unit an uncompressed digital audio and video signal is transmitted enabling you to enjoy high quality digital video and audio with just one cable When connecting to an HDMI compatible HDTV High Definition Television the output can be switched to 1080p 1080i o...

Page 11: ...o suit the connections to this unit These are the first settings you make upon buying the unit You don t need to make these settings again STATU A A S CREAT A A E CHAPTER F U N C T I O N M E N U D I R E C T N A V A I G A T A A O R GUIDE RETURN PLAY PA P P USE STOP SLOW SEARCH CH SELECT INPUT 0 9 8 7 6 5 4 3 2 1 CH AV A A TV DRIVE SELECT DVD VHS VOL DELETE MANUAL SKIP PROG CHECK EXIT OK OPTION TRAC...

Page 12: ...he name RETURN The Owner ID settings screen disappears and and then repeat steps to enter and store House No and Postcode Auto setup for your unit is complete You can now make your favourite channels and store them in the required order in the profiles 62 Clock Setting This unit usually obtains time and date information from digital broadcasts and automatically corrects the time several times a da...

Page 13: ...e disc failed to play on other equipment we recommend you create top menu 61 Use of Panasonic discs is recommended For available recording times for different discs under different recording modes see DVD Recording Modes and Durations on page 24 Formatting and or recording initializing constraints may prevent you from playing or recording certain discs Please see specifications 94 for compatible d...

Page 14: ...G and MP3 format data recorded on DVD R DVD R DL or CD R RW You can also play CD DA Video CD and SVCD conforming to IEC62107 format data recorded on CD R RW Close the session or finalise the disc after recording The producer of the disc can control how discs are played So you may not always be able to control play as described in these operating instructions Read the disc s instructions carefully ...

Page 15: ...ding or play of the disc may take time if there are a lot of sessions Operation may take time to complete when there are many files tracks and or folders groups some files tracks may not display or be playable Images recorded at a very high resolution may take a long time to display English alphabetical characters and Arabic numerals are displayed correctly Other characters may not display correct...

Page 16: ... STATU A A S DIRECTTVREC EXT LINK REC MODE REC CREAT A A E CHAPTER F U N C T I O N M E N U D I R E C T N A V A I G A T A A O R GUIDE RETURN PLAY PA P P USE STOP SLOW SEARCH CH SELECT INPUT 0 9 8 7 6 5 4 3 2 1 CH AV A A TV DRIVE SELECT DVD VHS VOL DELETE MANUAL SKIP PROG CHECK EXIT OK OPTION TRACKING V LOCK PAGE SKIP INDEX RESET REW FF This DVD recorder has a tuner which allows it to directly recei...

Page 17: ...r to Advanced Video Cassette Playback 41 43 for detailed information VHS Insert a cassette 74 Play starts automatically if you insert a cassette with the accidental erasure tab removed Stopping Play Press STOP Pausing Play Press PAUSE Press again to restart play DVD VHS to turn the unit on DRIVE SELECT to select the VHS drive The VHS indicator lights up on the unit PLAY Refer to Advanced Disc Play...

Page 18: ... It takes about 30 seconds for the unit to complete recording management information after recording finishes You cannot change the channel or recording mode during recording This unit cannot record NTSC signals to discs that already have PAL signal recordings Simultaneous recording to both DVD and VHS is not possible VHS Even if the video cassette is labelled S VHS it is not possible to record in...

Page 19: ... after purchasing this unit The TV Guide system will not work if the clock is not set correctly If NTSC has been selected for TV System 67 the TV Guide system cannot be used FR recording mode is not available when the timer programme is controlled by Guide Link Simultaneous recording to both DVD and VHS is not possible Tips RAM RW V R R DL RW To use a new disc formatting is necessary To check prog...

Page 20: ...r more seconds to cancel copying in the middle However you cannot stop finalising after it has started PLAY to copy without finalising If you press STOP you can cancel copying On the main unit While both DVD and VHS are stopped COPYING COPYING Press and hold for about 3 seconds REC to copy and automatically finalise when done see page 61 for more information on finalising If you press STOP you can...

Page 21: ...o deactivate it before copying 17 When copying doesn t start the COPYING indicator on the main unit blinks for about 7 seconds Check if the unit is properly prepared Tips When you start copying from the selected title 1 Press DRIVE SELECT to select the DVD drive 2 Press DIRECT NAVIGATOR 3 Press to select the recording you want to start then press OK 4 Go to the operation shown above Index signals ...

Page 22: ... select all necessary items Press again to cancel With the unit stopped F U N C T I O N M E N U Disc Protection Off FUNCTION MENU Recording Playback Copy Delete To Others OK RETURN DVD RAM to select Delete then OK Tips To return to the previous screen Press RETURN To view other pages Press to select Previous or Next then press OK You can also press to view other pages Deleting Titles During Playba...

Page 23: ... REPEAT OPEN DC IN 9V I CD SEQUENTIAL DISC DOUBLE RE MASTER DISC EXCHANGE DISC SKIP OPEN CLOSE 1 2 3 4 5 Record to DVD R etc Finalise Play on other DVD equipment RW If the disc failed to play on other equipment we recommend you create top menu 61 RAM CPRM compatible discs only R R DL RW V R R DL RW Can do Cannot do RAM R R DL RW V VHS The original aspect used for the source programme will also be ...

Page 24: ...ng the programme will fit on one disc perfectly You can set FR mode when programming timer recordings and flexible recording 26 Recording Mode Advanced Recording VHS Recording Modes and Durations Tips To prevent recording errors Set a timer recording period slightly longer than the actual programme to make sure the programme is recorded in full If the image quality is important to you or if you wi...

Page 25: ...M R R DL RW V R R DL RW VHS This function allows specifying the length of recording time up to 4 hours Notes This function does not work during timer recording or Flexible Recording Recording stops and the set time is cleared if you press STOP The unit turns off automatically after recording finished During recording On the main unit REC repeatedly until the desired time is reached The recording t...

Page 26: ...xible Recording Flexible Rec Start Cancel Record in FR mode Set rec time Maximum rec time 8 Hour 00 Min 8 Hour 00 Min RETURN SELECT to select Flexible Rec then OK to select Hour and Min and to set the recording time You can set Hour and Min using the numbered buttons When you want to start recording to select Start then OK Recording starts Notes You cannot record more than 8 hours Tips To exit the...

Page 27: ...ordings 30 Notes In order to prevent accidental operation press EXT LINK to cancel the setting after recording is finished This function does not work when TV System is set to NTSC in the setup menu 67 This function does not work with some equipment Refer to the equipment s operating instructions The beginnings of recordings may not be recorded correctly in some cases When Ext Link is set to Ext L...

Page 28: ...hile recording from an external device timer recording takes priority and recording from the external device stops If video is copied from another piece of equipment to this unit then the video quality will be degraded Almost all videos and DVD Video on sale have been treated to prevent illegal copying Any software that has been so treated cannot be recorded using this unit Recording from an Exter...

Page 29: ...he unit S VIDEO IN 2 VIDEO MONO AUDIO R L 4 pin DV Cable RAM R R DL RW V R R DL RW RECMODE to select the recording mode 24 Turn on the DV equipment and pause play at the point you want to start recording DV Auto Rec Rec to DVD Cancel DV unit is connected Record from the DV unit OK RETURN SELECT DV Auto Rec screen may appear to select Rec to DVD then OK to select Rec then OK Recording from a DV Cam...

Page 30: ...unit s display flashes when the unit cannot go to timer recording standby If two timer recording times overlap the first recording always has priority The second recording will start only after the first recording has finished Recorded subtitles cannot be deleted later A Timer Recording will not start while a disc is being formatted deleted or finalised The recording begins afterwards When Name is...

Page 31: ...egin when the set time is reached even when playing Timer recordings do not begin while editing or copying If the unit is turned on when timer recording begins it remains turned on after recording finishes It does not turn off automatically You can turn the unit off during timer recording If the unit is not put in the timer recording standby mode at least 10 minutes before the programmed timer rec...

Page 32: ... programme Mode STTL Stop Start No Date Drive Name Drive space NewTimer Programme 1 58 SP DVD VHS Timer Recording screen icons Timer programme is active Currently recording Programmes are overlapped Recording of the programme with the later start time starts when the earlier programme finishes recording You stopped a weekly or daily timer recording The icon disappears when the next timer recording...

Page 33: ... s display lights recording from TV does not start Programmes are recorded as one title on this unit when the end time of the earlier timer recording and the start time of the later timer recording are close to each other RAM To divide the titles go to Divide Title 50 Tips To stop recording Press STOP DVD VHS to turn the unit off The start and end of recording is controlled by TV Advanced Features...

Page 34: ...ne This is convenient to check the status of Timer recording Portrait view This is convenient to narrow down channels to search for the programme you want to watch To switch between Landscape view and Portrait view Press GUIDE Notes The receipt of the TV Guide system data is only possible via the aerial input of this unit The receipt of the TV Guide data via externally connected satellite receiver...

Page 35: ...annel 4 Channel 5 10 31 Channel 6 32 70 to select the programme Tips To return to the previous TV Guide list before you have selected the programme type or categories Select All Types of the programme type and All Services of the categories in step above To return to the previous screen Press RETURN To exit the screen Press EXIT Blue Yellow e g Programme type News and Factual is selected in step o...

Page 36: ...itle Chapter Skip is operated for each chapter During playback or There are 5 search speeds Each press increases the search speed R R DL RW up to 3 speeds Press PLAY to restart normal playback Advanced Disc Playback DIRECT NAVIGATOR screen icons Protected Not recorded due to recording protection Digital broadcasts etc It cannot be played because data is damaged etc Currently recording One time onl...

Page 37: ...o restart normal playback Notes If continued for approx 5 minutes slow motion play pauses automatically except DVD V VCD VCD allow slow motion in the forward direction only RAM R R DL RW V R R DL This function does not work with finalised discs RW RW VR Skips approx 1minute forward with each press Manual Skip During playback MANUAL SKIP During playback CHAPTER CREATE Tips Chapters cannot be create...

Page 38: ... JPEG then press OK Slide Show Tips To stop the Slide Show Press STOP To change the rate at which pictures are displayed 1 In step above press to select Slide Interval then press OK 2 Press to select desired interval 0 to 30 seconds then press OK From the Picture JPEG View screen to select Folder then OPTION Start Slide Show Slide Interval to select Start Slide Show then OK Selecting Still Picture...

Page 39: ...tate LEFT Zoom in OK RETURN to select Zoom in then OK Notes To return to the picture to its original size Press to select Zoom out in step then press OK When zooming in the still picture may be cut off Zoom in information is not stored Zoom in and Zoom out do not work with images that have a resolution larger than 640 480 pixels Picture Properties While playing a picture STATUS twice to display pi...

Page 40: ... from Mars 008 Starry Blue 009 Velvet Cuppermine 010 Ziggy Starfish Page 001 024 1 1 My favourite 2 3 4 5 6 7 8 9 10 Total Track Tree G 1 T 3 TOTAL 3 111 MP3 Menu 0 9 Number Group No Prev Next ENTER Selected group Track list is shown Group No Track No in the group Track No Total tracks in all groups to select a track then OK to play From the track list while a track is highlighted to display the t...

Page 41: ... cancelled after 10 minutes Advanced Video Cassette Playback With the unit stopped FF to fast forward the tape REW to rewind the tape During playback PAUSE Press and hold for about 2 seconds Press PLAY to restart normal playback During playback FF to cue to later portions of the tape REW to review a portion just played Press PLAY to restart normal playback During playback FF twice to Jet Search fo...

Page 42: ...me When the tape reaches the end of the programme it will automatically rewind to the beginning and play again Repeat Playback During playback or while stopped PLAY Press and hold for about 5 or more seconds Repeat Playback goes on indefinitely until you cancel it The R indication appears on screen Press STOP to stop play Tips To remove the noise from a paused picture Start slow play 41 then adjus...

Page 43: ...Mono L audio of the Hi Fi stereo audio R Mono R audio of the Hi Fi stereo audio Normal Normal audio Recording mode 24 Operation status Shows the tape counter and remaining tape time Pressing STATUS to cycle the display as follows No display Tape counter Remaining tape time Press DELETE to reset the tape counter elapsed time to 0 00 00 The tape counter is automatically reset when inserting a video ...

Page 44: ...recorded and will remain visible during playback Changing the Category You can select one of your favourite channels by changing the category such as Free Services Radio and Registered Profiles 62 When digital channel information is displayed Blue to change the category Press to select the channel Showing the Digital TEXT MHEG When TXT appears in digital channel information TEXT to show the Digita...

Page 45: ...uping your favourite chapters You can create playlists by g Playlists 26 The unit sets the best possible picture quality that fits the recording within the remaining disc space Th it t th b t i Flexible Rec 29 DV automatic recording function DV a tomatic recording f nc DV Auto Rec 62 You can change the unit s settings using Setup Menu You can change the unit s se Setup 4 60 You can manage discs th...

Page 46: ...s button is pressed the playback image is not immediately displayed on the screen and it may not be possible to watch the contents from where playback started In this case press or to go back to where playback started 3 This function is available with the TV which has HDAVI Control 3 function When the TV is on Easy playback VIERA Link Q Link When the TV is on and the following operations are perfo...

Page 47: ... while DVD Video is copying Advanced Features Advanced Features Using the FUNCTION MENU window to operate this unit VIERA Link Display this unit s FUNCTION MENU window using the TV remote control If this unit is turned off this unit will be turned on automatically Select the item you want to operate with the TV remote control then OK Using the OPTION menu window to operate this unit VIERA Link By ...

Page 48: ...n not edit finalised discs RW RW VR You can edit titles on the DIRECT NAVIGATOR screen deleting unwanted parts of titles such as commercials changing Thumbnail dividing and deleting titles etc Preparation RAM Release protection disc cartridge 60 Setting Protection Insert a disc Press DRIVE SELECT to select the DVD drive Press DIRECT NAVIGATOR Press to select a title Multiple editing below Tips Pre...

Page 49: ... prevent accidental erasure of titles Perform steps of Accessing the Title View 48 Press to select Set up Protection or Cancel Protection then press OK Press to select Yes then press OK The lock symbol appears when the title is protected BBC 0 27 10 MON 07 08 DIRECT NAVIGATOR Title Vie BBC 0 27 10 DVD RAM Partial Delete RAM Use to remove unwanted parts of titles such as commercials Important Once ...

Page 50: ...wn in the Title View screen Perform steps of Accessing the Title View 48 Press to select Change Thumbnail then press OK DIRECT NAVIGATOR Change Thumbnail Change Finish 0 00 01 Change 08 OK RETURN Start play and select the image of a thumbnail Set up Protection Cancel Protection Partial Delete Change Thumbnail Divide Title Enter Name DVD RAM Press PLAY to start play Press OK at the point you want t...

Page 51: ...o select Combine Chapters then press OK Press to select Combine then press OK The selected chapter gets combined with the next chapter RAM When creating chapters in your favourite scenes you can easily reach the head of scene using SKIP or play on Chapter View Properties Edit Chapter View Delete Refer to Chapter Operations right You can go back to the Title View Combine Chapters Delete Chapter Cre...

Page 52: ...t the source chapter you want to add to a playlist and press OK Press to cancel Press OPTION to select Create Chapter then press OK if you want to create a new chapter in the source title 51 Press to select the position to insert the chapter then press OK Press repeatedly to return to step if you want to add additional source titles Chapters are registered to the playlist Repeat steps and to add o...

Page 53: ... edit Press OPTION to display the menu list You can go back to the Playlist View Move Chapter Create Chapter Combine Chapters Delete Chapter Playlist View Add Chapter Refer to Chapter Operations right Chapter Operations Add Chapter Press to select Add Chapter then press OK 52 Creating Playlists Move Chapter Press to select Move Chapter then press OK Press to select the position to insert the chapt...

Page 54: ...cel All Copy Direction Copy Mode Copy Time VHS DVD VHS Video SP Set the time a few minutes longer Press to select Hour and Min then press to set the recording time Press OK Press to confirm You can also set the recording time with the numbered buttons Press to select Start Copying then press OK Press to select Yes then press OK to start copying VHS R R DL RW V R R DL Press to select Copy Finalise ...

Page 55: ...playlists for copy If you are going to copy a registered list without making any changes to it step Press to select Create List then press Page 01 01 Copy Create copy list Size 0 00 Destination Remaining 2 32 No Size New item Total 0 1 2 3 Cancel All Copy Direction Copy Mode Create List Start Copying DVD VHS VIDEO SP Name of item 0 OK RETURN OPTION Press to select New item then press OK Press the ...

Page 56: ...press OK 2 Press to select Yes then press OK Move Move selected items or change the order of items on the copying list 1 Press to select Move then press OK 2 Press to select the destination then press OK After performing steps 55 left column Press to select Cancel All then press OK Press to select Yes then press OK The settings and lists may be cancelled in the following situations When a title or...

Page 57: ... confirm Copying to the VHS continues for the set time even after the content being played finishes Set a few minutes longer than the source title in order to include the operation time before play begins You can also set the recording time with the numbered buttons Press to select Start Copying then press OK Press to select Yes then press OK to start copying The disc top menu is displayed Disc pl...

Page 58: ...D V Disc Menu Soundtrack Subtitle language ENG English CHI Chinese FRA French KOR Korean DEU German MAL Malay ITA Italian VIE Vietnamese ESP Spanish THA Thai NLD Dutch POL Polish SVE Swedish CES Czech NOR Norwegian SLK Slovak DAN Danish HUN Hungarian POR Portuguese FIN Finnish RUS Russian Others JPN Japanese Audio attributes LPCM Digital DTS MPEG Signal type k kHz Sampling frequency b bit Number o...

Page 59: ... AV3 or DV is selected Reduces video tape noise during recording Depending on the video signal jittering may occur Automatic Noise reduction only works on picture input from a video tape On Noise reduction works for any video input Off Noise reduction is off Select when you want to record input as is RAM R R DL RW V R R DL RW DVD V RW VR CD VCD Repeat Play This function works only when the elapsed...

Page 60: ...s RAM The disc cannot be formatted if the write protect tab left is switched to PROTECT Release the protection to continue The message Unable to format appears when trying to format discs the unit cannot use You can delete all titles on the single sided DVD RAM at once Important Once deleted contents cannot be recovered RAM Perform preparation steps of Accessing the Management Menus left Press to ...

Page 61: ...ition and mode of recording Tips After you have finished recording or copying and try to eject the disc a screen asking if you want to finalise the disc appears 25 Create Top Menu RW RW discs contain no Top Menu data Top Menu is a convenient function We recommend you create the menu before playing a RW disc on other equipment Perform preparation steps of Accessing the Management Menus 60 Press to ...

Page 62: ...t the channel setting itself Timer recording may not work correctly if you edit the profiles during timer recording standby Channel numbers cannot be changed due to broadcast restrictions Setup Disc Picture Sound Display Connection VHS Tuning Edit Profiles Auto Setup Restart Others OK RETURN TAB SELECT DVB Manual Tuning Add New DVB Services Signal Condition Edit Profiles RETURN SELECT Profile Sele...

Page 63: ...ion VHS Tuning Edit Profiles Auto Setup Restart Others OK RETURN TAB SELECT DVB Manual Tuning Add New DVB Services Signal Condition Add New DVB Services Please wait Ch 21 68 Prog Quality Channel Service Name Net ID TS ID RETURN RETURN to cancel The unit starts searching for newly available terrestrial digital channels This takes about 5 minutes The bar over the table shows you the search progress ...

Page 64: ...Temporary Unlock Soundtrack English German French Italian Spanish Original Other Subtitle Automatic English German French Italian Spanish Other Menus English German French Italian Spanish Other Settings for Recording Press OK to show the following settings Recording time in EP mode Select the maximum number of hours for recording in EP mode EP 6Hours You can record for 6 hours on an unused 4 7 GB ...

Page 65: ...fore output Bitstream When you have connected the unit to a piece of equipment with a built in MPEG decoder PCM When you have connected the unit to a piece of equipment without a built in MPEG decoder Audio Mode for XP Recording Choose the audio type when recording or copying with XP mode Dolby Digital 92 LPCM 92 The picture quality of LPCM recordings may be lower than that of normal XP mode recor...

Page 66: ...ic Bright FL Display Connection select Connection select item OK TV Aspect This setting needs to be changed when connected to a 4 3 standard aspect TV Press to select the TV Aspect then press OK 16 9 4 3 Letterbox Notes Aspect 4 3 16 9 4 3 16 9 4 3 standard aspect television 16 9 widescreen television 16 9 When connected to a 16 9 widescreen television 4 3 When connected to a 4 3 aspect television...

Page 67: ...y Select when this unit is connected to an amplifier with an optical digital audio cable 72 and connected to a TV with an HDMI cable 10 and you want to enjoy the highest quality of audio from discs VIERA Link On Off Select when you do not want to use HDAVI Control AV1 Output Set according to the terminal of the connected TV Select Video with component for component output progressive output Video ...

Page 68: ... the unit is turned off Off TV Guide Software search period Selects the time to automatically perform TV Guide download and updates when the unit is turned off This can only be set when TV Guide Download in Standby and Software Update in Standby is set to On If there is a programmed recording set for the time you have selected the programmed recording will be given priority Automatic The unit will...

Page 69: ...ng different codes if available Some TVs may not be compatible with the unit s remote control TV operation buttons Remote Control Codes for the TV Manufacturer Code No Panasonic 01 02 03 04 AIWA 35 AKAI 27 30 BEJING 33 BEKO 05 71 72 73 74 BENQ 58 59 BP 09 BRANDT 10 15 BUSH 05 CENTREX 66 CHANGHONG 69 CURTIS 05 DAEWOO 64 65 DESMET 05 DUAL 05 ELEMIS 05 Manufacturer Code No FERGUSON 10 34 FINLUX 61 FI...

Page 70: ...et Rear of this unit To household mains socket To household mains socket Before connection turn off the mains for all connected equipment and read the appropriate operating instructions Be sure to read the Caution for AC Mains Lead on page 3 Additional Connections RF coaxial cable supplied black The RF coaxial cable cannot be used for showing pictures from the unit The unit must be connected using...

Page 71: ...output COMPONENT VIDEO IN CRT DO NOT Using an Audio Video Cable The S VIDEO OUT terminal achieves a more vivid picture than the VIDEO OUT terminal Actual results depend on the television OUT S VIDEO AC IN RF IN OPTICAL DIGITAL AUDIO OUT PCM BITSTREAM AV OU AV V OUT COMPONENT VIDEO OUT OUT VIDEO AUDIO L R PR PB Y OUT VIDEO AUDIO L R AUDIO IN VIDEO IN R L S VIDEO IN Rear of TV Rear of TV Rear of thi...

Page 72: ...ignal is transmitted enabling you to enjoy high quality digital video and audio with just one cable When connecting to an HDMI compatible HDTV High Definition Television the output can be switched to 1080p 1080i or 720p HD video Please use High Speed HDMI Cables that have the HDMI logo as shown on the cover When outputting 1080p signal please use HDMI Cables 5 0 meters or less Wh t d t HDMI tibl i...

Page 73: ...iscs Discs are not indestructible and occasionally dirt or condensation may appear Clean by gently wiping with a soft dry lint free cloth in a straight line from the centre of the disc to the edge of the disc Return discs to their cases when not in use this helps to protect against scratches and dirt Storing discs Do not place or store discs in the following locations Direct sunlight Very dusty or...

Page 74: ...es can cause the heads to become dirty and malfunction Store your video cassettes carefully and discard them when they become dirty or damaged Never use video cassettes on which juice has been spilled or those that are extremely damaged since this will not only cause the heads to become dirty but will also make the unit malfunction Video Cassette Information Insert a cassette the surface with the ...

Page 75: ...th a moisture sensor The manufacturer accepts no responsibility and offers no compensation for loss of recorded or edited material due to a problem with the unit or recordable media and accepts no responsibility and offers no compensation for any subsequent damage caused by such loss Examples of causes of such losses are A disc recorded and edited with this unit is played in a DVD Recorder or comp...

Page 76: ...tup Page How can I enjoy High Quality Video up converted to 1080p Connect the unit to 1080p compatible HDTV using an HDMI cable Set HDMI Video Format in the Setup Menu to 1080p 10 67 72 What equipment is necessary to play multi channel surround sound You cannot playback multi channel sound on this unit without other equipment You must connect this unit with an HDMI cable or an optical digital cabl...

Page 77: ...ith 48 kHz sampling frequency 65 You cannot record MP3 signals TV Guide Page Is it possible to programme a recording with a start and end time that are different from the TV Guide system You can manually change the start and end time of programmes in the Timer Recording menu But if timings are altered by more than 10 minutes Guide link will not be able to function 30 Can I receive TV Guide system ...

Page 78: ...ed This is not a malfunction The unit is carrying out its recovery process You cannot operate the unit while the message is displayed PROG FULL There are already 16 timer recording programmes Delete unnecessary timer recording programmes 32 PROTECT You have inserted a video cassette without the accidental erasure prevention tab Use a video cassette with an accidental erasure prevention tab 74 SW D...

Page 79: ...itch to an appropriate AV channel on your TV The VHS plays back while recording on DVD You can watch the VHS playback by connecting 21 pin Scart cable from AV1 on the unit to the television VHS cannot be output via DVD Priority OUT while recording on DVD 70 Please set clock Set the clock 12 This is a non recordable disc The unit cannot record on the disc you inserted Insert a DVD RAM or unfinalise...

Page 80: ...wing indicator appears on the unit s display Change the code on the remote control to match the code displayed for the main unit step To Reset This Unit To reset the unit s settings To reset the ratings level settings To restore the unit if it freezes With the unit stopped Press OPEN CLOSE to open the disc tray Press DRIVE SELECT to select the DVD drive On the main unit Press and hold REC and for ...

Page 81: ... g Blank after 1 h 36 min The unit s display also appears like this if the tape is dirty or damaged Consult your dealer if this is the case The clock does not display on the unit when switched to standby Ensure Power Save is set to Off 68 The following does not indicate a problem with the unit Regular disc video cassette rotating sound Poor reception due to atmospheric conditions Image disturbance...

Page 82: ...nit as follows Press I on the main unit to switch to standby mode If the unit doesn t switch to standby mode reset the unit 80 To restore the unit if it freezes The unit cannot be operated while performing an update SW DL appears on the unit s display while it is updating Please wait until the SW DL disappears 68 U88 is displayed and the disc cannot be ejected The unit is carrying out the recovery...

Page 83: ...ial cable fly lead between this unit and antenna wall socket to minimise impulse noise pickup If problem persists consult your local TV aerial installer When No Signal message is displayed check aerial connection Adjust the aerial reception with DVB Manual Tuning Perform Auto Setup Restart in the Setup Menu 63 8 9 63 63 Picture very infrequently breaks up on some or all channels Electrical atmosph...

Page 84: ...the signal strength display go to red Readjust the picture with your room aerial until the picture quality improves Page General Issues VIERA Link VIERA Link doesn t work Check the HDMI cable connection Check that HDMI is displayed on the front display when the power for the main unit is set to On Make sure that VIERA Link is set to On Check the HDAVI Control settings on the connected device Some ...

Page 85: ... The recorded title is stretched vertically 16 9 aspect programmes are recorded in 4 3 aspect in the following cases R R DL RW V If you recorded or copied using EP or FR recordings 5 hours or longer recording mode If you recorded or copied to a R R DL or RW It may be possible to adjust the display mode on the TV Refer to your television s operating instructions There is a lot of after image when p...

Page 86: ...of connected devices To output audio from a device connected with an HDMI cable set Digital Audio Output to HDMI and Optical in the Setup Menu 67 Depending on the connected equipment the sound may be distorted if this unit is connected with an HDMI cable Cannot switch audio You cannot switch the audio in the following cases When a DVD R DVD R DL DVD RW DVD Video format R R DL or RW disc is in the ...

Page 87: ...orded on the disc You may have to use the disc s own menus to select languages and audio tracks 36 No subtitles Subtitles are not recorded on the disc Set Subtitle in the Disc menu to On 58 Angle cannot be changed This function depends on software availability Angles can only be changed during scenes where different angles are recorded You have forgotten your ratings password With the tray open pr...

Page 88: ...ng 42 The tape is old or damaged Playback Issues VHS Sound Page Page On screen display indicators do not appear Select a setting other than Off in On Screen Messages in the Setup Menu Press STATUS to show the on screen display indicators 43 66 The grey background appears during playback You are playing a blank or poor quality portion of the tape You can damage the unit if you play dirty or damaged...

Page 89: ...recorded on this unit may not be recordable on other Panasonic DVD Recorders The broadcast you are trying to record is copy protected This unit cannot record NTSC signals to discs that already have PAL signal recordings Play of discs recorded with both PAL and NTSC on another unit is not guaranteed 67 Digital broadcasts cannot be recorded or copied Some digital broadcasts are copyright protected w...

Page 90: ...is not equal on DVD and on VHS The sound level on DVD and VHS may not match depending on the disc When the sound level in a particular part of the sound source is soft or loud the sound may be recorded loudly or softly on a video tape Stripe shaped black noise is recorded An external playback device is interfering with the TV because the device is too close to the TV Move the device away from the ...

Page 91: ...65 Corsican 6779 Hebrew 7387 Macedonian 7775 Russian 8285 Thai 8472 Afrikaans 6570 Croatian 7282 Hindi 7273 Malagasy 7771 Samoan 8377 Tibetan 6679 Albanian 8381 Czech 6783 Hungarian 7285 Malay 7783 Sanskrit 8365 Tigrinya 8473 Amharic 6577 Danish 6865 Icelandic 7383 Malayalam 7776 Scots Gaelic 7168 Tonga 8479 Arabic 6582 Dutch 7876 Indonesian 7378 Maltese 7784 Serbian 8382 Turkish 8482 Armenian 728...

Page 92: ...ds per second PAL discs or 30 frames 60 fields per second NTSC discs Generally appropriate for TV drama programmes or animation Finalise A process that makes play of a recorded CD R CD RW DVD R etc possible on equipment that can play such media You can finalise DVD R DVD R DL DVD RW DVD Video format R and R DL on the unit After finalising the disc becomes play only and you can no longer record or ...

Page 93: ... Reference Placement Set the unit up on an even surface away from direct sunlight high temperatures high humidity and excessive vibration These conditions can damage the cabinet and other components thereby shortening the unit s service life Do not place heavy items on the unit Voltage Do not use high voltage power sources This can overload the unit and cause a fire Do not use a DC power source Ch...

Page 94: ... termination Video Out PAL NTSC AV1 AV2 21 pin Video Out pin jack 1 Vp p 75 termination S Video Out PAL NTSC AV1 21 pin S Video Out S terminal 1 Vp p 75 termination RGB Out PAL NTSC AV1 21 pin 0 7 Vp p PAL 75 termination Component video output NTSC 480p 480i PAL 576p 576i Y 1 0 Vp p 75 termination PB 0 7 Vp p 75 termination PR 0 7 Vp p 75 termination Audio Recording system Dolby Digital 2 ch Linea...

Page 95: ...AC receptacle AC IN RF RF IN IN RF RF OUT OUT OPTICAL DIGITAL AUDIO OUT PCM BITSTREAM A AV OU V OUT T COMPONENT VIDEO OUT OUT OUT VIDEO AUDIO L R PR PB Y S VIDEO AV 2 EXT AV 1 TV For your safety be sure not to connect or handle equipment with wet hands Your attention is drawn to the fact that recording pre recorded tapes or discs or other published or broadcast material may infringe copyright laws...

Page 96: ...HDMI 10 46 47 72 Initialize 68 Jet Rewind 41 JPEG 15 38 92 Language Audio 58 Code list 91 Soundtrack 58 Subtitle 58 LPCM 65 92 Manual Skip 37 Menu MP3 40 On screen 58 Pictures 38 Setup 62 Mode Recording 24 Still Mode 64 MP3 15 40 Name Disc 60 Entering text 48 Playlist 53 Title 30 49 New Service 45 63 66 Noise reduction NR 59 On screen Digital channel information 44 Display 58 Status messages 45 Op...

Reviews: