RQT8318
28
28
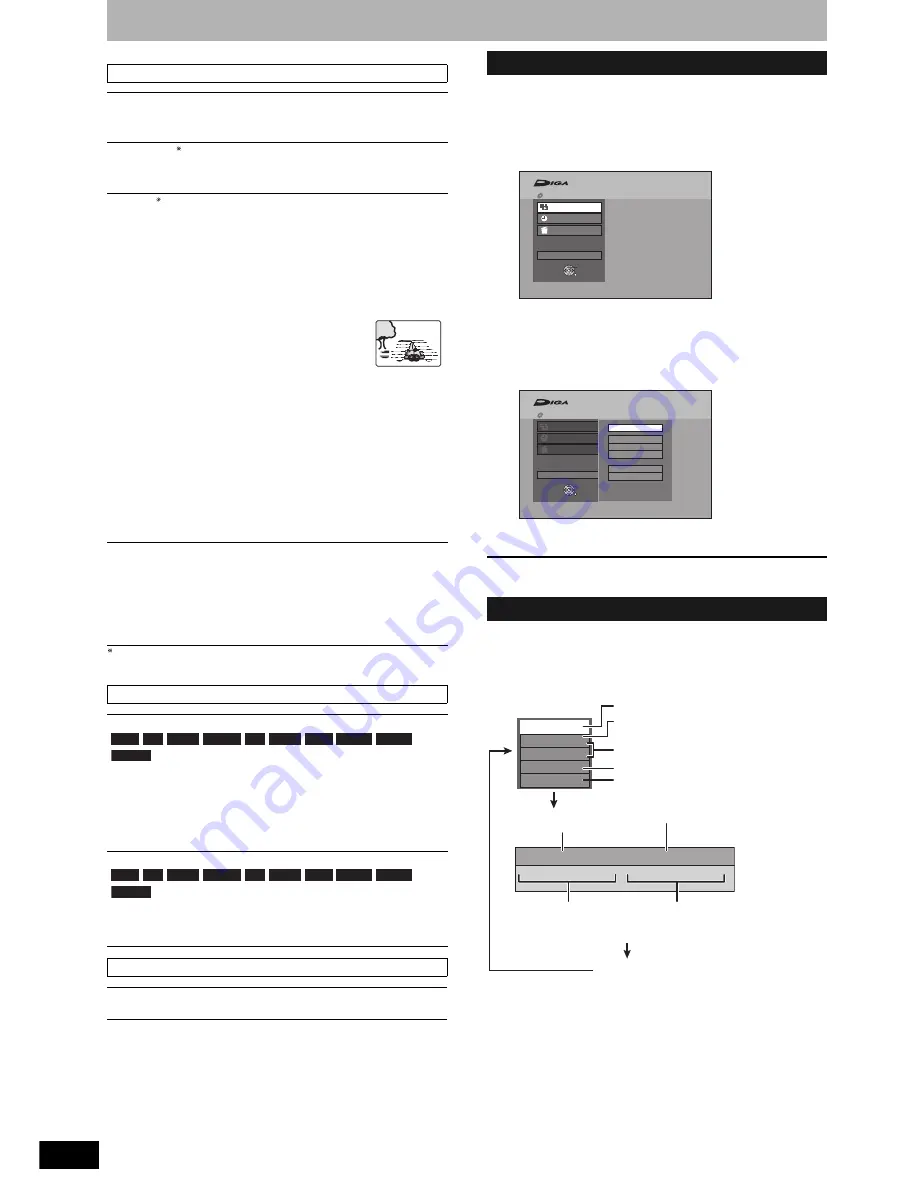
Using on-screen menus/FUNCTIONS window and Status message
Refer to the control reference on page 27.
Only when you have set “Progressive” to “On” in the Setup menu
(
➔
page 40).
By using the FUNCTIONS window you may access the main
functions quickly and easily.
1
While stopped
Press [FUNCTIONS].
Functions displayed depend on the type of disc.
2
Press [
e
,
r
] to select an item and
press [ENTER].
• If you select “To Others” and press [ENTER], the following
screen appears. Press [
e
,
r
] to select an item and press
[ENTER].
• If you press [RETURN], you can return to the previous
screen.
To exit the FUNCTIONS window
Press [FUNCTIONS].
Status messages appear on the television during operation to show
the condition of the unit.
Press [STATUS].
The display changes each time you press the button.
• TV audio type
Picture menu–Change the picture quality
Playback NR
Reduces noise and picture degradation.
On
l
Off
Progressive (
➔
page 50)
Select “On” to enable progressive output.
Select “Off” if the picture is stretched horizontally.
Transfer
[When “Progressive” (
➔
above) is set to “On”]
Select the method of conversion for progressive output to suit
the type of title being played (
➔
page 50, Film and video).
When the output signal is PAL
•
Auto:
Automatically detects the film and video content,
and appropriately converts it.
•
Video:
Select when using “Auto”, and the content is
distorted.
•
Film:
Select this if the edges of the film
content appear jagged or rough
when “Auto” is selected.
However, if the video content is
distorted as shown in the
illustration to the right, then select “Auto”.
• When the tray is opened, the setting will return to “Auto”.
When the output signal is NTSC
•
Auto 1
(normal)
:
Automatically detects the film and video content,
and appropriately converts it.
•
Auto 2:
In addition to “Auto 1”, automatically detects film
contents with different frame rates and
appropriately converts it.
•
Video:
Select when using “Auto 1” and “Auto 2”, and the
content is distorted.
AV-in NR
(Only when AV1, AV2, AV3 or DV is selected)
Reduces video tape noise while dubbing.
•
Automatic:
Noise reduction only works on picture input from
a video tape.
•
On:
Noise reduction works for any input video.
•
Off:
Noise reduction is off. You can record the input
signal as it is.
Sound menu–Change the sound effect
V.S.S.
(Dolby Digital, MPEG, 2-channel or over only)
Enjoy a surround-like effect if you are using two front speakers
only.
• Turn V.S.S. off if it causes distortion. (Check the surround
function on the connected equipment.)
• V.S.S. does not work for bilingual recordings.
Dialog Enhancer
and DivX
(Dolby Digital, 3-channel or over only, including a center channel)
The volume of the center channel is raised to make dialog
easier to hear.
Other menu–Change the display position
Position
1 - 5: The higher the setting the lower the on-screen menu moves.
RAM -R
-R DL -RW(V) +R +R DL +RW DVD-V DVD-A
-RW(VR)
RAM -R
-R DL -RW(V) +R +R DL +RW DVD-V DVD-A
-RW(VR)
FUNCTIONS window
Status message
STEREO:
Stereo broadcast
M 1/M 2:
Bilingual dual-sound broadcast
M 1:
Monaural broadcast
Playback
Recording
Delete
To Others
FUNCTIONS
Cartridge Protection Off
Disc Protection Off
DVD-RAM
ENTER
RETURN
Playback
Recording
Delete
To Others
ShowView Record
Playlists
Flexible Rec
DV Auto Rec
Setup
DVD Management
FUNCTIONS
Cartridge Protection Off
Disc Protection Off
DVD-RAM
ENTER
RETURN
1:45 SP
12:34:50 7. 5.
T12 0:01.23 SP
g
g
g
T12 0:12.34 SP
DVD-RAM
Remain
REC
STEREO
L R
PLAY
Type of disc
Recording or play status/input channel
Date and time
Available recording time
and recording mode
Title number and elapsed
time during recording/
Recording mode
Title number and elapsed
time during play/
Recording mode
No display
TV audio type being received (
➔
below)
Selected audio type
The remaining time appears here while
stopped.
Summary of Contents for DIGA DMR-ES15
Page 53: ...MEMO 53 RQT8318 ...


