background image

15

RQT8023

Ge

ttin

g

 st

a

rte

d

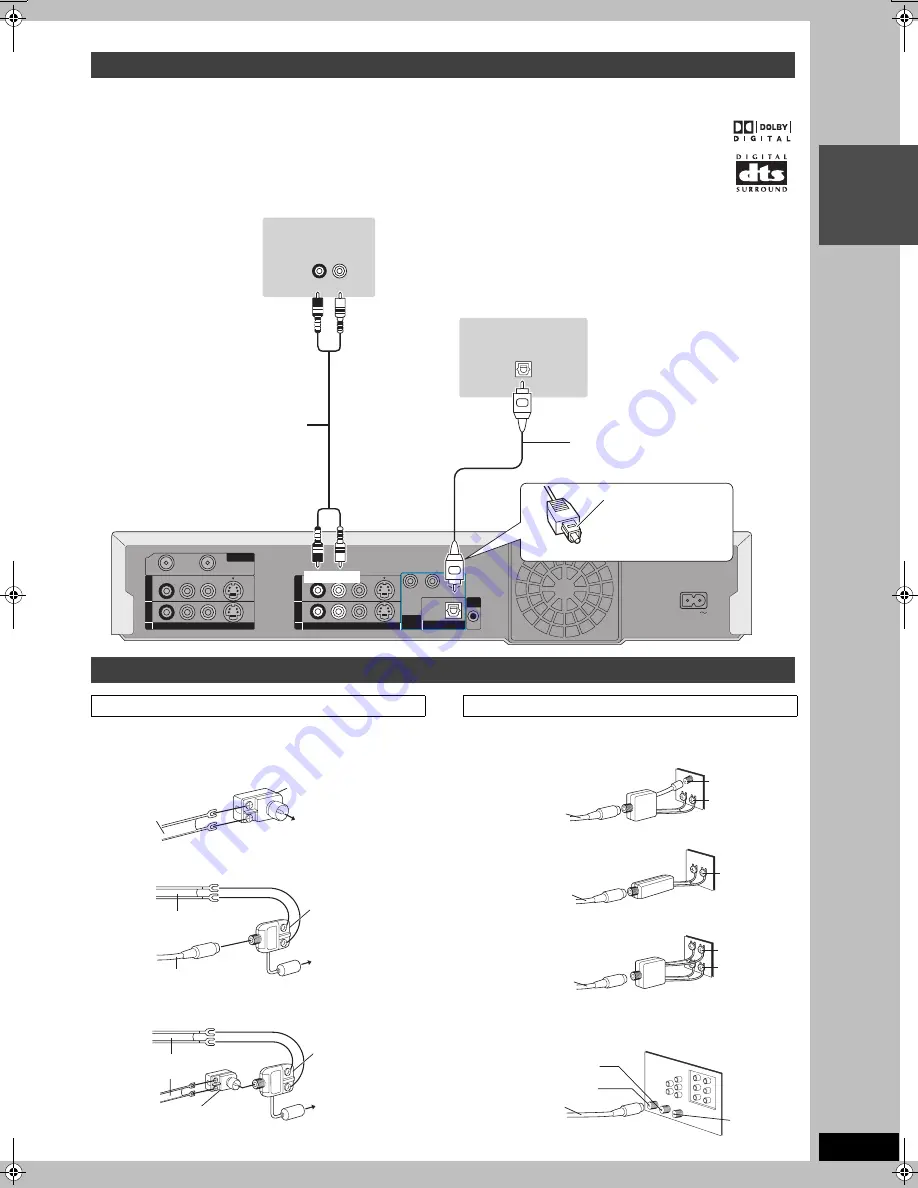
Connection to a stereo amplifier

To enjoy multi-channel surround sound on 
DVD-Video

Use one of the following connections to suit the antenna lead.

If your television has both lead and coaxial VHF terminals, use 
the lead connection to minimize signal loss.

A single twin lead

A twin lead and a coaxial cable

Two twin leads

Use one of the following connections to suit the antenna terminals 
on your television. Refer to the television’s operating instructions.

A twin lead and coaxial plug terminal

A twin lead terminal

Two twin lead terminals

Multiple antenna terminals

Connect to one of the ANT terminals, then change the television’s 
settings as necessary.

Connecting an amplifier or system component

If the antenna connector doesn’t match

S VIDEO

VIDEO

OUT2O

U

T

2

OUT1O

U

T

1

Y

P

B

P

R

COMPONENT

COMPONENT

VIDEO

VIDEO OUT

OUT

(

48

480p/

p/48

480i

0i

)

AC  IN 

S VIDEO

VIDEO

IN3IN

3

IN1IN

1

VH

VHF / UHF

UHF

G-LINK

LINK

RF 

RF 

I N

I N

RF 

RF 

OUT

OUT

VIDEO

VIDEO

VIDEO

VIDEO

R-AUDIO-L

R-AUDIO-L

R-AUDIO-L

R-AUDIO-L

DIGITAL AUDIO OUT

DIGITAL AUDIO OUT

(PCM/BITSTREAM)

(PCM/BITSTREAM)

OPTICAL

OPTICAL

OPTICAL IN

AUDIO IN

R      L

Optical digital audio cable
Do not bend sharply when 
connecting.

Insert fully, with this 
side facing up.

Audio cable

This unit

Red White

Red White

Connect an amplifier with a built-in decoder 
displaying these logo marks using an optical digital 
audio cable and change the settings in “Digital Audio 
Output” (

56).

You cannot use DTS Digital Surround decoders not 

suited to DVD.

Output is not digital with DVD-Audio; however, you can enjoy it in 

analog (

left).

[For digital playback, set “Play DVD-Audio in Video Mode” (

55) 

to “Video Mode (Video On)” when the DVD-Audio contains DVD-
Video.]

Amplifier’s rear panel

Amplifier’s rear panel

To OUT 1 or OUT 2

or

Other antenna connections to the unit

300–75 

 transformer

from the antenna

(Flat) Twin lead 
300 

 cable

To this unit’s RF IN 
terminal

from the antenna

(Flat) Twin lead 300 

 cable

To this unit’s RF IN 
terminal

(Round)
75 

 coaxial cable

VHF/UHF band mixer

from the antenna

To this unit’s RF 
IN terminal

300–75 

 transformer

(Flat) Twin lead
300 

 cable

VHF/UHF band mixer

Other antenna connections to the television

VHF/UHF band separator

Television

75 

 coaxial cable

VHF

UHF

75 

 coaxial cable

75–300 

 transformer

Television

VHF or 
UHF

75 

 coaxial cable

VHF/UHF band separator

Television

VHF

UHF

ANT 2

ANT 1

Split out

Television

75 

 coaxial cable

EH50English.book  Page 15  Tuesday, February 1, 2005  6:36 PM

Summary of Contents for Diga DMR-EH50

Page 1: ...letely Please keep this manual for future reference Region number supported by this unit Region numbers are allocated to DVD players and DVD Video according to where they are sold The region number of this unit is 1 The unit will play DVDs marked with labels containing 1 or ALL Example 1 ALL 2 4 1 If you have any questions contact In the U S A 1 800 211 PANA 7262 In Canada 1 800 561 5505 For U S A...

Page 2: ...N ADVARSEL SICHTBARE UND UNSICHTBARE LASERSTRAHLUNG WENN ABDECKUNG GEÖFFNET NICHT DEM STRAHL AUSSETZEN VORSICHT Inside of product The lightning flash with arrowhead symbol within an equilateral triangle is intended to alert the user to the presence of uninsulated dangerous voltage within the product s enclosure that may be of suffi cient magnitude to constitute a risk of electric shock to persons ...

Page 3: ...el Clock settings when TV Guide On ScreenTM system is not used 57 Auto channel clock settings 57 Channel captions 58 Messages 59 Frequently asked questions 60 Troubleshooting guide 62 Specifications 67 Glossary 68 Product Service 69 Limited Warranty ONLY FOR U S A 70 Limited Warranty ONLY FOR CANADA 71 Index Backcover This DVD Recorder records high quality images to rapid random access capable HDD...

Page 4: ...tivate While in SLEEP mode play or recording may not begin right away because the HDD takes time to be re activated When not using the unit we recommend removing the disc in the tray in order to set the HDD to the SLEEP mode Setup precautions Do not place in an enclosed area so the rear cooling fan and the cooling vents on the side are covered up Place the unit on a surface that is flat and not su...

Page 5: ...wing pleasure Dust and dirt may adhere to the unit s lens over time making it impossible to record or play discs Use the DVD RAM lens cleaner about once every year depending on frequency of use and the operating environment Carefully read the lens cleaner s instructions before use Note Do not obstruct the rear panel s internal cooling fan Only insert or remove the SD card after turning the unit of...

Page 6: ...ain or SAP only can be recorded for MTS broadcasts Playing the disc on other DVD players is not possible before finalizing DVD R DVD RW and R are collectively referred to as DVD R etc on this page Therefore follow the steps below when you use DVD R etc Record to DVD R etc Hola 16 9 aspect program with Main and SAP Hello Hello SAP Main The selected audio only is recorded e g Main only 4 3 aspect Di...

Page 7: ...e numbers indicated in parentheses when asking for replacement parts Product numbers correct as of December 2004 These may be subject to change Only for U S A To order accessories refer to Accessory Purchases on page 70 Only for Canada To order accessories call the dealer from whom you have made your purchase 1 Remote control EUR7729KB0 1 AC power supply cord K2CB2CB00018 1 75 coaxial cable K2KZ2B...

Page 8: ...tively record or play both sides Note When Rec for High Speed Dubbing is set to On the restrictions on secondary audio recording etc are also applied to DVD RAM Turn this setting Off if high speed transfer dubbing to DVD R etc is not necessary when recording a program 22 DVD Video Recording format This is a recording method which allows you to record and edit television broadcasts and so on Digita...

Page 9: ...orded title is erased Y Available space does not increase after erasing t t We recommend using Panasonic discs and cards We also recommend using DVD RAM discs with cartridges to protect them from scratches and dirt Discs from other manufacturers may not be recorded or played due to the condition of the recording You may not be able to record to DVD R DVD RW and R discs on this unit or play them du...

Page 10: ...ase items 32 Smart Wheel operation Note Press the Smart Wheel lightly when turning it If you press it strongly when turning it 3 4 2 1 may be mistakenly activated Remote control HDD HDD DVD DVD SD SD 1 2 3 4 5 6 7 8 9 FU N C T I O N S TV GUIDE S C H E D U L E CH CH SUB MENU SUB MENU T O P M E NU S DUBBING DUBBING DVD TV DVD TV DVD POWER POWER TV Í CH VOLUME TV VIDEO INPUT SELECT AUDIO F Rec SETUP ...

Page 11: ... g HDD 2 Channel 3 Transferring dubbing indicator 4 D MIX multi channel DVD Audio only When lit Down mixing 68 is possible When off The disc prevents down mixing so only the two front channels can be played 8 Regarding DVD Audio 5 Recording mode 6 Disc type 7 Lights when the HDD DVD or SD drive is selected 8 Main display section 9 Scheduled recording indicator Main unit IN2 IN2 C H C H HDD DVD SD ...

Page 12: ...gnal will be affected by copyright protection systems and the picture may not be shown correctly When connecting to a television with a built in VCR Connect to the input terminals on the television side if there are both television and VCR input terminals Connection with a television and video cassette recorder S VIDEO VIDEO OUT2 OUT2 OUT1 OUT1 Y PB PR COMPONENT COMPONENT VIDEO VIDEO OUT OUT 48 48...

Page 13: ...ensor of the cable TV box Connection with a cable TV box and video cassette recorder S VIDEO VIDEO OUT2 OUT2 OUT1 OUT1 Y PB PR COMPONENT COMPONENT VIDEO VIDEO OUT OUT 48 480p p 48 480i 0i AC IN S VIDEO VIDEO IN3 IN3 IN1 IN1 VH VHF UHF UHF G LINK LINK RF RF IN IN RF RF OUT OUT VIDEO VIDEO VIDEO VIDEO R AUDIO L R AUDIO L R AUDIO L R AUDIO L DIGITAL AUDIO OUT DIGITAL AUDIO OUT PCM BITSTREAM PCM BITST...

Page 14: ... VHF UHF RF IN VHF UHF RF OUT AUDIO R AUDIO L VIDEO OUT OUT AUDIO R AUDIO L VIDEO IN IN Audio Video cable To IN1 or IN3 This unit Video cassette recorder Red White Yellow Yellow White Red To enjoy even higher fidelity Connecting to the S VIDEO IN terminal S VIDEO VIDEO OUT2 OUT2 OUT1 OUT1 Y PB PR COMPONENT COMPONENT VIDEO VIDEO OUT OUT 48 480p p 48 480i 0i S VIDEO VIDEO VH VHF UHF UHF G LINK LINK ...

Page 15: ...AL OPTICAL OPTICAL IN AUDIO IN R L Optical digital audio cable Do not bend sharply when connecting Insert fully with this side facing up Audio cable This unit Red White Red White Connect an amplifier with a built in decoder displaying these logo marks using an optical digital audio cable and change the settings in Digital Audio Output 56 You cannot use DTS Digital Surround decoders not suited to D...

Page 16: ...ble TV box is set to the channel that appears on screen and press ENTER Only English is displayed in the TV Guide On ScreenTM system Other languages cannot be displayed TV Guide On ScreenTM system This unit features the TV Guide On ScreenTM system that provides an 8 day grid of TV programs available in your area Use the TV Guide On ScreenTM system to choose TV programs and simplify the recording o...

Page 17: ...lect Clock Settings and press ENTER 4 Press 3 4 to select Set Clock Manually and press ENTER 5 Press 2 1 to select the item you want to change and press 3 4 to change the setting 6 Press ENTER The clock starts 7 Press SETUP DST Daylight Saving Time On or Off If you select On the clock is advanced one hour starting at 2 a m on the first Sunday in April and ending at 2 a m on the last Sunday in Octo...

Page 18: ... RETURN To exit the screen Press SETUP HDD HDD DVD DVD SD SD 1 2 3 4 5 6 7 8 9 FU N C T I O N S TV GUIDE S C H E D U L E CH CH SUB MENU SUB MENU T O P M E NU S DUBBING DUBBING DVD TV DVD TV DVD POWER POWER TV Í CH VOLUME TV VIDEO INPUT SELECT AUDIO F Rec SETUP CANCEL 0 VCR Plus CM SKIP SKIP SLOW SEARCH STOP STOP PAUSE PAUSE PLAY x1 3 ENTER ENTER RETURN RETURN CREATE CREATE CHAPTER CHAPTER Info STA...

Page 19: ...asonic products close together Use 1 the factory set code under normal circumstances 1 Press SETUP 2 Press 3 4 to select Setup and press 1 3 Press 3 4 to select Remote Control Code and press ENTER 4 Press 3 4 to select the code 1 2 or 3 and press ENTER 5 To change the code on the remote control While pressing ENTER press and hold the numbered button 1 2 or 3 for more than 2 seconds 6 Press ENTER W...

Page 20: ... can record while the unit is in standby for scheduled recording but once the time for the scheduled recording to begin is reached any recording taking place will stop and the scheduled recording will begin To pause recording Press Press again to restart recording You can also press REC to restart Title is not split into separate titles To stop recording Press From the start to the end of the reco...

Page 21: ...recorded title must be more than 3 minutes HDD RAM R RW V R During recording Press REC to select the recording time You can specify up to 4 hours later The unit display changes as shown below This does not work during scheduled recordings 24 or while using Flexible Recording 22 If you change the channel or recording mode while recording is paused the time specified to stop recording is cancelled T...

Page 22: ... quality that fits the recording within the remaining disc space The recording mode becomes FR mode Using FLEXIBLE RECORDING is convenient in these kinds of situations RAM R RW V R When the amount of free space on the disc makes selecting an appropriate recording mode difficult When you want to record a long program with the best picture quality possible HDD When you want to record a title to HDD ...

Page 23: ...DD or DVD to select the recording drive 3 Press To stop scheduled recording Press then ENTER within 5 seconds You can also press and hold on the main unit for more than 3 seconds to stop recording While recording you can play a scene in the title being recorded or a previously recorded title Both images being played and recorded are shown 1 Press TIME SLIP during recording Play starts from 30 seco...

Page 24: ...o select Quality and press the Blue button Each time you press the button To change the recording drive Press 3 4 to select Destination and press the Blue button Each time you press the button HDD DVD When the recording drive is DVD and there is not enough remaining space recording automatically switches to the HDD 27 Relief Recording 4 Press TV GUIDE Returns to the television screen The unit goes...

Page 25: ...TER Press the Green button to change recording frequency Each time you press the button To program other recordings Press 3 4 2 1 to select RECORD and repeat steps 2 4 5 Press TV GUIDE Returns to the television screen The unit goes to scheduled recording standby F lights on the unit s display however it may not turn off automatically To save power turn the unit off by pressing Í DVD POWER Schedule...

Page 26: ...e TV box make sure the cable TV box is turned on Notes on scheduled recording 27 To check change or delete a program 27 To cancel recording when it has already begun Press then ENTER within 5 seconds You can also press and hold on the main unit for more than 3 seconds to stop recording Using VCR Plusi system to make scheduled recordings HDD HDD DVD DVD SD SD 1 2 3 4 5 6 7 8 9 FU N C T I O N S TV G...

Page 27: ... that the unit is in scheduled recording standby F flashes when the unit cannot go to scheduled recording standby Scheduled recordings are activated regardless of whether the unit is turned on off Scheduled recordings begin when the set time is reached even when recording or when playing Scheduled recordings do not begin while transferring dubbing in normal speed mode 43 If the unit is turned on w...

Page 28: ...bsequent broadcasts of the same program are displayed together in one column In this case press 3 4 to select a program name and press ENTER Each broadcast of the program is then displayed separately Press 3 4 to select the desired program Functions of Action Buttons The SCHEDULE screen displays programs registered for recording or as a Favorite separately on the list In addition to being able to ...

Page 29: ... channels 1 Press 2 2 Press the Blue button to move up or the Green button to move down Repeat steps 2 3 as necessary 4 Press TV GUIDE Review options menu Selecting the TV Guide On ScreenTM system start up pattern 1 Press 3 4 to select Review options and press ENTER 2 Press 3 4 to select the option and press ENTER On Turns on auto start up Off Turns off auto start up The MESSAGES screen is where a...

Page 30: ...een the sorted Title View will be cancelled 3 Press 3 4 2 1 to select the title and press ENTER You can also select titles with the numbered buttons To show other pages Press 3 4 2 1 to select Previous or Next and press ENTER Thumbnail Display only You can also press 9 to show other pages To exit the screen Press DIRECT NAVIGATOR Direct Navigator screen icons IN2 IN2 C H C H HDD DVD SD S VIDEO S V...

Page 31: ...excluding moving picture parts CD Audio is heard during all levels of search Depending on the disc search may not be possible Skip During play or while paused press or 9 Skip to the title chapter or track you want to play Each press increases the number of skips Starting from a selected item Press the numbered buttons Play starts from the selected title chapter or track HDD CD discs with MP3 files...

Page 32: ...e time increases 3 or decreases 4 by 1 minute intervals Press and hold for 10 minute intervals Press 1 PLAY to show the play images in full CM Skip HDD RAM R RW V R RW VR Press CM SKIP Each time you press play restarts approximately a minute later 0 min Play CH 4 Play images Current receiving images You can change the channel being received by pressing W X CH You cannot change the channel being re...

Page 33: ...3 Bit rates 32 kbps to 320 kbps Sampling frequency 16 kHz 22 05 kHz 24 kHz 32 kHz 44 1 kHz 48 kHz This unit is not compatible with ID3 tags HDD HDD DVD DVD SD SD 1 2 3 4 5 6 7 8 9 FU N C T I O N S TV GUIDE S C H E D U L E CH CH SUB MENU SUB MENU T O P M E NU S DUBBING DUBBING DVD TV TV VIDEO INPUT SELECT AUDIO F Rec SETUP CANCEL 0 VCR Plus CM SKIP SKIP SLOW SEARCH STOP STOP PAUSE PAUSE PLAY x1 3 E...

Page 34: ...select JPEG Menu and press ENTER Picture protected Picture in which the number of prints is set DPOF 42 68 IN2 IN2 C H C H HDD DVD SD S VIDEO S VIDEO VIDEO VIDEO L MONO L MONO AUDIO AUDIO R OPEN CLOSE OPEN CLOSE DRI DRIVE VE SELECT SELECT REC REC POWER x1 3 HDD HDD DVD DVD SD SD 1 2 3 4 5 6 7 8 9 FU N C T I O N S TV GUIDE S C H E D U L E CH CH SUB MENU SUB MENU T O P M E NU S DUBBING DUBBING DVD T...

Page 35: ...formats DCF compliant Content recorded on a digital camera etc Design rule for Camera File system unified standard established by Japan Electronics and Information Technology Industries Association JEITA File format JPEG TIFF non compressed RGB chunky format Number of pixels 34k34 to 6144k4096 Sub sampling is 4 2 2 or 4 2 0 This unit can handle a maximum of 3000 files and 300 folders including hig...

Page 36: ... channel Off Stereo Î Digital 2 0 ch Menu Item Setting Disc menu Setting the disc content Soundtrack HDD RAM R RW V R RW VR The disc s audio attributes appear DVD V DVD A Select the audio and language below Audio attribute Language Subtitle DVD V DVD A Turn the subtitle on off and select the language below Language HDD RAM R RW V R RW VR Only discs that contain subtitle on off information Turn the...

Page 37: ...yed 68 Film and video Auto1 normal Detects 24 frame per second film content and appropriately converts it Auto2 Compatible with 30 frame per second film content in addition to 24 frame per second film content Picture distortion may occur depending on the content Video Select when using Auto1 and Auto2 and the video content is distorted Line in NR Only when IN1 IN2 or IN3 is selected Reduces video ...

Page 38: ...n Press DIRECT NAVIGATOR Title Chapter Programs are recorded as a single title consisting of one chapter You can divide a title into multiple chapters HDD RAM 32 39 You can change the order of chapters and create a playlist 40 HDD RAM Titles are divided into about 5 minute chapters after finalizing 52 R RW V R Editing titles chapters and playing chapters HDD HDD DVD DVD SD SD 1 2 3 4 5 6 7 8 9 FU ...

Page 39: ...D RAM below For quicker editing You can divide a title into two 1Press ENTER at the point you want to divide the title 2Press 3 4 to select Exit and press ENTER 3Press 2 1 to select Divide and press ENTER To confirm the division point Press 3 4 to select Preview and press ENTER The unit plays 10 seconds before and after the division point To change the division point Restart play and press 3 4 to ...

Page 40: ...o the previous screen Press RETURN To exit the screen Press RETURN several times You can arrange the chapters 38 to create a playlist Transferring dubbing 43 a playlist will create a title Playlists are not recorded separately so this doesn t use much capacity Editing chapters in a playlist does not modify the source titles and source chapters Creating playlists HDD HDD DVD DVD SD SD 1 2 3 4 5 6 7...

Page 41: ...een Copy Playlist Name Change Thumbnail Create Properties Edit View Chapters Erase Playlist Refer to Playlist operations PLAYLISTS Chapter View 01 10 27 Mon 0 30 001 002 HDD 0 53 01 Chapter View screen Move Chapter Create Chapter Combine Chapters Erase Chapter View Playlists Add Chapter Refer to Chapter operations Playlist operations Erase Playlist HDD RAM Press 2 1 to select Erase and press ENTER...

Page 42: ...laying chapters 38 Step 2 Folder Name Setup Protection Cancel Protection DPOF Select Folder Erase Entire Folder To switch to another higher folder 35 Picture and folder operation Erase Picture Erase Entire Folder HDD RAM SD Press 2 1 to select Erase and press ENTER Once erased the recorded contents are lost and cannot be restored Make certain before proceeding When erasing a folder the files not c...

Page 43: ...t be registered on the same transferring dubbing list You can transfer dub your favorite titles and playlists to an archive disc Transferring dubbing a playlist will create a title When you want to re edit finalized content on a DVD R etc When you want to play a transferred dubbed disc on other equipment you must finalize the disc after transferring dubbing 52 68 1 Before recording to HDD set Rec ...

Page 44: ...select Dubbing Direction and press 1 2 Press 3 4 to select Source and press ENTER 3 Press 3 4 to select the drive and press ENTER 4 Press 3 4 to select Destination and press ENTER 5 Press 3 4 to select the drive and press ENTER The same drive as the transfer dubbing source cannot be selected 6 Press 2 to confirm 4 Set the recording mode If you are not going to change the recording mode press 4 ste...

Page 45: ...orded or erased at the transfer dubbing source When steps have been taken for instance to turn off the unit open the tray change the transfer dubbing direction etc To stop transferring dubbing Press and hold RETURN for 3 seconds If stopped partway transferring dubbing will be up to that point However in high speed mode only titles that have completed transferring dubbing at the point stopped are t...

Page 46: ...ically begins from title 1 when First Title is selected from the Playback will start with menu when finalizing the disc 52 7 When the top menu is displayed Press 3 4 2 1 to select the title you want to start transferring dubbing and press ENTER While playing in order all the titles after the selected title are recorded until the set time After the last title on the disc has finished playing the to...

Page 47: ...ess to pause recording Press again to restart recording To stop recording Press Using Flexible Recording 22 you can save the content of a video cassette approx 1 8 hours to a 4 7 GB disc with the best possible quality of recording without wasting disc space HDD HDD DVD DVD SD SD 1 2 3 4 5 6 7 8 9 FU N C T I O N S TV GUIDE S C H E D U L E CH CH SUB MENU SUB MENU T O P M E NU S DUBBING DUBBING DVD T...

Page 48: ... folder by folder basis 1 Press 3 4 to select Create List and press 1 2 Press 3 4 to select Picture Folder and press ENTER 3 Press 3 4 to select Folder and press ENTER 4 Press 3 4 to select New Entry and press ENTER 5 Press 3 4 to select the folder and press ENTER To select a multiple number of items together press to add the check mark and press ENTER 49 Multiple editing To show other pages 49 To...

Page 49: ...ress ENTER 3 Press 3 4 to select COPY ALL PICTURES and press ENTER If there is a multiple number of higher folders recognizable you can switch them using 2 1 4 Press 3 4 to select Copy to and press 2 1 to select the drive 5 Press 3 4 2 1 to select Copy and press ENTER To stop transferring dubbing Press and hold RETURN for 3 seconds To return to the previous screen Press RETURN To show other pages ...

Page 50: ...S window With a finalized DVD R DVD RW DVD Video format and R the name is displayed on the Top Menu To return to the previous screen Press RETURN To exit the screen Press RETURN several times Common procedures HDD HDD DVD DVD SD SD 1 2 3 4 5 6 7 8 9 FU N C T I O N S TV GUIDE S C H E D U L E CH CH SUB MENU SUB MENU T O P M E NU S DUBBING DUBBING DVD TV Í CH VOLUME TV VIDEO INPUT SELECT AUDIO F Rec ...

Page 51: ...ess 2 1 to select Yes and press ENTER 6 Press 2 1 to select Start and press ENTER A message appears when formatting is finished Note Formatting normally takes a few minutes however it may take up to a maximum of 70 minutes RAM Do not disconnect the AC power supply cord while formatting This can render the disc or the card unusable 7 Press ENTER Note When a disc or card has been formatted using thi...

Page 52: ...ible disc it may take longer than displayed on the confirmation screen approximately four times You cannot finalize discs recorded on other manufacturer s equipment If you finalize discs recorded on Panasonic equipment other than this unit the background selected as Top Menu Style may not be displayed Discs finalized on this unit may not be playable on other players due to the condition of the rec...

Page 53: ... 6 7 8 9 FU N C T I O N S TV GUIDE S C H E D U L E CH CH SUB MENU SUB MENU T O P M ENU S DUBBING DUBBING DVD TV AUDIO F Rec SETUP CANCEL 0 VCR Plus CM SKIP SKIP SLOW SEARCH STOP STOP PAUSE PAUSE PLAY x1 3 ENTER ENTER RETURN RETURN CREATE CREATE CHAPTER CHAPTER Info STATUS STATUS REC REC MODE ERASE DISPLAY D I R E C T N A V I G A T OR T I M E S L I P RETURN 3 4 2 1 ENTER SUB MENU 9 CANCEL Numbered ...

Page 54: ...RCH STOP STOP PAUSE PAUSE PLAY x1 3 ENTER ENTER RETURN RETURN CREATE CREATE CHAPTER CHAPTER Info STATUS STATUS REC REC REC MODE REC MODE ERASE ERASE DISPLAY DISPLAY PAGE PAGE D I R E C T N A V I G A T OR T I M E S L I P RETURN 3 4 2 1 ENTER SETUP CANCEL Í DVD POWER Numbered buttons Common procedures Tabs Menus Options Set Channels Automatically Channel SETUP Setup TV Guide Settings CableTV Signal ...

Page 55: ...urs on an unused 4 7 GB disc EP Extended Play 8H You can record for 8 hours on an unused 4 7 GB disc The sound quality is better when using EP Extended Play 6H than when using EP Extended Play 8H Rec for High Speed Dubbing When high speed transferring dubbing a title to DVD R DVD RW DVD Video format and R it is necessary to turn this setting On before recording to HDD however the screen size etc i...

Page 56: ...logo DTS Bitstream When connecting to equipment displaying the DTS logo PCM When connecting to equipment not displaying the DTS logo Audio for XP Recording Choose the audio type when recording or transferring dubbing with XP mode Dolby Digital 68 LPCM 68 The picture quality of LPCM recordings may be lower than that of normal XP mode recordings The audio recording becomes Dolby Digital even if you ...

Page 57: ... Time l GMT j9 HST Hawaii Standard Time l GMT j10 For other areas xx hr If the Auto Clock Setting does not start automatically select Clock Settings from the Setup tab and then select Set Clock Automatically If the time was not set correctly use manual clock setting 17 or adjust time zone 6 Press ENTER The unit configures channels according to the Signal Source RF IN settings as follows Adjust the...

Page 58: ...annel number press CANCEL Repeat steps 4 and 5 to enter other channels 6 Press ENTER 3 Press 3 4 to select Manual Channel Captions and press ENTER 4 Press 3 4 to select the channel and press 1 Channels are only displayed if they contain a station and if preset captions have not been added 5 Press 3 4 to select the first character and press 1 You can choose from the following characters A Z 0 9 spa...

Page 59: ... 51 This disc is not formatted properly The operation is prohibited by the unit or disc CHK REMOTE stands for a number The remote control and main unit are using different codes Change the code on the remote control Press and hold ENTER and the indicated number button at the same time for more than 2 seconds 19 HARD ERR If there is no change after turning the unit on and off consult the dealer whe...

Page 60: ...ys high speed recording compatible DVD R DVD RW R discs 8 9 Please tell me about CD R and CD RW compatibility with this unit This unit plays CD R CD RW discs which have been recorded in one of the following standards CD DA Video CD MP3 and still pictures JPEG TIFF Close the session or finalize the disc after recording This unit can recognize up to 99 folders groups and 999 files tracks on a disc w...

Page 61: ...r chip which has limited storage space Factors used in determining which programs display detailed program information are the number of channels turned ON in the CHANNEL EDITOR screen and the availability of the descriptions Setting channels that cannot be received to OFF in the CHANNEL EDITOR screen may increase the amount of information displayed 29 What kind of information might be seen in the...

Page 62: ...he flashing 12 00A will change to the current time If the unit s display does not change to the current time even after waiting we recommend that you set the clock using Set Clock Manually If you do not want to use the TV Guide On ScreenTM system set the clock with Set Clock Automatically 17 57 Compared to the actual recorded time the elapsed time displayed is less The displayed recording play tim...

Page 63: ...he disc was created 56 22 56 15 Cannot operate the television The remote control doesn t work Change the manufacturer code Some televisions cannot be operated even if you change the code The remote control and main unit are using different codes Change the code on the remote control Press and hold ENTER and the indicated number button at the same time for more than 2 seconds The batteries are depl...

Page 64: ...ing to the HDD set Rec for High Speed Dubbing to On in the SETUP menu 22 When transferring dubbing it takes a long time even when high speed mode is selected Use a disc that is compatible with high speed recording Even if the disc is high speed recording compatible the maximum speed may not be possible due to the condition of the disc It takes longer than normal to transfer dub many titles You can...

Page 65: ...k would also not be available The program highlighted doesn t match up with the video window on the TV screen The data entered during the initial setup was incorrect or the channel line up you selected was incorrect Select Change system settings menu and verify the data entered during initial setup If the settings are wrong set up the TV Guide On ScreenTM system again The station in question may h...

Page 66: ...nceled when the unit is turned off or when the tray is opened The memorized position on the playlist is also canceled when the playlist and title are edited Cannot format The disc is dirty Wipe with a damp cloth and then wipe dry You tried formatting a disc that you may not be able to use in this unit 5 8 9 Cannot create chapters Cannot mark the start point or the end point during Shorten Title op...

Page 67: ...s Wave Length 795 nm CDs 662 nm DVDs Laser power No hazardous radiation is emitted with the safety protection TV system NTSC system 525 lines 60 fields Antenna reception input TV Channel 2 ch 69 ch 75 CATV Channel 1 ch 125 ch 75 RF converter output Not provided Recording system MPEG2 Hybrid VBR Input LINE pin jack a3 1 0 Vp p 75 S connectora3 Y 1 0 Vp p 75 C 0 286 Vp p 75 Output LINE pin jack a2 1...

Page 68: ... that can play such media You can finalize DVD R DVD RW DVD Video format and R on this unit After finalizing the disc becomes play only and you can no longer record or edit However finalized DVD RW can be formatted to become recordable Folder This is a place on the hard disk or memory card where groups of data are stored together In the case of this unit it refers to the place where still pictures...

Page 69: ...irectory on page 70 In Canada contact the Panasonic Canada Inc Customer Care Centre at 1 800 561 5505 or visit the website www panasonic ca or an authorized Servicentre closest to you Language code list Enter the code with the numbered buttons Abkhazian 6566 Afar 6565 Afrikaans 6570 Albanian 8381 Ameharic 6577 Arabic 6582 Armenian 7289 Assamese 6583 Aymara 6589 Azerbaijani 6590 Bashkir 6665 Basque...

Page 70: ...amage that is attributable to acts of God THERE ARE NO EXPRESS WARRANTIES EXCEPT AS LISTED UNDER LIMITED WARRANTY COVERAGE THE WARRANTOR IS NOT LIABLE FOR INCIDENTAL OR CONSEQUENTIAL DAMAGES RESULTING FROM THE USE OF THIS PRODUCT OR ARISING OUT OF ANY BREACH OF THIS WARRANTY As examples this excludes damages for lost time travel to and from the servicer loss of media or images data or other record...

Page 71: ...S FOR A PARTICULAR PURPOSE IN NO EVENT WILL PANASONIC CANADA INC BE LIABLE FOR ANY SPECIAL INDIRECT OR CONSEQUENTIAL DAMAGES In certain instances some jurisdictions do not allow the exclusion or limitation of incidental or consequential damages or the exclusion of implied warranties so the above limitations and exclusions may not be applicable WARRANTY SERVICE For product operation and information...

Page 72: ...xión proporciona la mejor calidad de imagen El terminal S VIDEO proporciona una imagen más viva que la del terminal VIDEO Por qué debo conectar el IR Blaster El IR Blaster es un dispositivo que permite a esta unidad comunicarse con el receptor de TV por cable Sirve como mando a distancia para el receptor de TV por cable Si conecta un receptor de TV por cable a esta unidad también necesitará coloca...

Page 73: ...IR Blaster está conectado e instalado correctamente 13 72 el receptor de TV por cable está encendido Si no conecta un receptor de TV por cable el cable de antena está conectado al terminal RF IN de esta unidad 5 Deje esta unidad en el modo de espera Se recomienda esperar un mínimo de 24 horas antes de utilizar la unidad Si la unidad se utiliza antes no se producirán fallos pero el grupo de canales...

Page 74: ...eparado para la grabación programada Pulse el botón Verde para cancelar Pulse el botón Azul varias veces para cambiar la frecuencia de grabación arriba Marca de grabación y frecuencia de grabación Repita los pasos 2 3 para programar otras grabaciones 4 Pulse TV GUIDE Vuelve a la pantalla del televisor La unidad se pone en espera de grabación programada F se enciende en el visualizador de la unidad...

Page 75: ...ducción de discos solamente HDD RAM R RW V R RW VR Ej 5 0 0 5 15 0 1 5 115 1 1 5 5 0 5 15 1 5 Operaciones durante la reproducción Parada Pulse La posición de parada se memoriza PLAY parpadea en el visualizador del aparato Excepto cuando se reproduce desde el Direct Navigator y cuando se reproduce una lista de reproducción Función de reanudación de la reproducción Pulse 1 PLAY para reanudar la repr...

Page 76: ...se reduction NR Integrated DNR 37 MPEG DNR 37 Line in NR 37 One Touch Transfer dubbing 44 On screen Language 56 Menus 36 Status messages 37 PCM Down Conversion 56 Picture 34 Playlist 40 Progressive 37 68 Properties Playlist 41 Still picture 34 Title 39 Protection Card 50 Cartridge 50 Disc 50 Folder 42 Still picture 42 Title 39 Quick View 31 Quick Start 12 Ratings level 55 Recording Flexible Record...

Reviews: