background image

14

RQT9430

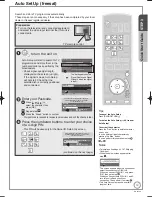
 Repeat step 

 to enter PIN 

again to confirm.

Owner ID-Data Entry

PIN

0000

NAME

HOUSE NO

POSTCODE

RG12 8FP

RETURN

Change PIN

Select

The Owner ID-Data Entry screen appears.
Make a note of PIN in case you forget it.

 Enter your NAME.


 Press [

e

r

] to select “NAME”, then press [OK].

User input

NAME

A B C D E F G

g

H

I

J

K

L M N

U V W X Y Z

0

1

2

3

4

5

6

O P Q R S T

7

8

9

!

:

#

a

b

c

d

e

f

h

i

j

k

l

m n

o

p

q

r

s

t

u

v

w

x

y

z

(

)

+

-

.

*

_

RETURN

Set character

Select 

Select

Delete

Delete all


 Press [

e

r

,

w

q

] to select the character, then 

press [OK].


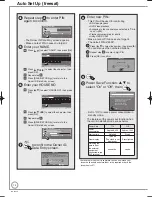
  Repeat step 

.


Press [BACK/RETURN  ] to return to the 
Owner ID-Data Entry screen.

 Enter your HOUSE NO.

   Press [

e

r

] to select “HOUSE NO”, then press 

[OK].

User input

HOUSE NO

A B C D E F G

g

H

I

J

K

L M N

U V W X Y Z

0

1

2

3

4

5

6

O P Q R S T

7

8

9

!

:

#

a

b

c

d

e

f

h

i

j

k

l

m n

o

p

q

r

s

t

u

v

w

x

y

z

(

)

+

-

.

*

_

RETURN

Set character

Select 

Select

Delete

Delete all


Press [

e

r

,

w

q

] to select the character, then 

press [OK].

   Repeat step 

.

   Press [BACK/RETURN  ] to return to the 

Owner ID-Data Entry screen.

Owner ID-Data Entry

PIN

0000

NAME

HOUSE NO

POSTCODE

RG12 8FP

RETURN

Edit

Select

EEEE

ABC


BACK/

RETURN

 to confirm the Owner ID-
Data Entry screen.

RETURN

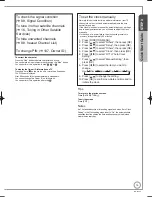
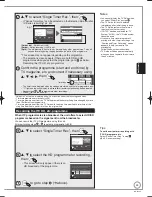
Enter a new 4-digit PIN, then press OK.
This PIN will be used for controlling viewing and playback.
PIN will be set to “0000” by pressing “RETURN” when there is no
number input.

0

-

Number

9

PIN Entry

-

-

-

-


8

  Enter new PIN.

This PIN will be used for controlling

BD-Video playback
DVD-Video playback
Accessing to the channels you selected in “Child 
Lock” (

 99)

Playback programmes for adults
Using VIERA CAST

Make a note of PIN in case you forget it.
The default PIN is “0000”.

  Press [

e

r

] to select the number, then press [

q

].

You can also use the numbered buttons.

   Repeat step 

 for enter 4-digit PIN.

    Press [OK] to confirm.

OK

Remember the PIN.

PIN Entry

0

0

0

0

9


 Power Save Function: 

e

r

 to 

select “On” or “Off”, then 

Power Save

On : Minimise standby power consumption, 
without Quick Start function and
AV2 loop-through in standby.

Off : With Quick Start function 
and AV2 loop-through in standby.

RETURN

On

Off

OK

Set to “On” to reduce power consumption in 
standby mode.

The features of the power save function when 

the unit is in standby mode are as below.

Power Save

On

Off

Power 
consumption

Approx. 0.4 W

Approx. 12 W

Startup time

Not quick

Quick

Front display

Turns off

(The clock is not 

displayed.)

Stays lighted

Watching the 
picture from 
the external 
equipment 
connected to the 
AV2 terminal

cannot do

can do


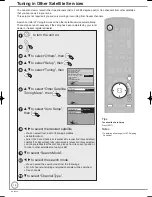
Auto setup for your unit is complete. You can now make your 
favourite channels and store them in the required order in the 
favourites (

 97).

Auto Set Up (freesat)

RQT9430-1B̲DMR-BS850̲EB.indb   14

RQT9430-1B̲DMR-BS850̲EB.indb   14

2009/05/13   15:00:57

2009/05/13   15:00:57

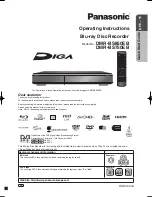
Summary of Contents for Diga DMR-BS750EB

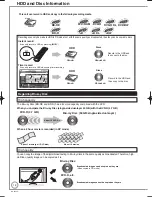
Page 1: ...ns completely Please keep this manual for future reference Note EB on the packaging indicates the United Kingdom Trademark of the DVB Digital Video Broadcasting Project Declaration of Conformity 12th December 2008 For DMR BS850 No 6261 For DMR BS750 No 6262 The illustrations in these Operating Instructions show the images of DMR BS850EB Quick Start Guide P8 15 Region management information BD Vide...

Page 2: ...g to TV through HDMI Connection 10 Watching Television 24 Also in HD 29 Guide Link Series recording Split programme 28 7days EPG Timer recording is made easier because the TV Guide allows you to see programme information up to 7 days ahead 43 Linked operations with the TV Parental Guidance Receives freesat free digital satellite broadcasts in the UK freesat HD tuners built in Record with High Defi...

Page 3: ...ase ensure that the replacement fuse has a rating of 5 ampere and that it is approved by ASTA or BSI to BS1362 Check for the ASTA mark or the BSI mark on the body of the fuse If the plug contains a removable fuse cover you must ensure that it is refitted when the fuse is replaced If you lose the fuse cover the plug must not be used until a replacement cover is obtained A replacement fuse cover can...

Page 4: ...g 41 To deactivate timer programme e g to interrupt a daily or weekly timer programming 42 Notes on timer recording 42 TV Guide system freesat 43 Using the TV Guide list 43 Selecting the programme from the desired channel genre or programme type 44 Playing Back Advanced Playback 45 Selecting Titles to Play 45 Search 46 Skip 46 Quick View Play x1 3 46 Direct Play 46 Slow motion Play 46 Frame by Fra...

Page 5: ... Settings 104 Network Settings 106 System Settings 107 Other Settings 108 HOLD function 108 Using the Unit s Remote Control to Operate the TV 108 Network Settings 109 Testing the connection 109 Setting the IP address 109 Setting the DNS IP 109 Setting the connection speed 109 Setting the proxy server 110 Setting the network service VIERA CAST 110 Software Update 111 If a software update is availab...

Page 6: ...ject to temperature changes Place in an area where condensation does not occur Condensation is a phenomenon where moisture forms on a cold surface when there is an extreme change in temperature Condensation may cause internal damage to the unit Conditions where condensation may occur When there is an extreme change in temperature moving from a very hot location to a very cold location or vice vers...

Page 7: ...ut once every year depending on frequency of use and the operating environment Carefully read the lens cleaner s instructions before use Lens cleaner RP CL720E Do not place the unit on amplifiers or equipment that may become hot The heat can damage the unit DO NOT Select a position with good ventilation when installing the unit Do not block the cooling fan on the rear of the unit Before moving the...

Page 8: ...s according to on screen instructions for switching the DIRECT NAVIGATOR screen for TV Guide operations disactivating timer programme for selecting programme category for editing favourites bl Recording function REC Start recording 27 REC MODE Change recording mode 64 EXT LINK Linked timer recordings with external equipment 64 DIRECT TV REC Direct TV recording 37 bm Show Digital TEXT MHEG Teletext...

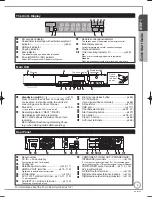
Page 9: ... Disc tray open close button 26 5 DV IN terminal for a digital video camcorder 65 6 SD card slot 117 7 USB port 117 8 Channel select button 24 27 9 Start recording button 27 bk Stop button 26 27 bl Play 1 3 button 26 bm AV3 input terminals 65 Rear Panel LAN PCM BITSTREAM COMPONENT AV4 IN OUT R AUDIO L S VIDEO VIDEO AC IN DISH IN 1 DISH IN 2 Y PB PR AV OUT OPTICAL DIGITAL AUDIO OUT AV1 TV AV2 EXT 1...

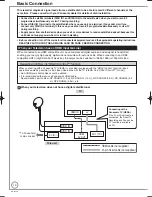
Page 10: ...d audio with just one cable When connecting to an HDMI compatible HDTV High Definition Television the output can be switched to 1080p 1080i or 720p HD video When connecting with a Panasonic TV VIERA or a receiver equipped with the HDAVI Control function linked operations would be possible 86 Linked Operations with the TV VIERA Link HDAVI Control Q Link Non HDMI compliant cables cannot be utilized ...

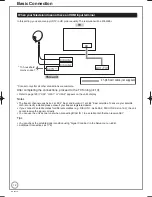
Page 11: ...connect 2 satellite dishes for different satellites e g DISH IN 1 Astra 28 2 DISH IN 2 Astra 19 2 the unit cannot receive the signal correctly You can use the unit as one tuner when connecting DISH IN 1 to a satellite dish that can receive SKY If connecting to equipment that is only compatible with 2 channel audio output audio with 3 channels or more will be down mixed 138 and output as 2 channels...

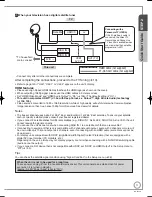
Page 12: ...20 if U50 U50 1 or U50 2 appears on the unit s display Notes The freesat channel uses Astra 2 at 28 2 East and Eurobird 1 at 28 5 East satellites To ensure your satellite dish is correctly installed please consult your freesat registered dealer If you connect 2 satellite dishes for different satellites e g DISH IN 1 Astra 28 2 DISH IN 2 Astra 19 2 the unit cannot receive the signal correctly You c...

Page 13: ...channel list Exit freesat setup Enter Postcode for local channels including space Postcode A B C D E F G H I J K L M N U V W X Y Z 0 1 2 3 4 5 6 O P Q R S T 7 8 9 RETURN Set character Select Select Delete Confirm Delete all The bar appears beside Signal Quality and Signal Strength when the signal is input Owner ID Please enter new PIN PIN 0 PIN entry 9 RETURN You now have the opportunity to enter ...

Page 14: ...This PIN will be used for controlling viewing and playback PIN will be set to 0000 by pressing RETURN when there is no number input 0 Number 9 PIN Entry 8 Enter new PIN This PIN will be used for controlling BD Video playback DVD Video playback Accessing to the channels you selected in Child Lock 99 Playback programmes for adults Using VIERA CAST Make a note of PIN in case you forget it The default...

Page 15: ...ck is incorrect or cannot be automatically set perhaps due to bad signal reception you will need to adjust the clock manually In the case of a power failure the clock setting remains in memory for approximately 60 minutes 1 Press FUNCTION MENU 2 Press e r to select Others then press OK 3 Press e r to select Setup then press OK 4 Press e r to select Others then press OK 5 Press e r to select Clock ...

Page 16: ...Setup Satellite Selection freesat and other satellite channels Satellite Selection Search Mode Start Select Change Astra2 Eurobird All Channel Type All 8 w q to select the desired satellite You can select from a list of following satellites Astra2 Eurobird Astra1 The dish will need to be repositioned to receive from these satellites Hotbird The dish will need to be repositioned to receive from the...

Page 17: ...ed BACK RETURN to confirm deletion RETURN Other Satellite Auto Setup Satellite Selection freesat and other satellite channels Satellite Selection Search Mode Continue Astra2 Eurobird All Channel Type DISH Input 1 Signal Quality 0 10 All DISH Input 1 Signal Strength0 10 DISH Input 1 Signal Lock Locked DISH Input 2 Signal Quality 0 10 DISH Input 2 Signal Strength0 10 DISH Input 2 Signal Lock Locked ...

Page 18: ...am UFO Hot Wave Used Car Behind me Black House Crowntown Deal USO Blue Wave In the Great A News Show News Show Red Cap Red Cap 113 ITV2 114 ITV2 1 115 ITV3 116 ITV3 1 117 ITV4 120 Channel4 HD RETURN OK Select Programme Select Channel 24 hours Prog Type Channel Genre Page Up Page Down Portrait Landscape Info CH GUIDE Record to the HDD and then copy to the disc Regarding Blu ray Disc High capacity T...

Page 19: ...can be copied 2 Copy as standard definition SD quality Copy in Normal Speed mode Co with compressed high definition data py as high definition HD quality 1 Data size of the copied title may be larger than the original title depending on the transfer rate It is recommended to use HE or HL mode when you record high definition and long programmes 2 You cannot switch the subtitle or audio description ...

Page 20: ...ssible only once Copying HD No Copy titles 33 Copy in standard definition quality XP SP LP EP FR mode is possible Play on other players It can be played on the players compatible to BD RE Ver 2 1 and BD R BD RE and BD R that were recorded on this unit may not be played on other Blu ray players etc Playback of LTH type BD R discs may not be possible with players that do not support the LTH type for...

Page 21: ...d Standard definition SD quality Recording mode in which video is recorded XP SP LP EP FR Rewritable Timer recording Copying HD Copy Once titles 33 Copy in standard definition quality XP SP LP EP FR mode is possible Copying HD No Copy titles 33 Copy in standard definition quality XP SP LP EP FR mode is possible Play on other players Finalisation is needed for playback on other equipment R DL can b...

Page 22: ... on BD RE BD R to On for the disc that has high definition video AVCHD recorded by Panasonic s video camera etc and other video format such as those recorded on this unit 100 Close the session after recording Play may be impossible on some discs due to the condition of the recording Operation and sound quality of CDs that do not conform to CD DA specifications copy control CDs etc cannot be guaran...

Page 23: ...rd 2 from 4 GB to 32 GB 1 Including miniSD Card and microSD Card 2 Including miniSDHC Card and microSDHC Card The card types mentioned above will be referred to as SD card in these operating instructions Standard symbol SD Data that can be played Still pictures JPEG HD Video AVCHD format Data that can be copied Still pictures JPEG It can be copied to from HDD BD RE or DVD RAM SD Video MPEG2 format...

Page 24: ...e Selection The Channel Genre Selection screen appears e r w q to select the desired genre then The TV Guide list appears Landscape WED 19 08 2009 13 30 TV Guide WED 19th 12 00 20 00 BBC HD Preview All Channels All Types Time 14 00 14 30 15 00 15 30 16 00 108 BBC HD BBC HD Preview Red Cap Love USA 100 Sheep Dream Heartbeat 100 Sheep Dream UFO Hot Wave Used Car Behind me Black House Crowntown Deal ...

Page 25: ...video input terminal that this unit is connected to Important This unit has only digital satellite tuners to turn the unit on a few times and select Other Sat then The channel list appears To display the type of the selected channel press the Blue button Each time you press the Blue button the type will be displayed as follows Free TV Radio Data All Channels Free TV To sort the channel press the Y...

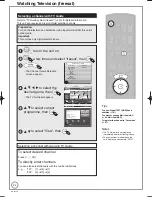
Page 26: ...item then You can sometimes use the numbered buttons to select an item PAUSE STOP SLOW SEARCH PAGE CH AV TV DRIVE SELECT VOL SKIP PLAY x1 3 SELECT INPUT DEL 0 9 8 7 6 5 4 3 2 1 abc def jkl ghi mno tuv qrs p xyz w TIME SLIP STATUS REC MODE REC EXTLINK CREATE CHAPTER RETURN BACK DIRECTTVREC EXIT OK OPTION D I R E C T N A V I G A T O R F U N C T I O N M E N U CH MANUAL SKIP GUIDE Tips To display Pop ...

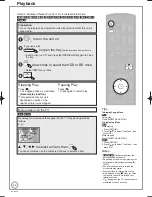
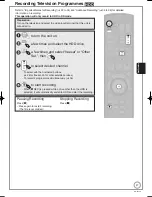
Page 27: ...red buttons 24 for freesat 25 for other satellite services To record 2 programmes simultaneously 36 to start recording When REC is pressed while a drive other than the HDD is selected it will automatically switch to HDD and start the recording Pausing Recording Press h Press again to restart recording The title is not divided Stopping Recording Press g PAUSE STOP SLOW SEARCH PAGE CH AV TV DRIVE SE...

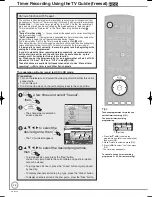
Page 28: ...nctions are available for freesat channels only Use Manual timer recording 39 to timer record Other Sat channels This operation will only record to HDD in DR mode Preparation Turn on the television and select the video input terminal that this unit is connected to Turn on this unit Confirm that the clock on the unit s display is set to the correct time a few times and select freesat then OK RETURN...

Page 29: ...e start time modified to later time or the stop time modified to earlier time than the original time Recording the ITV HD etc programme When ITV programme is also broadcast the unit offers to select HD SD programme based on the signal sent from the broadcaster You can record the ITV HD programme using this unit After performing steps to select a programme 28 e r to select Single Timer Rec then Sel...

Page 30: ... Press e r to select Copy Direction then press q Press e r to select Source then press OK Press e r to select HDD then press OK If you select HDD Destination is automatically set to BD DVD Press e r to select Destination then press OK Press e r to select BD DVD then press OK The same drive as the copy source cannot be selected Press w to confirm Set the recording mode If you are not going to chang...

Page 31: ...er of the copying list If you want to specify the order repeat selecting one item at a time To show other pages Press u i Press OK To edit the copying list 61 You cannot start copying when the value of Size 62 exceeds 100 Destination Capacity is not sufficient Press w to confirm Set other settings If you are not going to change these settings press r twice step 8 Press e r to select Other setting ...

Page 32: ...aining Title Name Others HDD BD RE RAM When VIDEO is not selected press the Red button to select VIDEO To view other pages Press u i e r to select the title then A check mark is displayed Repeat this step until you select all necessary items Press h again to cancel w to select Delete then Delete Titles During Playback During playback DEL w to select Delete then Deleting Titles Notes You cannot del...

Page 33: ...btitles will be recorded but it is not possible to switch off during playback Before copying Copy Select the subtitle language in Preferred Subtitles in the Setup menu 99 and set Automatic in Subtitles in the copy setting screen Copy Title Playing Select the subtitle language in Preferred Subtitles in the Setup menu 99 and set On in Subtitles in the Disc menu 88 Surround audio You can enjoy surrou...

Page 34: ...at high speed BD RE BD R Title cannot be copied at high speed R R DL RW V R R DL RW Title can be copied at high speed if Recording Format for DVD was set to Video format before the programme is recorded to HDD from external input The default setting is Video format 101 But in the following cases high speed mode does not work R R DL RW Titles recorded in EP mode and FR recordings 5 hours or longer ...

Page 35: ...st Surround audio produced by conversion of broadcast audio format 2 Stereo audio 1 The subtitles cannot be switched on or off during playback 2 If the audio sampling frequency is not 48 kHz surround audio is mixed and recorded in front LR channels Audio will be output from two front speakers only even if you play it on 5 1 ch speaker connection Recording method Possible Impossible Recording metho...

Page 36: ...ding to the HDD in EP or FR recordings 5 hours or longer mode you cannot perform high speed copy to R R DL or RW discs 4 When Recording time in EP mode is set to 6 hours in the Setup menu 101 The sound quality is better when using 6 hours than when using 8 hours RAM When recording to DVD RAM using 8 hours mode play may not be possible on DVD players that are compatible with DVD RAM Use 6 hours mod...

Page 37: ...t to a Q Link compatible TV using the 21 pin Scart cable When recording using the TV s tuner you can select the recording mode from XP SP LP EP You can also use this function using VIERA Link 86 and hold for about 1 second Tips To stop recording Press g Notes If you switch TV channels while using Direct TV recording during viewing the analogue or digital terrestrial broadcasting the Direct TV reco...

Page 38: ...play the programme you want to stop on the TV screen above Press g From the start to the end of the recording is called one title To pause recording It is necessary to display the programme you want to pause on the TV screen above Press h Press again to restart recording You can also press REC to restart Title is not split into separate titles When recording is paused the record indicator flashes ...

Page 39: ... the recording mode 35 You can change it only when you select AV1 AV2 AV3 or AV4 in Channel Renew Auto Renewal Recording 41 ON OFF You can change its setting only when you select weekly programme in Day Date Input Name You can enter programme name Press OK 84 Entering Text The timer icon is displayed in left column z Timer icon z lights on the unit s display to indicate timer recording standby has...

Page 40: ...looksatthetransformationoftheUKTVindustry S 0 50 0 20 Remain HDD 60 19 DR Selection Screen WED 19 08 2009 12 42 OFF The series timer recording cannot be selected if the selection screen does not appear You cannot change Channel Day Date Drive and Input Name With Start and Stop automatically set by the Guide Link function Start can be changed back by up to 10 minutes and Stop can be changed forward...

Page 41: ...mmes or Resolve Overlapping The timer recording list can be viewed even when the unit is off then e r to select the programme Icons Channel Name Schedule Drive Mode Space NewTimer Programme OK RETURN Page UP Page Down CH Turn Timer Off Total 4 32 Resolve overlap Timer Recording 30 30 DR HDD Remain WED 19 08 2009 21 30 DEL Delete Info MON 09 03 22 00 23 00 MON 09 03 23 05 23 35 MON 09 03 23 15 23 3...

Page 42: ...n again to activate timer programme Notes on timer recording Timer recording will not be performed if the clock is not set During recording timer recording standby or EXT LINK standby this unit cannot play discs or titles that do not match the TV System setting It is recommended TV System be set to match the discs or title before playing them But to prevent the failure of the timer recording chang...

Page 43: ...o search for the programme you want to watch To switch between Landscape view and Portrait view Press GUIDE Using the TV Guide list To change channels Landscape view Press e r to select a channel Portrait view Press w q to select a channel The TV Guide list appears for this channel To view a programme list for another day Jump ahead 24 hours Press the Green button to jump ahead by one day Jump bac...

Page 44: ...s Prog Type Channel Genre Time 23 30 0 00 0 30 1 00 1 30 Info 402 WEDDING Help I Need Date Me Mar 403 WEDDING The Wedding Real Weddin For Better or For Worse 406 info TV PokerHeaven PokerHeaven com Europea Red Cap 450 M and M Police 10 7 Fre 451 Audi The Science The Science The Wedding Planner 23 30 0 00 MON 9th GUIDE Select Channel OK RETURN Select Programme TV Guide Landscape WED 19 08 2009 23 3...

Page 45: ...d Titles screen Two or more titles recorded in the Day Date or series timer recording mode are bundled and displayed as one item All Titles screen Displays all titles DIRECT NAVIGATOR Time Remaining 45 54 DR OK RETURN VIDEO PICTURE MUSIC VIDEO PICTURE MUSIC HDD Page 01 01 Rec time 0 00 DR Titles Date Channel Grouped Titles OPTION 01 06 01 06 1 35 12 36 1 13 AV2 AV1 25 05 Born And Bred AWrathful 1 ...

Page 46: ... name 84 Entering Text Even if the group name is changed the title names in the group will not be changed Notes This function is only available for videos and not available for music and still pictures Search During playback or There are 5 search speeds Each press increases the search speed R R DL RW Up to 3 speeds Press q PLAY to restart normal playback BD V Only primary video is played while per...

Page 47: ... be created during EXT LINK standby 64 Display the subtitle during play HDD BD RE BD R It is possible to display the subtitles during the playback if the programme with subtitle is recorded with DR mode It will switch between On Off every time it is pressed BD V DVD V AVCHD DivX Display with Subtitles in the Disc menu 88 Subtitles Notes When playing DVD R DL Dual Layer single sided and R DL Double...

Page 48: ...d Refer to Direct Play 46 to playback Operation during play 45 to 47 Advanced Playback Notes Set Play Video AVCHD on BD RE BD R to On in the Setup menu for the disc that has high definition video AVCHD recorded by Panasonic s video camera etc and other video format such as those recorded on this unit 100 Multiple titles may not playback continuously depending on the disc Press DIRECT NAVIGATOR and...

Page 49: ...e secondary audio is not be played Enjoying BD Live discs with Internet Many BD Live compatible discs require content to be downloaded onto an SD card 139 Local storage in order to access the available BD Live features An SD card with 1 GB or more of free space SD Speed Class Rating 2 or higher needs to be inserted prior to inserting the BD Live compatible disc Some BD Live content available on th...

Page 50: ...Master Audio DTS HD Master Audio 7 1ch LPCM Down mixed 5 1ch PCM 7 1ch PCM Down mixed 5 1ch PCM 2 7 1ch PCM Down mixed 2ch PCM 1 When the connected equipment is not supported with these audio format the audio is output as Dolby Digital bitstream DTS Digital Surround bitstream or down mixed 2ch PCM e g TV 2 BD V When playing BD Video without secondary audio or clicking sound the audio is output as ...

Page 51: ...s Press u i To exit the screen Press DIRECT NAVIGATOR If the menu screen left is not displayed display it by performing the following operation R R DL CD USB 1 Press FUNCTION MENU 2 R R DL CD Press e r to select Playback then press OK USB Press e r to select Others then press OK Press e r to select USB device then press OK Notes Picture sizes set at the recording time may prevent the unit from sho...

Page 52: ...me another registration code is then displayed in DivX Registration Do not use this registration code to purchase DivX VOD content If you use this code to purchase DivX VOD content and then play the content on this unit you will no longer be able to play any content that you purchased using the previous code If you purchase DivX VOD content using a registration code different from this unit s code...

Page 53: ...rn to the previous screen Press BACK RETURN To exit the menu screens Press DIRECT NAVIGATOR To view other pages Press u i Multiple editing Only Delete Set up Protection Cancel Protection Select with e r then press h Repeat A check mark appears Press h again to cancel Title Operations Delete HDD BD RE BD R RAM R R DL RW V R R DL RW Use to delete unneeded titles Important Once deleted contents canno...

Page 54: ...of titles Divide Title HDD BD RE BD R RAM You can divide a title into two Once divided titles cannot be recombined Perform steps of Accessing the Title View 53 Press e r to select DivideTitle then press OK Press q PLAY and h to set the point you want to divide Set up Protection Cancel Protection Partial Delete ChangeThumbnail Divide Title DR File Conversion Enter Title Name PICTURE VIDEO MUSIC DIR...

Page 55: ...uring standby is selected COPY on the unit s display remains lighted during conversion Only when Unit s Display in the Setup menu is set to Bright 104 When DR file will be converted in standby is displayed in the DIRECT NAVIGATOR the conversion has not finished DIRECT NAVIGATOR Time Remaining 45 54 DR OK RETURN VIDEO PICTURE MUSIC VIDEO PICTURE MUSIC HDD Rec time 0 00 DR Titles Date Channel Time T...

Page 56: ...w then press OK Press w q to select the chapter To start play Press OK To edit Step To create Press the Green button below Create Chapter DIRECT NAVIGATOR Chapter View 15 08 DR OK RETURN VIDEO PICTURE MUSIC HDD 007 SOCCER Edit Chapter Mark Press OK to start playing from the selected chapter Selected chapter can be edited via OPTION Press RETURN to go back to previous menu Chapter View Select OPTIO...

Page 57: ... When is high speed copy not possible BD RE BD R HDD Copy Normal speed RAM RW VR HDD Copy High speed RW HDD Copy Normal speed Before finalise R R DL RW V R R DL Cannot copy DVD V After finalise R R DL RW V R R DL HDD Copy Normal speed SD Video MPEG2 format From an SD card or Panasonic s video camera etc from USB HDD RAM Copy High speed BD RE BD R R R DL RW V R R DL RW Cannot copy HD Video AVCHD fo...

Page 58: ...The above rate in the list indicates the shortest time and fastest speed required for copying one hour title from HDD to the disc by High Speed copying The required amount of time and speed may vary depending on the conditions such as the area where information is written or unique feature on the disc Copy restrictions Some programmes on freesat channels are copy restricted and the number of times...

Page 59: ...mode is needed on the HDD When the number of titles recorded to the HDD and the number of titles to be copied to the disc is greater than 499 in total When stopping the copy during copy When High speed copying All titles that have completely copied at the point cancelled are copied When Normal Speed copying Copies until the point cancelled R R DL RW V R R DL RW If copy is cancelled during the step...

Page 60: ...ecording mode BD RE BD R High speed 1 Same as title to be copied 1 RAM R R DL RW V R R DL RW Normal speed FR 1 When copying over the available space on the disc one from HG HX HE or HL modes will be selected to match the available space and it will be copied with normal speed Titles in XP SP LP EP or FR mode Copy destination Copy speed Recording mode BD RE BD R Normal speed Recording mode of playi...

Page 61: ... the value of the Size exceeds 100 Destination Capacity is not sufficient 62 About the data size for copying Press w to confirm Set other settings If you are not going to change these settings press r twice step Press e r to select Other Settings then press q Subtitles Only when copying titles in DR mode and the recording mode other than High Speed is selected Press e r to select Subtitles then pr...

Page 62: ...l Start Time and Title Name You cannot select this item if a title has a check mark If you close the Copying list screen the display order is cancelled Tips To return to the previous screen in steps Press BACK RETURN To view other pages in step Press u i While copying after step 8 To stop copying Press and hold BACK RETURN for 3 seconds You cannot stop while finalising When you stop High speed cop...

Page 63: ...onger 2 Min 00 Press w q to select Hour or Min then press e r to set the recording time Press OK Press w to confirm Copying to the HDD continues for the set time even after the content being played finishes Set a few minutes longer than the source title in order to include the operation time before play begins Press e r to select Start Copying then press OK Press w to select Yes then press OK to s...

Page 64: ... 1 Press FUNCTION MENU 2 Press e r to select Others then press OK 3 Press e r to select Ext Link Standby then press OK 4 Press w q to select Yes then press OK To cancel the external control Turn on this unit Press EXT LINK to stop recording or to cancel linked timer recording standby EXT L disappears Notes During EXT LINK standby mode or recording you cannot press INPUT SELECT to select external i...

Page 65: ... cable a few times to select the recording mode DR HG HX HE HL FR mode cannot be selected Start play on the external device at the point you want to start recording Tips To skip unwanted parts Press h to pause recording Press again to restart recording To stop recording Press g The confirmation screen appears Press OK Notes When timer recording starts while recording from an external device timer ...

Page 66: ...ment e g Panasonic s video camera etc can be connected to the unit via the DV input terminal It is not possible to operate the unit from the connected DV equipment The DV input on this unit is for use with DV equipment only It cannot be connected to a computer etc The DV equipment name may not be shown correctly Depending on the DV equipment the images or audio may not be input properly Date and t...

Page 67: ...d after repeating about 30 times of step recording or editing R RW V After finalising chapters for every 5 minutes will be created R After finalising chapters for every 8 minutes will be created RW Regardless of top menu chapters for every 8 minutes will be created Flexible Recording via AV Input HDD The title is recorded to the size of a new DVD 4 7GB by automatically selecting optimal quality be...

Page 68: ...deo camera etc to this unit Select the appropriate mode that makes the Panasonic s video camera etc ready for data transfer such as PC CONNECT on the Panasonic s video camera etc Refer to the camera s operating instructions for detail USB device OK RETURN USB device is inserted Copy Video AVCHD Copy Video MPEG2 Play Pictures JPEG Copy Pictures JPEG Play Copy Music MP3 e r to select Copy Video AVCH...

Page 69: ...nt Preparation Turn on both this unit and the Panasonic s video camera etc Connect the Panasonic s video camera etc to this unit Select the appropriate mode that makes the Panasonic s video camera etc ready for data transfer such as PC CONNECT on the Panasonic s video camera etc Refer to the camera s operating instructions for detail USB device OK RETURN USB device is inserted Copy Video AVCHD Cop...

Page 70: ...2 Press e r to select USB device then press OK With the unit stopped HDD BD RE RAM When PICTURE is not selected press the Green button to select PICTURE To switch the display method Still pictures copied from SD cards and USB memories are grouped by the shooting date on Pictures by Date screen Switching the DIRECT NAVIGATOR appearance 1 Press OPTION 2 Press e r to select Album View or Pictures by ...

Page 71: ...8 can be played during the playback of the slideshow After performing steps 1 3 1 Press e r to select Soundtrack 2 Press w q to select On 3 Press e r w q to select Set then press OK RETURN OK Select Soundtrack Please select music playlist for soundtrack Sample Soundtrack My Favourites 01 02 03 To change the music to playback After performing steps 1 3 1 Press e r to select Select Soundtrack then p...

Page 72: ...diting Select with e r w q then press h Repeat A check mark appears Press h again to cancel e r to select the operation then e g HDD Pictures by Date Copy to New Album Copy to Disc Copy to Album Slideshow Settings Copy Delete VIDEO MUSIC Change Date Start Slideshow Album View Useful functions during still picture play 71 Still pictures operation 73 e g HDD Album View Start Slideshow Slideshow Sett...

Page 73: ...re Date folder of the original is maintained even if all original pictures were deleted after changing the date of folder Delete it if unrequired If there is no folder with the changed date a new folder will be created Enter Album Name HDD BD RE RAM SD Album View only You can give a name to the album 84 Entering Text Album names input using this unit may not be displayed on other equipment Set up ...

Page 74: ...ing on what is recorded in the SD card Press e r to select Copy Pictures JPEG then OK Press w q to select Copy then OK Protection of the card is Set Copy will start Not set Go to step Press w q to select Copy Delete or Copy Only then OK If Copy Delete is selected Copied pictures in the SD card will be deleted after copying If Copy Only is selected Pictures will not be deleted will be displayed on ...

Page 75: ...OK to start copying Tips To return to the previous screen in steps to Press BACK RETURN To stop copying after step Press and hold BACK RETURN for 3 seconds Notes The sequence in which the still pictures are registered on the copy list may not be the same at the copy destination If still pictures are already contained inside the copy destination folder the new still pictures are recorded following ...

Page 76: ...ICTURE MUSIC Select OPTION h Press OK to display pictures DELETE Navigator Pictures by Date Page 01 01 2 0 0 1 0 0 Time Remaining Deleting a still picture 1 Press e r w q to select the item which contains the still picture to delete then press OK 2 Press e r w q to select the still picture then press OK Deleting the album date folder 1 Press e r w q to select the album date folder you want to dele...

Page 77: ...ed as folder number DIRECT NAVIGATOR CD MP3 Select Folder 0 09 March Moon RETURN 001 My favorite 001 Brazilian pops 002 Chinese pops 003 Czech pops 004 Hungarian pops 005 Liner notes 006 Japanese pops 007 Mexican pops 008 Philippine pops 009 Swedish pops 001 Momoko 002 Standard number 001 Pi l MP3 music F 7 27 OK You cannot select folders that contain no compatible files e r w q to select a folder...

Page 78: ...2Press e r to select the name of the artist then OK 3Press e r to select the album then press OK When Albums is selected 1Press w q to select the initial of the album 2Press e r to select the album then press OK e r to select the track then Slideshow Add to My Favourites DIRECT NAVIGATOR 0 09 March Moon 4 30 OK RETURN No Track Name Artist Music List OPTION HDD 0001 March Moon Do this flower open D...

Page 79: ...eHD DTS DTS HD or MPEG is set to PCM However in this case audio is output as 2 ch from the DIGITAL AUDIO OUT terminal Display Still Pictures Slideshow Sample pictures in this unit or pictures stored on Album View of the HDD can be played back as slideshow during playback of the music While playing the music Press the Red button Change the pictures to display 1 Press OPTION 2 Press e r to select Se...

Page 80: ... Album and track operation right 81 79 Tips To return to the previous screen Press BACK RETURN To exit the screen Press DIRECT NAVIGATOR Album and track operation After performing step left Delete All Tracks While displaying Music Menu screen Delete all tracks in the HDD 1 Press w q to select Yes then press OK 2 Press w q to select Delete then press OK Once deleted the recorded contents are lost a...

Page 81: ...URN Playlist Name HDD Please select playlist to add to My Favourites Playlist 01 Playlist 02 Playlist 03 Playlist 04 Playlist 05 Playlist 06 Playlist 07 Playlist 08 Playlist 09 Tips To return to the previous screen Press BACK RETURN To exit the screen Press DIRECT NAVIGATOR Editing Playlist HDD While stopped When MUSIC is not selected press the Yellow button to select MUSIC e r to select Playlists...

Page 82: ...s in the folder will be recorded Cannot record track by track It will be recorded as 1 album to the HDD in 1 recording Audio quality CD Music CD LPCM R R DL CD USB MP3 MP3 The maximum number of tracks on HDD 40000 Depends on the remaining capacity If titles or pictures are recorded then the number of albums that can be recorded will be reduced While stopped Insert a disc or USB memory CD Music CD ...

Page 83: ...Played Albums Total Tracks 53 HDD My Favourites Playlists OPTION Deleting an artist album music 1 Press e r to select the item then press OK 2 Press e r w q to select the item then press DEL Deleting a track 1 Press e r to select the item then press OK 2 Press e r w q to select the item then press OK 3 Press e r to select the track then press OK You can confirm the item that you have selected usin...

Page 84: ...characters when you ve finished entering text Tips Using the numbered buttons to enter characters e g entering the letter R 1 Press 7 to move to the 7th row 2 Press 7 twice to highlight R 3 Press OK To delete a character Press h on a character in the name field To cancel in the middle Press BACK RETURN Characters will not be saved Notes _ Enter Title Name 1 2 3 4 5 A B C a D E F d G H I g 6 7 8 9 ...

Page 85: ...s To access more features on YouTube or Picasa Web Albums site enter your user ID and password that you have previously set up with these sites through the internet on your PC However not all features may be accessible through VIERA CAST VIERA CAST Home screen Weather 20 New York NY NNW7 mph Settings Panasonic Select Featured Videos Images are for illustration change without notice Regarding Setti...

Page 86: ... s input will automatically switch to HDMI input mode VIERA Link or AV input mode Q Link and the TV displays the corresponding action Picture or sound may not be available for the first few seconds Press FUNCTION MENU 1 q PLAY 2 DIRECT NAVIGATOR GUIDE PROG CHECK etc When the TV is off Power on link VIERA Link Q Link When the TV is off and the following operations are performed the TV will automati...

Page 87: ...er to Notes on page 93 To pause the TV programme you are watching Pause Live TV Tips To stop Pause Live TV 1Press r while the Control Panel is displayed 2Press w q to select Yes then press OK Using the OPTION menu window to operate this unit VIERA Link This function is available with the TV that supports HDAVI Control 2 or later By using the TV remote control you can play discs using the Control P...

Page 88: ...played even when there is only one audio type Subtitles BD V DVD V AVCHD Turn the subtitle on off and select the language below Language HDD except the title copied the title in DR mode or the high definition video AVCHD format RAM R R DL RW V R R DL RW RW VR Only discs that contain subtitle on off information Turn the subtitle on off Subtitle on off information cannot be recorded using this unit ...

Page 89: ... rough when Auto is selected However if the video content is distorted as shown in the illustration to the above then select Auto It will work when playing DVD V with the following settings HDMI Video Mode is set to Off 105 AV1 Output is set to Video with component 105 or S Video with component 105 Component Resolution is set to 576p 480p 105 Sound Menu Sound Effects HDD BD RE BD R BD V RAM R R DL...

Page 90: ...layed as available on particular programmes but may not be available for all individual programmes being broadcast Display the extra information to confirm availability of these functions 103 ITV Wales 19 35 Coronation Street AD 19 30 20 00 Now Exit info All freesat Channels AD FS e g Tips To switch information of the current programme and the next programme Press w q Now current programme Next ne...

Page 91: ...itles When Subtitles appears in digital satellite channel information to show subtitles Press again to hide Notes Programmes are recorded with subtitles when you record them with the subtitles on Tips To select subtitle language 99 Preferred Subtitles Signal Quality No Signal The digital satellite broadcast signal is not being received No Service No broadcasts are currently available If No Signal ...

Page 92: ...es of the 16 9 image disappear and the image is enlarged Please note that the right and left sides of the image are cut off when the black bar is not displayed 16 9 image with black bars on the right and left Display as frame on the 4 3 aspect ratio TV screen Enlarged display with black bar erased with Side cut Displayed with black bars on right and left on the 16 9 aspect ratio TV screen Enlarged...

Page 93: ...ending on the HDD free space Operation during Pause Live TV Search Press t y The speed increases up to 5 steps Press q PLAY to restart play Pause Press h Press q PLAY to restart Quick View Press and hold q PLAY 1 3 Press again to return to the normal speed Slow motion While paused press t or y The speed increases up to 5 steps Press q PLAY to restart play Stop Pause Live TV 1 Press g 2 Press w q t...

Page 94: ...hen press OK Tips To return to the previous screen Press BACK RETURN To exit the screen Press EXIT Setting Protection BD RE BD R RAM Use to prevent accidental erasure of disc Perform preparation steps of Accessing the Management Menus left Press e r to select Disc Protection then press OK Press w to select Yes then press OK Naming Discs BD RE BD R RAM R R DL RW V R R DL RW You can give a name for ...

Page 95: ...ed Perform preparation steps of Accessing the Management Menus 94 Press e r to select Format Disc or Format Card then press OK Press w to select Yes then press OK Press w to select Start then press OK Formatting starts RAM may take up to a maximum of 70 minutes A message appears when formatting is finished 8 Press OK to complete Notes Do not disconnect the AC mains lead while formatting This can r...

Page 96: ...ncelled may take up to 15 minutes R DL R DL up to 60 minutes A message appears when finalising is finished 8 Press OK to complete Notes Do not disconnect the AC mains lead while finalising This can render the disc unusable When finalising a high speed recording compatible disc it may take longer than displayed on the confirmation screen approximately 4 times longer After finalising BD R R R DL R R...

Page 97: ...ellite Tuning Menu Signal Condition Child Lock Preferred Multi Audio Preferred Subtitles Access freesat Favourites Edit You can create Favourites of freesat channels for making viewing and recording easier Editing Favourites does not affect the channel setting itself Favourites Editor Add Add all RETURN Store Select Channel All freesat Channels 101 BBC 1 Wales 102 BBC Two Wales 103 ITV1 Wales 104 ...

Page 98: ...Setup Auto Setup You can start the auto setup of the other satellite services 16 Tuning in Other Satellite Services RETURN Other Satellite Auto Setup Satellite Selection freesat and other satellite channels Satellite Selection Search Mode Start Select Change Astra2 Eurobird All Channel Type All Manual Tuning You can set the channel of the other satellite manually RETURN Other Satellite Manual Tuni...

Page 99: ... AV AV AV freesat freesat freesat freesat freesat RETURN Lock Select Next Type Lock all Unlock all Page Up Page Down CH 4 Press e r to select the channel or AV input to prevent access to 5 Press OK Press OK again to cancel Press the Yellow button to lock all channel and AV input Press the Blue button to unlock all channel and AV input Press the Red button to change the channel type displayed AV fr...

Page 100: ... ratings recorded on them Changing settings When 0 to 254 year s is selected Unlock Recorder Change Level Temporary Unlock DVD Video Ratings Set a ratings level to limit DVD Video play Follow the on screen instructions Enter a 4 digit PIN with the numbered buttons when the PIN screen is shown It will be the common PIN for DVD Video Ratings BD Video Ratings Child Lock Parental Control and Network L...

Page 101: ...or FR recordings 5 hours or longer mode When recording to a R R DL and RW Recording Format for DVD Titles recorded to the HDD from external input with Recording Format for DVD set to Video format can be copied to DVD R DVD R DL DVD RW DVD Video format R R DL and RW using high speed mode We recommend turning the setting VR format if high speed copy to DVD R etc is not necessary when recording a pro...

Page 102: ... M1 Digital Audio Output Audio Mode for XP Recording Dolby Digital Audio Mode for DV Input Stereo 1 Audio Mode for Digital Broadcast Automatic Audio Channels for HG HX HE HL Recording 5 1 channel Dynamic Range Compression BD V DVD V Change the dynamic range for late night viewing On Off Automatic Downmix Switch the downmix system for playing back multi channel surround sound When Dolby D Dolby D D...

Page 103: ...ker output on the amplifier when output with PCM 1 The default setting is PCM 2 The default setting is Bitstream BD Video Secondary Audio BD V with secondary audio Turn on off the clicking sound on the menu and audio with secondary video On The sampling frequency is converted to 48 kHz Audio will be converted to Dolby Digital during playback of the BD Video with secondary audio when Bitstream abov...

Page 104: ...ormation on the subjects shown List Four differently coloured page numbers are situated at the bottom of the screen Each of these numbers can be altered and stored in this unit Blue LED Set the lighting method for the lamp on the SD card slot On SD inserted When this unit is turned on and SD card is inserted the lamp is lighted Off Connection e r select Connection Connection OK RETURN HDMI Connect...

Page 105: ...omponent Resolution This sets the video output resolution when using the component video terminal 576i 480i 576p 480p 720p 1080i You cannot change the setting while the HDMI Video Mode is set to On Set the HDMI Video Mode to Off and set the AV1 Output to Video with component or S Video with component If it is set to 720p images other than 720p will be output as 1080i Even if you select 720p or 108...

Page 106: ...ll duplex 100BASE half duplex 100BASE full duplex Proxy Server Settings 110 Press OK to show the following settings Initialize Set the setting of the Proxy Server Settings back Proxy Address The initial setting is blank Proxy Port Number The initial setting is 0 Connection Test Network Service 110 Press OK to show the following settings Network Lock You can restrict using VIERA CAST Follow the on ...

Page 107: ...n PIN NAME HOUSE NO POSTCODE PIN Entry 14 Power Save On Off Refer to the following when Power Save is set to On Power consumption is minimized when the unit is turned off 14 step Startup of the unit becomes slower compared to when Power Save is Off System Update In order to update this unit s software and to support system changes made by broadcasts this unit periodically performs software updates...

Page 108: ...he functions do not work repeat steps using different codes if available Some TVs may not be compatible with the unit s remote control Remote Control Codes for the TV Manufacturer Code No Panasonic 01 02 03 04 AIWA 35 AKAI 27 30 BEJING 33 BEKO 05 71 72 73 74 BENQ 58 59 BP 09 BRANDT 10 15 BUSH 05 CENTREX 66 CHANGHONG 69 CURTIS 05 Manufacturer Code No DAEWOO 64 65 DESMET 05 DUAL 05 ELEMIS 05 FERGUSO...

Page 109: ... numbered buttons then press OK After checking the specifications for your broadband router enter each number If the number is unknown then check the number of other devices such as personal computers connected via a LAN cable Assign a different number from those of other devices for IP Address and the same number for others If a wrong number is entered then press DEL 192 1 IP Address Please input...

Page 110: ... Text After the input of Proxy Address is completed 8 Press e r to select Proxy Port Number then press OK 9 Enter numbers with the numbered buttons then press OK 1 Proxy Port Number Please input HTTP Proxy Server Port Number and press OK The number will be set to 0 by pressing OK when there is no number input Press DEL button if a wrong number is entered 0 Number 9 Press w to select Yes then press...

Page 111: ...a notification is displayed New software version has been found The software will be updated automatically after the unit is switched to standby Do not disconnect the AC mains lead Update of the software will start when the power is turned off To start downloading Press OK To ignore the new software Press EXIT The unit s display during the update SW DL Software is downloading Download will stop wh...

Page 112: ...erminal EXT V2 Scart terminal EXT 1 Audio output CH2 R 1 Audio output CH2 R 2 Audio input CH2 R 2 Audio input CH2 R 3 Audio output CH1 L 3 Audio output CH1 L 4 Audio ground 4 Audio ground 5 Blue ground 5 Blue ground 6 Audio input CH1 L 6 Audio input CH1 L 7 Blue output 7 Blue input 8 Switching voltage output 8 Switching voltage input 9 Green ground 9 Green ground 10 Q Link control signal 10 Reserv...

Page 113: ...ive output 139 to provide a purer picture than the S VIDEO OUT terminal PR PB Y COMPONENT VIDEO IN PR PB Y COMPONENT VIDEOOUT R AUDIO L OUT AUDIO IN R L This unit TV Audio cable Component video cables Required settings Set HDMI Video Mode to Off 105 Set AV1 Output to Video with component or S Video with component 105 Set Component Resolution to the item compatible with connected equipment 105 Note...

Page 114: ...tion Television the output can be switched to 1080p 1080i or 720p HD video Please use High Speed HDMI Cables that have the HDMI logo as shown on the cover When outputting 1080p signal please use the HDMI cables 5 0 meters or less Regarding VIERA Link HDAVI ControlTM function When connecting with a Panasonic TV VIERA or a receiver equipped with the HDAVI Control function linked operations would be ...

Page 115: ...software can be done from the broadcast too Internet Straight LAN cable Hub or broadband router Telecommunications equipment modem etc This unit LAN 10BASE T 100BASE TX When your communication equipment modem etc has no broadband router functions Connect a broadband router When your communication equipment modem etc has broadband router functions but there are no vacant ports Connect a hub Use a r...

Page 116: ...n Starting of timer recording possible during the following operations Starting of timer recording not possible during the following operations Recording the title 1 Playing the title 2 Editing the title Copying a title in high speed mode without finalising creating top menu Only 1 programme can be recorded Executing DV Automatic Recording 3 Executing Recording via AV3 input 3 Executing Pause Live...

Page 117: ...ion may result in malfunction or loss of the card s contents Inserting foreign objects can cause a malfunction Inserting the card ADAPTER If you are using a miniSD card or a microSD card insert it into the adaptor that comes with the card Insert and remove this adaptor from the unit e g miniSD Insert the card label up with the cut off corner on the right Removing the card 1 Press on the centre of ...

Page 118: ... video terminals for high quality progressive video If you have a CRT television or a multi system television using PAL mode that is compatible with progressive scan we cannot recommend progressive output as some flickering can occur 10 12 112 113 Is my TV progressive output compatible All Panasonic televisions that have 625 576 50i 50p 525 480 60i 60p input terminals are compatible Consult the ma...

Page 119: ... Can I receive TV Guide system data via a connected satellite or cable receiver No only via the built in tuner To perform timer recordings with satellite or cable receiver please use the External Link feature or your unit s manual timer programming 39 64 How can I cancel a timer programming Press PROG CHECK and select the desired entry and then press DEL 41 42 What happens when I unplug my unit fr...

Page 120: ...Video format that has been recorded on other equipment Format the disc to use it However all the recorded contents on the disc are deleted 95 UNSUPPORT You have inserted a disc the unit cannot play or record onto You tried to operate with a non compatible USB memory 20 22 23 UPD stands for a number The software is being updated You cannot operate the unit until the update is complete 111 U50 The t...

Page 121: ...t of the card inserted is incomplete MPEG 2 or AVCHD will only be recognised when recorded on to the card from Panasonic s video camera etc Files on the card are not of the right type 117 23 Not enough space in the copy destination Create space by deleting any unnecessary items Delete one or more items registered on the copying list to ensure that the Destination Capacity is not exceeded 32 53 95 ...

Page 122: ... To reset the unit s settings by using the menu see page 107 To reset the ratings level settings With the unit stopped Press OPEN CLOSE to open the disc tray Press DRIVE SELECT to select the BD drive On the main unit Press and hold REC and q 1 3 for about 5 seconds To restore the unit if it freezes On the main unit Press and hold 8 for more than 10 seconds The unit is turned in standby To eject th...

Page 123: ...lock 15 The displayed time of this unit is different from the actual recording time or MP3 recording time Times shown may disagree with actual times BD R R R DL R R DL The remaining capacity does not increase even if titles are deleted Available space on a DVD RW DVD Video format or RW disc increases when you delete the last title space may increase slightly when you delete other titles If you rec...

Page 124: ... standby mode If the unit doesn t switch to standby mode reset the unit 122 To restore the unit if it freezes 2 While the unit is turned in standby press and hold g and CH 1 on the main unit at the same time for about 5 seconds Ejection may take extra time depending on discs Cannot eject a disc The unit is recording The unit may have a problem Eject the disc as in 2 above Linked timer recordings w...

Page 125: ...ere aren t any stations in the station list Shipping Condition was performed or the unit was in the delivery status The Auto setup was then started and interrupted Do an Auto setup again and let it continue right through to the end The data is only saved after this has been completed The Signal Strength is over 100 10 Reduce the signal amplification at your satellite dish 98 Interference or frozen...

Page 126: ... is wrong Use the TV to change the aspect If your TV does not have that function set HDMI Video Mode to Off and Component Resolution to 576i 480i in the Setup menu If you connect an HDMI cable set Aspect for 4 3 Video in the Setup menu to 16 9 Check the settings for TV Aspect in the Setup menu It may be possible to adjust the display mode on the TV Refer to your television s operating instructions...

Page 127: ...14 89 105 103 Cannot switch audio You cannot switch the audio in the following cases When the recording mode is XP and Audio Mode for XP Recording is set to LPCM When Recording Format for DVD is set to Video format The default setting is Video format You have used a digital connection Set Dolby D Dolby D Dolby TrueHD DTS DTS HD or MPEG to PCM or connect using audio cables analogue connection There...

Page 128: ...to switch soundtrack and subtitles 26 No subtitles Subtitles are not recorded on the HDD or disc Turn the subtitles on Set Subtitles on the on screen menu to On Subtitles are not recorded in the following cases When the Subtitle on the on screen menu is set to Off and a DR mode programme on HDD is converted to a different mode When the Subtitle on the on screen menu is set to Off and a DR mode pro...

Page 129: ...ord when there is not enough space or when the number of titles has reached its limit Delete unwanted titles or use a new disc In the following situations you cannot copy Delete unnecessary titles from the HDD and then copy If there is not enough space available on the HDD If you will copy titles from the HDD to a blank disc and fill the entire disc HDD disc space equivalent to 4 hours of SP mode ...

Page 130: ...ed for High Speed Copy in the Setup menu 101 Cannot record from the external device The external device is not correctly connected The proper external input channel AV1 AV2 AV3 AV4 or DV is not selected Press INPUT SELECT to change Select the input channel for the equipment you have connected 65 The DV Automatic Recording function does not work If images cannot be recorded or if the recording is a...

Page 131: ...r R DL does not increase even after deleting previous titles Available space on DVD RW DVD Video format or RW increases when you delete the last title Cannot create a playlist Creation or editing of playlists cannot be done on this unit Editing Issues Still Pictures Page The contents of the card cannot be read Remove the card from the slot and then insert again If this does not solve the problem t...

Page 132: ...stops Pause Live TV from AV1 AV2 AV3 or AV4 input stops when a timer recording from external input started Language code list Enter the code with the numbered buttons Abkhazian 6566 Afar 6565 Afrikaans 6570 Albanian 8381 Amharic 6577 Arabic 6582 Armenian 7289 Assamese 6583 Aymara 6589 Azerbaijani 6590 Bashkir 6665 Basque 6985 Bengali Bangla 6678 Bhutani 6890 Bihari 6672 Breton 6682 Bulgarian 6671 ...

Page 133: ...133 RQT9430 Reference ...

Page 134: ...Video system PAL colour signal 625 lines 50 fields NTSC colour signal 525 lines 60 fields Recording system MPEG2 Hybrid VBR MPEG 4 AVC H 264 Video in PAL NTSC AV1 AV2 21 pin AV3 AV4 pin jack 1 Vp p 75 Ω termination S Video in PAL NTSC AV2 21 pin AV3 AV4 S terminal 1 Vp p 75 Ω termination RGB in PAL AV2 21 pin 0 7 Vp p 75 Ω termination Video out PAL NTSC AV1 AV2 21 pin Video Out pin jack 1 Vp p 75 ...

Page 135: ...obal Motion Compensation is not supported DivX DivX Certified and associated logos are trademarks of DivX Inc and are used under license SD Standard Definition Video Playable media SD 6 USB 7 Codec MPEG2 SD Video Entertainment Video Profile File format SD Video format conforming HD High Definition Video Playable media SD USB 8 Codec MPEG4 AVC H 264 File format AVCHD format conforming R R DL CD Com...

Page 136: ... jpg P0000012 jpg P0000003 jpg P0000004 jpg P0000005 jpg P0000001 jpg P0000002 jpg P0000006 jpg P0000007 jpg P0000008 jpg P0000009 jpg Root Order of play 002 Folder 003 Folder 004 Folder BD RE RAM The following can be displayed on this unit 1 Still pictures on the root folder can also be displayed 2 Folders can be created on other equipment However these folders cannot be selected as a copying des...

Page 137: ... are registered trademarks of Gracenote The Gracenote logo and logotype and the Powered by Gracenote logo are trademarks of Gracenote Gracenote End User License Agreement USE OFTHIS PRODUCT IMPLIES ACCEPTANCE OFTHETERMS BELOW This application or device contains software from Gracenote Inc of Emeryville California Gracenote The software from Gracenote the Gracenote Software enables this application...

Page 138: ...ue clearly Film and video DVD Videos are recorded using either film or video This unit can determine which type has been used then uses the most suitable method of progressive output Film Recorded at 25 frames per second PAL discs or 24 frames per second NTSC discs NTSC discs recorded at 30 frames per second as well Generally appropriate for motion picture films Video Recorded at 25 frames 50 fiel...

Page 139: ...mpling is the process of converting the heights of sound wave analogue signal samples taken at set periods into digits digital encoding Sampling frequency is the number of samples taken per second so larger numbers mean more faithful reproduction of the original sound Signal quality This is the guide for checking the satellite dish direction The numbered values displayed do not indicate the streng...

Page 140: ... OF FIRE ELECTRIC SHOCK OR PRODUCT DAMAGE DO NOT EXPOSE THIS APPARATUS TO RAIN MOISTURE DRIPPING OR SPLASHING AND THAT NO OBJECTS FILLED WITH LIQUIDS SUCH AS VASES SHALL BE PLACED ON THE APPARATUS USE ONLY THE RECOMMENDED ACCESSORIES DO NOT REMOVE THE COVER OR BACK THERE ARE NO USER SERVICEABLE PARTS INSIDE REFER SERVICING TO QUALIFIED SERVICE PERSONNEL CAUTION DO NOT INSTALL OR PLACE THIS UNIT IN...

Page 141: ...and batteries please contact your local municipality your waste disposal service or the point of sale where you purchased the items Penalties may be applicable for incorrect disposal of this waste in accordance with national legislation For business users in the European Union If you wish to discard electrical and electronic equipment please contact your dealer or supplier for further information ...

Page 142: ... Still picture 70 Title 45 Direct TV Recording 37 Discs Disc name 94 Discs that cannot be played 22 Discs you can use for recording and play 20 Format 95 Play only discs 22 Protection 94 Divide Title 54 DivX 51 135 138 DR File Conversion 55 DR Mode 36 E Edit Chapter 56 Music on HDD 80 Still picture 72 Title 53 F Finalise 96 138 Format 95 101 138 freesat Auto setup 13 14 Channel 24 Timer Recording ...

Page 143: ...mat 95 Play HD video 48 Play still picture 70 Supported format 23 SD Video Copy 69 Select Channel freesat 24 Other satellite service 25 Setup Menu 97 Simultaneous Record and Playback 37 Slideshow 71 Software Update 111 Soundtrack 88 Specifications 134 Status Messages 91 Still Picture Copy 74 Delete 76 Edit 72 Play 70 Subtitle Disc 88 Playback 47 Switch the Audio Subtitles on the Disc Disc Menu 88 ...

Page 144: ...ic net Pursuant to at the directive 2004 108 EC article 9 2 Panasonic Testing Centre Panasonic Marketing Europe GmbH Winsbergring 15 22525 Hamburg Germany EU Environment friendly printed on chlorine free bleached paper RQT9430 1B H0409FJ1059 En ...

Reviews: