background image

Preparation:

¡

To receive TV broadcasts, install the TV antenna 
(CL-T60EW, option) .

¡

For receiving TV broadcasts, stop your car where
there is no obstacle to broadcast reception around.

¡

It is required to perform area setting depending on
your country and area before receiving TV broad-
casts. 

(

“Country and Area Selection”

a

page 42) 

PW

R

MO

DE

CH 1

1

4

7

8

0

#

ENTER

MU

TE

LOU

D

VOLUME

CAR AV

NA

VI

NAVIGATION

SCR

OLL

DISP

ASPECT

M

ENU

P·MODE

9

5

6

2

3

RAN

DOM

SCA

N

REP

EAT

CH 2

#

PW

R

MO

DE

CH 1

1

4

TA

AF

LOC

ENTER

MU

TE

LOU

D

VOLUME

CAR AV

NA

VI

NAVIGATION

SCR

OLL

DISP

ASPECT

M

ENU

P·MODE

PTY

5

6

2

3

RAN

DOM

SCA

N

REP

EAT

CH 2

4

5

6

1

2

3

7

8

0

9

21

11

E
N

G

L

I

S
H

12

E
N

G

L

I

S
H

20

CQ-VA7800N

CQ-VA7800N

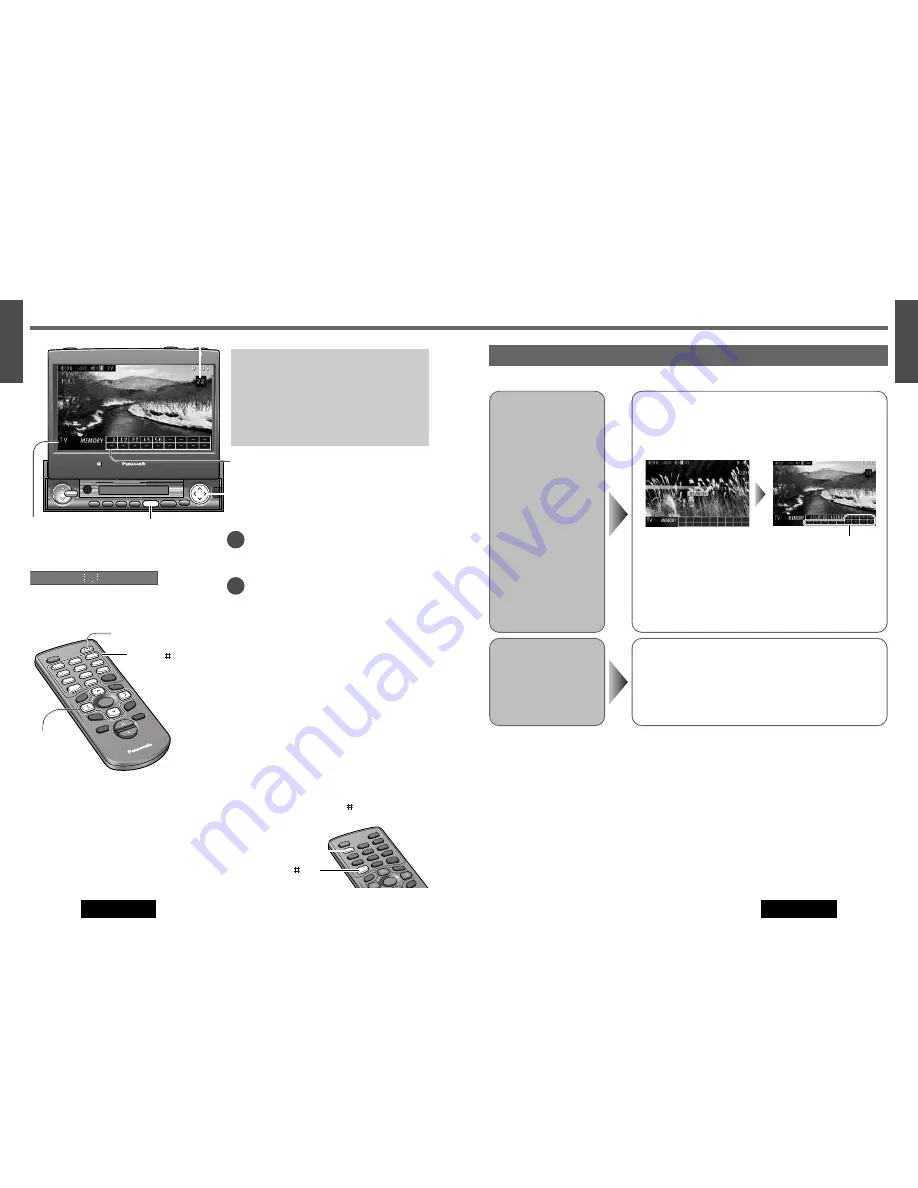
Preset Channels

Auto Preset
Memory

Press and hold 

[

}

or 

[

{

]

for more than 2 seconds.

[

}

]: 

channel search in ascending order

[

{

]: 

channel search in descending order

¡

A stored channel can be renewed every time you store another channel.

¡

The unit may receive a channel that has poor-quality images depending
on broadcasting conditions.

¡

The search returns to the start position if there is no receivable chan-
nel.

“–” appears if the number of receivable channels is less than 18.

Preset Channel
Calling

Press 

[

}

or 

[

{

]

to select the channel.

This function can search for channels automatically. Up to 18 channels can be stored.

* See below

TV Tuner

TV Mode

Press 

[MODE]

to change to TV mode.

Channel Selection

[

[

]

(CHANNEL)

:

Up

[

]

]

(CHANNEL)

:

Down

Channel Search

Press and hold for more than 0.5 seconds then
release.

[

[

]

(CHANNEL)

:

Up

[

]

]

(CHANNEL)

:

Down

Searching will automatically stop when the signal of
the next broadcast channel is received.

If “

A

” is included in channel numbers.

In some countries or areas, “A” is included in channel 
numbers. In such cases, press 

[ ]

on the remote control.

Example:

Channel Number 

1A

Press 

[1]

.

Press 

[ ] 

(A).

[0] 

[9], [ ] 

(A)

(Direct channel selection)

[

]

] [

[

]

(Channel)

[

}

] [

{

(Preset memory)

[MODE]

VOL

VOL

VOL

NAVI

NAVIGATION

ASP

ASPECT

TILT

MUTE

MUTE

DISP

P

SCRL

SCROLL

P • MODE

ENTER

MODE

POWER

MENU

IN-DASH 7 INCH WIDE COLOR LCD TV WITH RECEIVER

CQ-VA7300N

LOUD

CHANNEL/
TRACK

DISC

OPEN / CLOSE

CQ-VA7800N

ASPECT

TILT

MODE

Mode display

[MODE]

[

]

] [

[

]

(CHANNEL) 

[

}

] [

{

(Preset memory)

Channel number

Preset channels

Sub-LCD Display

Mode display

Sub-LCD Display Change

” (

a

page 44)

PWR

MODE

CH 1

1

4

7

8

0

#

ENTER

SCRO

LL

DISP

M

EN

U

P·M

OD

E

9

5

6

2

3

RAN

DOM

SCA

N

REPE

AT

CH 2

1

#

Direct Channel Selection

(Only for remote control)

Enter a channel number by pressing 

[0]

to 

[9]

.

Example:

Channel Number 

17

Press 

[1]

and 

[7]

.

2

1

Summary of Contents for CQ-VA7800N

Page 1: ...U ME CAR AV NAVI NAVIGATI ON SCROLL DISP ASPECT MEN U P MO DE 9 5 6 2 3 RANDOM SCAN REPEAT CH 2 IN DASH 7 INCH WIDE COLOR LCD TV WITH RECEIVER 擁有接收器的嵌入式7英寸寬屏彩色電視机 Please read these instructions carefully before using this product and keep this manual for future reference 使用本產品之前 請仔細閱讀這些說明書 並妥善保管本操作說明書以備將來使用 CQ VA7800N Operating Instructions 操作說明書 YEFM284106 NB0703 0 Printed in Japan Matsushita Ele...

Page 2: ...tings 36 Display Screen Settings 38 TV Tuner Settings 42 Other Settings 44 Installation 48 Anti Theft System 55 Electrical Connections 56 Troubleshooting 67 Maintenance 72 Specifications 73 目錄 3 安全注意事項及緊急處理方法 4 各部名稱及其功能 8 安全上的注意事項 74 特點 75 准備工作 76 屏幕指示 78 各部名稱及其功能 79 概述 82 電視調諧器 TV 84 錄像机 VTR 86 收音機 AM FM 88 CD換盤器 VCD換盤器控制 CH C 90 用戶設置 USER 92 聲音設置 SOUND 100 顯示器設置 SCREEN 102 電視調諧器設置 TV 106 其他設置 10...

Page 3: ...o CD Changer CX VCD10AEW option can be connected Private mode P MODE You can connect another monitor for rear seat CY VM1500EX option and mute the sounds from the rear speakers Private mode Activation of the private mode allows you to enjoy the front and rear monitor independently with different sources at the same time Rear Monitor CY VM1500EX option Refer to Connection with Rear Monitor and Camc...

Page 4: ...iving TV broadcasts TV Tuner Setting a page 42 Connecting the Side Brake Parking Brake Connection This system is designed so that you cannot see the moving picture while you are driving Be sure to connect side brake parking brake connection lead Connecting the Side Brake Parking Brake Connection Lead a page 59 Precautions on Installing the Unit Please follow the laws and regulations of your provin...

Page 5: ...ass and treble in the low and middle volume level LOUD a page 18 P MODE Private mode Activate inactivate the private mode a page 47 0 9 A Selects a TV channel directly a page 20 1 6 Memorizes and recalls broadcast stations a page 25 4 RANDOM 5 SCAN 6 REPEAT Random scan repeat play for CD Changer Video CD Changer mode a page 27 1 CH 1 2 CH 2 Switches changer 1 and 2 when two changers are connected ...

Page 6: ...utomatically a page 25 Determines an operation or item DISC Selects for TV stations and mem orize them automatically a page 21 Selects a preset station a page 25 Selects a disc a page 27 Selects vertically or adjusts an operation or item CHANNEL TRACK Selects or searches for a channel frequency or track a page 20 24 27 Selects horizontally or adjusts an operation or item Dimmer sensor Remote contr...

Page 7: ...car s ignition key to ACC or ON position ON Press MODE POWER on the display unit Press PWR or MODE on the remote control OFF Press MODE POWER again for more than 2 seconds on the display unit Press PWR again or MODE again for more than 2 seconds on the remote control Warning Do not touch the unit while the display is mov ing Inserting hands fingers or foreign objects into the unit can cause injuri...

Page 8: ...r of receivable channels is less than 18 Preset Channel Calling Press or to select the channel This function can search for channels automatically Up to 18 channels can be stored See below TV Tuner TV Mode Press MODE to change to TV mode Channel Selection CHANNEL Up CHANNEL Down Channel Search Press and hold for more than 0 5 seconds then release CHANNEL Up CHANNEL Down Searching will automaticall...

Page 9: ...Unit DVD Player e g CX DVP292 option NON Panasonic Car Navigation System Caution When you connect external devices to Video Input Terminal 1 VTR 1 Video Input Terminal 2 VTR 2 be sure to connect the side brake connection lead a page 59 Sub LCD Display Mode display Sub LCD Display Change a page 44 NAVI NAVIGATION NAVI NAVIGATION Car Navigation Mode Preparation Specify the correct terminal that is c...

Page 10: ...re sequentially scanned for 5 seconds each To stop the scanning press 1 to 6 Select a band step w on the previous page Press and hold ENTER for more than 2 seconds Preset Station Calling Select a band step w on the previous page Press 1 to 6 Note You can call up preset stations 1 to 6 by pressing and as well Note New stations overwrite existing saved stations after following this procedure Tune Pr...

Page 11: ...f it Changers are arranged as follows Press 1 CH 1 Press 2 CH 2 CD Changer functions are designed for an optional Panasonic CD Changer unit Connect another CD Changer by using an optional dual CD Changer selector CA CD55 Preparation Connect the CD Changer and load a maga zine and CD Notes Not compatible with CD RW except when CX DP880 is connected Trouble may occur while playing CD Rs CD RWs The p...

Page 12: ...TER to set DISPLAY UNIT q Press or to select CLOCK w Press ENTER to set CLOCK Make selection and adjustment Make a selection Clock display clock display ON 0 00 is displayed before adjusting the clock clock display OFF Adjusting the clock manually Press to adjust the hour Press to adjust the minute Notes To change numbers rapidly while adjusting cock hold or The clock starts by pressing MODE or ME...

Page 13: ...IN DASH 7 INCH WIDE COLOR LCD TV WITH RECEIVER CQ VA7300N LOUD CHANNEL TRACK DISC OPEN CLOSE CQ VA7800N ENTER MODE MENU ENTER Select adjust MENU MODE End Press MODE End to close the main menu and the setting adjusting menu Press MENU in the setting adjusting menu to return to the main menu mode 2 1 q and buttons move the cursor vertically w and buttons move the cursor horizontally e To set press E...

Page 14: ...le adjustment q Press or to select VTR SKIP w Press ENTER to set VTR SKIP VTR skip skips VTR1 not skip VTR1 VTR skip skips VTR2 not skip VTR2 OFF ON VTR2 SKIP OFF ON VTR1 SKIP VTR skip If a VTR is not used the VTR mode is skipped when changing the mode Default OFF Make a selection PWR MODE CH 1 1 4 7 8 0 ENTER MU TE LOUD VO LUME CAR AV NA VI NAVIGATION SCROLL DISP ASPECT MEN U P MODE 9 5 6 2 3 RAN...

Page 15: ...u to activate the anti theft function when leaving your car Default ON VIDEO CNT VIDEO CONTROL This setting is required when you connect a DVD player e g CX DVP292 option Default VTR 1 MEMORY CLEAR The state of all of the current memories are returned to default settings Default NO Caution Be aware that this setting restores the unit to default settings so that all the memories and settings that y...

Page 16: ... Hz 80 Hz 120 Hz LPF Note No sound comes out from Subwoofer when set to level 0 Make selection and adjustment Front Rear Left Right Center Make an adjustment Make a selection Make selection and adjustment PWR MODE CH 1 1 4 7 8 0 ENTER MU TE LOUD VO LUME CAR AV NA VI NAVIGATION SCROLL DISP ASPECT MEN U P MODE 9 5 6 2 3 RANDOM SCAN REP EAT CH 2 ENTER MEN U Select adjust ENTER MODE End MENU VOL VOL V...

Page 17: ...djust the image contrast CONTRAST Adjust the image brightness BRIGHT Adjust the image color depth COLOR Adjust the image tone or tint a Note on TINT on the left TINT Display Adjustment Default 0 Setting range 15 to 15 q Press or to select PICTURE w Press ENTER to set PICTURE 2 Darker Brighter AUTO PWR MODE CH 1 1 4 7 8 0 ENTER MU TE LOUD VO LUME CAR AV NA VI NAVIGATION SCROLL DISP ASPECT MEN U P M...

Page 18: ...IGATION SCROLL DISP ASPECT MEN U P MODE 9 5 6 2 3 RANDOM SCAN REP EAT CH 2 ENTER MEN U Select adjust ENTER MODE End MENU VOL VOL VOL NAVI NAVIGATION ASP ASPECT TILT MUTE MUTE MUTE DISP P SCRL SCROLL P MODE ENTER MODE POWER MENU IN DASH 7 INCH WIDE COLOR LCD TV WITH RECEIVER CQ VA7300N LOUD CHANNEL TRACK DISC OPEN CLOSE CQ VA7800N ENTER MODE MENU ENTER Select adjust MENU MODE End Sub LCD Display Pr...

Page 19: ... VOL NAVI NAVIGATION ASP ASPECT TILT MUTE MUTE MUTE DISP P SCRL SCROLL P MODE ENTER MODE POWER MENU IN DASH 7 INCH WIDE COLOR LCD TV WITH RECEIVER CQ VA7300N LOUD CHANNEL TRACK DISC OPEN CLOSE CQ VA7800N ENTER MODE MENU ENTER Select adjust MENU MODE End Press MODE End to close the main menu and the setting adjusting menu Press MENU in the setting adjusting menu to return to the main menu mode 2 1 ...

Page 20: ... Press DISP to change the display as follows Power OFF At display either open or close VTR 1 2 At display either open or close CD Changer Video CD Changer Mode Radio Mode AM FM At display open AM At display close FM At display close Mode display Band preset number frequency Clock time LCD OFF OFF Clock time LCD OFF Back light is OFF Mode display Clock time LCD OFF TV Mode At display open Mode disp...

Page 21: ...n only In some cases the picture looks different from the original one due to your selection of aspect Car Navigation images are fixed to FULL Press ASP ASPECT on the display unit or press ASPECT on the remote control to change the aspect ratio as follows NORMAL The conventional display image has a 4 to 3 ratio of horizontal to vertical In this case a blank area remains on the right and left sides...

Page 22: ...nnections carefully a page 56 66 Failure to do so may result in damage to the unit 3 Connect the power lead after all other connections are made 4 Be sure to connect the battery lead yellow to the posi tive terminal of the battery or fuse block BAT termi nal 5 Insulate all exposed wires to prevent short circuiting 6 Secure all loose wires after installing the unit 7 Please carefully read the opera...

Page 23: ...ew y Flat Head Screw y Flat Head Screw Note The car model installation condi tions and combination of the units used may impose some restrictions on opening and closing the monitor as well as on the angle and position to which the monitor can be adjusted Fastening the Mounting Collar w The tabs to be bent vary depending on the car Bend them with a screwdriver to fasten the Mounting Collar w secure...

Page 24: ...n mount the unit on the carpet Note Some carpet materials may not be suitable for this mounting method In this case please contact the shop where you purchased this product Unit installation by using the Mounting Brackets 3 and the Base Brackets 4 2 Hex Nut 5 mmø 2 Hex Nut 5 mmø Carpet 3 Mounting Bracket 0 Binding Head Screw 5 mmø x 8 mm 0 Binding Head Screw 5 mmø x 8 mm 1 Tapping Screw 6 mmø x 20...

Page 25: ...e plate Removing this face plate makes the unit totally inoperable Place Removable Face Plate into Case q Switch off the power of the unit w Remove the removable face plate a page 54 e Gently press the bottom of the case and open the cover Place the face plate into the case and take it with you when you leave the car Panel Removal Alarm This alarm sounds to warn you not to forget to remove the pan...

Page 26: ...ntil the wiring is completed Be sure to insulate any exposed wires to prevent short circuiting with the car chassis Bundle all cables and prevent cable terminals from touching any metal parts Precautions ISO Connector The pin arrangement of the power connector conforms to ISO standard The pin arrangement of ISO connectors in some cars may differ from the ISO standard Please check that the pin arra...

Page 27: ...o the power source side lead of the side brake parking brake lever Side Brake Parking Brake Connection Lead Blue yellow stripe Comes up to this point Power source side lead Names and Colors of Connectors VIDEO CONT TWIN CD C CONT NAVI MUTE RM OUT Hide away Unit Display Unit R Red L White VIDEO Yellow SUBWOOFER Black TV ANTENNA Black Display unit Hide away unit Connector Power Connector CD Changer ...

Page 28: ...p Take it out of the back of the tail lamp mount Reverse lamp Clip connector Battery Car chassis Transmission gear Cut here Reverse Lead Violet white stripe Camera Input Terminal Camera Input Terminal COLOR LCD MONITOR VM1500 Panasonic STAND BY R ON G Connection with Rear Monitor and Camcorder Connection with a camcorder option and rear monitor e g CY VM1500EX option Note Refer to the operating in...

Page 29: ...ontinuous 12V DC Extension Cord DIN BATT RCA GND Supplied with CX VCD10AEW Ground Lead To a clean bare metallic part of the car chassis Black Yellow 3 Display Unit Hide away Unit Connecting Cord Connection with DVD Player CX DVP292 Connection with DVD Player CX DVP292 option Note Refer to the operating instructions for the connected devices in addition DVD Player CX DVP292 option CQ VA7800N Displa...

Page 30: ...amplifier Bridge connection Right Speaker Rear Left Speaker Front Right Speaker Front ACC or IGN Power Lead To ACC power 12 V DC Amplifier Control Power Lead Blue white stripe Amplifier Control Power Lead Blue white stripe Ground Lead To a clean bare metallic part of the car chassis Operating Unit Main Unit Connecting DIN Cord Supplied with CY AC300 SUB W ANALOG IN DIGITAL IN Notes on handling opt...

Page 31: ...al dual CD Changer selector CA CD55 is necessary Refer to the operating instructions for the connected devices in addition Either of CD Changer CX DP880 option and CD TEXT Recognizable CD Changer CX DP9061 option can be replaced by Video CD Changer CX VCD10AEW option Connection with Dual CD Changer Selector CA CD55 CD Changer CX DP880 option Dual CD Changer Selector CA CD55 option CD Text recogniz...

Page 32: ... car navigation system is not correct aConnect it correctly Input setting of a car navigation system is not correct aMake the input setting correct The picture from external devices are not displayed External devices are not connected correctly aConnect external devices correctly The picture from a rear view camera is not displayed Rear view camera is not connected correctly aConnect rear view cam...

Page 33: ... part of the antenna and tighten up the screw The motor antenna relay control lead is not connected correctly aIf there is a motor antenna in the car connect the motor antenna relay control lead to the motor antenna lead that is installed in the car correctly Station is too far or signals are too weak aSelect other stations of higher signal level Too much noise on FM stereo and monaural AM broadca...

Page 34: ...witch only when the unit fails to operate with any buttons Stored settings and adjustments are not cleared If the unit fails to return to normal condition contact the shop where you purchased this product Reset switch Maintenance Clean dirt by wiping lightly with a soft cloth When the unit is dirty wipe the surface of the display using the Wiping Cloth supplied Without a Wiping Cloth When the unit...

Reviews: