background image

9

Image display method

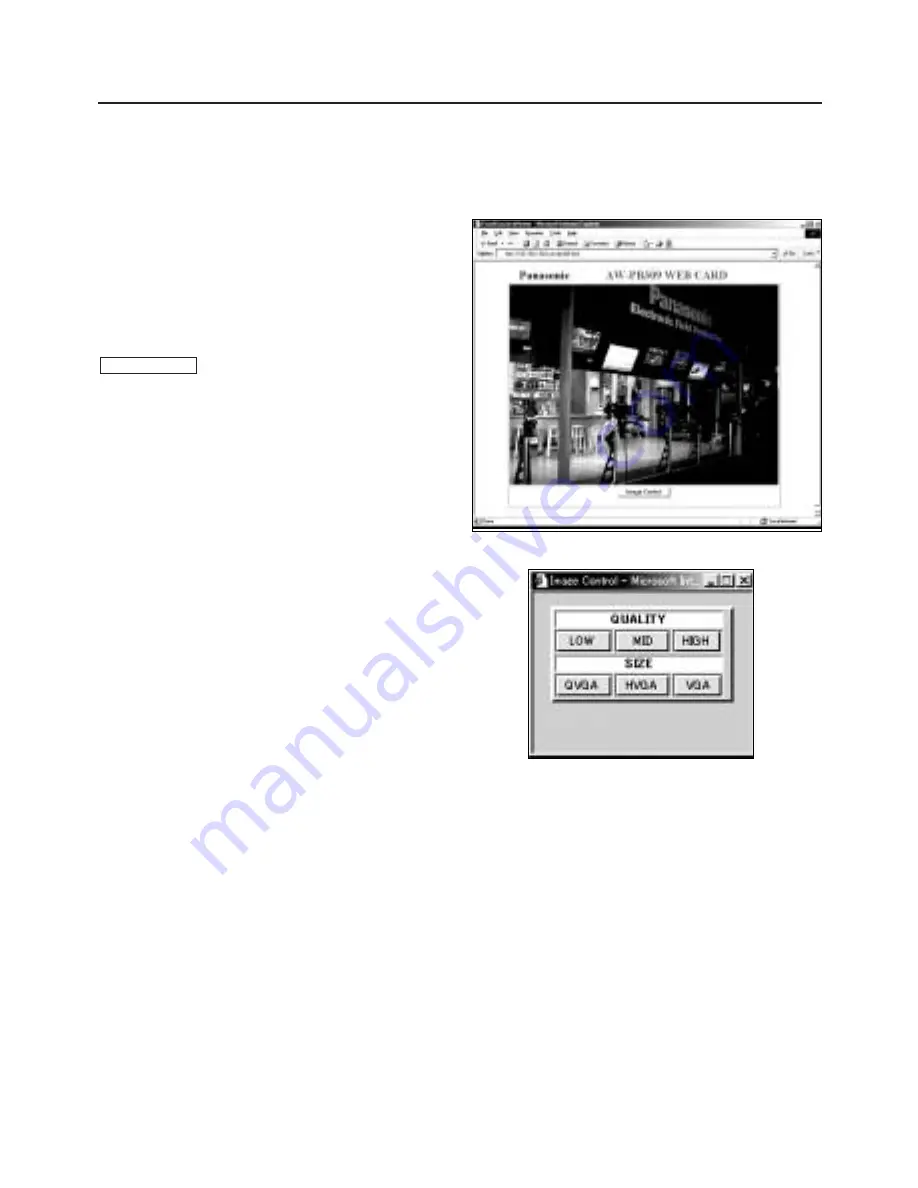
When this address is input, an image such as the
one shown in Fig. 1 appears. (The image is a
sample.)

HIGH is set for the image quality and VGA (640

a

480) is set for the size in the initial status.

To change the image quality or size, click the

button under the image.

When this button is clicked, the window shown in
Fig. 2 is opened.  Now change the setting or
settings.

QUALITY and SIZE on the Image Control window
function as follows.

1) QUALITY

HIGH : JPEG compression rate of approximately

one-sixth

MID : JPEG compression rate of approximately

one-ninth

LOW : JPEG compression rate of approximately

one-fifteenth 

These compression rates differ from one subject
to another and thus serve merely as guidelines.
2) SIZE

VGA : JPEG compression using 640 

a

480

pixels

HVGA : JPEG compression using 640 

a

240

pixels

QVGA : JPEG compression using 320 

a

240

pixels

Image Control

Start up the browser, and input the address.

http://(new IP address setting)/user/pb309.html

Images can be displayed when the following address is input in the factory setting status.

http://192.168.1.50/user/pb309.html

Fig. 1

Fig. 2

In the HVGA mode, JPEG compression is implemented in 1-field increments, and images are enlarged
to twice their original size in the vertical direction and displayed by the browser.  This mode is best
suited to subjects which move a lot.

The quality and size in which the image is to appear when the power is turned on can be set on the
Config screen. (See pages 12 and 13)

<Note>

If the “Image Display” and “Image Control” windows are open and these windows are to be exited,
close each window.
(The “Image Control” window will not be automatically exited when the “Image Display” is closed.)

Summary of Contents for AW-PB309P

Page 1: ...AW P WEB card RST LINK RX 10BASE T RS232C RDY Before attempting to connect operate or adjust this product please read these instructions completely ...

Page 2: ...UTION TO REDUCE THE RISK OF FIRE OR SHOCK HAZARD AND ANNOYING INTERFERENCE USE THE RECOMMENDED ACCESSORIES ONLY indicates safety information FCC Note This device complies with Part 15 of the FCC Rules To assure continued compliance follow the attached installation instructions and do not make any unauthorized modifications This equipment has been tested and found to comply with the limits for a cl...

Page 3: ... plug in software is required By combining the convertible camera with the AW PH350 indoor pan tilt head the pan tilt head and camera can be controlled over the network A dedicated software cable is required Contact your local dealer for details Precautions for use Turn off the power before connecting or disconnecting the cable Before connecting or disconnecting the cable ensure that the power is ...

Page 4: ... via the network varies from one status to another If the network is congested the image updating interval is lengthened Depending on the differences in the subjects too the file size for JPEG compressed image differs and the image updating interval at the terminal end changes The volume of data transferred from the WEB card remains constant This means that any improvement in the image quality or ...

Page 5: ...n the rear panel of the camera then remove the panel itself 3 Loosen the 2 screws on the optional card slot cover then remove the cover 4 Align the WEB card with the guide rail at the bottom of the camera and tab at the top and insert it Slide it all the way in securely 5 Secure the card using the 2 screws If the screws have been lost or misplaced use the accessory screws 6 mm long instead 6 Firml...

Page 6: ...s or browser version other than the ones recommended is used Do not simultaneously install other application software such as a word processing or spreadsheet program in addition to the browser Doing so may cause operation to become unstable Pentium is a registered trademark of Intel Corporation Windows Windows 98 Windows ME Windows 2000 and Internet Explorer are registered trademarks of Microsoft...

Page 7: ...ddresses click OK and restart the PC 4 Setting the WEB card s IP address The following addresses were set in the WEB card before shipment IP address 192 168 1 50 Net mask 255 255 255 0 Gateway 192 168 1 1 Set the addresses in line with the network to be used by following the steps on the following page Consult your network administrator for details on the allocation of the IP address etc The scree...

Page 8: ...ecking operation under the new address The new address has been set in the PC and WEB card by following the instructions above Input the following address into the browser and check that the same setting screen as before appears http new IP address setting config config html If the setting screen fails to appear check whether the IP address and net mask have been set correctly for both the PC and ...

Page 9: ... compression using 640 a 480 pixels HVGA JPEG compression using 640 a 240 pixels QVGA JPEG compression using 320 a 240 pixels Image Control Start up the browser and input the address http new IP address setting user pb309 html Images can be displayed when the following address is input in the factory setting status http 192 168 1 50 user pb309 html Fig 1 Fig 2 In the HVGA mode JPEG compression is ...

Page 10: ...1 Start up the browser 2 Input the following address into the browser http new IP address setting config config html The following address is used in the factory setting status http 192 168 1 50 config config html 3 A setting screen such as the one shown in the figure now appears 1 2 3 4 ...

Page 11: ...click this button and check that the settings completed screen has appeared The settings will be updated about 15 seconds after the button is clicked Bear in mind that the settings will not be updated if the screen is exited without pressing the button Notes If the settings on the Config screen are to be updated you must make a note of these settings If the IP address and password cannot be identi...

Page 12: ...rd should also be set along with the operation password Concerning the characters used to set the passwords The following characters can be used for the passwords Letters of the alphabet differentiation is made between upper case and lower case Numerals All ASCII symbols except and Input up to 15 characters for each password Setting the passwords The passwords are set on the Config screen 1 Start ...

Page 13: ... possible to restore the factory settings when a password cannot be identified However bear in mind that all the settings will be replaced by the factory settings so that the settings will have to set again from the start Refer to Reference Resetting method on page 8 for more details on the resetting procedure Types of passwords 1 Monitor password This is used to restrict access to images The foll...

Page 14: ...n set The password may not be confirmed if access is made without exiting the browser The browser should always be exited then restarted The image updating is suspended When the password is input the image updating resumes The following message appears Certification failed Try again In this case select YES and input the user name and password Internet Explorer 5 5 When a cancel operation is perfor...

Page 15: ...Provide the AW CA50F29 dedicated cable optional accessory separately for connection to the pan tilt head Since control is exercised via the network the response time taken for the images to change after operation differs according to the network conditions and it may be some time before the change takes effect Server functions The WEB card is equipped with the following two functions HTTP server F...

Page 16: ... Check whether the net mask has been set properly 3 In the case of different networks check that the gateway address has been set properly Yes Communication is OK 1 How to use the ping command The ping command is used to check whether the PC and WEB card are connected on the network If it is executed and there is no response it means that the IP address or some other setting is incorrect or that a...

Page 17: ... to Ethernet 10BASE T RS 232C Mini DIN 8 pin connector a 1 for camera pan tilt head control LED displays RDY Green LED indicating that the WEB card is operating LINK RX Green LED indicating Ethernet connection status flashes during communication Switch RST Pushbutton switch for restoring factory settings Usable temperature range 14 F to 113 F 10 C to 45 C Humidity 30 to 90 Accessories Operating In...

Page 18: ...18 ...

Page 19: ...19 ...

Page 20: ...Los Angeles CA 90068 323 436 3500 Government Marketing Department 52 West Gude Drive Rockville MD 20850 301 738 3840 Broadcast PARTS INFORMATION ORDERING 9 00 a m 5 00 p m EST 800 334 4881 24 Hr Fax 800 334 4880 Emergency after hour parts orders 800 334 4881 TECHNICAL SUPPORT Emergency 24 Hour Service 800 222 0741 Panasonic Canada Inc 5770 Ambler Drive Mississauga Ontario L4W 2T3 905 624 5010 Pana...

Reviews: