28
Working with clip thumbnails (continued)
Thumbnail display settings
Thumbnail display options can be customized as suitable
for the intended use.
(1) Press the THUMBNAIL button.
The thumbnail screen is displayed on the LCD.
(2) Press the MENU BAR button.
The pointer moves to the menu bar.
(3) On the menu bar, select [THUMBNAIL], then
[SETUP].
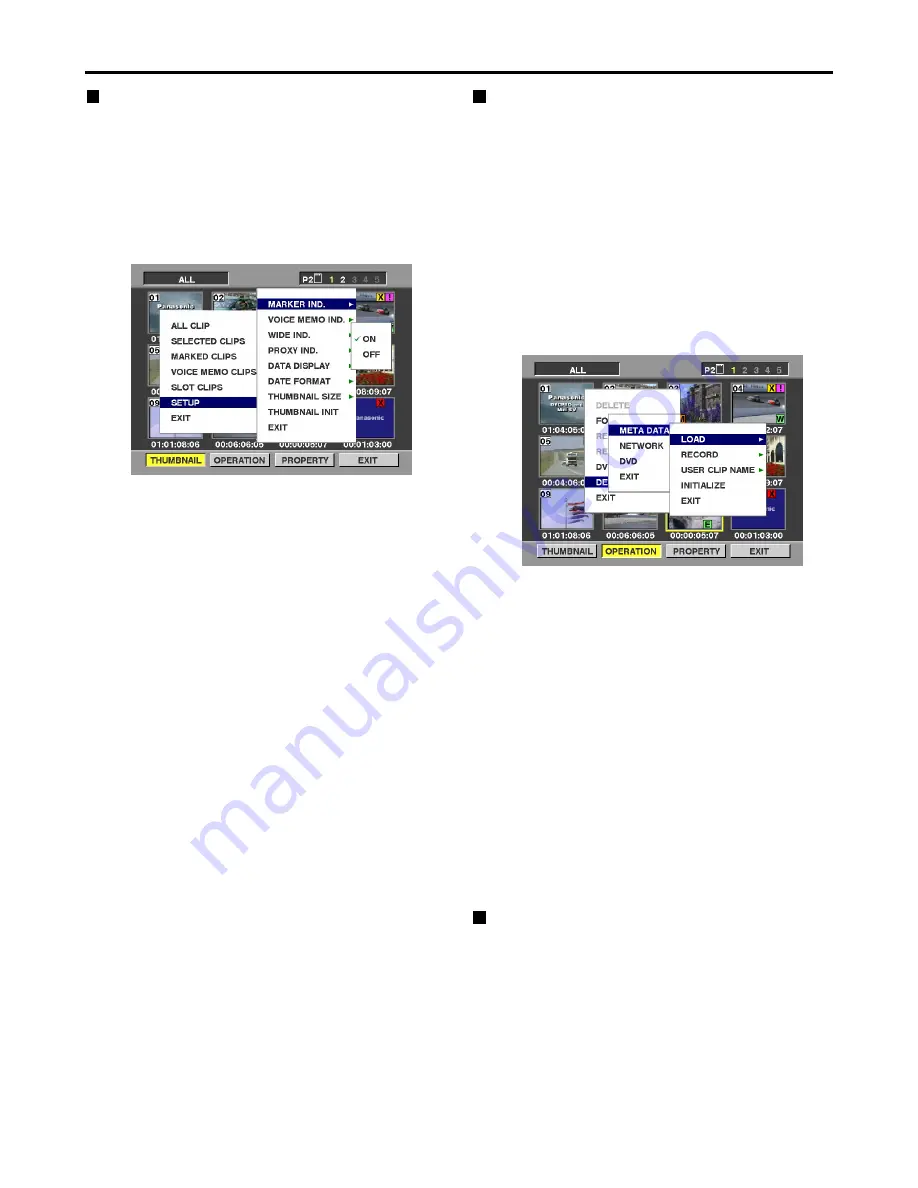
The following screen is displayed.
MARKER IND.:
Toggles the shot mark indicator display ON/OFF. The
default setting is display ON.
VOICE MEMO IND.:
Toggles the voice memo indicator display ON/OFF.
The default setting is display ON.
WIDE IND.:
Toggles the wide indicator display ON/OFF. The
default setting is display ON.
PROXY IND.:
Switches the proxy indicator between indication and
no indication (ON/OFF). The factory setting is ON
(indication).
DATA DISPLAY:
The following clip time display options are available:
time code (TC), user’s bit (UB), recording time (TIME),
recording date (DATE) or date/time (DATE TIME). The
default setting is time code.
DATE FORMAT:
The following recording date and time display formats
are available: year month day (YMD), month day year
(MDY), day month year (DMY). The default setting is
year month day (YMD).
This setting applies to the recording date displayed
under clip properties, and the recording date and time
displayed when DATE is selected for DATA DISPLAY.
THUMBNAIL SIZE:
Either LARGE or NORMAL can be selected for the
size of the thumbnails which are to be displayed on
the LCD monitor screen. The factory setting is
NORMAL.
THUMBNAIL INIT:
Return the above thumbnail display settings to default.
Select [THUMBNAIL INIT], and press the SET button.
Select “YES” when the confirmation screen is
displayed.
EXIT:
Returns to the previous menu.
Setting of Clip Meta Data
Information such as the name of person who shot the
video, the name of the reporter, the shooting location, or
a text memo can be read from the SD memory card, and
can be recorded as Clip Meta Data.
<Reading Clip Meta Data (metadata upload)>
(1) Insert the SD memory card that contains the
Clip Meta Data (metadata upload file).
(2) Press the THUMBNAIL button.
The thumbnail screen appears on the LCD monitor.
(3) Press the MENU BAR button.
The cursor moves to the menu bar.
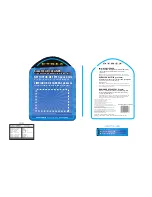
(4) Select [OPERATION]
→
[DEVICE SETUP]
→
[META DATA]
→
[LOAD] from the menu bar,
and press the SET button.
(5) Names of metadata upload files stored on the
SD memory card are displayed.
Select the desired files using the cursor buttons, and
choose YES. Upload starts.
To check the loaded data, refer to “Confirmation of
Metadata Upload” on page 33.
<To set whether or not the uploaded metadata is
recorded>
Set ON/OFF by selecting [OPERATION]
→
[DEVICE
SETUP]
→
[META DATA]
→
[RECORD] from the menu
bar.
ON:
The metadata is recorded in accordance with the
setting for the USER CLIP NAME recording method.
OFF:
The metadata is not recorded.
Metadata upload files
Using the latest update version of P2 viewer, metadata
upload files can be written to SD memory cards using a
PC. Download the latest update version of P2 viewer
from the following URL and install it to your PC:
http://panasonic.biz/sav/p2
Regarding SD memory cards to be used, see “Cautions
in using SD memory cards” (page 27).


