Shooting
25
Basic shooting operations
Preparing to shoot
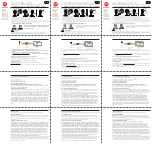
1
Set the POWER switch to ON. (Page 19)
2
,IFTUPTHEVIEWÚNDERPRESSTHESIDEOFTHE
card slot cover (
A
), and slide the cover (
B
)
to open it.
3
Insert the P2 card securely in the card slot.
4
0USHTHE0CARDEJECTBUTTONTOTHE
direction of the arrow, and close the card
slot cover.
4HEREARETWOCARDSLOTS
Be absolutely sure to close the card slot
covers to keep the dust out.
$ONOTREMOVETHE0CARDWHILETHE0CARD
access lamps are blinking orange. (Page 26)
3
4
1
POWER
ON
OFF
Lock
release
Shooting in auto mode
1
Turn the POWER switch to ON. (Page 19)
Check that the mode lamp (CAM) is lighted
red.
2
3WITCHTHE!54/-!.5!,SWITCHTO!54/
to select auto mode.
“
A
oAPPEARSONTHEVIEWÚNDERAND,#$
screens.
4HEFOCUSGAINIRISANDWHITEBALANCEARE
adjusted automatically.
•
•
•
•
•
•
3
0RESSTHE34!2434/0BUTTON2ED ONTHE
POWER switch to start shooting.
Press again to return to the camera to the
shooting standby mode.
Use the handle START/STOP button to make
ITEASIERTOSHOOTFROMLOWANGLES
1
2
3
POWER
ON
OFF
POWER
ON
OFF
AUTO MANUAL
Mode button
Mode lamp
Lock release
LCD
side
(ANDLE34!2434/0
button
REC CHECK
button
5NDERTHEFOLLOWINGCIRCUMSTANCESEVENIFYOU
press the STOP button it may take some time
UNTILTHEWRITINGTOTHE0CARDÚNISHES&ORTHIS
REASONTHEOPERATIONWILLNOTBEACKNOWLEDGED
if you press the START button too soon.
Stopped after only a short recording time
Stopped immediately after the recording has
moved to a second P2 card
•
•
•
•
Shooting