background image

INF-33 

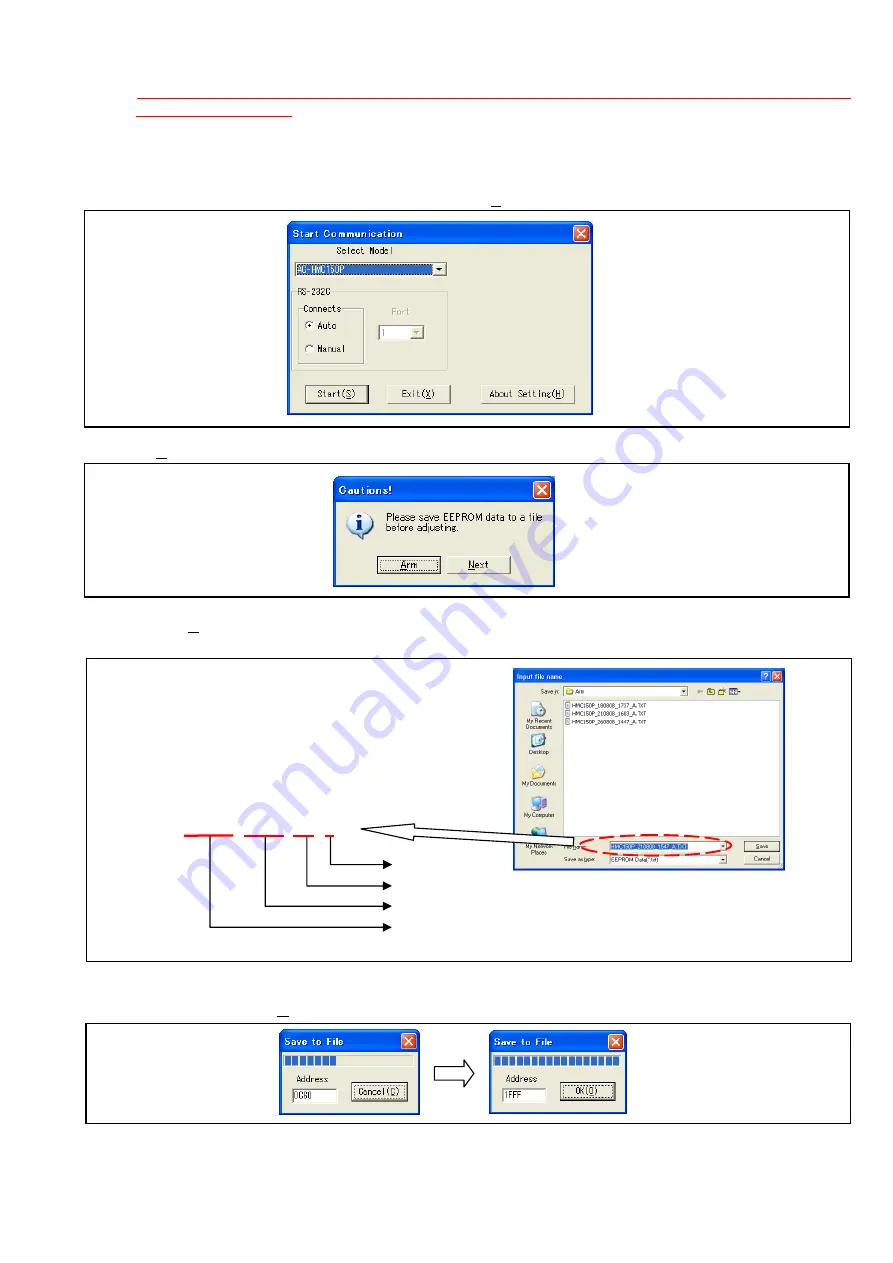
7-1-3. Save data of XP EEPROM 


NOTE: 

Please execute the saving data of XP EEPROM to both system NTSC and PAL when you save the 

data of AG-HMC151E.

 The SYSTEM FREQ can be selected by setting menu (SYSTEM FREQ / OTHER 

FUNCTION / Setting menu) 

 
1.  This camera recorder is set to 

COM

 mode. 

2.  Start up the PC EVR software. 
3.  Select the model in 

“Select Model”

 box and click

 “Start(S)”

 button on 

Start Communication 

screen. 


4. Click 

“Arm” 

button.


5. When 

the 

“Arm”

 button is clicked, 

Input file name 

screen appears to saving data. Save EEPROM of Arm with 

file name currently displayed.


6.  After confirming the file name, click 

“Save”

 button on 

Input file name 

screen. While saving data, progress bar 

is displayed. When 

“OK(O)”

 button is displayed, data saving is complete.


A: Arm 

File saved time Hour & Minute    15:47 

File saved day, month and year: 21/08/08 

Model name: HMC150P/HMC151E/HMC152EN 

HMC153MC/HMC154ER/HMC155 

HMC150P_210808_1547_A.TX 

Summary of Contents for AG-HMC150P/AN

Page 1: ...1 7 Update INF 10 4 2 ADJUST menu INF 11 4 2 1 Adjustment item for Video Level INF 11 4 2 2 Adjustment method for Video Level INF 11 4 2 3 LCD Correction INF 12 4 2 4 EVF Correction INF 12 5 PC EVR software VVS0070 INF 13 5 1 Required tools and equipment for PC EVR software INF 13 5 2 Connection INF 13 5 3 Setup of PC EVR software INF 16 5 4 Setting Tool screen INF 17 5 4 1 Setting and confirmatio...

Page 2: ...Save data of XP EEPROM INF 33 7 2 Write EEPROM data from PC to Camera Recorder INF 35 7 2 1 Write data of Camera EEPROM INF 35 7 2 2 Write data of SYS EEPROM INF 37 7 2 3 Write data of XP EEPROM INF 38 8 Factory Initialize INF 39 9 Operation after major part exchanged INF 40 9 1 Operation List INF 40 9 2 Operation flow chart after replacement of major parts INF 41 9 2 1 DIGITAL MAIN P C Board INF ...

Page 3: ...scale Chart 4 3 Reflection type 22 White chart 23 VVS0070 PC EVR Software Download from the Global WEB site 24 VVS0068 Camera adjustment Software Download from the Global WEB site 25 VVS0069 PC EVR Software Download from the Global WEB site 26 VVS0058 USB Driver for Adjustment Download from the Global WEB site 27 USB cable A type mini B New service tool software Please refer the use usage of each ...

Page 4: ...46 VFK1660 VFK1659 10 CC Filter 15 7 8 11 VFK1884 LBA2 VFK1888 LBB6 VFK1885 LBB2 CC Filter 4 22 VFK1809 72 mm Attachment Ring VFK1989 Extension Cable 23 AC Adapter 24 RS 232C Cross Cable 9P 25 White Chart 26 27 VFK0645 Grayscale Chart 28 K2KZ9DB00004 Component Cable K2RYYYYY0001 PIN BNC Conversion Cable VFK1346 Step Down Ring 62mm 52mm K2GJ2DC00002 DC Cable 18 19 VVS0070 PC EVR Software VVS0068 Ca...

Page 5: ...ion number of times of item 5 4 5 Display of ZOOM MOTOR operation number of times about display procedure by PC EVR software page INF 20 2 3 Reset of operation number of times After replacing Zoom Motor unit set the operation number of times to 0 times Please refer to Setting of operation number of times of item 5 4 5 Display of ZOOM MOTOR operation number of times about setting procedure by PC EV...

Page 6: ...etting the Calendar of operation instructions for the setting method NOTE A setup date and time of internal clock can be set also on PC EVR software refer to item 5 4 1 Setting and confirmation of Date and Time of internal clock SYSCON S section and item 6 3 3 Setup of Date and Time of internal clock NOTE Do not pick up the lithium battery and electric lead terminal with tweezers When you use twee...

Page 7: ... same manner and location as the original battery with the correct polarity contacts observed Do not attempt to re charge the old battery or re use it for any other purpose It should be disposed of in waste products destined for burial rather than incineration CAUTION DANGER OF EXPLOSION IF BATTERY IS INCORRECTLY REPLACED REPLACE ONLY WITH THE SAME OR EQUIVALENT TYPE INFORMATION IC1009 10 REAL TIM...

Page 8: ... can be displayed in addition to a setup menus Tilt the OPERATION lever in the direction to select the DIAGNSTICS MENU or ADJUST MENU and press the OPERATION lever or tilt direction to open the each menu Note PB mode can not be display the menu CAM MENU 3 3 OTHER FUNCTIONS DIAGNOSTICS MENU ADJUST MENU SETUP ENTER EXIT MENU The DIAGNOSTICS menu and the ADJUST menu is displayed on the third page MEN...

Page 9: ... refer to item 5 4 3 Software Version Display SYSCON S section page INF 19 and item 6 3 5 Software Version Display XP section page INF 28 Type Name on display Ref No Board CAM MICON IP202 DIGITAL MAIN SYS MICON IP1000 DIGITAL MAIN Microprocessor XP MICON IC1200 DIGITAL MAIN CAM FPGA IP300 CAMERA FLASH SYS FPGA IC508 DIGITAL MAIN CAM IP200 201 DIGITAL MAIN SYS IC1013 DIGITAL MAIN EEPROM XP IP1500 D...

Page 10: ...er to move the EEPROM VERSION display screen EEPROM VERSION CAM 1 15 00 0 00 SYS 1 00 00 0 00 XP 1 00 00 0 00 EXIT MENU SOFT VERSION CAM MICON 1 15 00 0 00 CAM FPGA 1 03 00 0 00 SYS MICON 1 04 00 0 00 SYS FPGA 1 01 00 0 00 XP MICON 1 05 00 0 00 EXIT MENU DIAGNOSTICS MENU 2 2 MODEL No HMC150P SERIAL No J8TA00100 SOFT VERSION NO EEPROM VERSION NO 1394UID NO SETUP ENTER EXIT MENU DIAGNOSTICS MENU 2 2...

Page 11: ...TION lever to move the 1394 UID display screen Note The UID information can be confirmed also with the PC EVR software VVS0069 Please refer to item 6 3 2 Write UID data Page INF 25 4 1 4 Error reset of XP Micon EEPROM Note This item is only use at factory 1394UID AVCHD 0080458200000001 EXIT MENU DIAGNOSTICS MENU 2 2 MODEL No SERIAL No SOFT VERSION EEPROM VERSION 1394UID YES NO SETUP ENTER EXIT MEN...

Page 12: ...n direction 2 Tilt the OPERATION lever in the direction to select the x4 or x16 And press the OPERATION lever to value is fixed Factory setting is set to x4 4 1 7 Update This item is only use at factory Don t execute the item UPDATE If UPDATE is executed camera recorder can not operate DIAGNOSTICS MENU 2 2 ERROR RESET NO SERVO ZOOM 000200T SHUTTLE SPEED x4 UPDATE NO SETUP ENTER EXIT MENU DIAGNOSTI...

Page 13: ...adjusted on this item The displayed value is the same as value for Component PB level in D Terminal Output Level adjustment EVR CMPNT PR LVL Component PR level of COMPONENT OUTPUT signal can be adjusted on this item The displayed value is the same as value for Component PR level in D Terminal Output Level adjustment EVR 4 2 2 Adjustment method for Video Level 1 Tilt the OPERATION lever in the dire...

Page 14: ... the OPERATION lever in the direction to select the correction level and press the OPERATION lever to value is fixed R signal output to LCD is corrected 1 Correction level 1 2 Correction level 2 DIAGNOSTICS 2 2 LCD OFFSET OFF EVF OFFSET 1 CAM DEBUG MODE 2 DARK MODE SETUP ENTER EXIT MENU DIAGNOSTICS 2 2 LCD OFFSET EVF OFFSET OFF CAM DEBUG MODE 1 DARK MODE 2 SETUP ENTER EXIT MENU R signal output to ...

Page 15: ...VJA1128 1 For Measuring board DC cable K2GJ2DZ00022 1 For Camera Recorder DE A35BA For P model DE A35CA For E EN and ER model DE A35DA For MC model AC Adaptor DE A35EA For AN model 2 For Camera Recorder and Measuring board 9pin RS232C cross cable 1 Personal Computer 1 NOTE OS WINDOWS XP SP2 5 2 Connection 1 Unless otherwise specified set the switches on the Measuring Board as shown in the table be...

Page 16: ...nnector in Unit Then make sure that the direction of the VFK1989 is correct as shown in Figure Connect VFK1989 with connector P2 as shown in picture The unit will not work if the connector is attached backwards VFK1989 P2 When the VFK1989 is connected to EVR connector be careful of the direction of connector on VFK1989 Please follow as shown in the figure EVR CONNECTOR REAR SIDE COVER SCREW A SCRE...

Page 17: ... and AC Adapter to supply DC voltage to Measuring Board 6 Connect a 9 pin RS 232C cross cable between the Measuring Board and RS 232C connector on Personal Computer as shown in Figure AC Adapter AC Adapter RS232C cross cable This cable connect to serial port of PC VFK1988 VFK1989 ...

Page 18: ...eries AG HPX500 series and AG HPG10 The model can be selected on the following screen 5 Select the CAM C or SYSCON S according to the purpose and click OK button The following screen will appear and when communication between the PC and the Camera Recorder has been succeeded blue is displayed to the status lamp 6 The communication status between the PC and the Camera Recorder can be confirmed with...

Page 19: ...Tool screen will appear on screen Function of the Setting Tool screen The following confirmation and the setup can be performed on a Setting Tool screen Setting and confirmation of Date and Time of internal clock Hour Meter display operation hours Software version display CAM SYS Power supply reboot Display and reset of ZOOM MOTOR operation number of times CAM C section Setting and confirmation of...

Page 20: ...t in a camera recorder follow the set up on the Setting Tool screen In case of data time is not input to window gray window clock information of PC is set After click Set button see the display on LCD panel to confirm the date time display have changed NOTE In case of put the check in box 9H the time of 9 hour from the time displayed on the Setting Tool is set NOTE A setup of the date and time of ...

Page 21: ...M SYS software and EEPROM are displayed 2 The version of all software and EEPROM can be confirmed by the DIAGNOSTICS menu menu Please refer to item 4 1 2 Software Version Display page INF 7 5 4 4 Power supply reboot SYSCON S section 1 Clicking Re Boot button the power of camera recorder automatically OFF and ON ...

Page 22: ... numerical value number of times that wants to be set can be set to the input window Clicking Set button the following massage is displayed NOTE The operation number of times can be set only by 100 units 2 When the power supply DC power supply on the AC adaptor side is OFF and ON the setting time is written in the camera recorder 3 Clicking Clear button 4 Click Get button to confirm that the setti...

Page 23: ...8 from Global Service WEB Site 2 After extracting VVS0058 zip execute USB_COM exe in VVS0058 3 Execute setup exe in ComMass folder Install it according to the message 4 This camera recorder is set to COM mode Setting method of COM mode 4 1 Turn the power on and confirm camera recorder is set to CAM mode 4 2 The COM mode is set by hold down the STOP Tilt the Operation lever in the directions EXEC b...

Page 24: ...ions EXEC button and WFM button simultaneously for at the three seconds to set COM mode The letter of COM blinks to the LCD screen when the COM mode is set NOTE To cancel the COM mode execute the operation of the same button as the setting Com mode cannot be cancel if the power has been switched off and back on again 4 Connect the USB cable between camera recorder and PC 5 Start up the PC EVR soft...

Page 25: ... Next button Go to step 10 8 When the Arm button is clicked Input file name screen appears to saving data After confirming the file name click Save button on Input file name screen While saving data progress bar is displayed When OK O button is displayed data saving is complete 9 Clicking OK O button the screen of Step 7 is displayed again Click Next button to open the main screen 10 Main screen i...

Page 26: ...Save and write EEPROM data page INF 29 VIDEO Level adjustment Please refer to item 2 Adjustment procedure on Section 3 Electrical Adjustment 6 3 1 Setting of destination NOTE For AG HMC151E model Setting of destination is not required 1 Select Editing the ARM memory E in Edit M menu 2 Set it as follows and click Execute E button on ARM Edit Memory screen ADRS Address 0052 CMD Command Write 1byte D...

Page 27: ...camera recorder and open the DIAGNOSTIC menu 5 Confirm that the MODEL NO is displayed as follows Set Destination MODEL NO P HMC150P AN HMC150AN EN HMC152EN ER HMC154ER MC HMC153MC 6 3 2 Write UID data 1 Select Write New UID E in Videi Adjust V menu or double click VIDEO Write New UID on Adjustment item 2 Click Write W button so that the new UID information is wrote to camera recorder automatically...

Page 28: ...ime of internal clock 1 Select Calendar and Clock set up C in Setting S 2 The date time information of PC is displayed on Set calendar and clock screen 3 Clicking Write W button a date and time information is set in a camera recorder ...

Page 29: ...alization is completed it replaces the FACTORY INIT OK display The mark is indicated as shipment destination information Please confirm that mark is corresponding to the destination of the camera recorder Ex In case of AG HMC150P it displayed as P 5 Turn power off the camera recorder 6 Factory initialize can be executed by push the button of the camera recorder Please refer to item 8 Factory initi...

Page 30: ...INF 28 6 3 5 Software Version Display XP section Software version of XP micon and EEPROM can be displayed as follows XP micon Software Version XP EEPROM Software Version ...

Page 31: ...software VVS0069 is used Please connect the tools and set up the PC EVR software follow the item 6 PC EVR software VVS0069 7 1 Save data of EEPROM data of Camera Recorder to PC 7 1 1 Save data of Camera EEPROM 1 This camera recorder is set to CAM mode 2 Select CAM C section after start up the PC EVR software and click OK button 3 Select Option in Setting S menu and select EEPROM 4 byte read write ...

Page 32: ...ect 64K on EEPROM Read screen 6 Click OK button and reading starts 7 Green is displayed to the status lamp while reading it When writing is completed the status lamp changes into a blue display and a message of the reading completed will appear on screen ...

Page 33: ...splayed when the reading error occurred Click OK button the power of the camera recorder automatically OFF and ON 8 Select Save Image File S in File F menu 9 Click Send S button after the file name is input and the place that saves a file is specified on SAVE screen The following message is displayed when saving a file is completed ...

Page 34: ...K is selected on EEPROM Read screen 4 Click OK button and reading starts 5 Green is displayed to the status lamp while reading it When reading is completed the status lamp changes into a blue display 6 Select Save Image File S in File F menu 7 Click Send S button after the file name is input and the place that saves a file is specified on SAVE screen The following message is displayed when saving ...

Page 35: ...ox and click Start S button on Start Communication screen 4 Click Arm button 5 When the Arm button is clicked Input file name screen appears to saving data Save EEPROM of Arm with file name currently displayed 6 After confirming the file name click Save button on Input file name screen While saving data progress bar is displayed When OK O button is displayed data saving is complete A Arm File save...

Page 36: ...Next button to open the main menu screen 8 When Next button is clicked on the screen displayed in step 4 and 7 the main screen is displayed The Input file name screen is displayed by clicking Save ARM EEPROM data S in File F menu and data can be saved according to the procedure for showing in step 5 ...

Page 37: ... camera recorder is set to CAM mode 2 Select CAM C section after start up the PC EVR software and click OK button 3 Select Open Image File O in File F menu the screen for selecting the file to be written will appear 4 Click Open O button in the Open screen and reading starts 5 Select EEPROM Write W in File F menu following message will appear When Cancel C button is clicked writing EEPROM data is ...

Page 38: ...to a blue display and a message of the writing completed will appear on screen NOTE When the writing error of data occurs the power of the camera recorder should be OFF and ON The following message is displayed when the writing error occurred Click OK button the power of the camera recorder automatically OFF and ON ...

Page 39: ...K button is clicked the writing starts 7 Red is displayed to the status lamp while writing it When writing is completed the status lamp changes into a blue display NOTE Hour meter value OPERATION TIME of camera recorder is saved in SYS EEPROM After EEPROM backup data of SYSCON is written back to the replaced P C Board please turn the power supply OFF and ON with the following procedure Write back ...

Page 40: ...set to COM mode 2 Start up the PC EVR software 3 Select the model in Select Model box and click Start S button on Start Communication screen 4 Clicking Next button main screen is displayed 5 Select Write ARM all data to EEPROM W in File F menu Select file screen is displayed 6 Select the file to be written on Select file screen and clicking Open button reading starts While writing data progress ba...

Page 41: ...2 This camera recorder is set to CAM mode 3 The following three buttons are pushed at the same time for two seconds or more EXEC REW REC START STOP 4 It is blink displayed as FACTORY INIT on the LCD panel 5 After initialization is completed it replaces the FACTORY INIT OK display The mark is indicated as shipment destination information Please confirm that mark is corresponding to the destination ...

Page 42: ...P C Board Not required SIDE JACK Ass y R SIDE P C Board X Setting of Internal clock s CAM OP P C Board Not required TOGGLE SW P C Board Not required IRIS DIAL P C Board Not required SIDE CASE R U Ass y LCD Unit Not required LCD LEV P C Board Not required LCD Ass y ZOOM SW Unit X ZOOM SW P C Board X POWER SW P C Board Not required GRIP CASE Ass y TOP CON P C Board Not required TOP CASE Ass y REAR J...

Page 43: ...e following Procedure 2 Replace the DIGITAL MAIN P C Board The Hour Meter information becomes 0 Please operate Following Procedure 2 Write the Setting menu data USER FILE to SD memory card Is it possible to backup the data of XP EEPROM Is it possible to backup the data of CAM EEPROM Is it possible to backup the data of SYS EEPROM NO YES NO YES NO YES Load the backup data to new P C Board Write the...

Page 44: ...th Serial Number Writing Procedure please consult service department of Professional AV Business unit Set the destination Regarding destination setting procedure refer to item 6 3 1 Setting of destination page INF 24 NOTE For AG HMC151E model Setting of destination is not required Please operate following Procedure 2 Replace the DIGITAL MAIN P C Board ...

Page 45: ...ed Regarding Factory initialization procedure refer to item 6 3 4 Factory Initialize page INF 27 and 8 Factory Initialize page INF 39 Load the backed up Scene file data to new board Load the backed up Setting menu data USER FILE to new board Set the Internal clock s date and time Refer to item Setting the Calendar of operation instructions and item 6 3 3 Setup of the Date and Time of the Internal ...

Page 46: ... 3 1 CAMERA Adjustment page INF 46 Replace the CAMERA Lens Ass y Overall Check CAMERA Adjustment is required Regarding required adjustment items refer to item 9 3 1 CAMERA Adjustment page INF 46 Replace the Lens Ass y Overall Check CAMERA Adjustment is required Regarding required adjustment items refer to item 9 3 1 CAMERA Adjustment page INF 46 Replace the PRISM Ass y Reset the operation number o...

Page 47: ...od Replace the R SIDE P C Board Overall Check Overall Check CAMERA Adjustment is required Regarding required adjustment items refer to item 9 3 1 CAMERA Adjustment page INF 46 Replace the Zoom SW Ass y Overall Check CAMERA Adjustment is required Regarding required adjustment items refer to item 9 3 1 CAMERA Adjustment page INF 46 Replace the ZOOM MOTOR Ass y Reset the operation number of times of ...

Page 48: ...nce Indoor X X X White Balance Outdoor X X X White Balance Palook NOTE1 X X X White Balance White FL NOTE1 X X X White Balance Cool White NOTE2 X X X X Adjustment Confirmation Required The method of data backup EEPROM has been described to the item 7 Save and write EEPROM data of service information SECTION 1 NOTE1 The Palook and White FL white balance adjustment are required only for NTSC model N...

Page 49: ...rnal clock s date and time Refer to item Setting the calendar of operation instructions or item 5 4 1 Setting and confirmation of the Date and Time of the internal clock SYSCON S section page INF 18 and item 6 3 3 Setup of Date and Time of internal clock page INF 26 for the setting method Execute the D Terminal Output Level and Video Terminal Output Level Adjustment The adjustment procedure has be...

Page 50: ... SCENE FILE DIAL CN108 CN500 PHONE IRIS DIAL AWB BUTTON COMPONENT OUT LINE MIC INPUT 1 SW INPUT CH1 HANDLE UNIT 1 2 3 Recording enable disable SW CN104 CN103 CN100 GYRO_X SENSOR GYRO_Y SENSOR CN101 CN102 20P FFC CN400 EXEC BUTTON MENU BUTTON EVF UNIT VF_CASE_R_UNIT TOP_CASE UNIT TOP SET UNIT MENU P C B 1 64 1 16 1 4 OFF ND FILTER CH1 CH2 AUDIO CONTROL VR R REMOCON SENSOR TALLY LAMP REAR WFM BUTTON...

Page 51: ...C Board ZOOM P C Board DIGITAL MAIN P C Board POWER P C Board TOGGLE SW P C Board IRIS DIAL P C Board R SIDE P C Board CAMERA OP P C Board LCD LEV P C Board CAMERA P C Board CCD FLEX P C Board SD CARD P C Board SIDE JACK P C Board SIDE JACK2 P C Board RCA JACK P C Board HANDLE P C Board TOP CN P C Board MENU P C Board EVF CN P C Board ...

Reviews: