


48
Construction Phase
Make sure you have Crypto Cards and Construction Cards on hand. Crypto Card and
Construction Card are shipped from Pamex together with physical locks.(See Appendix
: Card Types)
In the scenario that wifi network and MF-Admin Server is not ready, and you have
installed locks on the doors, you will need Construction Cards to unlock and open the
door.
A lock can be unlocked using Construction Card only, after it has successfully scanned
the Crypto Card but before programmed by programming card. No other cards can
unlock the doors at this moment.
A Construction Card can unlock any locks which has been scanned by Crypto Card
given by Pamex for your project only..
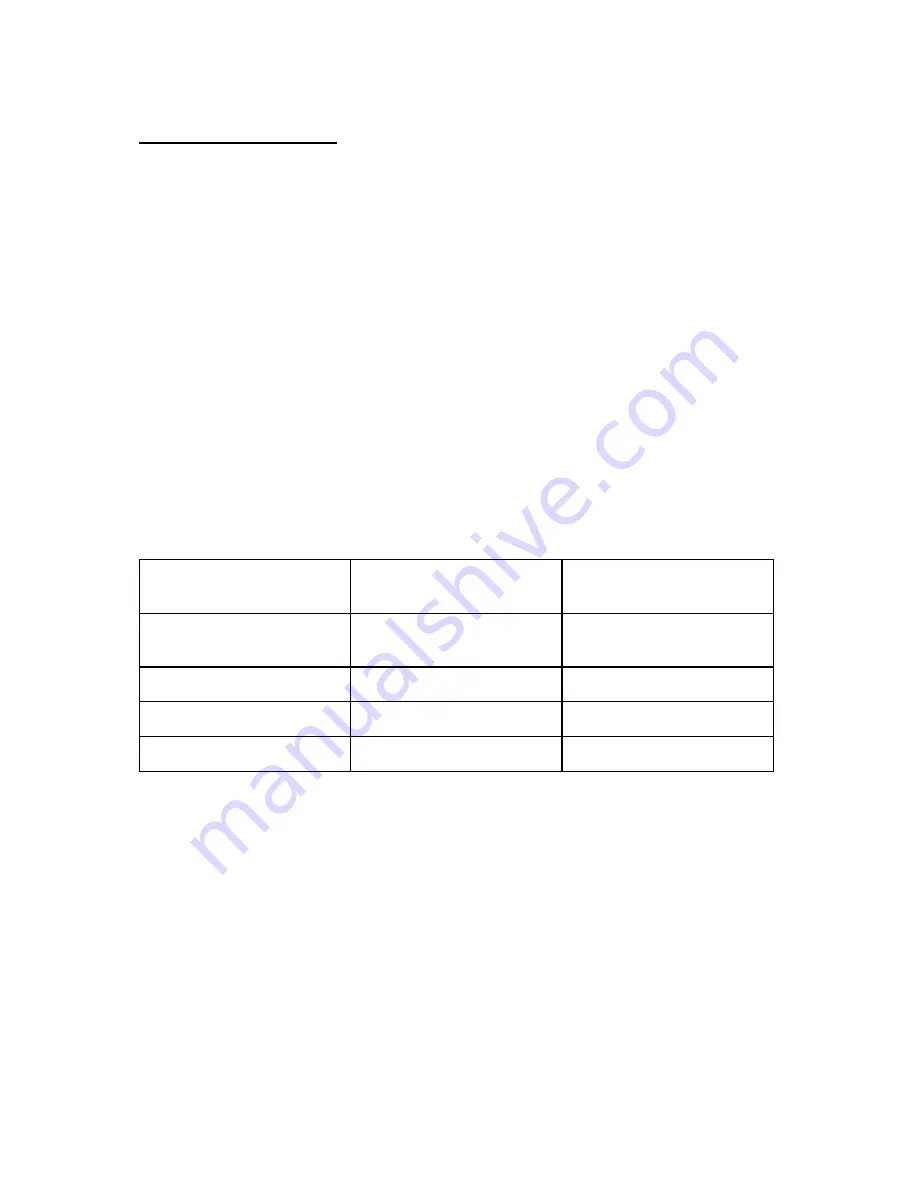
Depending on the lock model, lock will present below response when scanning Mifare
Cards :
Lock Model
Crypto Card
Success
Crypto Card
Fail
Wall Reader
Green LED on 1 sec & long
beep once
Red LED flash 3 times &
beep 3 times
Deadbolt
Same as Wall Reader
Same as Wall Reader
Leverset
Same as Wall Reader
Same as Wall Reader
Interconnect
Same as Wall Reader
Same as Wall Reader
Construction Cards will remain valid until you scan Programming Card to a lock.
Programming Cards can only be created using MF-Admin Server which means your
wifi APs and network is ready and you are entering the next phase - Lock Registration
Phase.
Summary of Contents for Kapture KA-WR1N
Page 10: ...9 Front View Figure 3 Kapture KA WR1S Front Kapture KA WR1N Front ...
Page 11: ...10 Back View Figure 4 Kapture KA WR1S Back Kapture KA WR1N Back ...
Page 13: ...12 Basic Door Installation Figure 6 Kapture KA WR1S N Basic Door Installation ...
Page 14: ...13 Basic Door Installation Wiring Figure 7 Kapture KA WR1S N Basic Door Installation Wiring ...
Page 15: ...14 Solid State Output Figure 8 Kapture KA WR1S N Solid State Output ...
Page 16: ...15 Surface Mounting Figure 9 Kapture KA WR1S N Surface Mounting ...
Page 18: ...17 Dimensions Figure 11 Kapture KA WR1S Front Figure 12 Kapture KA WR1N Front ...
Page 19: ...18 Back Figure 13 Kapture KA WR1S Back ...
Page 20: ...19 Figure 14 Kapture KA WR1N Back ...
Page 27: ...26 Product Photo Mark ...
Page 28: ...27 Dimensions 內外機 Mark ...
Page 29: ...28 Installation Guide ...
Page 32: ...31 Product Photo Mark ...
Page 33: ...32 Dimensions 內外機 Mark ...
Page 34: ...33 Installation Guide D1 Installation Guide ...
Page 37: ...36 Product Photo Mark ...
Page 38: ...37 Dimensions 內外機 Mark ...
Page 39: ...38 Installation Guide ...
Page 42: ...41 Product Photo Mark ...
Page 43: ...42 Installation Guide ...
Page 46: ...45 Product Photo Mark ...
Page 47: ...46 Installation Guide ...
Page 63: ...62 Place key card on reader first Click Read Key From Reader to get Key s UID ...
Page 81: ...80 Place key card on reader first Click Read Key From Reader to get Key s UID ...
Page 91: ...90 Check the box on Group Area M and click time control button to edit ...
Page 93: ...92 Click Issue Write Key to issue the vendor key Place key card on reader first ...
Page 99: ...98 Place key card on reader first Click Read Key From Reader to get Key s UID ...
Page 118: ...117 Factory default settings Deadbolt Same as Wall Reader ...
Page 119: ...118 Factory default settings Leverset Same as Wall Reader ...
Page 120: ...119 Factory default settings Interconnect Same as Wall Reader ...


