background image


66/78


06/02/2008 

1.00 

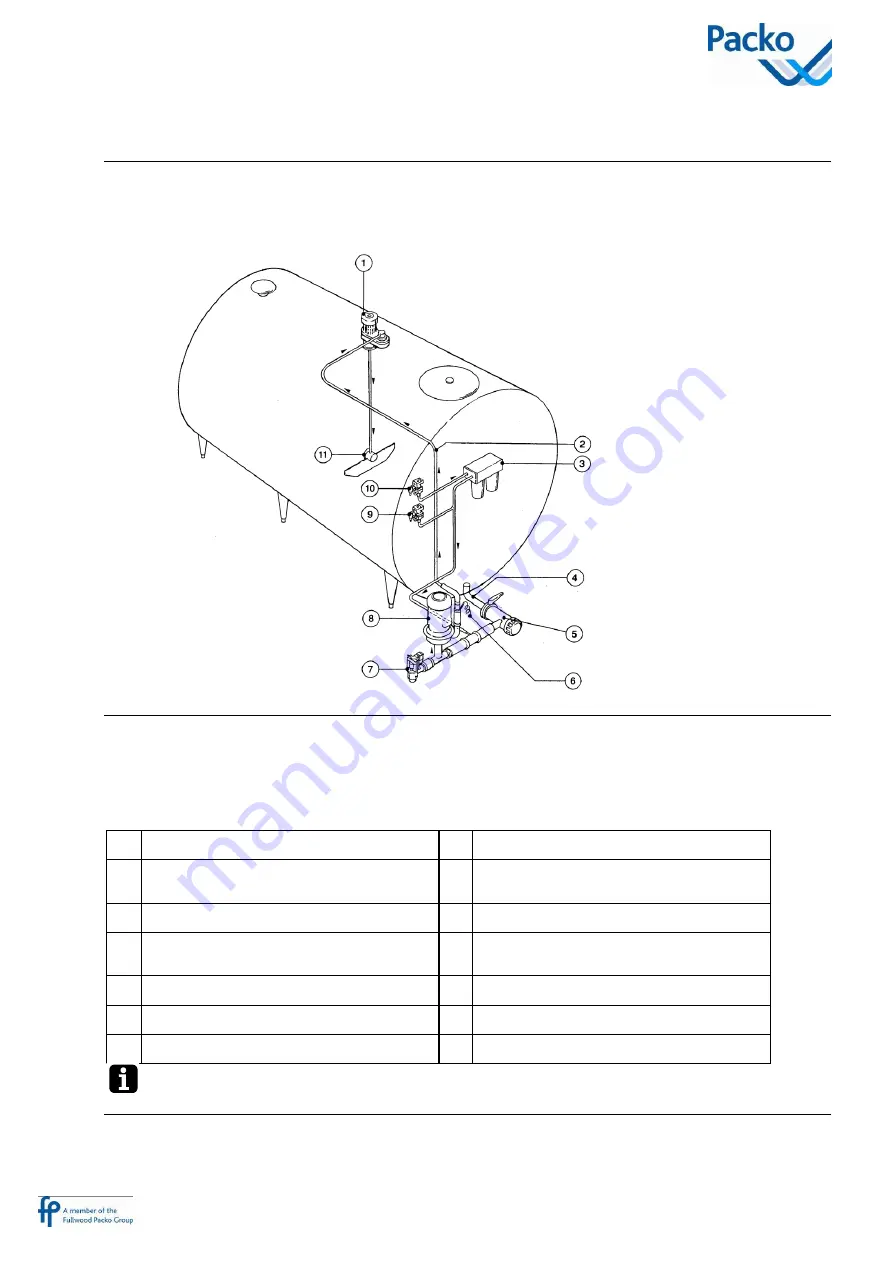
The standard automatic cleaning system 


Picture 


This drawing represents the standard automatic cleaning system. 


Parts 

 
The table below provides an overview of the parts of the standard cleaning system.  The arrows indicate the 
flow of the cleaning water. 
 

N° 

Description 

N° 

Description 

Agitator motor with rotating water 
coupling 

Dump valve 

Pressure pipe 

Cleaning pump 

Water box with dosage cups (second 
container = option) 

Cold water inlet valve 

Outlet tank 

10 

Hot water inlet valve 

Self washing outlet 

11 

Roto-Jet Spray ball 

Level sensor for the cleaning water 


 The standard automatic cleaning cycle can also be equipped with automatic dosage. 


Summary of Contents for REM/DX Series

Page 1: ...1 78 06 02 2008 1 00 Installation manual Milk cooling tanks General part 160251...

Page 2: ...1 Overview 11 Introduction 11 Warning 11 On delivery 12 Checking the delivery 12 Unpacking 12 Moving closed tanks 12 Moving VM DX 13 About your milk cooling tank 14 General specifications 14 Measureme...

Page 3: ...36 Overview 36 Introduction 36 The cooling unit 37 Illustration 37 Parts 37 Positioning of the remote cooling unit 38 Placing the cooling unit 38 Schematic diagram 38 Piping the remote cooling unit 3...

Page 4: ...ical 54 Electrical connection 54 Introduction 54 Regulations 54 Power required 54 Connections 54 Crank case heating 54 Softstarter 54 Voltage control relay 55 Description 55 Diagram 55 Differential cu...

Page 5: ...64 Choise of cleaning agent 64 Using acid or alkaline cleaning products 64 Warning 64 Recommended products 64 Dose 64 Automatic dosing 65 The standard automatic cleaning system 66 Picture 66 Parts 66...

Page 6: ...n of the motors 73 Cooling compressor 73 Manual cooling and cleaning 74 Specials 75 The DIB cooling system 75 The DIB cooling system 75 Schematic overview 75 Parts 75 Operation 76 DIB connection to th...

Page 7: ...n Meaning Description Remark A remark provides additional information about a certain topic The information in a remark is not invaluable but can be useful Attention If you do not follow the direction...

Page 8: ...k They cannot be removed according to the CE regulations Sticker Instructions The machine or part of it is built according to the CE regulations The machine or part of it is certified according to the...

Page 9: ...the following turn the main switch to 0 or OFF and lock it Before opening the electrical control box of the tank Before the servicing of the milk cooling tank Before checking the agitator blades spra...

Page 10: ...tions carefully and always follow the safety instructions Wear protective gloves and safety goggles whilst using the cleaning agents Cleaning unit Never sit lean or place any foreign objects on the co...

Page 11: ...s Overview Introduction In this chapter you will find detailed directions for installing your milk cooling tank Warning Only a recognised installer may carry out the installation The installation is t...

Page 12: ...ou should immediately inform your supplier Unpacking The tank was packaged with the greatest care for transport However when you unpack it we do advise that you check for possible damage which the tan...

Page 13: ...3 78 06 02 2008 1 00 Moving VM DX It is important that the guidelines below are observed when moving a tank with a built on cooling unit If not the tank may be damaged See center of gravity WRONG RIGH...

Page 14: ...monic interferences Condensing unit Single phase 230 V 50 60 Hz nominal Three phase 3 x 400 V 50 60 Hz nominal 3Ph N A protection against low voltage must be installed Ambient conditions ambient tempe...

Page 15: ...ominal volume of the tank L 13 Nominal kg cooling agent to be charged to the cooling unit 5 Fabrication date 14 Frequency Hz 6 Weight of the tank kg 15 Voltage e g 3 x 400 V N 7 Test pressure of the h...

Page 16: ...0 3800 T2 T4 3050 1800 1840 1960 590 4400 T2 T4 3420 1800 1840 1960 667 5000 T2 T4 3760 1800 1840 1960 730 6150 T2 T4 3440 2100 2058 2178 854 7200 T2 T4 3900 2100 2058 2178 901 8200 T2 T4 4355 2100 20...

Page 17: ...2670 2245 25500 T4 T6 9743 2133 2550 2670 2550 32000 T4 T6 11648 2133 2550 2670 3200 LS DX LS DIB 10250 T6 4205 2133 2550 2670 1196 13100 T6 5195 2133 2550 2670 1414 14500 T6 4182 2500 2917 3037 1421...

Page 18: ...996 2116 601 T2 2590 1800 2179 2299 682 3300 T4 2930 1800 1996 2116 655 T2 2930 1800 2178 2299 750 3800 T4 3245 1800 1996 2116 730 T2 3245 1800 2178 2299 830 4400 T4 3615 1800 1996 2116 860 T2 3615 18...

Page 19: ...a pressure of 12 N mm minimum Keep at least 0 6 metres around the tank including e g steps operator console built on cooling machine free for cleaning it The space between the ceiling and the top lad...

Page 20: ...20 78 06 02 2008 1 00 Placing the agitator Overview Introduction This section covers the installation procedure of the agitator depending on the type of tank...

Page 21: ...ded piece of the agitator motor shaft and check that the O ring is present 2 Mount the 4 threaded rods to the motor flange These rods must be screwed into the motor flange until they are just coming t...

Page 22: ...he end of the agitator shaft 4 Push the agitator bushing over the motor output shaft align the holes in both shafts and insert the stainless steel elastic pin 5 Secure the motor to the lid with 4 wash...

Page 23: ...it onto the lid 4 Put the distance ring 3 on the lid 5 Push the agitator bushing over the motor 4 output shaft align the holes in both shafts and insert the stainless steel elastic pin 6 For tanks wit...

Page 24: ...tlet side H2 For VM tanks put the spirit level on the bottom of the tank For closed tanks put the spirit level on the edges of the manhole while the cover is open and manhole seal removed 2 Fill the t...

Page 25: ...ance between mounting studs of the dipsticks Table Type H2 H1 mm 2 H2 H1 mm 5 LR mm LC mm L mm 5000 88 100 1712 2299 1893 6200 96 108 1712 2859 2453 7000 113 1712 3239 2833 8000 115 125 1712 3709 3303...

Page 26: ...he chapter Levelling the tank you can find how to use the table Figure LR measuring rod length LC inside dimensions milk tank L distance between mounting studs of the dipsticks Table Type H2 H1 mm 3 5...

Page 27: ...igure LR measuring rod length LC inside dimensions milk tank L distance between mounting studs of the dipsticks Table Type H2 H1 mm 2 H2 H1 mm 5 LR mm LC mm L mm 10250 124 1864 3543 3135 13100 150 186...

Page 28: ...ow In the chapter Levelling the tank you can find how to use the table Figure LR measuring rod length LC inside dimensions milk tank L distance between mounting studs of the dipsticks Table Type H2 H1...

Page 29: ...ds of the dipsticks Table Type H2 H1 mm 2 H2 H1 mm 5 LR mm LC mm L mm 1050 57 876 1279 936 1300 65 876 1588 1169 1700 65 876 1889 1487 2100 72 876 2376 1967 2600 56 1175 1777 1372 3100 66 1175 2137 17...

Page 30: ...the chapter Levelling the tank you can find how to use the table Figure LR measuring rod length LC inside dimensions milk tank L distance between mounting studs of the dipsticks Table Type H2 H1 mm 2...

Page 31: ...evelling the tank you can find how to use the table Figure LR measuring rod length LC inside dimensions milk tank L distance between mounting studs of the dipsticks Table Type H2 H1 mm LR mm LC mm L m...

Page 32: ...tank L distance between mounting studs of the dipsticks Table Type H2 H1 mm 2 H2 H1 mm 5 LR mm LC mm L mm 1600 62 876 1891 1481 2200 71 95 876 2524 2114 2800 62 1175 1716 1306 3300 67 1175 2056 1646 3...

Page 33: ...measuring rod length LC inside dimensions milk tank L distance between mounting studs of the dipsticks Table Type H2 H1 mm LR mm LC mm L mm 300 0 607 723 5 715 5 450 0 607 1097 5 1089 5 600 0 607 1447...

Page 34: ...k you can find how to use the table Figure LR measuring rod length LC inside dimensions milk tank L distance between mounting studs of the dipsticks Table Type H2 H1 mm LR mm LC mm L mm 600 0 607 1097...

Page 35: ...the tank you can find how to use the table Figure LR measuring rod length LC inside dimensions milk tank L distance between mounting studs of the dipsticks Table Type H2 H1 mm LR mm LC mm L mm 325 0...

Page 36: ...36 78 06 02 2008 1 00 Cooling Overview Introduction The installation procedure differs depending on the type of cooling system of the milk cooling tank This section covers the cooling instructions...

Page 37: ...a cooling unit supplied by Packo As not all the parts are standard you will perhaps not find all of them in your cooling unit Parts Element Function 1 Suction Rota lock valve 2 Condenser 3 High pressu...

Page 38: ...h is at least as large as the condenser is In the wall opposite the condenser make an opening the size of the condenser for the evacuation of hot air If the cooling unit is placed inside in front of a...

Page 39: ...ontal suction pipe should slope slightly down towards the compressor If the cooling unit is placed higher than the tank an oil trap as small as possible has to be made in the suction pipe before the v...

Page 40: ...lver solder to weld the pipes to the different elements evaporators liquid receivers Avoid getting moisture and dirt in the pipes If cooling agent or oil is accidentally spilt on the milk cooling tank...

Page 41: ...segments Low pressure pressostat Set the following values in kg cm Evaporator segments milk cooling tanks R22 R404A R134a R12 ON OFF ON OFF ON OFF Only bottom segment 1 5 0 5 1 5 0 5 1 3 0 3 Bottom se...

Page 42: ...is 5 5 bar Control of fan motor s If the cooling unit is installed outside ambient temperature 5 C for long periods or connected to a heat recovery system the pressure of the refrigerant in the receiv...

Page 43: ...r will be stopped when speed decreases to minimum speed 45V of R M S Min speed fan motor will be kept running at minimum speed when speed decreases to minimum speed 45V of R M S Factory settings CutOf...

Page 44: ...l may be round or oval depending on the type Parts The table below provides an overview of all the parts Part Description 1 Evaporator 2 Adjustable legs 3 Insulation layer 4 Agitator 5 Roto Jet Spray...

Page 45: ...below provides an overview of the parts of the DX cooling system No Description No Description 1 High and low pressure switch 7 Solenoid valve 2 Compressor 8 Sight glass 3 Air cooled fan condenser 9 H...

Page 46: ...denser 3 2 The fan sucks air over the cooling fins of the condenser so that the gas condenses into a fluid at a lower temperature 3 The fluid created in this way leaves the condenser under high pressu...

Page 47: ...l the parts Part Description 1 Ice water reservoir 2 Ice water pump 3 Insulation layer 4 Agitator 5 Adjustable legs 6 Evaporator tubes 7 Spray head 8 Control panel shape depends on the type of tank 9...

Page 48: ...r walls of the inner tank the milk tank itself This is a fast and efficient way of cooling As the stock of ice water does not have direct contact with the milk tank the milk even in small quantities d...

Page 49: ...d by an ice thickness regulator When the layer of ice is sufficiently thick the cooling unit is automatically switched off This prevents one block of ice being formed 3 When the milk cooling is activa...

Page 50: ...The thermostatic expansion valve 11 sprays the cooling fluid into the evaporator 10 5 The cooling fluid in the evaporator absorbs the heat of the water and evaporates This is how the water is cooled...

Page 51: ...heck this you can have the water analysed by a recognized laboratory Inhibitor The product which is added is 1 2 3 Benzotriazol The right dose is delivered with every IB tank or ice builder It must be...

Page 52: ...RM IB tanks are equipped with 2 sensors a 50 brown cable and 50 white cable one for each cooling unit When the 50 sensor is selected the ice is formed till a diameter of 53 mm 2 mm The sensor must al...

Page 53: ...installed the cooling unit is started with a delay This means if milk cooling ice water pump is started the time relay is counting down and after the preset time and if not enough ice is available the...

Page 54: ...pecting the local regulations You will find a general circuit diagram in the electrical box of the milk cooling tank Crank case heating If the compressor has crank case heating CV it should be connect...

Page 55: ...tput status yellow LED Over threshold R1 Is lit when the voltage exeeds the maximum threshold after the set delay 8 5 Relay supply status green LED Un Is lit when the voltage lies between the minimum...

Page 56: ...a good earth earth resistance 5 Ohm earth wire min 6mm Also to be checked with the local regulations Bonding The bonding has to be installed by means of a yellow green wire with 6 mm near the connecti...

Page 57: ...X RS DX Type content P Watt class I max A class in L 2BII 4BII 6BII 2BII 4BII 6BII LEM DX 5000 12064 9587 25 65 20 45 6200 14674 11472 29 85 25 15 7000 8000 18174 12564 35 40 28 40 9000 21944 15174 44...

Page 58: ...10250 13100 2000 11 00 14500 1860 10 30 15500 21500 2100 11 50 A TANK Type content P Watt class I max A class in L 2BII 4BII 6BII 2BII 4BII 6BII A TANK 8150 27848 16622 51 45 33 05 10350 38118 21944 6...

Page 59: ...7 25 4 41 1200 4029 2061 7 25 4 83 1500 4958 2960 9 15 6 07 1800 5500 3250 9 48 6 26 2300 6646 4029 11 17 7 25 OMDX 300 1588 1033 3 54 5 25 450 1811 1301 4 33 3 16 600 2710 1877 5 57 3 91 800 3779 181...

Page 60: ...M DIB and LS DIB single phase connection The power and the intensity are only for the tank so without the ice builder and its cooling group Supply cable Hereafter the types of cables to be used in fun...

Page 61: ...ressure minimum 1 5 bar maximum 5 bar Flow minimum 20 litres minute Connect to the water mains Connect the cold water valve blue sticker and the hot water valve red sticker to the cold and hot water t...

Page 62: ...he automatic cleaning system The tank is cleaned in phases each phase using an amount of water equal to 1 of the tank content with a minimum of 25 litres Phase Description 1 A first pre rinse with col...

Page 63: ...ain valve all the cleaning water runs into the sewer A second drain valve can be fitted to allow the milky water remains of the first rinse be piped to a separate drain Second dosage cup or third dosa...

Page 64: ...ning chlorine Mixing them will cause a chemical reaction resulting in poisonous gases Recommended products PACKO INOX N V recommends the following cleaning agents Type Name Art no content Alkaline FUL...

Page 65: ...cleaning agent should be connected as follows Connect a drum with an alkaline product to the blue hose Connect a drum with an acid product to the red hose Connect a drum with desinfectant with a whit...

Page 66: ...cate the flow of the cleaning water N Description N Description 1 Agitator motor with rotating water coupling 7 Dump valve 2 Pressure pipe 8 Cleaning pump 3 Water box with dosage cups second container...

Page 67: ...rows indicate the flow of the cleaning water N Description N Description 1 Agitator motor with rotating water coupling 7 Suction pipe of the cleaning pump 2 The Dolphin control panel 8 Level sensor of...

Page 68: ...lly Step Action 1 Screw the wash cap to the milk outlet or attach the rubber connection from the cleaning pump to the outlet 2 Open the outlet valve 3 Fill the tank with water via the manhole with 1 o...

Page 69: ...on 1 Rinse the tank with warm water for 2 minutes 2 Clean the tank with hot water and a cleaning agent for 12 minutes The water temperature required depends on the type of cleaning agent check the ins...

Page 70: ...70 78 06 02 2008 1 00 Commissioning See relevant installation manuals Dolphin 160183 PCV 3 155480...

Page 71: ...ng agent f e CIF 500 ml Always rinse thoroughly afterwards with pure water drinking water and dry off Never use cleaning agents which contain chlorine or the products for internal cleaning These can h...

Page 72: ...k the milk outlet pipe and complete tank after each cleaning Check all the water supply pipes valves and taps for leaks Check the oil level of the compressor using the sight glass The level should be...

Page 73: ...ample automatic dosing extra discharge etc Clear description of the problem as possible When how long and how often the problem occurs Safety fuses There is a spare for every type of safety fuse in th...

Page 74: ...ng If your milk cooling tank is equipped with the manual cooling and cleaning option you can is case of a breakdown of all automatic functions activate the cooling manually for a short period of time...

Page 75: ...the heat exchanger through a multi injection manifold At the top the warmed up ice water is extracted In this way the heat exchanger surface is used for the full 100 The various injection points are...

Page 76: ...the heat from the milk This is how the milk is pre cooled 4 The milk now runs into the milk cooling tank 3 5 Ice water is also being pumped into the heat exchanger 2 of the milk cooling tank 6 The ic...

Page 77: ...on the right hand side and one on the left hand side It is not important which one is used as inlet On big tanks equipped with 2 heat exchangers you will find 2 inlet and 2 outlets The 2 heat exchang...

Page 78: ...e coolers milk inlet serial For more than 1000 liter milk a second pre cooler should be installed in parallel see 2 pre coolers milk inlet parallel The volume of a pre cooler is 7 6 liter For good res...

Reviews: