15
MAN 9052454 EN V1
P. Lindberg A/S
Sdr. Ringvej 1
www.p-lindberg.dk
Tel.: +45 70212626
6600 Vejen, Denmark
E-mail: [email protected]
Re-assembling the post driver
After thorough cleaning and drying of the driver parts and cylinder, the post driver
can be re-assembled.
1.
Wear safety goggles.
2.
Apply a layer of EP 0 grease around the O-ring and on the outside of the piston and
push carefully back inside the housing using a soft item.
3.
Ally a little EP 0 grease to the crankpin and set it in. Exercise care to avoid grease
reaching the thread. Remember it is left threaded! The torque is 25.50 Nm – do not
overtighten the pin!
4.
Apply a layer of EP 0 grease on the outside of the top driver and push it carefully back
inside the housing with the O-ring against the top.
5.
On the bottom driver section, apply a layer of EP 0 grease on the bottom impact unit
and push the unit inside the guide bushing.
6.
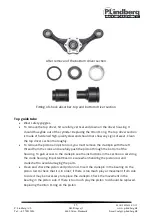
Refit the absorber and apply a little EP 0 grease on all of the components. Important!
The driver’s ‘guide’ must be oriented correctly, so that the side with the large bevelling
(lightly curved edge) faces down towards the bottom driver. Remember that the
curvature should face downwards! (Round to the ground).
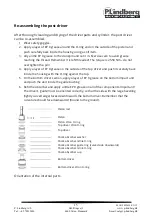
Orientation of the internal parts
Piston rod
Piston
Piston Viton O-ring
Top driver Viton O-ring
Top driver
Shock absorber washer
Shock absorber nitrile O-ring
Shock absorber guide ring (curved side downwards)
Shock absorber nitrile O-ring
Shock absorber cup
Bottom driver
Bottom driver Viton O-ring
Summary of Contents for 9052454
Page 2: ......


